# Welcome

Welcome to the FAQ page! Here you'll find answers to common questions about our platform. Explore the key features and learn how to optimize your telecom management easily.

### **We are Expanding Sales Channels for Our Clients**

Our platform enables you to launch new telecom products and expand your market reach. Here, you can:

* Set up and manage your own eSIM Store
* Offer pre-paid telecom products
* Transition pre-paid services into subscription-based products

This flexibility allows you to enter new markets and grow your customer base.

### Streamlined Operations and Finance

We reduce the time needed to manage multiple operators and financial tasks. Our platform automates invoicing and simplifies financial processes, making operations more efficient, especially when handling a large number of customers.

### Unified Platform for Global Telecom Management

The platform connects multiple telecom services worldwide, managed from a single interface.

**Key Features:**

* **Multi-Tenant:**\
  Here you can have a personalized dashboard with real-time data on usage, traffic, and SIM card status, helping them manage telecom services effectively.
* **Multi-White-Label:**\
  Customize the platform with your brand, applying logos, colors, and other elements for a cohesive user experience.
* **Data Security:**\
  Our platform ensures data protection and compliance with global standards, providing analytics to optimize telecom strategies while keeping your data secure.

### Jump right in

<table data-view="cards"><thead><tr><th></th><th></th><th data-hidden data-card-cover data-type="files"></th><th data-hidden></th><th data-hidden data-card-target data-type="content-ref"></th></tr></thead><tbody><tr><td><strong>Roles on the platform</strong></td><td>Manage access levels effectively</td><td><a href="https://2408445593-files.gitbook.io/~/files/v0/b/gitbook-x-prod.appspot.com/o/spaces%2FxYJmxgUa2SDfD4byrJY1%2Fuploads%2F4EcxYjj1Vl8M2kJQPvaL%2FOrganisation-roles.png?alt=media&amp;token=5ff7c304-76eb-4eef-ae49-6f264df66288">Organisation-roles.png</a></td><td></td><td><a href="/menu/quickstart">Roles on the platform</a></td></tr><tr><td><strong>Onboarding Guide</strong></td><td>Step by step instruction</td><td><a href="https://2408445593-files.gitbook.io/~/files/v0/b/gitbook-x-prod.appspot.com/o/spaces%2FxYJmxgUa2SDfD4byrJY1%2Fuploads%2FBqOTSSAeUaMPAHncQuva%2FOrganisation-onboarding.png?alt=media&amp;token=67cb8bca-1a1e-4e57-9340-f4e5e0a7d967">Organisation-onboarding.png</a></td><td></td><td><a href="/onboarding-guide/mandatory-settings">Onboarding Guide</a></td></tr><tr><td><strong>SIMs</strong></td><td>Efficient management of your SIM cards</td><td><a href="https://2408445593-files.gitbook.io/~/files/v0/b/gitbook-x-prod.appspot.com/o/spaces%2FxYJmxgUa2SDfD4byrJY1%2Fuploads%2FYINtp0zUaTlMc4GT956n%2FOrganisation-sim.png?alt=media&amp;token=8f3cada4-8289-4325-b048-4524808b95ba">Organisation-sim.png</a></td><td></td><td><a href="/menu/publish-your-docs">SIMs</a></td></tr><tr><td><strong>Plans</strong></td><td>Quick and consistent plan setup</td><td><a href="https://2408445593-files.gitbook.io/~/files/v0/b/gitbook-x-prod.appspot.com/o/spaces%2FxYJmxgUa2SDfD4byrJY1%2Fuploads%2FfFNyJY7QVj0HC44xZ7Ks%2FOrganisation-plans.png?alt=media&amp;token=ec0fcf5b-1518-4500-b32c-a5b82fe91201">Organisation-plans.png</a></td><td></td><td><a href="/menu/plans">Plans</a></td></tr></tbody></table>

<details>

<summary>I have a client who is interested in using your platform</summary>

We have multiple referral programs. Please contact us at [**info@droam.com**](#user-content-fn-1)[^1]

</details>

[^1]:


# Mandatory settings

<table data-view="cards"><thead><tr><th></th><th data-hidden data-card-target data-type="content-ref"></th></tr></thead><tbody><tr><td><ol><li>Integrate your Telecom(s)</li></ol></td><td><a href="/onboarding-guide/mandatory-settings/1.-integrate-your-telecoms">1. Integrate your Telecoms</a></td></tr><tr><td><ol start="2"><li>Create Company</li></ol></td><td><a href="/onboarding-guide/mandatory-settings/2.-create-company">2. Create Company</a></td></tr><tr><td><ol start="3"><li>Upload your SIMs</li></ol></td><td><a href="/onboarding-guide/mandatory-settings/3.-upload-your-sim-s">3.  Upload your SIM(s)</a></td></tr><tr><td><ol start="4"><li>Create Plan(s)</li></ol></td><td><a href="/onboarding-guide/mandatory-settings/4.-create-plan-s">4. Create Plan(s)</a></td></tr><tr><td><ol start="5"><li>Create your "Product"</li></ol></td><td><a href="/onboarding-guide/mandatory-settings/5.-assign-the-plan-to-sim-s">5. Assign the plan to SIM(s)</a></td></tr></tbody></table>


# 1. Integrate your Telecoms

### <mark style="background-color:blue;">**Complete the following steps:**</mark>

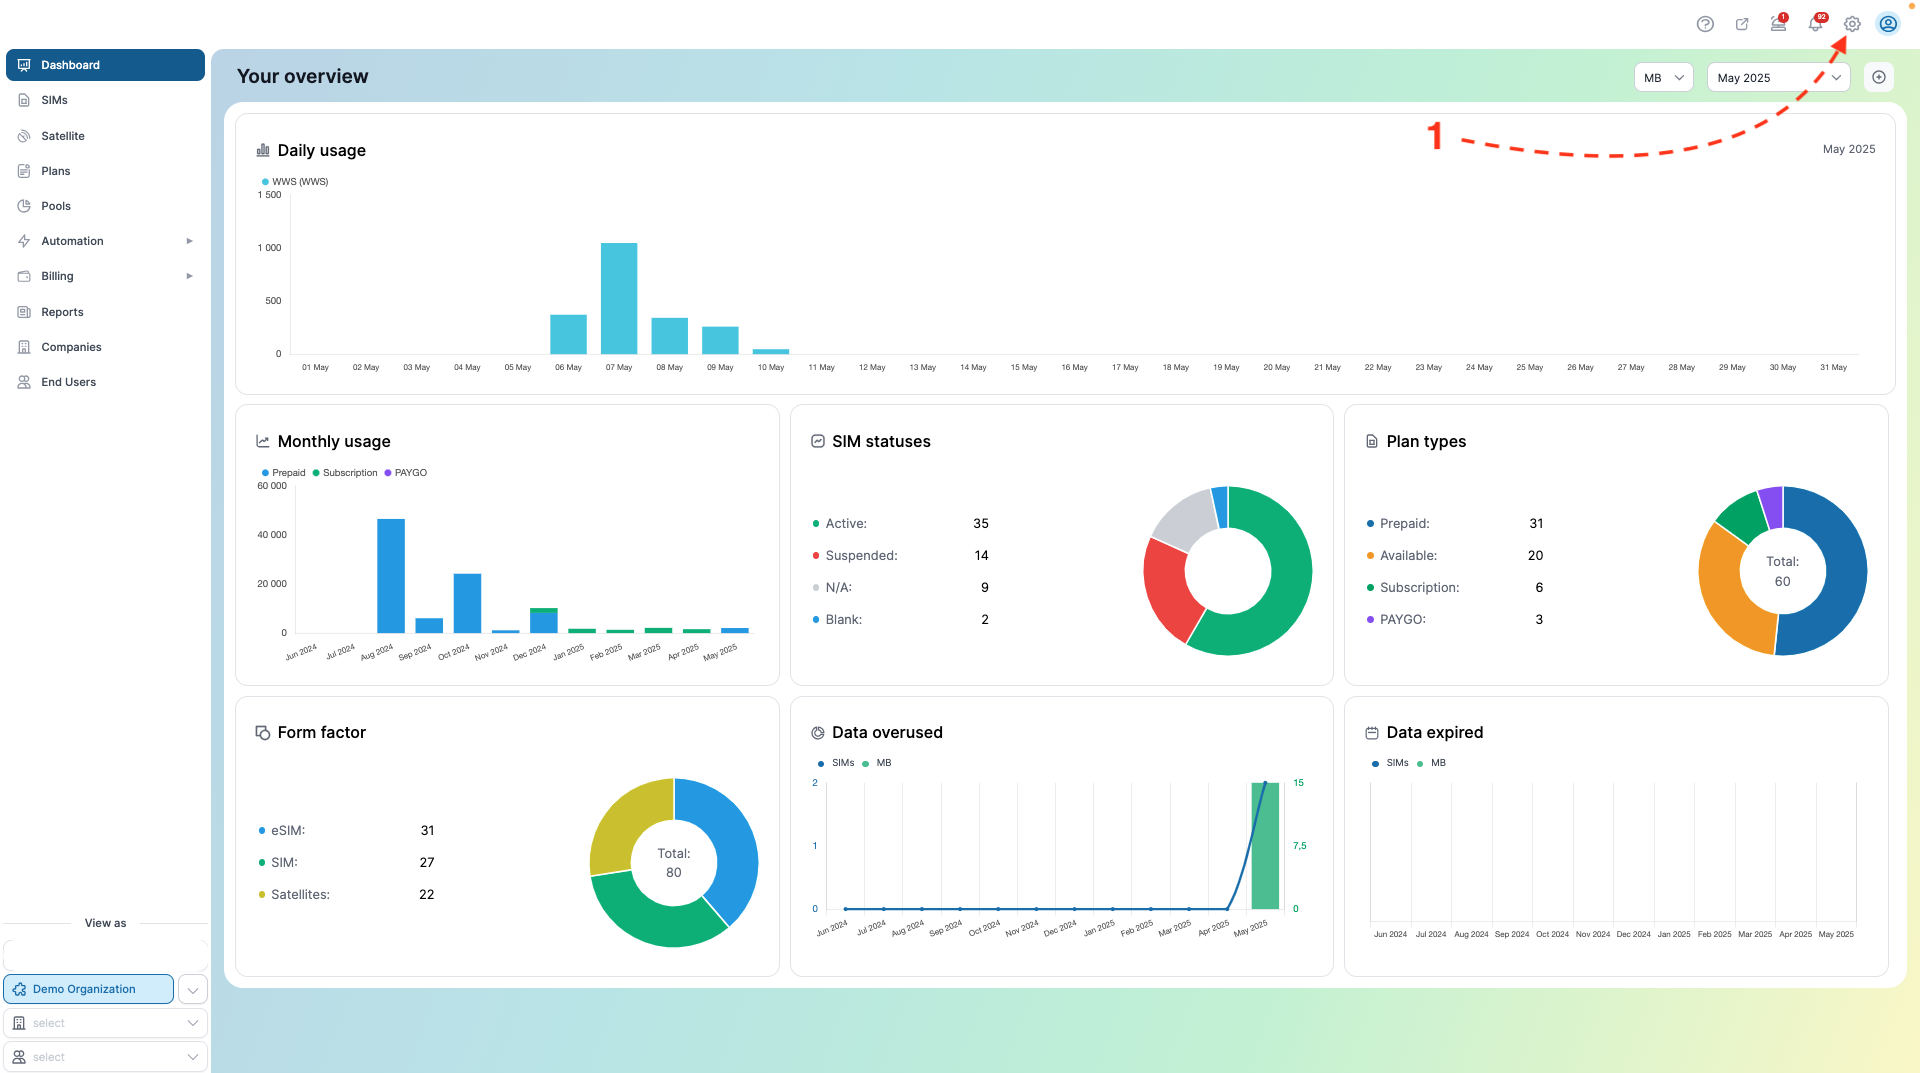
1. Go to Settings.

<div data-full-width="true"><figure><img src="https://2408445593-files.gitbook.io/~/files/v0/b/gitbook-x-prod.appspot.com/o/spaces%2FxYJmxgUa2SDfD4byrJY1%2Fuploads%2FZxRNzK9xW57zH0J37eG1%2Fsettings.png?alt=media&amp;token=95bc6e02-df92-4698-8263-8e1cfa5ef762" alt="" width="563"><figcaption></figcaption></figure></div>

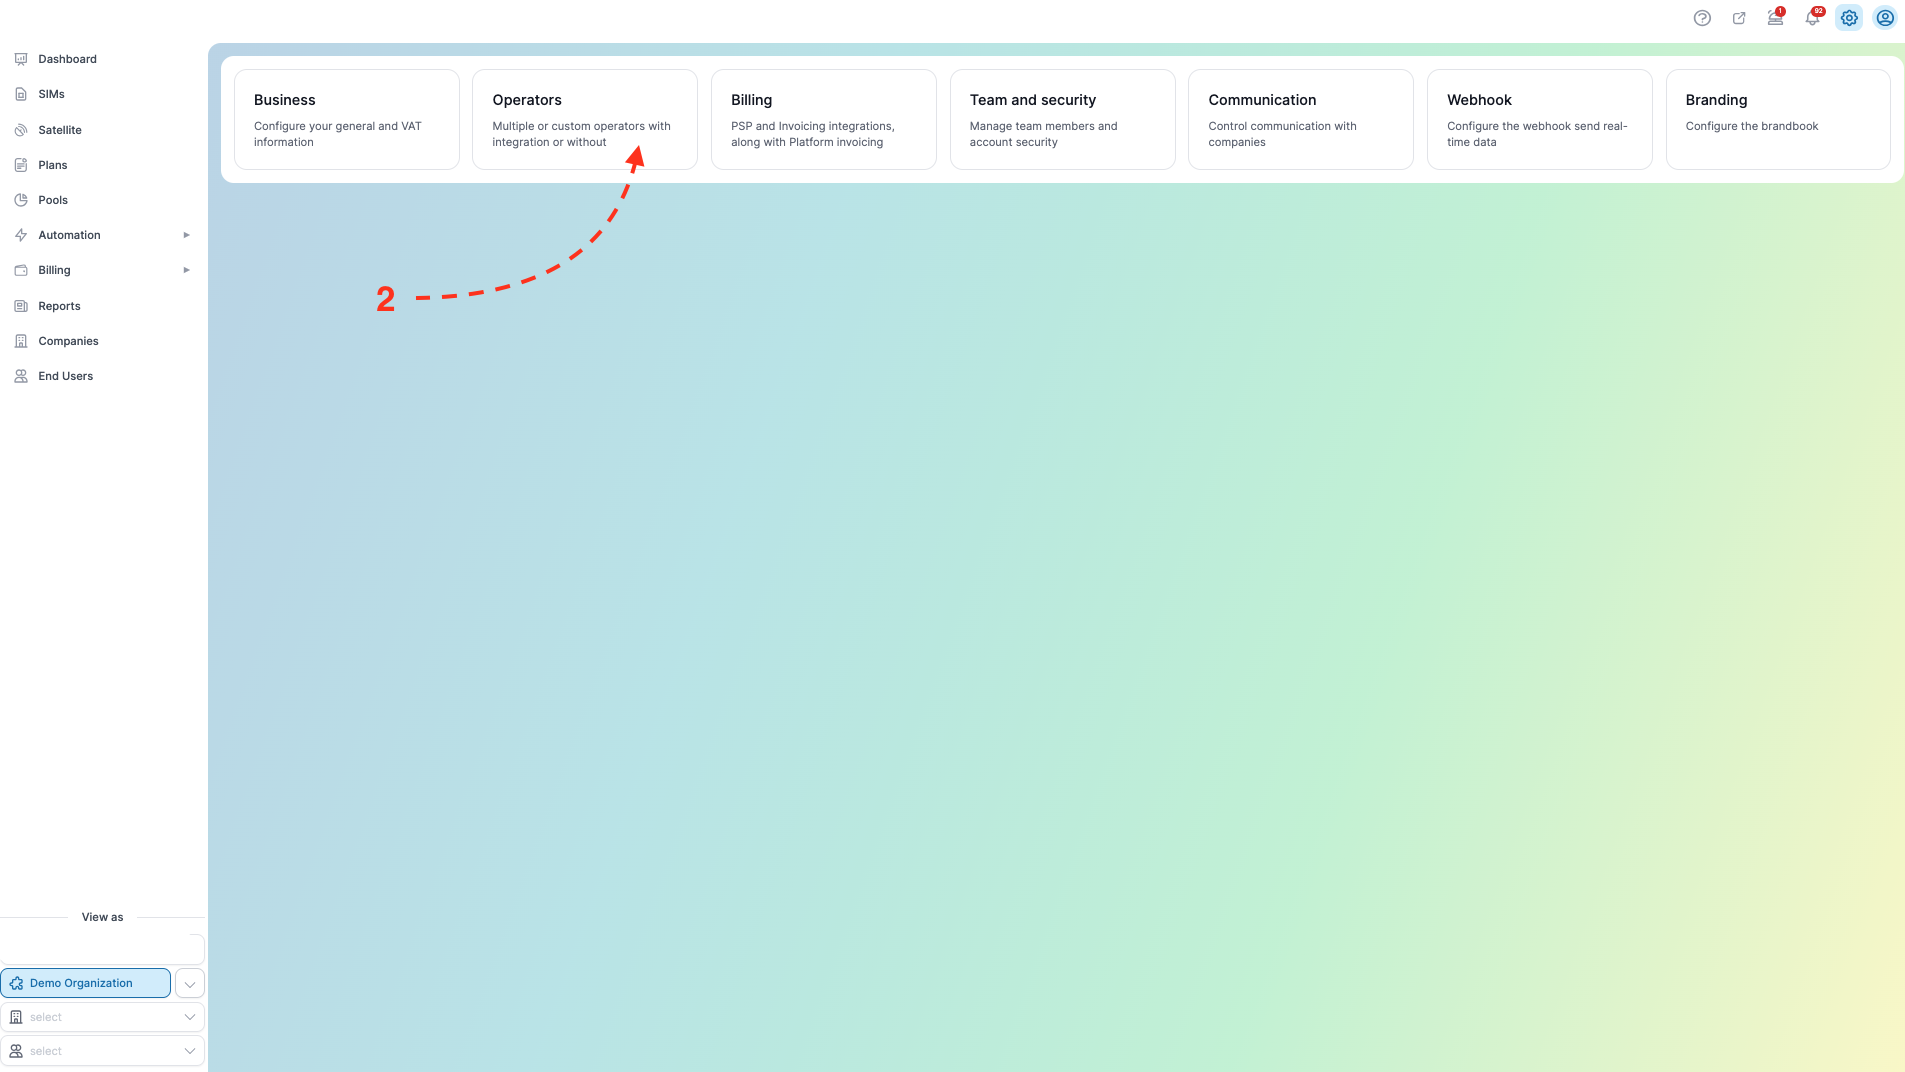
2. Select "Operators."

<div data-full-width="true"><figure><img src="https://2408445593-files.gitbook.io/~/files/v0/b/gitbook-x-prod.appspot.com/o/spaces%2FxYJmxgUa2SDfD4byrJY1%2Fuploads%2F5vf9t3ponWST3rtTLPCY%2FOperator.png?alt=media&amp;token=7ca535a9-7abe-4ba0-b1e8-1f6e409c99eb" alt="" width="563"><figcaption></figcaption></figure></div>

3. The "Operator" page will open —> click the plus (+) button on the right.
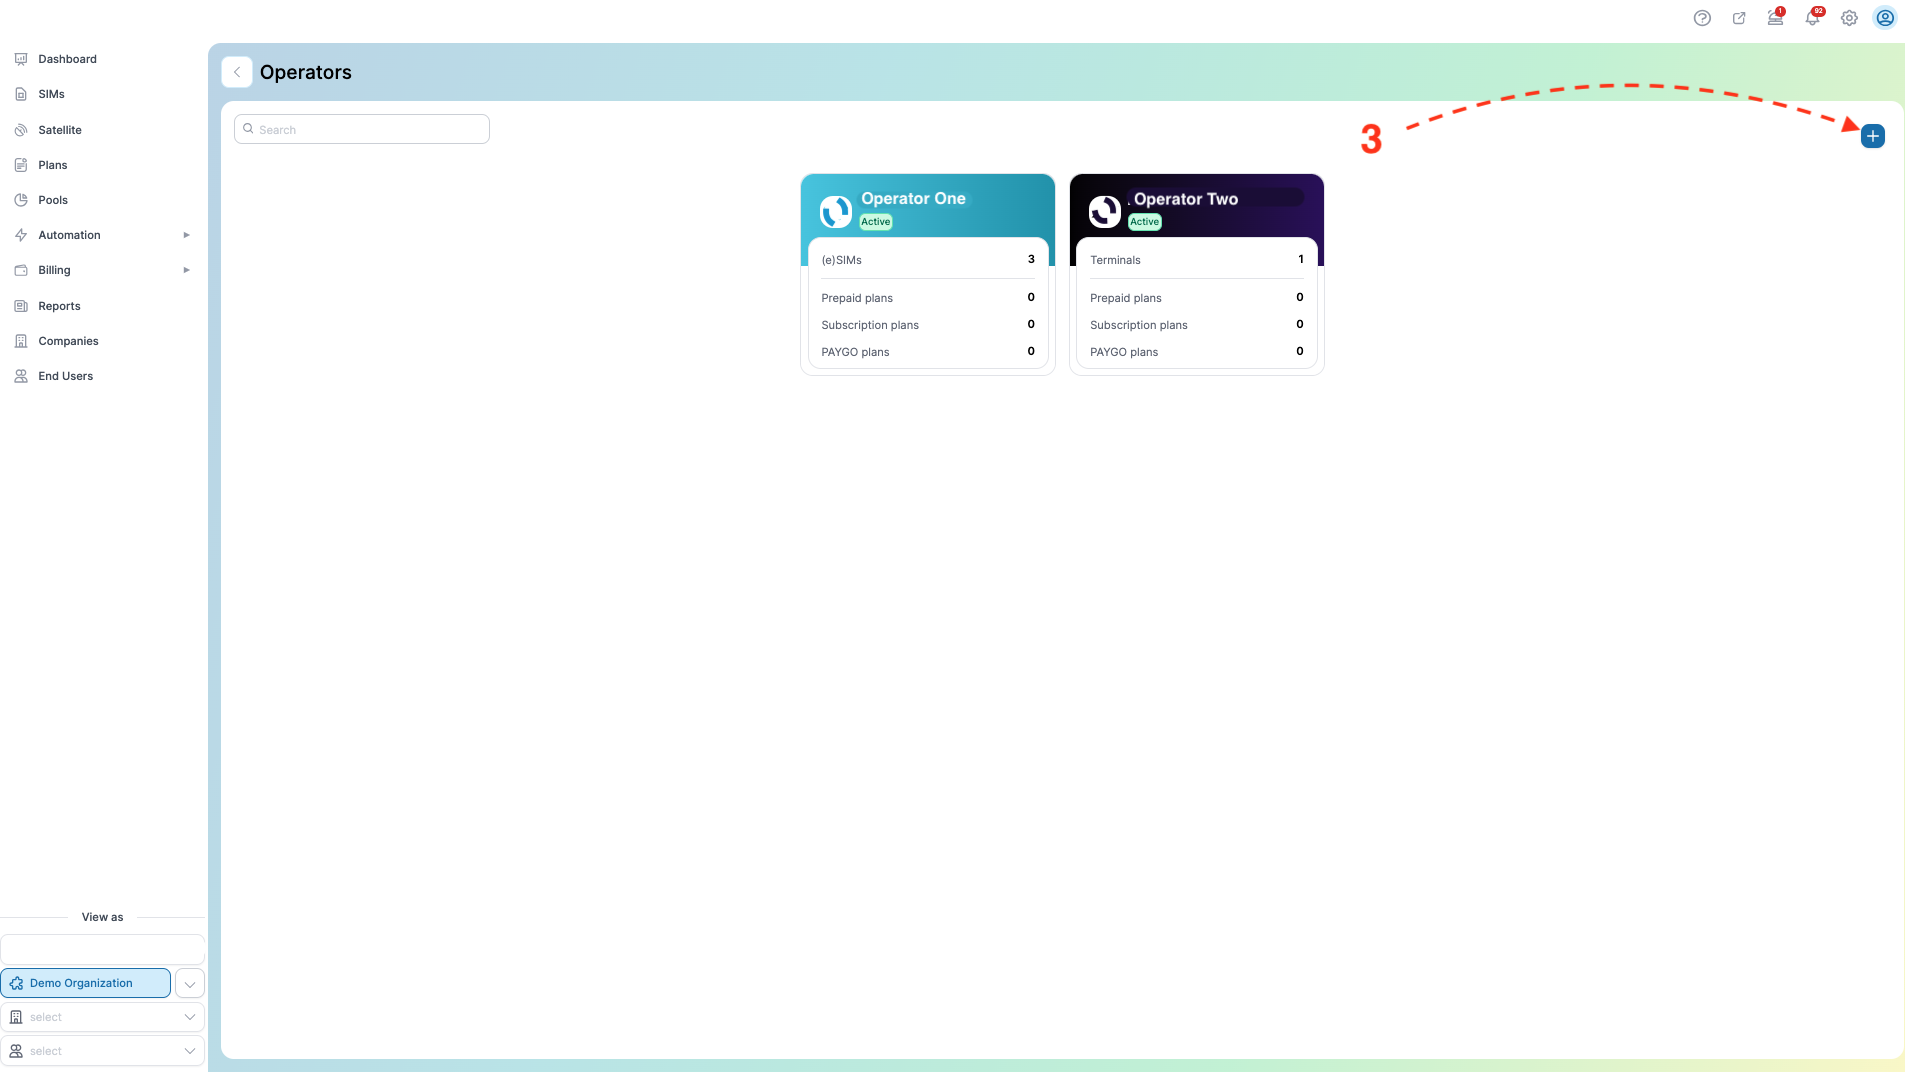
<div data-full-width="true"><figure><img src="https://2408445593-files.gitbook.io/~/files/v0/b/gitbook-x-prod.appspot.com/o/spaces%2FxYJmxgUa2SDfD4byrJY1%2Fuploads%2FJukVNjWht8RnVLf4l950%2FAdd%20Operator.png?alt=media&amp;token=9a75ca72-d618-4852-a1d0-ce32fad7d088" alt="" width="563"><figcaption></figcaption></figure></div>

4. A page will open where you can choose the operator from the drop-down list.
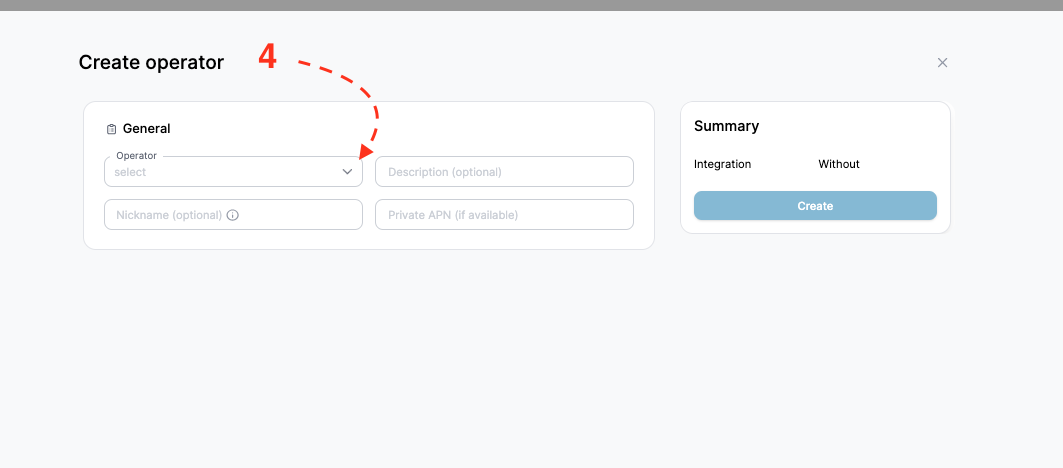
<div data-full-width="true"><figure><img src="https://2408445593-files.gitbook.io/~/files/v0/b/gitbook-x-prod.appspot.com/o/spaces%2FxYJmxgUa2SDfD4byrJY1%2Fuploads%2FUe4ZosgdCq4AibRwpDkT%2FDropdown%20list.png?alt=media&amp;token=286b8de5-36ab-4ea4-9620-37dd65e2fc6e" alt="" width="563"><figcaption></figcaption></figure></div>

5. Once you've selected the operator, depending on the integration type, you'll need to fill in the details.

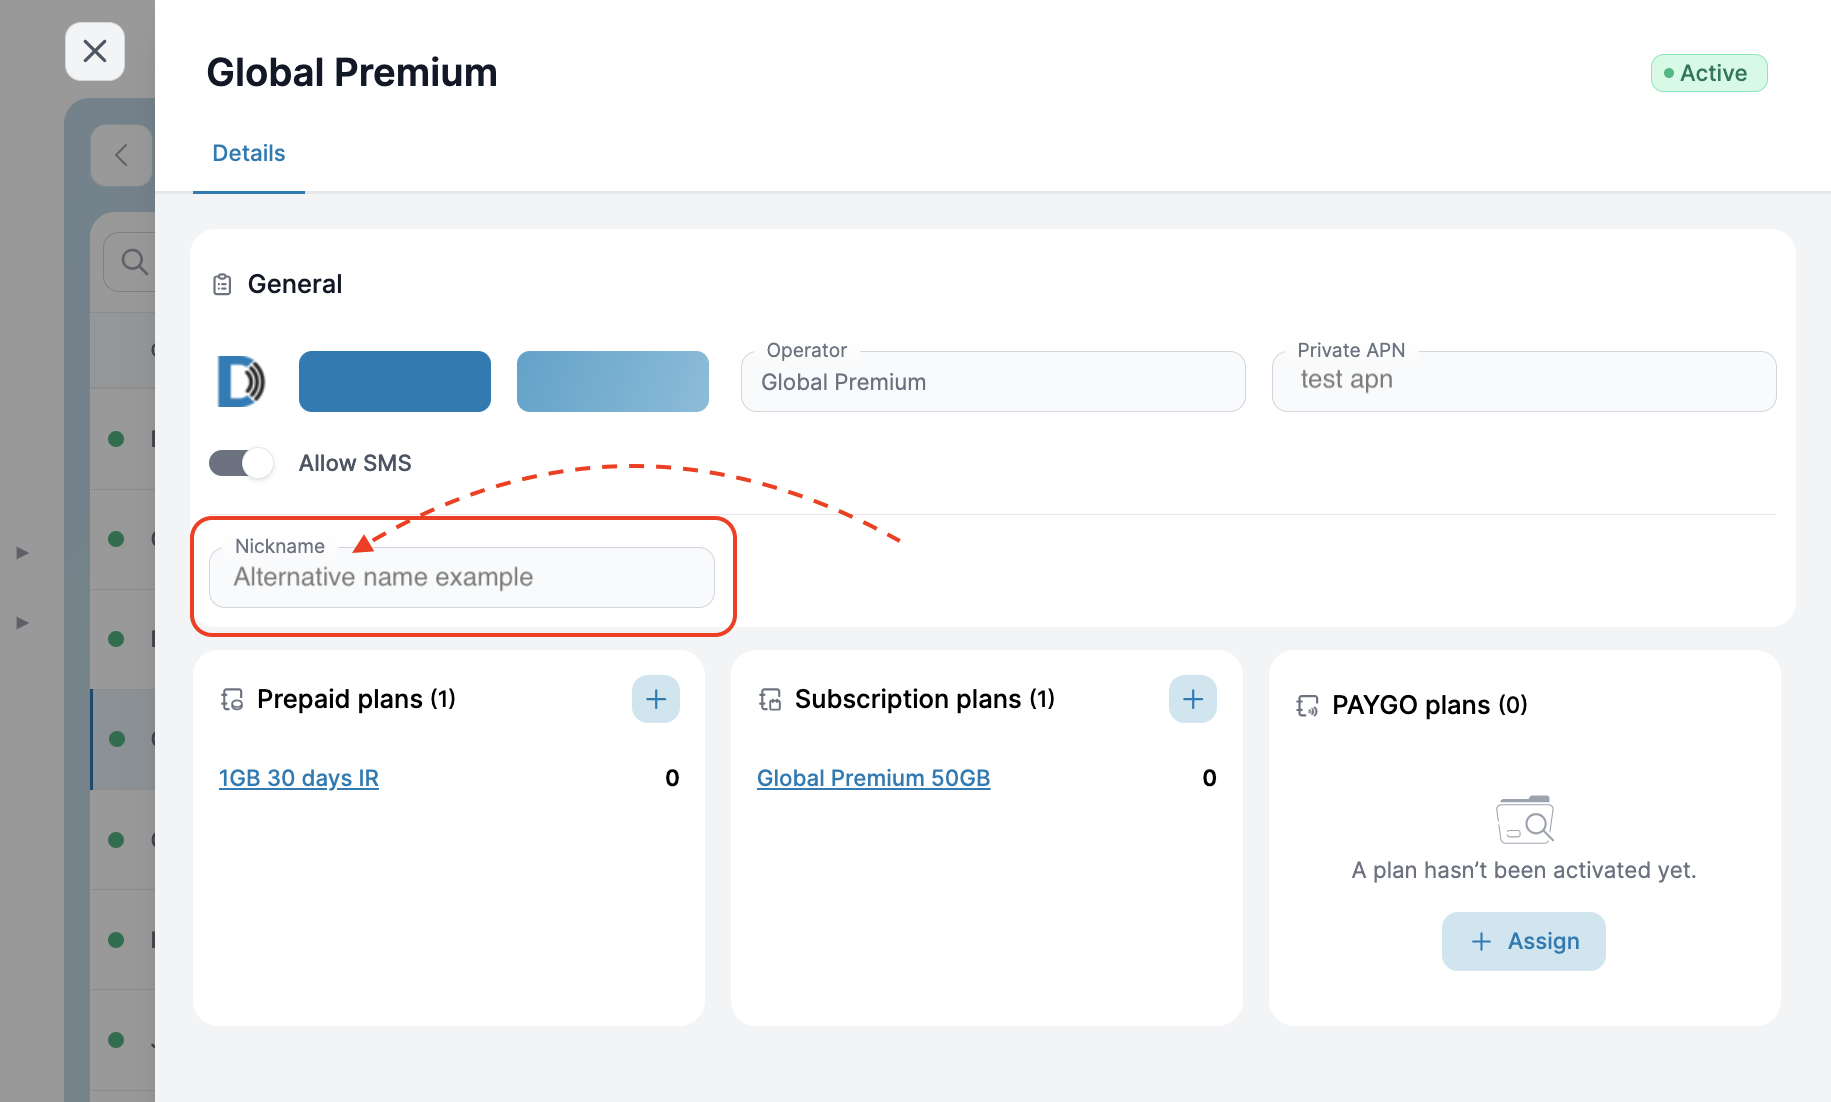
6. Note that you, as an Organization, have the option to use the **Nickname** field for operators.

{% hint style="info" %}
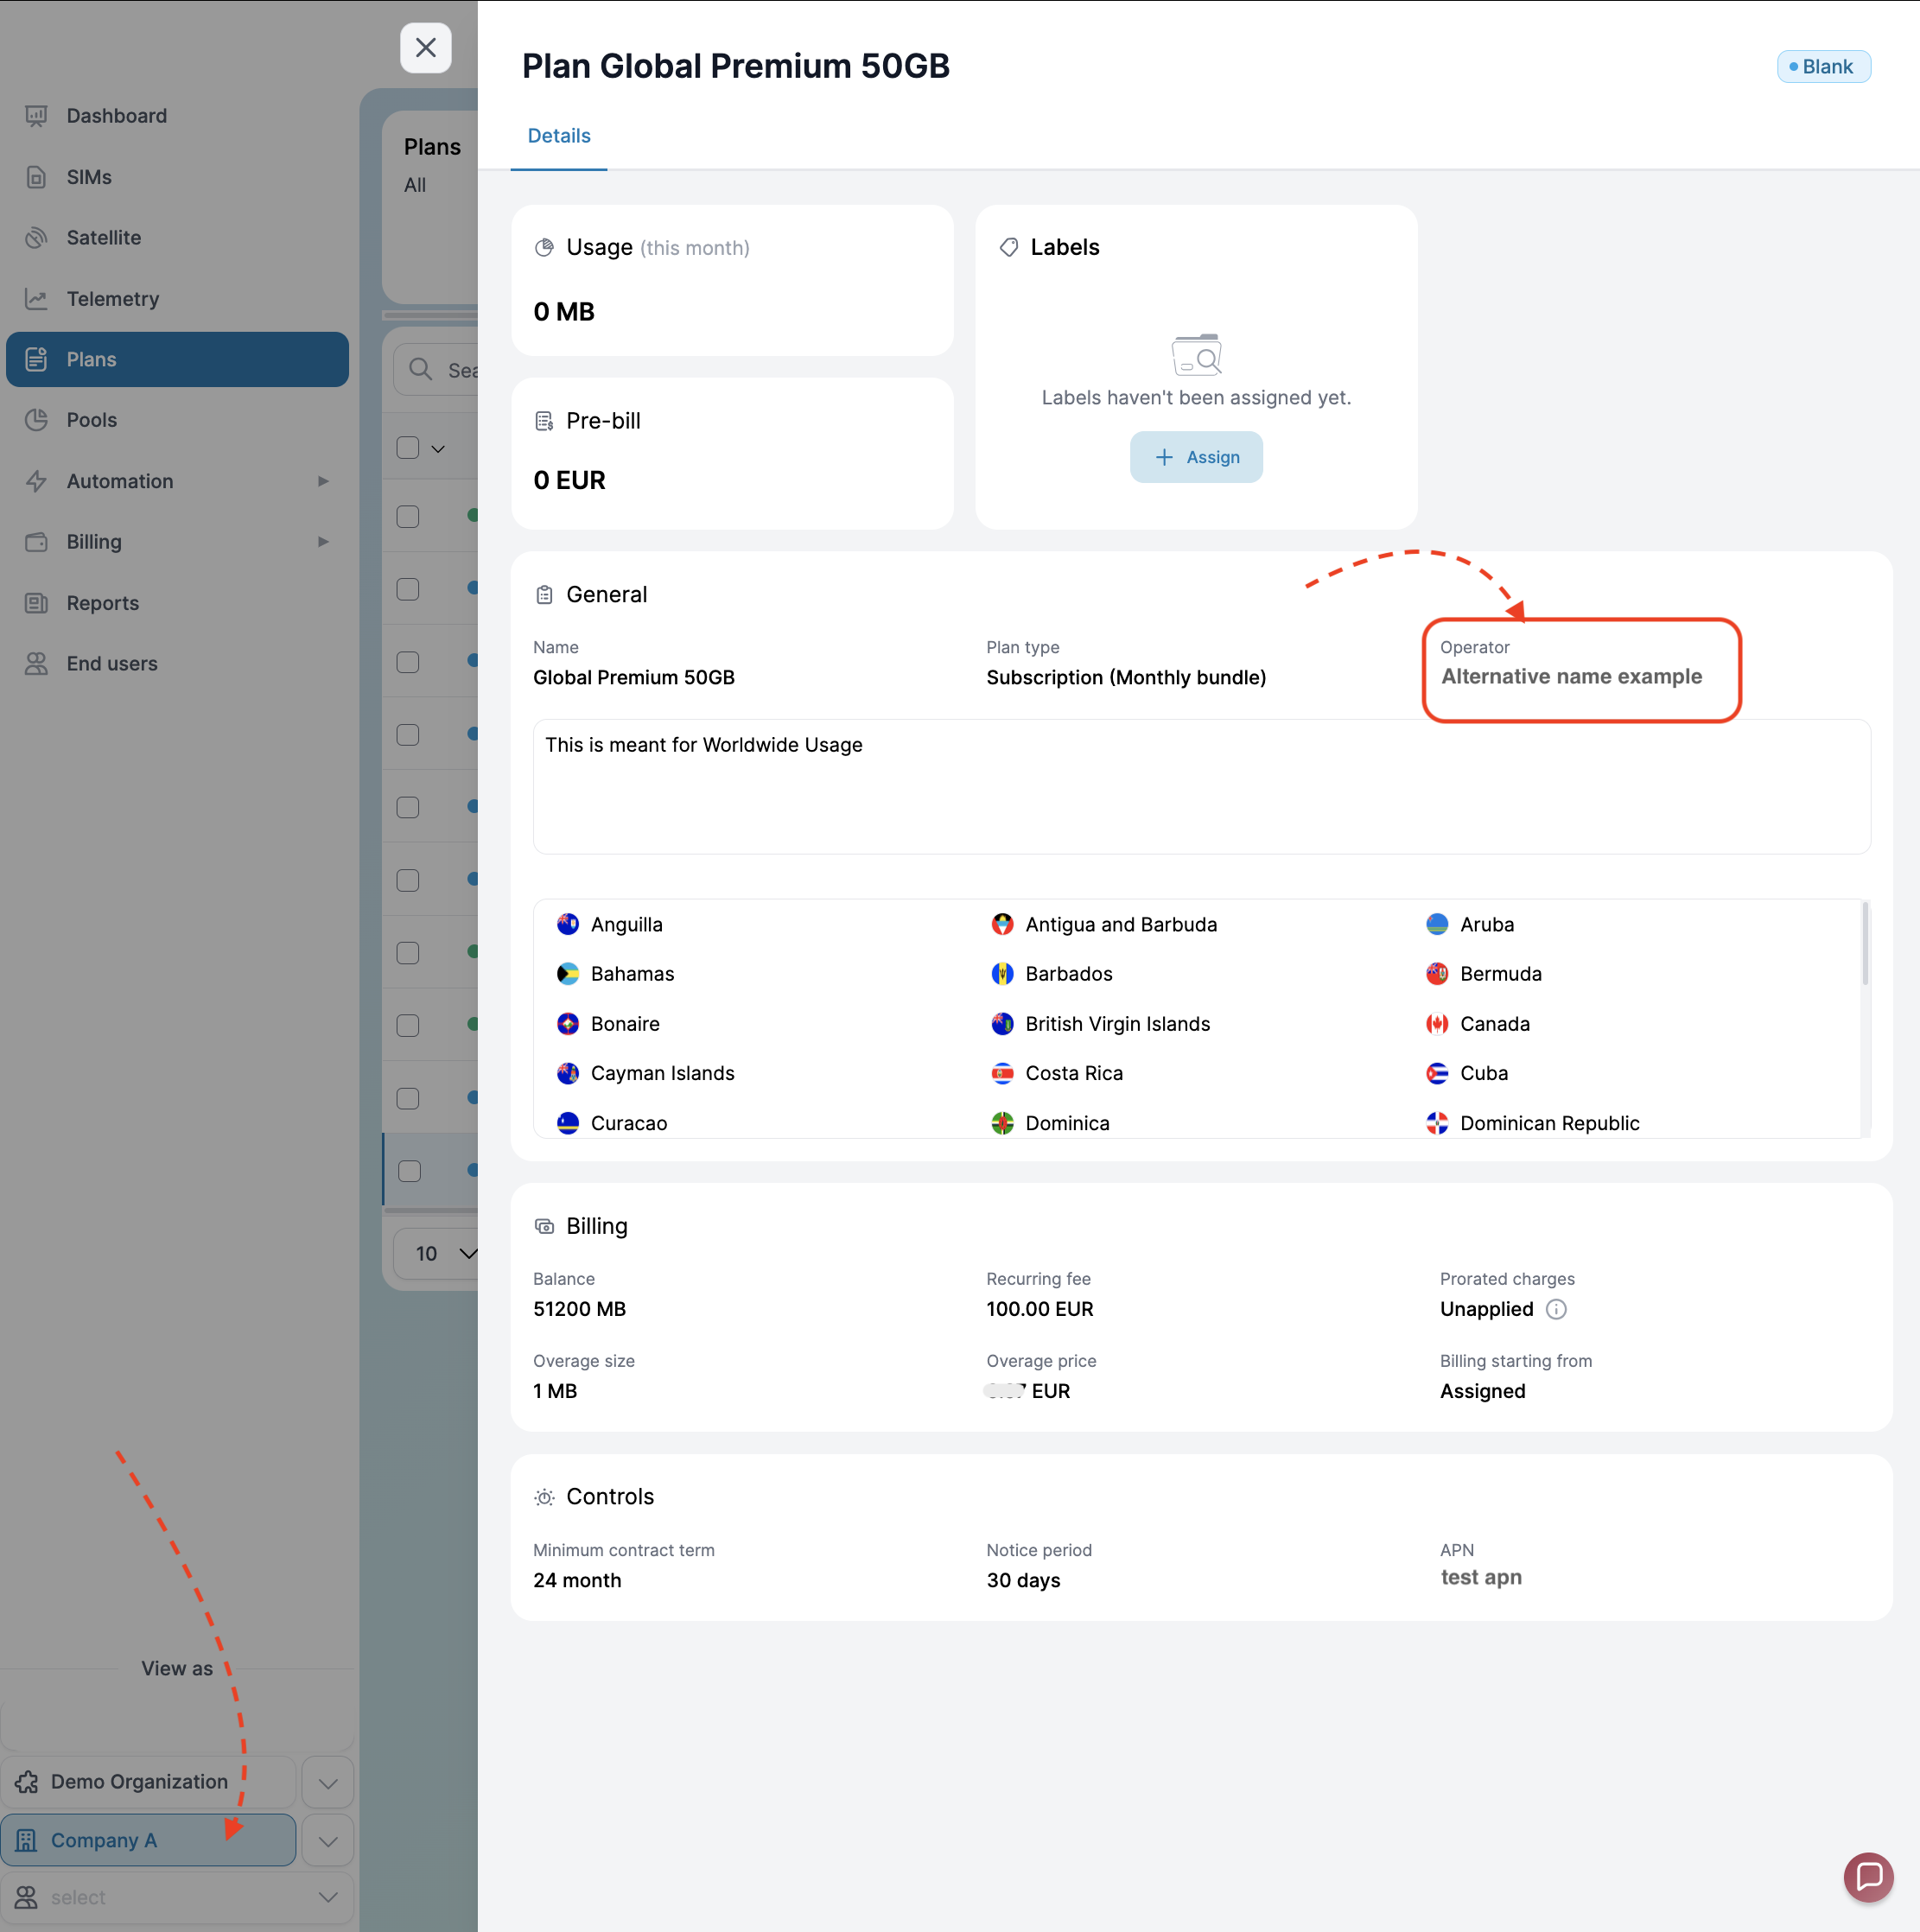
**A Nickname** is an optional alternative name that your Companies and End Users will see instead of the main operator name.&#x20;

* If you fill it in, the system will display this nickname in the interface&#x20;
* If left empty, the main operator name will be shown.
  {% endhint %}

<div data-full-width="true"><figure><img src="https://2408445593-files.gitbook.io/~/files/v0/b/gitbook-x-prod.appspot.com/o/spaces%2FxYJmxgUa2SDfD4byrJY1%2Fuploads%2FK7esJ5t6sE5TKLb3Uc4x%2FNickname.png?alt=media&amp;token=755699d7-7bc9-4b79-a4a7-0da1d49b5707" alt="" width="563"><figcaption></figcaption></figure></div>

* To change the nickname, click on the field in the edit form.
* Enter the new nickname and save changes.

Here’s how it appears at the Company level:
<div data-full-width="true"><figure><img src="https://2408445593-files.gitbook.io/~/files/v0/b/gitbook-x-prod.appspot.com/o/spaces%2FxYJmxgUa2SDfD4byrJY1%2Fuploads%2FUpQVF9X96VnobSRlcSio%2F%D0%97%D0%BD%D1%96%D0%BC%D0%BE%D0%BA%20%D0%B5%D0%BA%D1%80%D0%B0%D0%BD%D0%B0%202025-12-17%20%D0%BE%2013.39.00.png?alt=media&amp;token=560273c9-9dbc-46af-8b7f-d9f3f857c463" alt="" width="563"><figcaption></figcaption></figure></div>

***

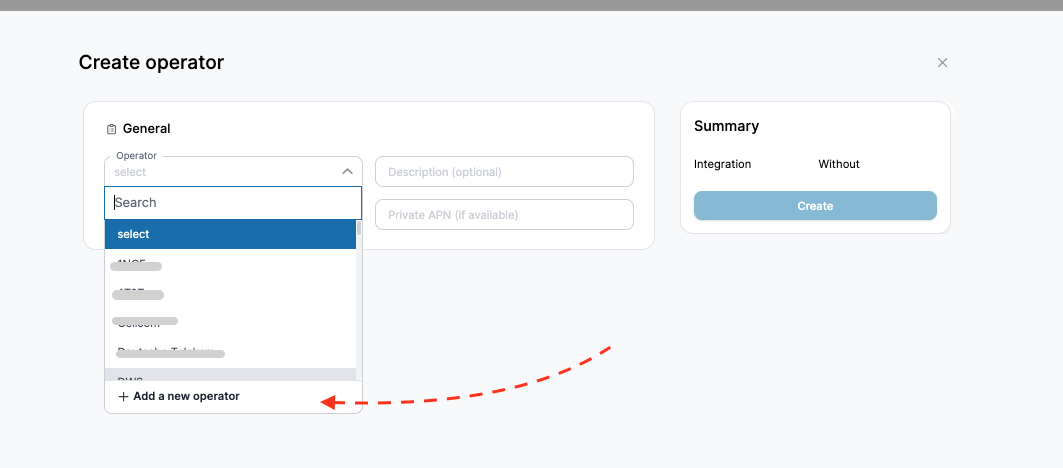
### <mark style="background-color:purple;">Couldn't find the right operator after checking the whole list?</mark>

* <mark style="background-color:yellow;">**Option 1**</mark> <mark style="background-color:yellow;"></mark><mark style="background-color:yellow;">–</mark> <mark style="background-color:yellow;"></mark><mark style="background-color:yellow;">**You don't have integration with the Operator**</mark>

This means you can add and manage SIMs, but you won’t be able to access real-time data usage information.
<figure><img src="https://2408445593-files.gitbook.io/~/files/v0/b/gitbook-x-prod.appspot.com/o/spaces%2FxYJmxgUa2SDfD4byrJY1%2Fuploads%2FPZM109RU29BPccfHLY2R%2F%D0%97%D0%BD%D1%96%D0%BC%D0%BE%D0%BA%20%D0%B5%D0%BA%D1%80%D0%B0%D0%BD%D0%B0%202025-05-15%20%D0%BE%2013.34.51.png?alt=media&amp;token=70748e2b-96e6-43e4-bcbe-e72d135ec24d" alt=""><figcaption></figcaption></figure>

<br>

<mark style="background-color:yellow;">**Option 2**</mark> <mark style="background-color:yellow;"></mark><mark style="background-color:yellow;">–</mark> <mark style="background-color:yellow;"></mark><mark style="background-color:yellow;">**There is an integration with the operator you would like to add.**</mark>

For the integration, the following credentials are required:

* API Documentation
* License key&#x20;
* API prefix or login, and password
* etc&#x20;

{% hint style="warning" %}
Credentials can vary based on the integration. For some, a CERT file might be needed, or other information could be required.
{% endhint %}

{% hint style="warning" %}
If an operator is not on the list, please provide us with the API documentation and credentials for integration.&#x20;

Timeline: That can take us up to 2 weeks to integrate
{% endhint %}


# 2. Create Company

### <mark style="background-color:blue;">**Complete the following steps:**</mark>

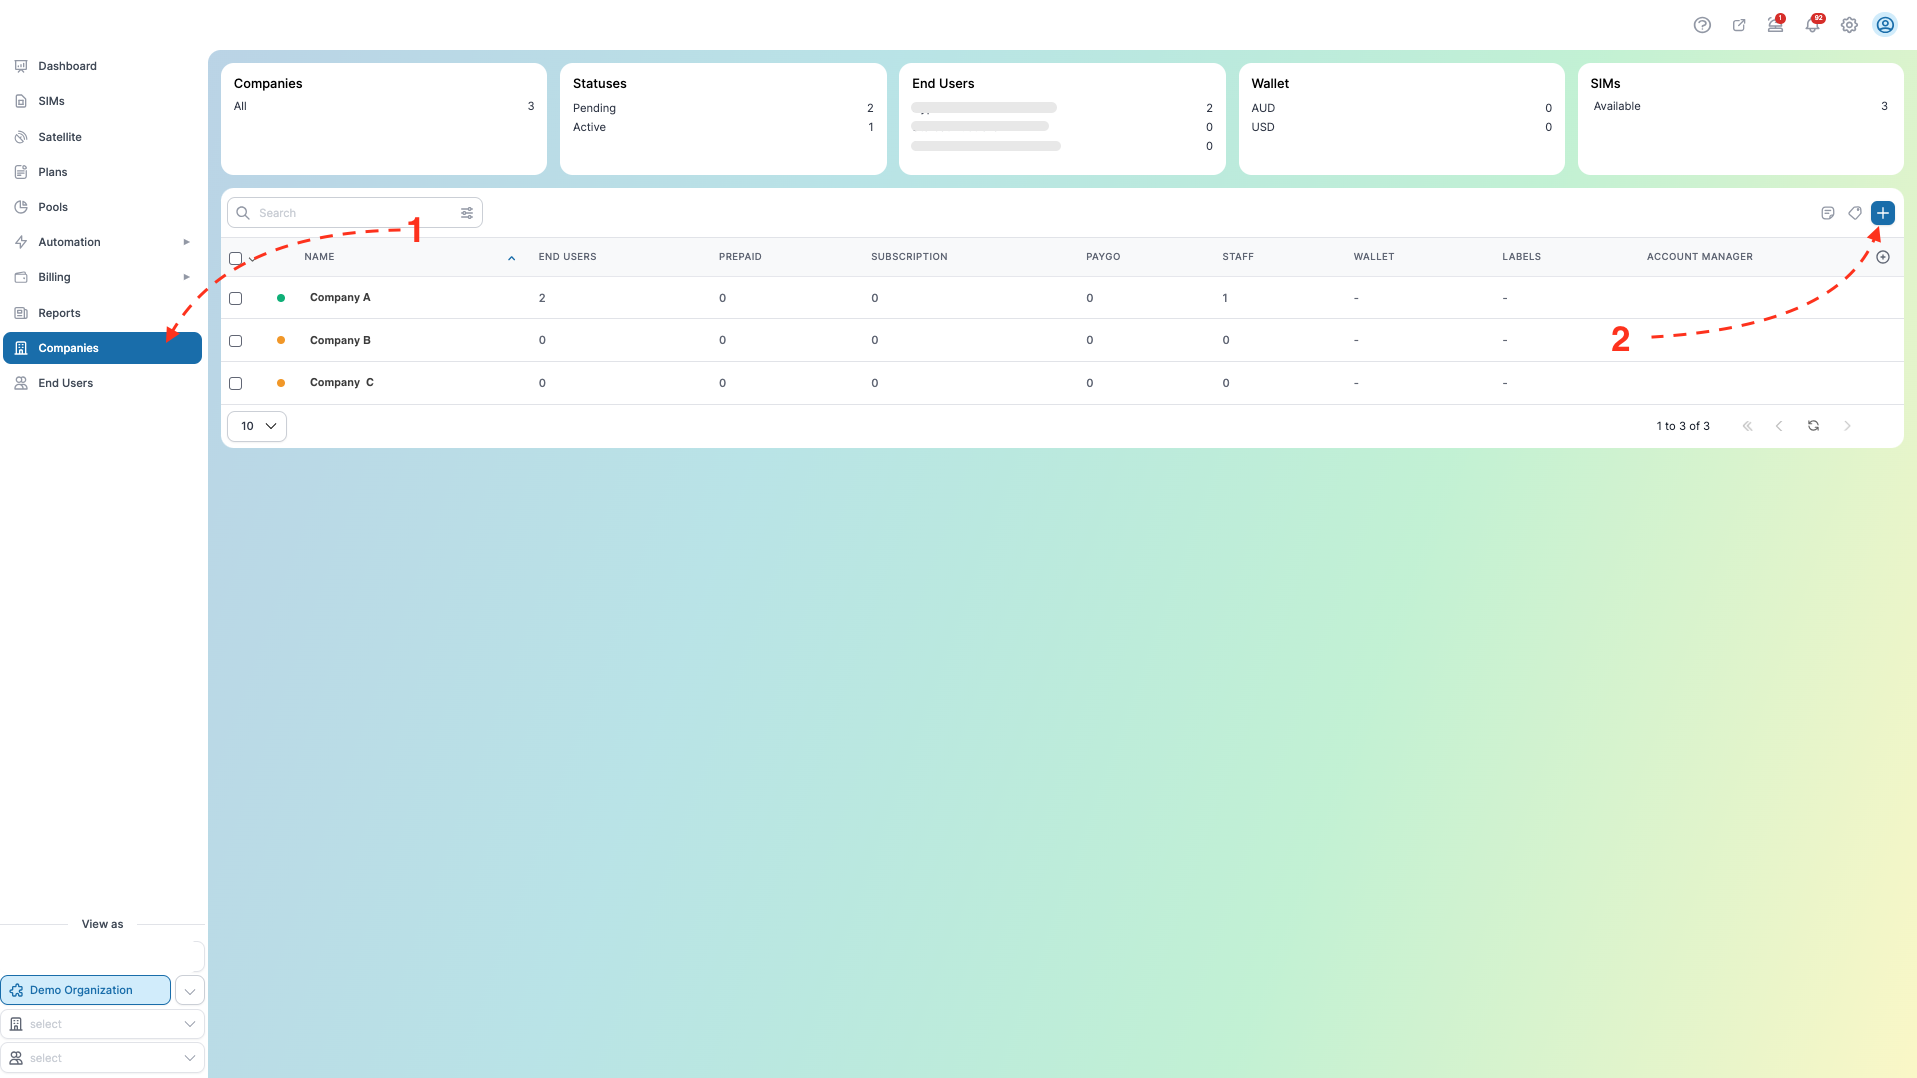
1. Go to the “Companies” button on your left side of the Side navigation menu
2. On your right, press the “plus” button to create a company&#x20;

<div data-full-width="true"><figure><img src="https://2408445593-files.gitbook.io/~/files/v0/b/gitbook-x-prod.appspot.com/o/spaces%2FxYJmxgUa2SDfD4byrJY1%2Fuploads%2FEeSk6v09uASHVDnKdDIQ%2FCompanies.png?alt=media&amp;token=27011bf5-5af4-468e-88d4-981be3fa673f" alt="" width="563"><figcaption></figcaption></figure></div>

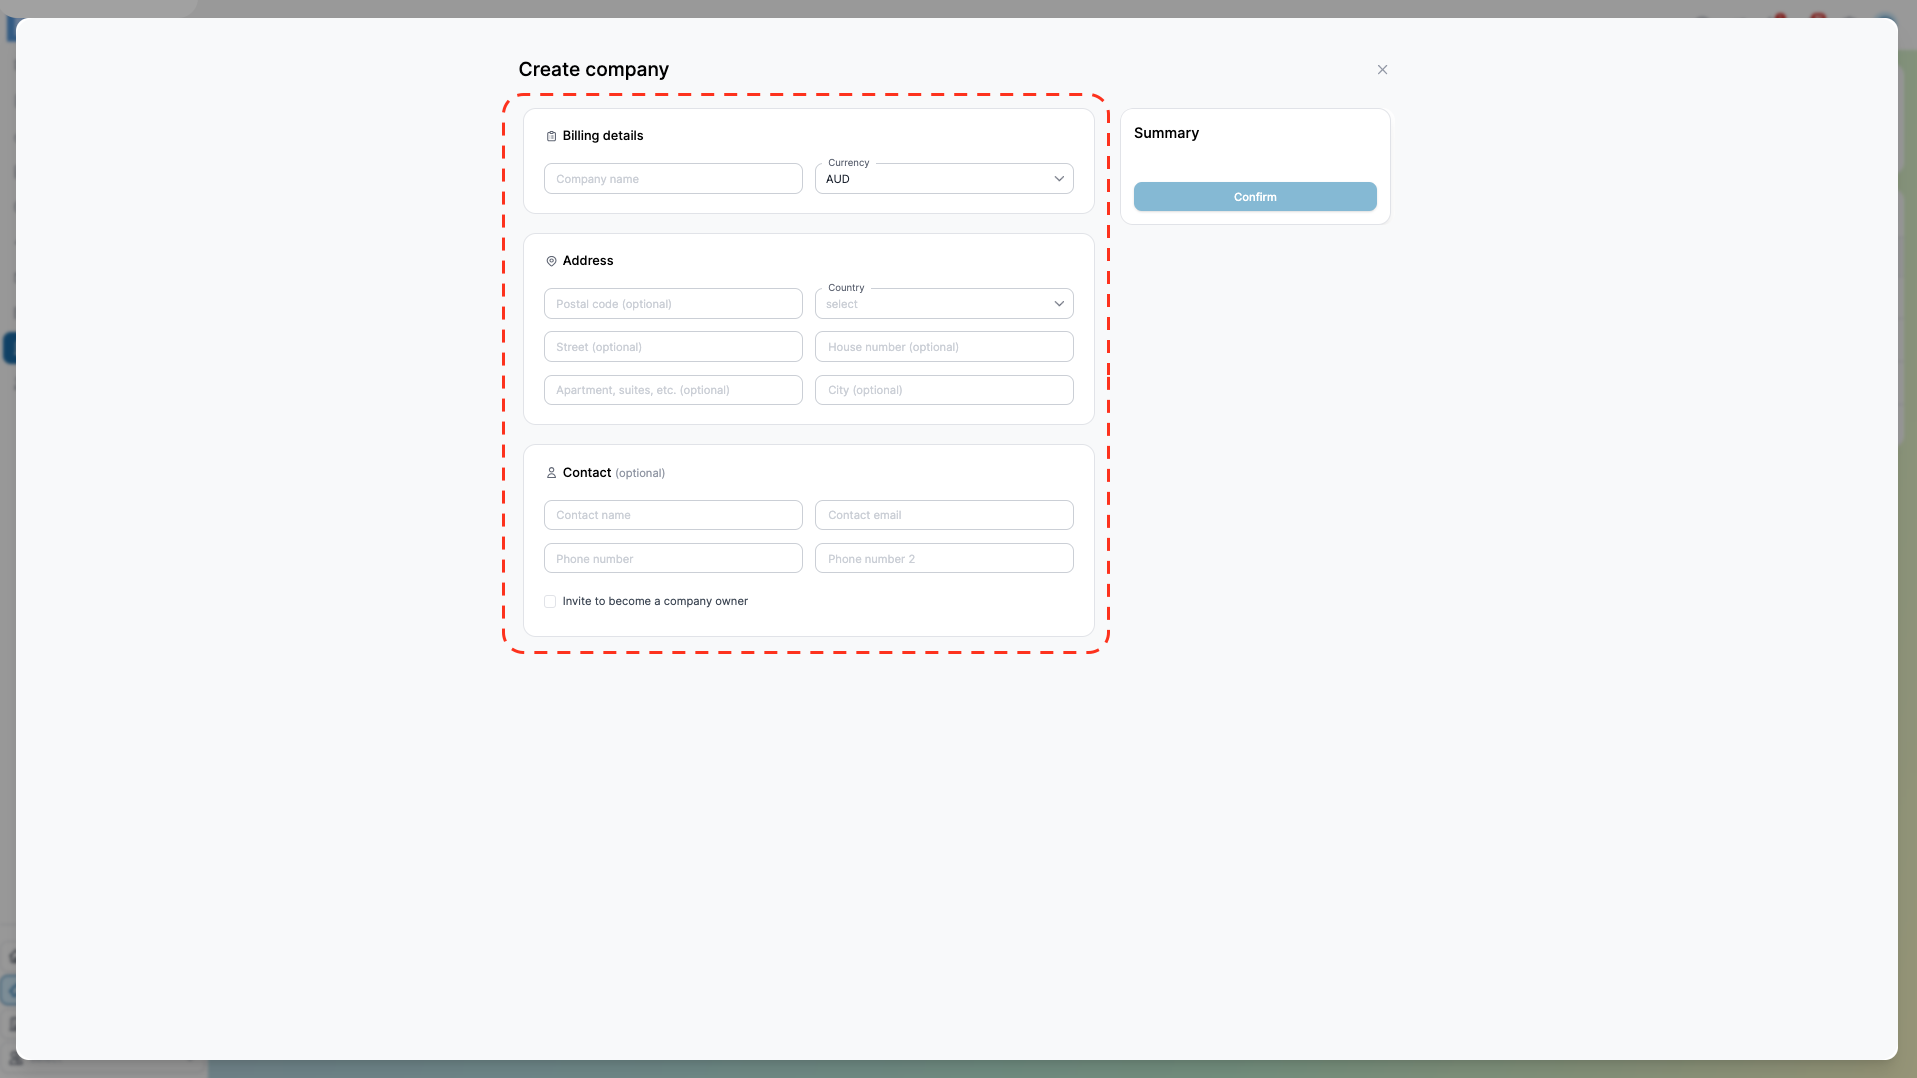
3. A wizard will appear, and you will need to fill in all the required information
<div data-full-width="true"><figure><img src="https://2408445593-files.gitbook.io/~/files/v0/b/gitbook-x-prod.appspot.com/o/spaces%2FxYJmxgUa2SDfD4byrJY1%2Fuploads%2FUIgJ3GbR4NdkjQnaGuxw%2FAdd%20NEW%20Company.png?alt=media&amp;token=0f3046ce-e26c-4fec-8822-2f1faa184941" alt="" width="563"><figcaption></figcaption></figure></div>

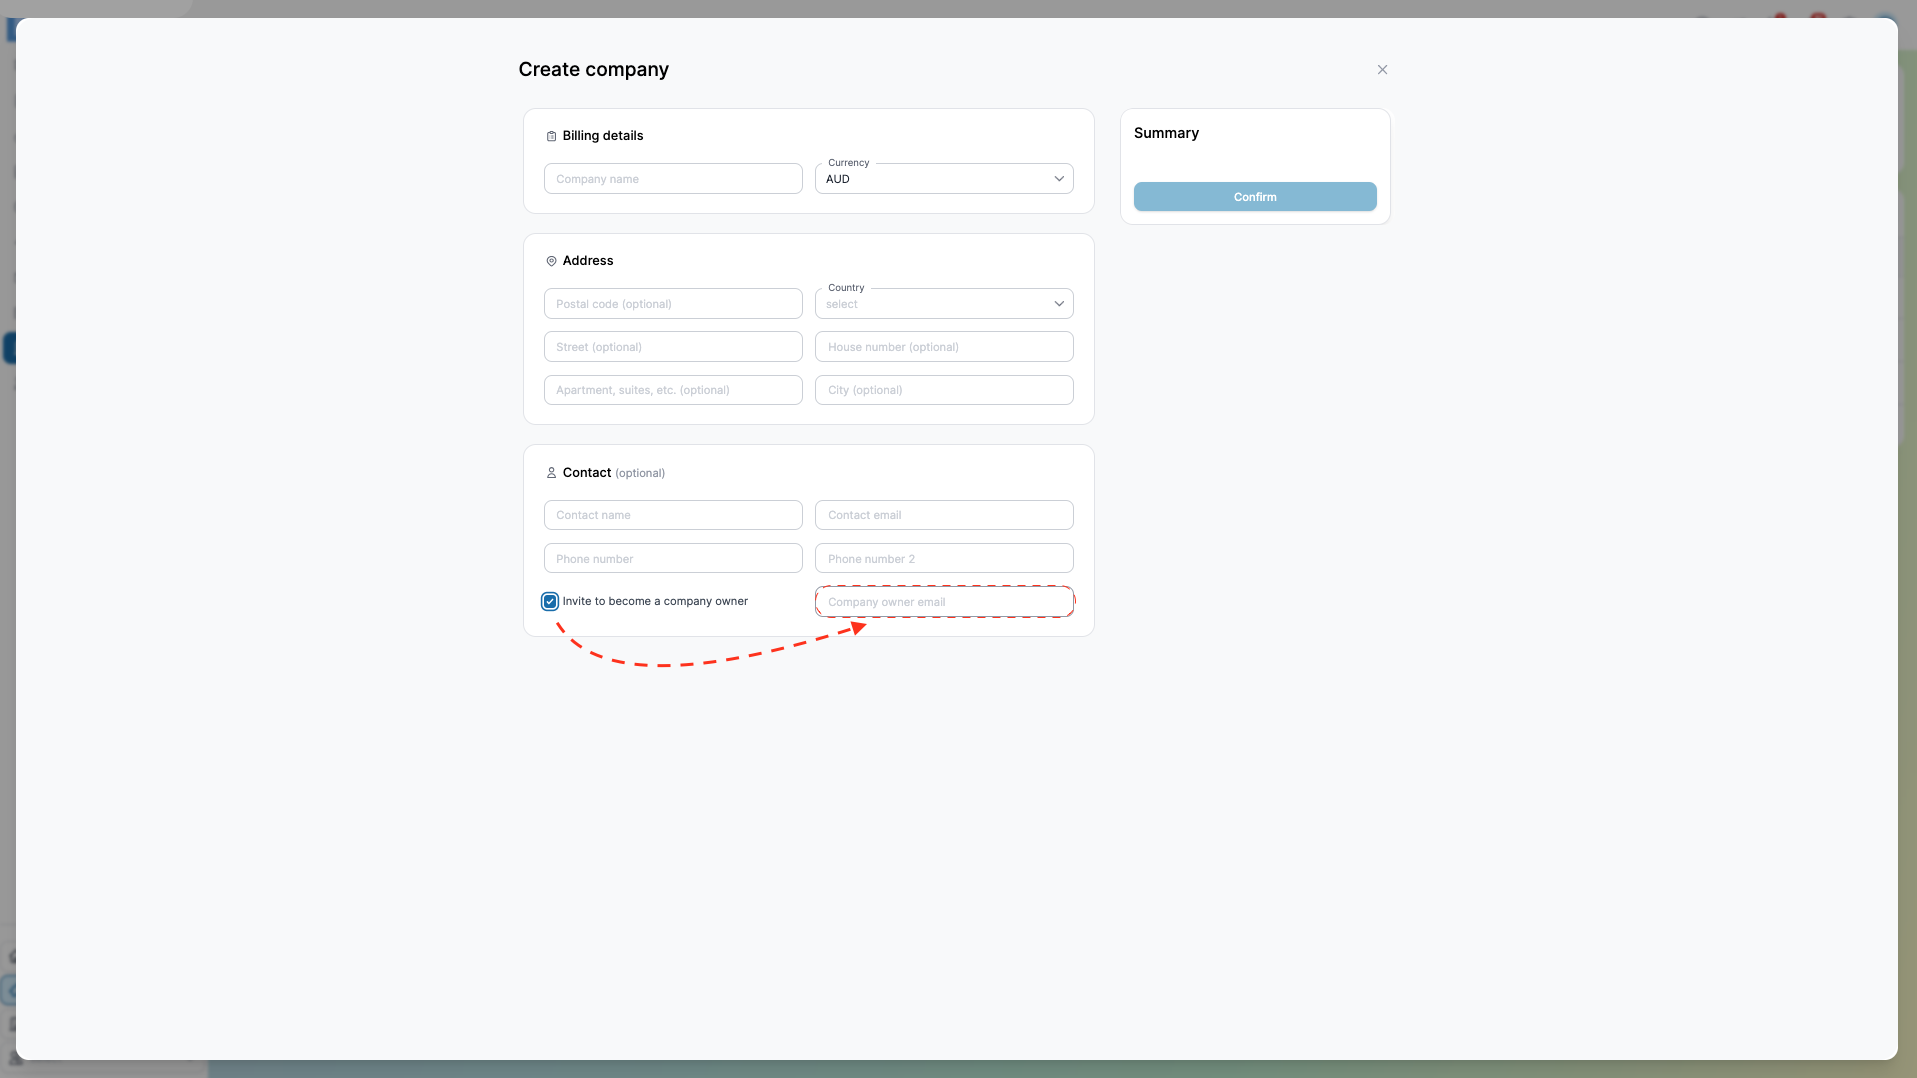
4. If you wish to invite someone to administer the company, please provide an email address.
<div data-full-width="true"><figure><img src="https://2408445593-files.gitbook.io/~/files/v0/b/gitbook-x-prod.appspot.com/o/spaces%2FxYJmxgUa2SDfD4byrJY1%2Fuploads%2F9imMbzviDqxBB7lFrObJ%2FInvite%20new%20comp.%20owner.png?alt=media&amp;token=ecc386e7-7201-4143-bcaa-c150e9dc49c4" alt="" width="563"><figcaption></figcaption></figure></div>

<br>


# 3.  Upload your SIM(s)

### <mark style="background-color:blue;">**Complete the following steps:**</mark>

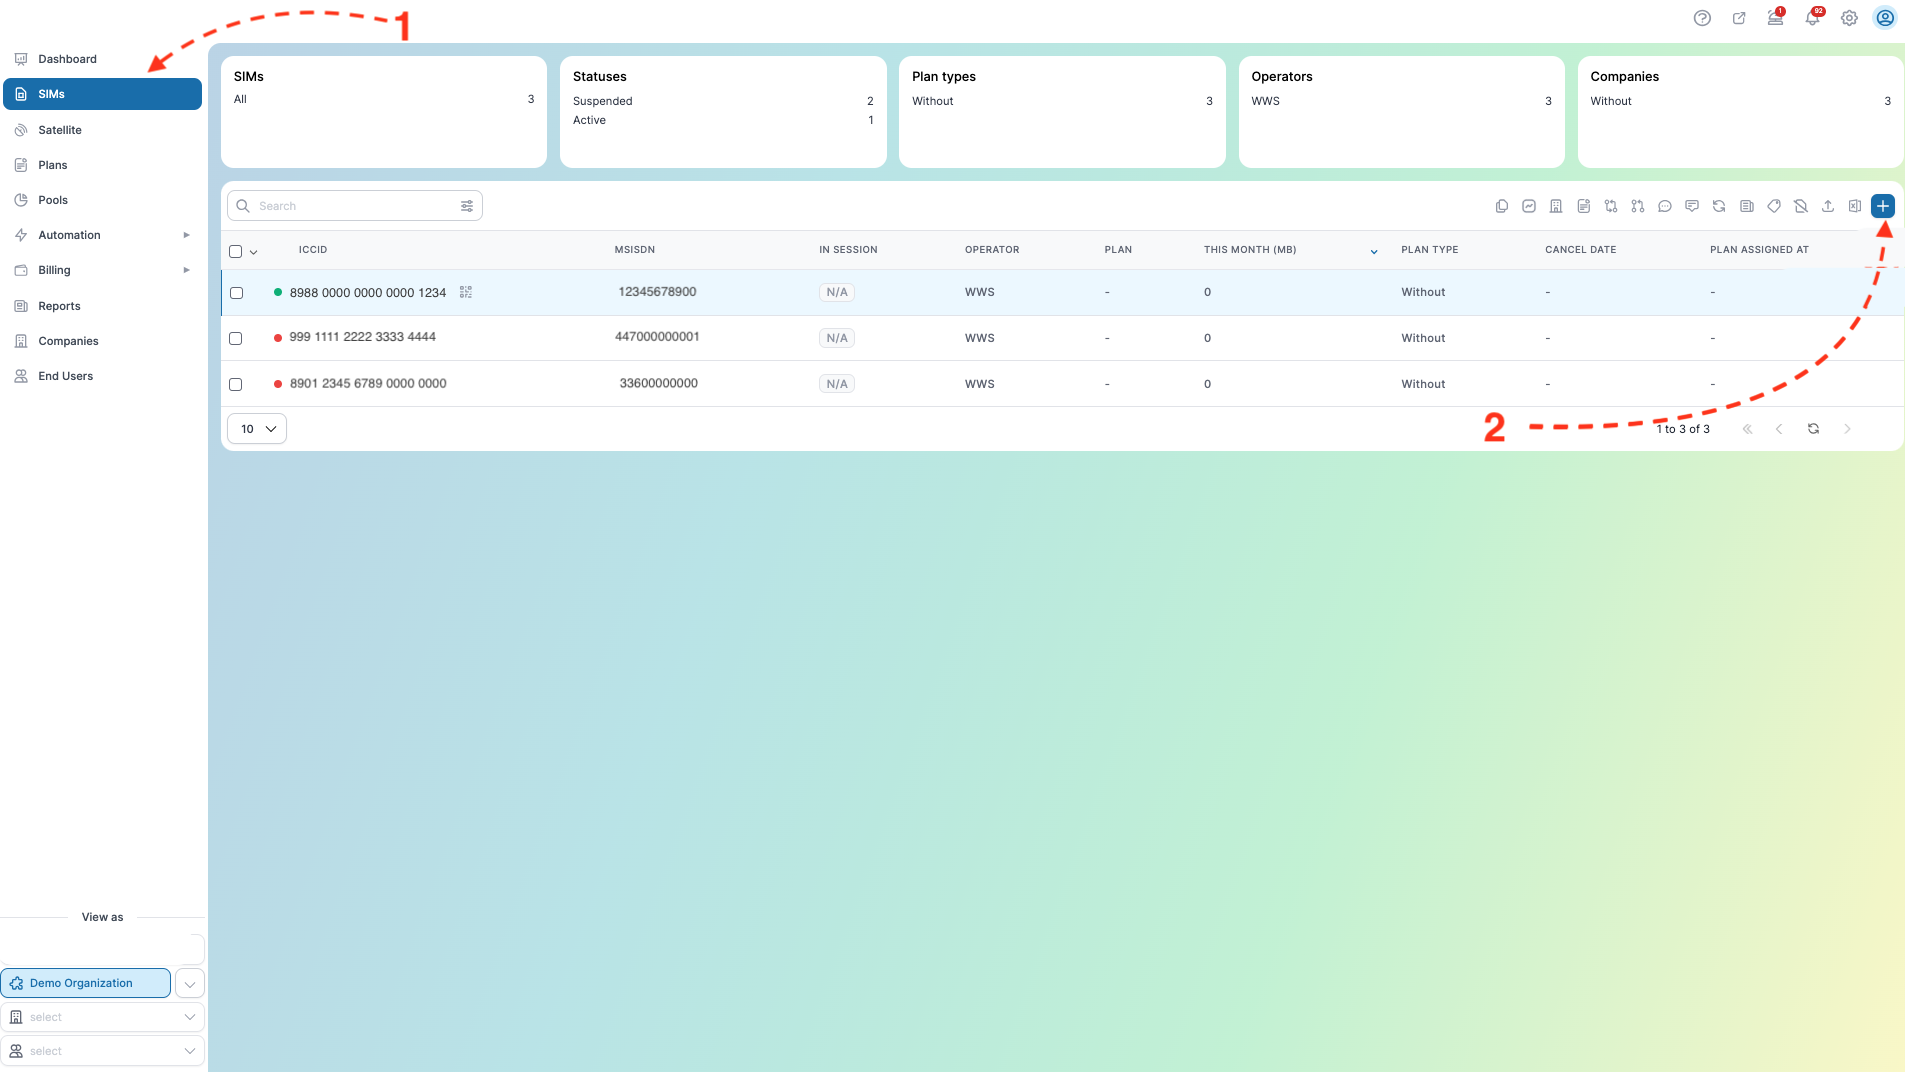
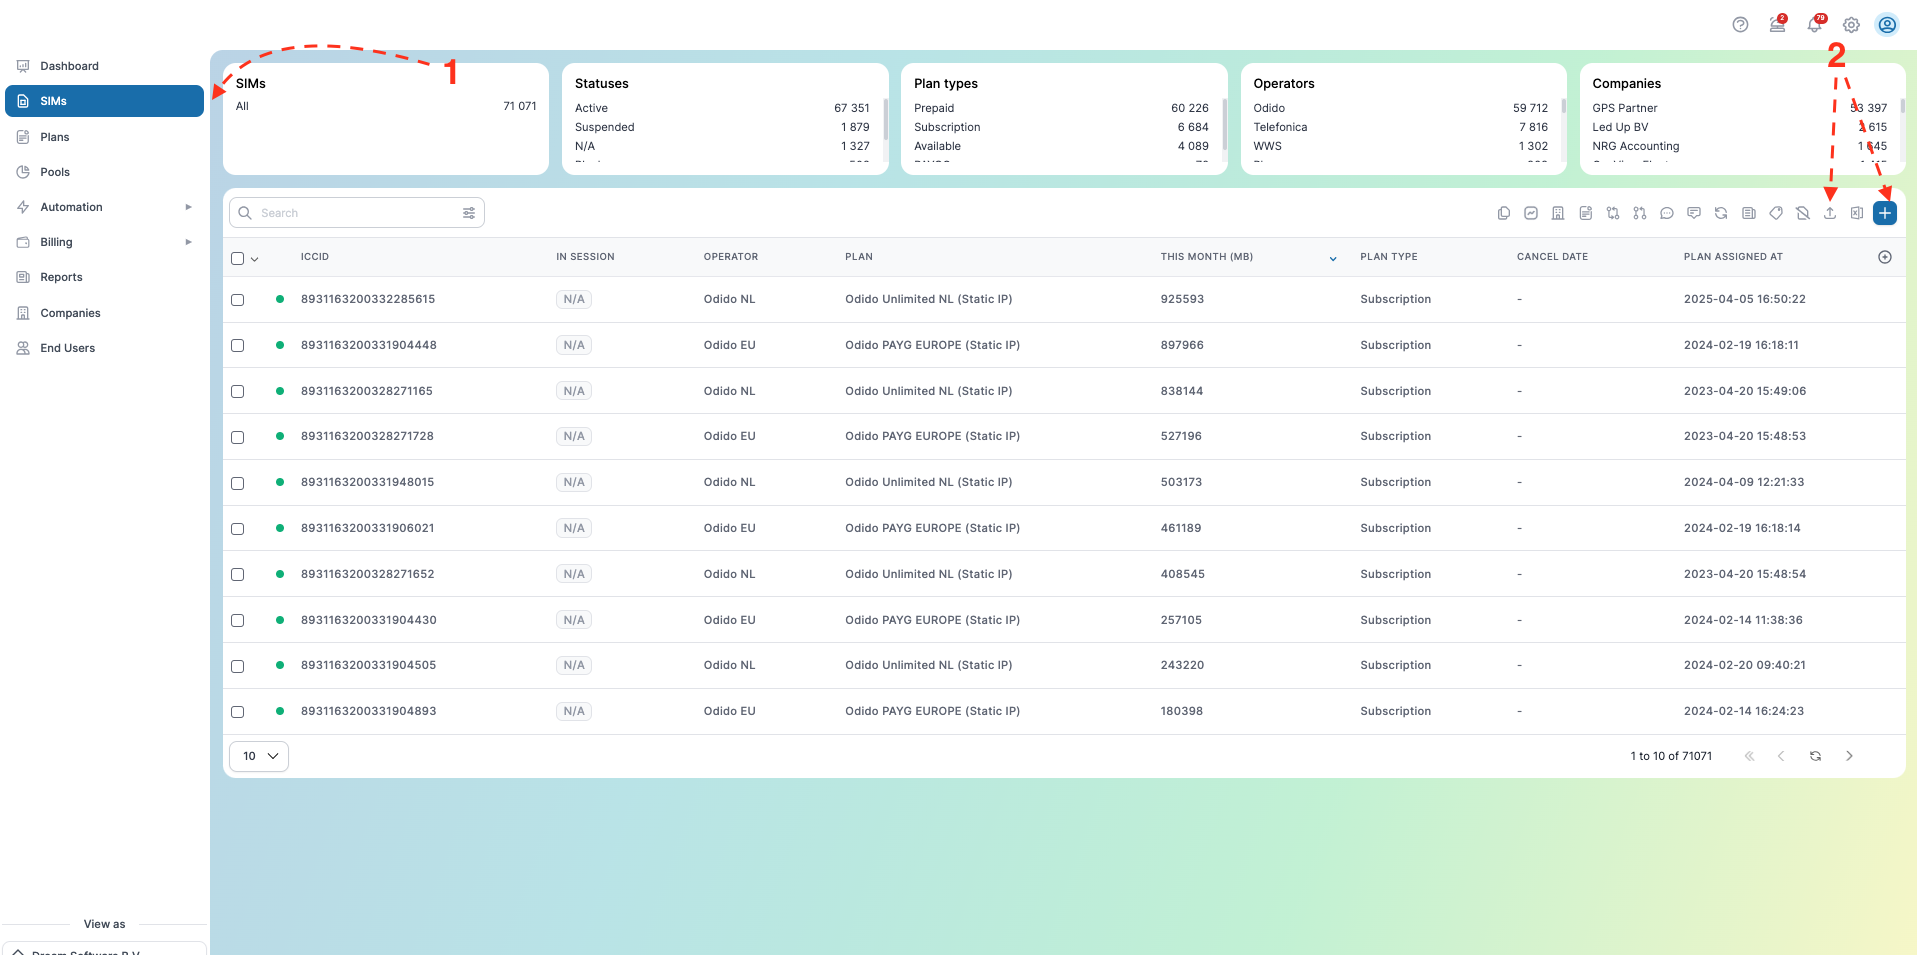
1. From the side menu on the left, select '**SIMs**'
2. Then, press the “plus” button on your right&#x20;

<div data-full-width="true"><figure><img src="https://2408445593-files.gitbook.io/~/files/v0/b/gitbook-x-prod.appspot.com/o/spaces%2FxYJmxgUa2SDfD4byrJY1%2Fuploads%2FUARHe7wdu1XnoBwCkm2M%2FSim%20%26add.png?alt=media&amp;token=1d175621-fefe-4789-94b6-9b8dd7ac3ba9" alt="" width="563"><figcaption></figcaption></figure></div>

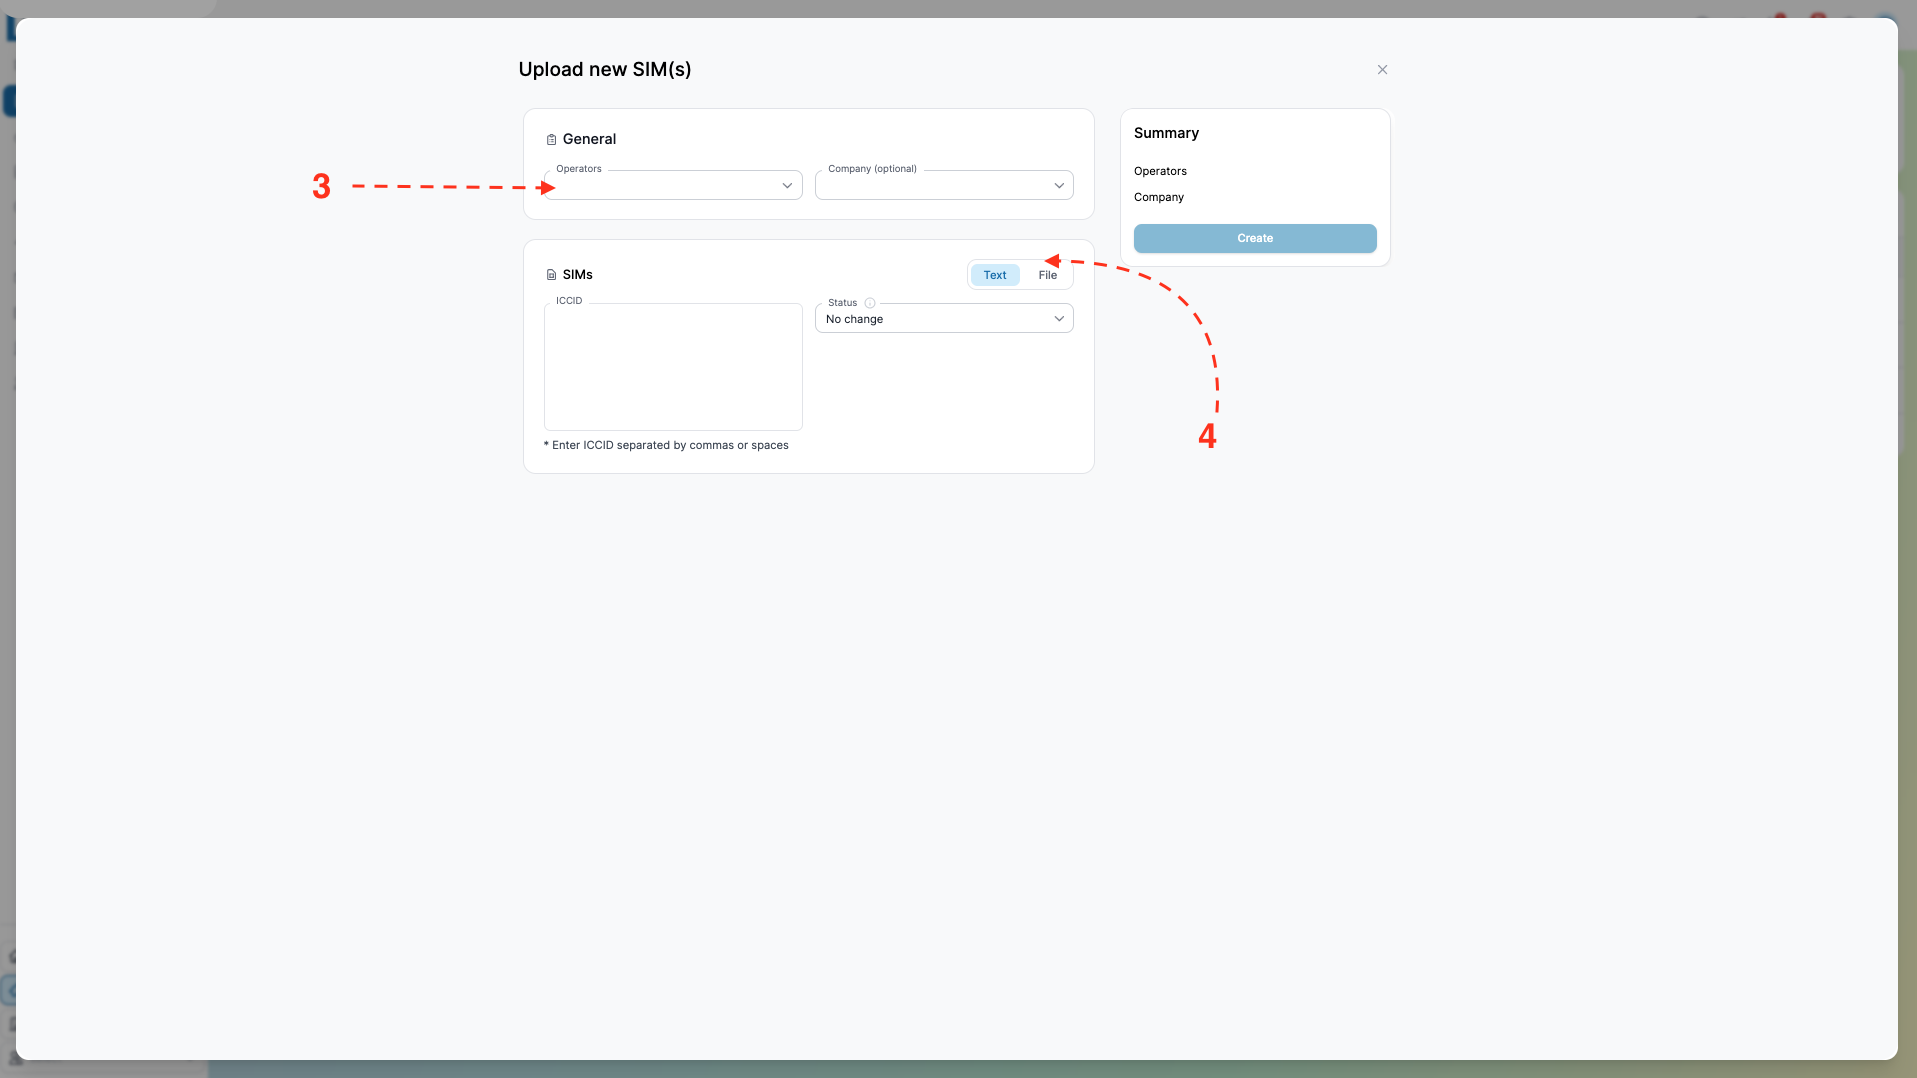
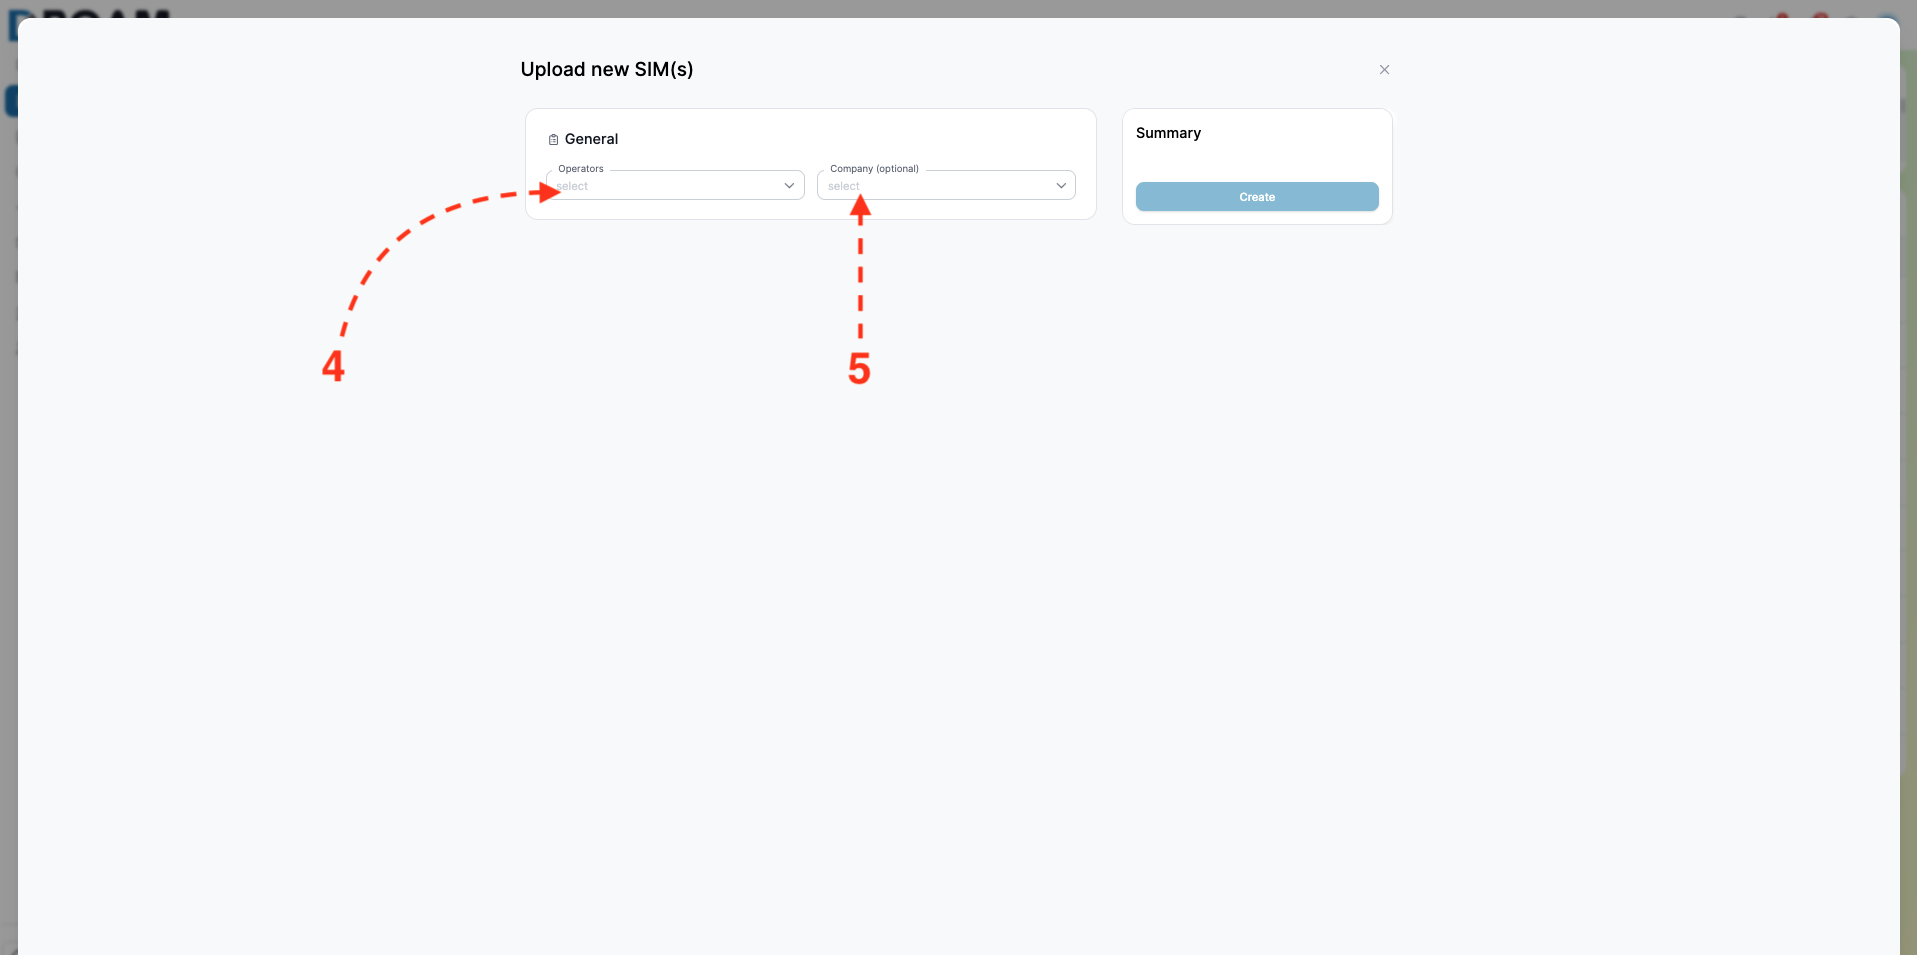
3. A wizard will appear. Choose the **Operator** from the list (obligatory) and the **Company** these SIM(s) belong to  (Optional)
4. You can add SIMs (ICCID) **manually** through a comma or by **uploading an XLSX file** (choose the preferred option)

<div data-full-width="true"><figure><img src="https://2408445593-files.gitbook.io/~/files/v0/b/gitbook-x-prod.appspot.com/o/spaces%2FxYJmxgUa2SDfD4byrJY1%2Fuploads%2FbRsDJ7FRskszzYMeFK17%2FWizard.png?alt=media&amp;token=71a608f8-ac5f-46c2-abf7-cf149a36e1cd" alt="" width="563"><figcaption></figcaption></figure></div>

{% hint style="warning" %}
**IMPORTANT!**

Before adding/uploading SIMs, please check with your operator if they are active. Sometimes you need to activate SIM(s) with the operator first.
{% endhint %}

{% hint style="info" %}
“[Activation ready](/menu/publish-your-docs#sim-statuses)” status means that the SIM is active but has never generated any traffic.
{% endhint %}

{% hint style="info" %}
More detailed information about SIM types you may find here: <https://faq.droam.com/menu/publish-your-docs>
{% endhint %}


# 4. Create Plan(s)

### <mark style="background-color:blue;">**Complete the following steps:**</mark>

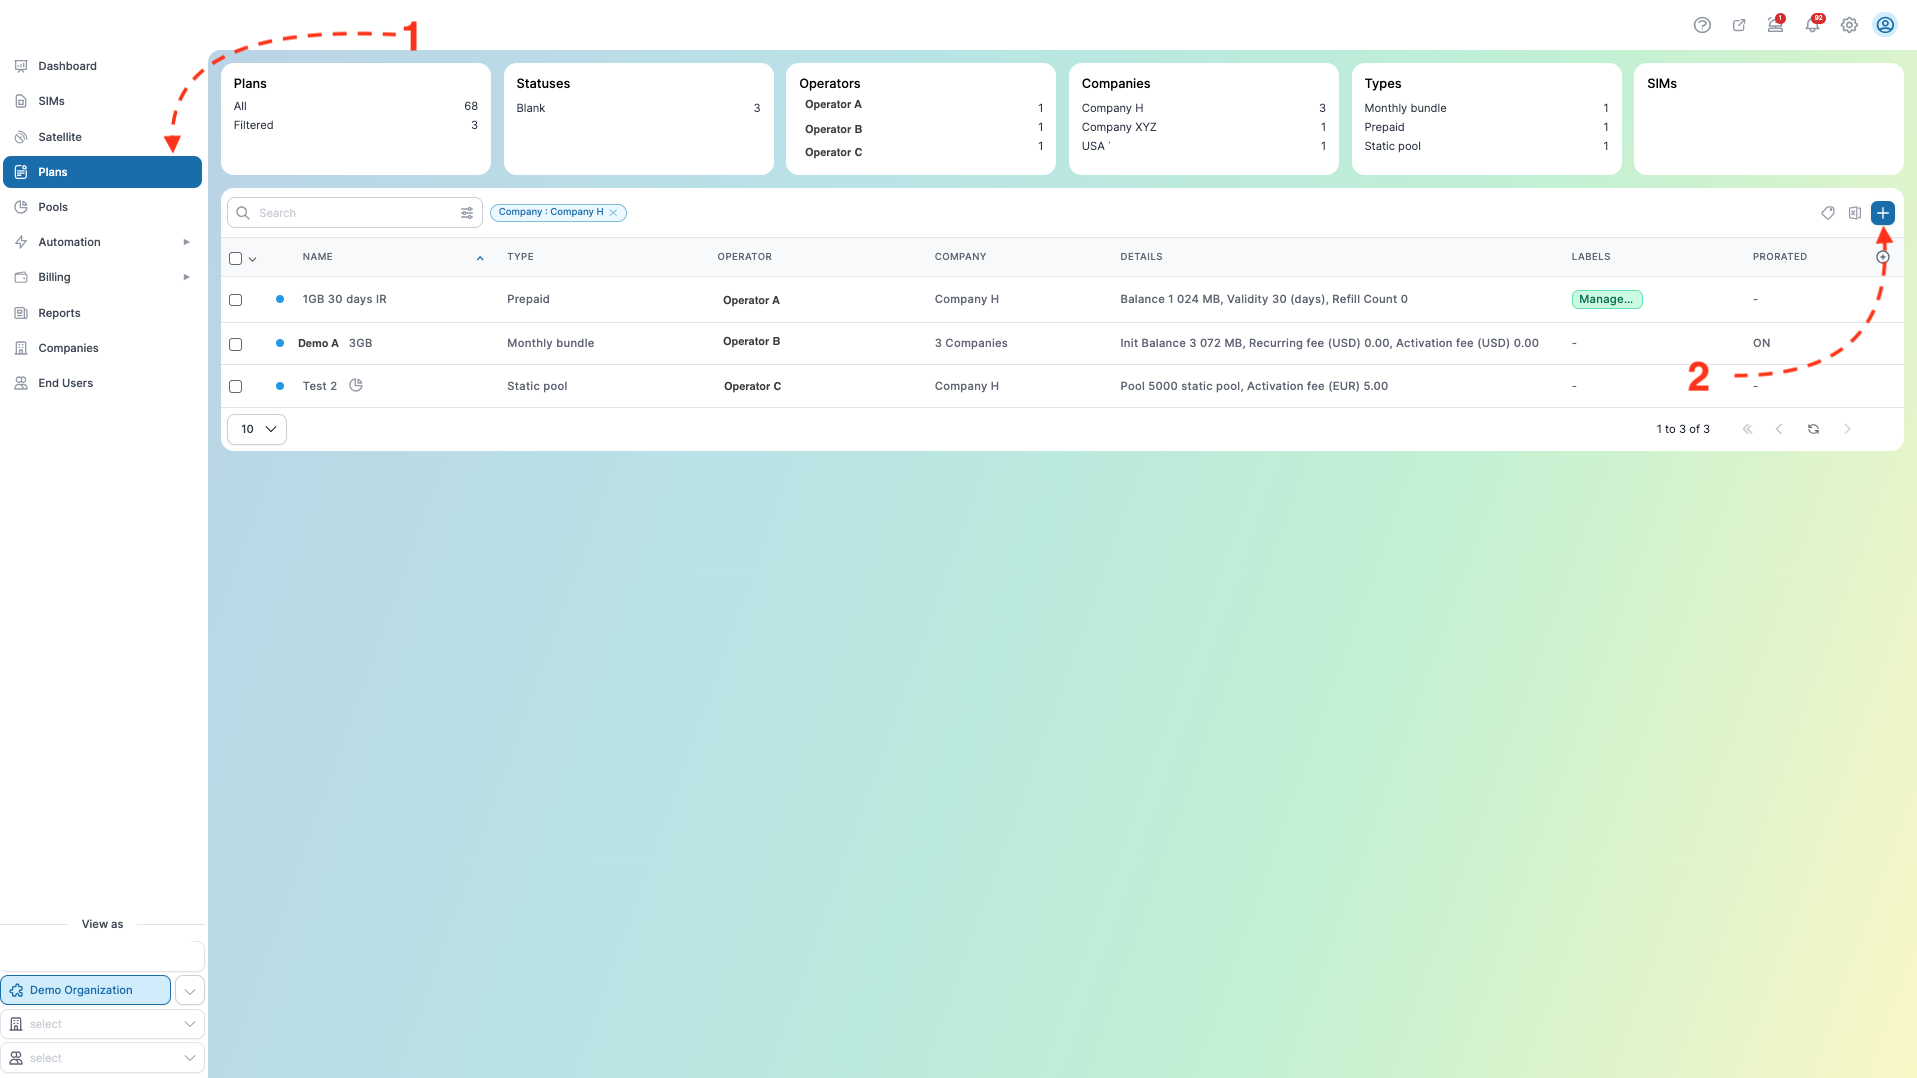
1. Go to the “Plans”  button on your left side of the navigation menu&#x20;
2. On your right, press the “plus” button and choose the plan type you want to create&#x20;

<div data-full-width="true"><figure><img src="https://2408445593-files.gitbook.io/~/files/v0/b/gitbook-x-prod.appspot.com/o/spaces%2FxYJmxgUa2SDfD4byrJY1%2Fuploads%2FscUxPdrwUZEFCcFwyW5h%2FPlans.png?alt=media&amp;token=741f33ef-e9e4-4df0-84bc-acf4c691afba" alt="" width="563"><figcaption></figcaption></figure></div>

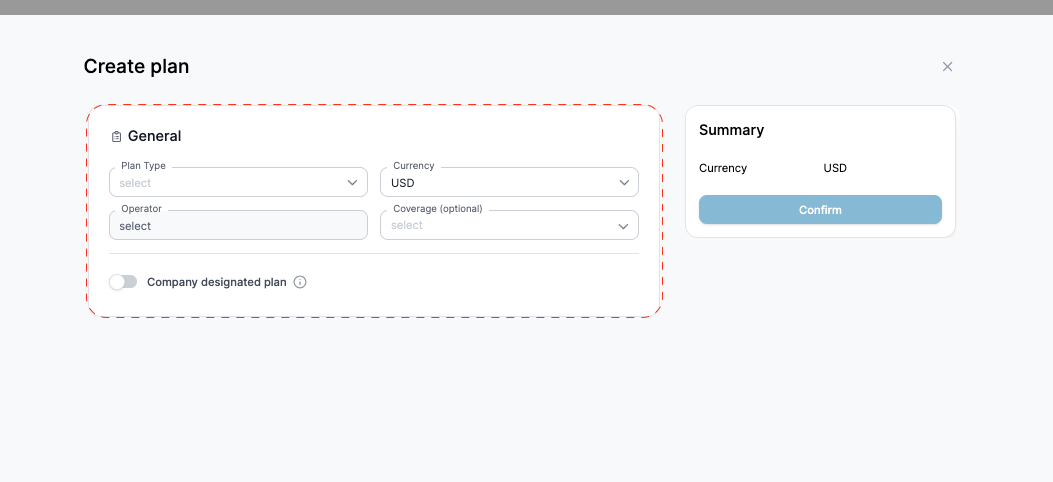
3. When a new wizard appears, fill in all essential fields.
<div data-full-width="true"><figure><img src="https://2408445593-files.gitbook.io/~/files/v0/b/gitbook-x-prod.appspot.com/o/spaces%2FxYJmxgUa2SDfD4byrJY1%2Fuploads%2FSLofJpmhJNttuO4mq51R%2FCreate%20Plan.png?alt=media&amp;token=f132fc80-6129-401e-b1f3-787ce2f28b32" alt="" width="563"><figcaption></figcaption></figure></div>

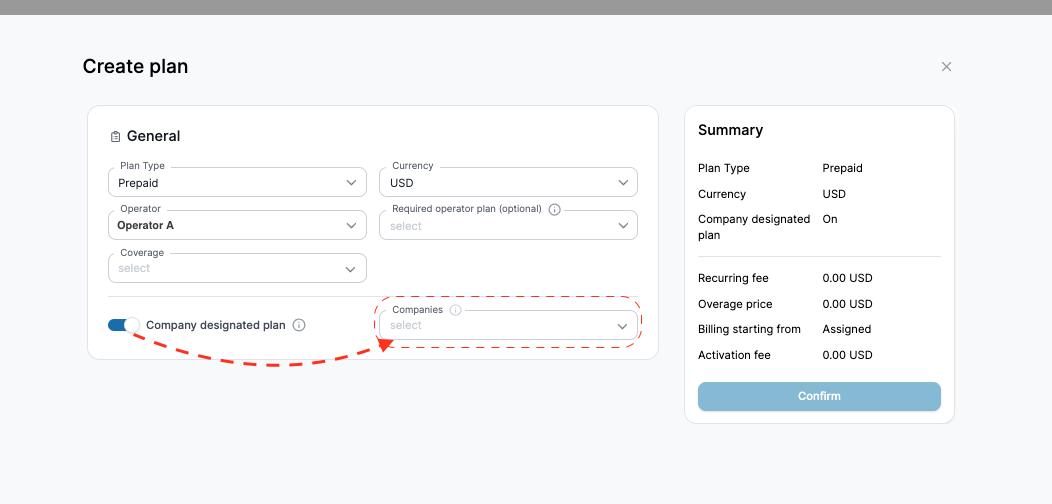
* If you want to make this plan available only to specific company(-ies), please activate the '**Company Designated Plan**' toggle.

<figure><img src="https://2408445593-files.gitbook.io/~/files/v0/b/gitbook-x-prod.appspot.com/o/spaces%2FxYJmxgUa2SDfD4byrJY1%2Fuploads%2F7UkERiVnfrOoisTKHccv%2FToggle.png?alt=media&amp;token=ab186d19-4aff-421e-b17e-e28334af99fd" alt=""><figcaption></figcaption></figure>

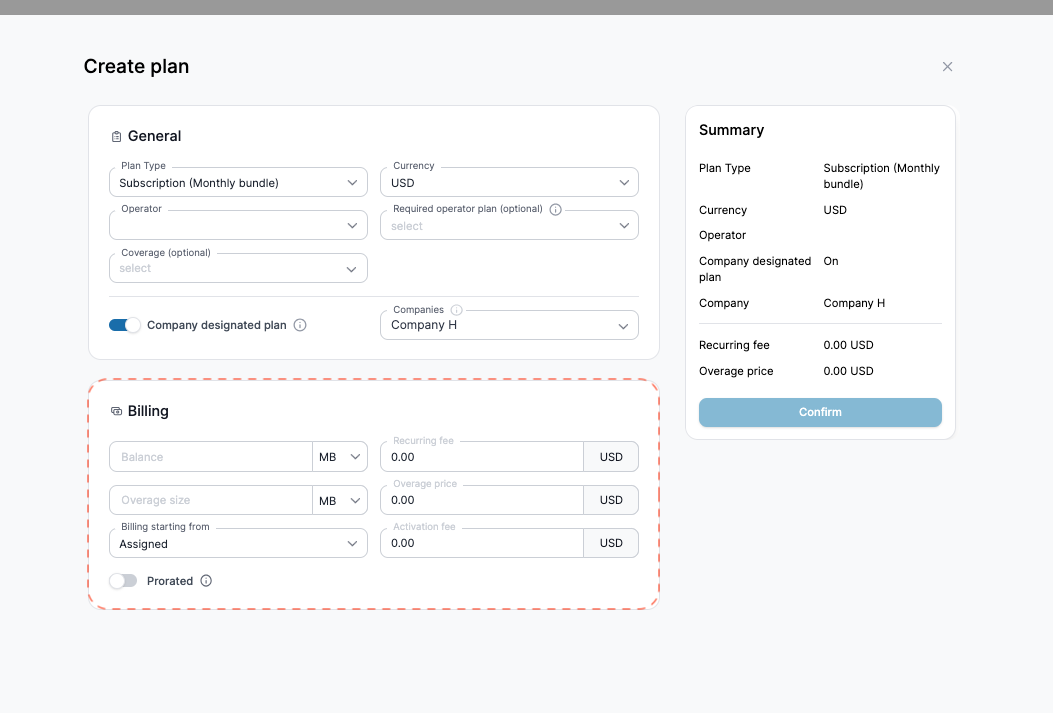
4. Fill in all the required information in the Billing section.
<div data-full-width="true"><figure><img src="https://2408445593-files.gitbook.io/~/files/v0/b/gitbook-x-prod.appspot.com/o/spaces%2FxYJmxgUa2SDfD4byrJY1%2Fuploads%2Fa7nALUVrZfhJg1BhKga6%2FBilling%20details.png?alt=media&amp;token=3f45e302-0984-4391-88d8-289d5aaba54f" alt="" width="563"><figcaption></figcaption></figure></div>

{% hint style="warning" %}
&#x20;**IMPORTANT!**

The price must be at least 1.0 when creating a plan.
{% endhint %}

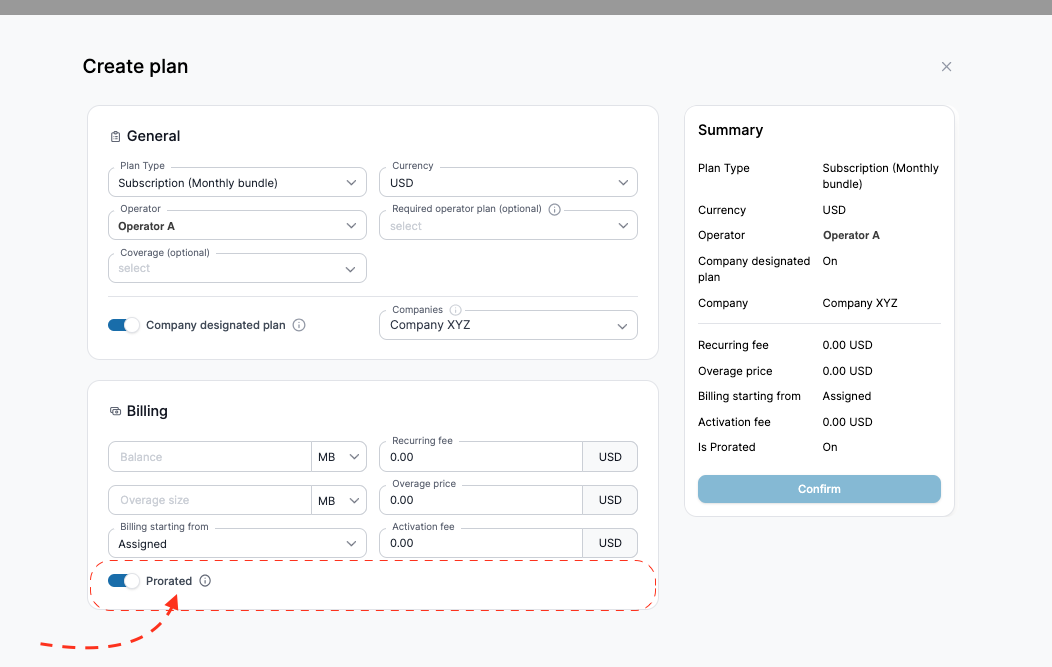
5. If you want the monthly fees and available balance to be prorated at the start and end of the subscription, simply enable the **'Prorated'** toggle.

<div data-full-width="true"><figure><img src="https://2408445593-files.gitbook.io/~/files/v0/b/gitbook-x-prod.appspot.com/o/spaces%2FxYJmxgUa2SDfD4byrJY1%2Fuploads%2FPVBxekFp2HCDAKC608yA%2FProrated%20_toggle.png?alt=media&amp;token=568280a6-8d9c-448c-8082-c9a2cb26cba2" alt="" width="563"><figcaption></figcaption></figure></div>

{% hint style="info" %}
**General plan** – all current and future companies in this organization will have access to it.
{% endhint %}

{% hint style="info" %}
**Company designated** **plan** will be assigned to the selected companies.
{% endhint %}

{% hint style="info" %}
You can find more information about **plan types** here: <https://faq.droam.com/menu/plans>
{% endhint %}

<br>


# 5. Assign the plan to SIM(s)

“Create your product” means that you need to assign a plan or a pool and a company for the SIM(s) that were uploaded as new SIM(s).

To assign a plan (same as assigning in bulk) to SIM(s)&#x20;

### <mark style="background-color:blue;">**Complete the following steps:**</mark>

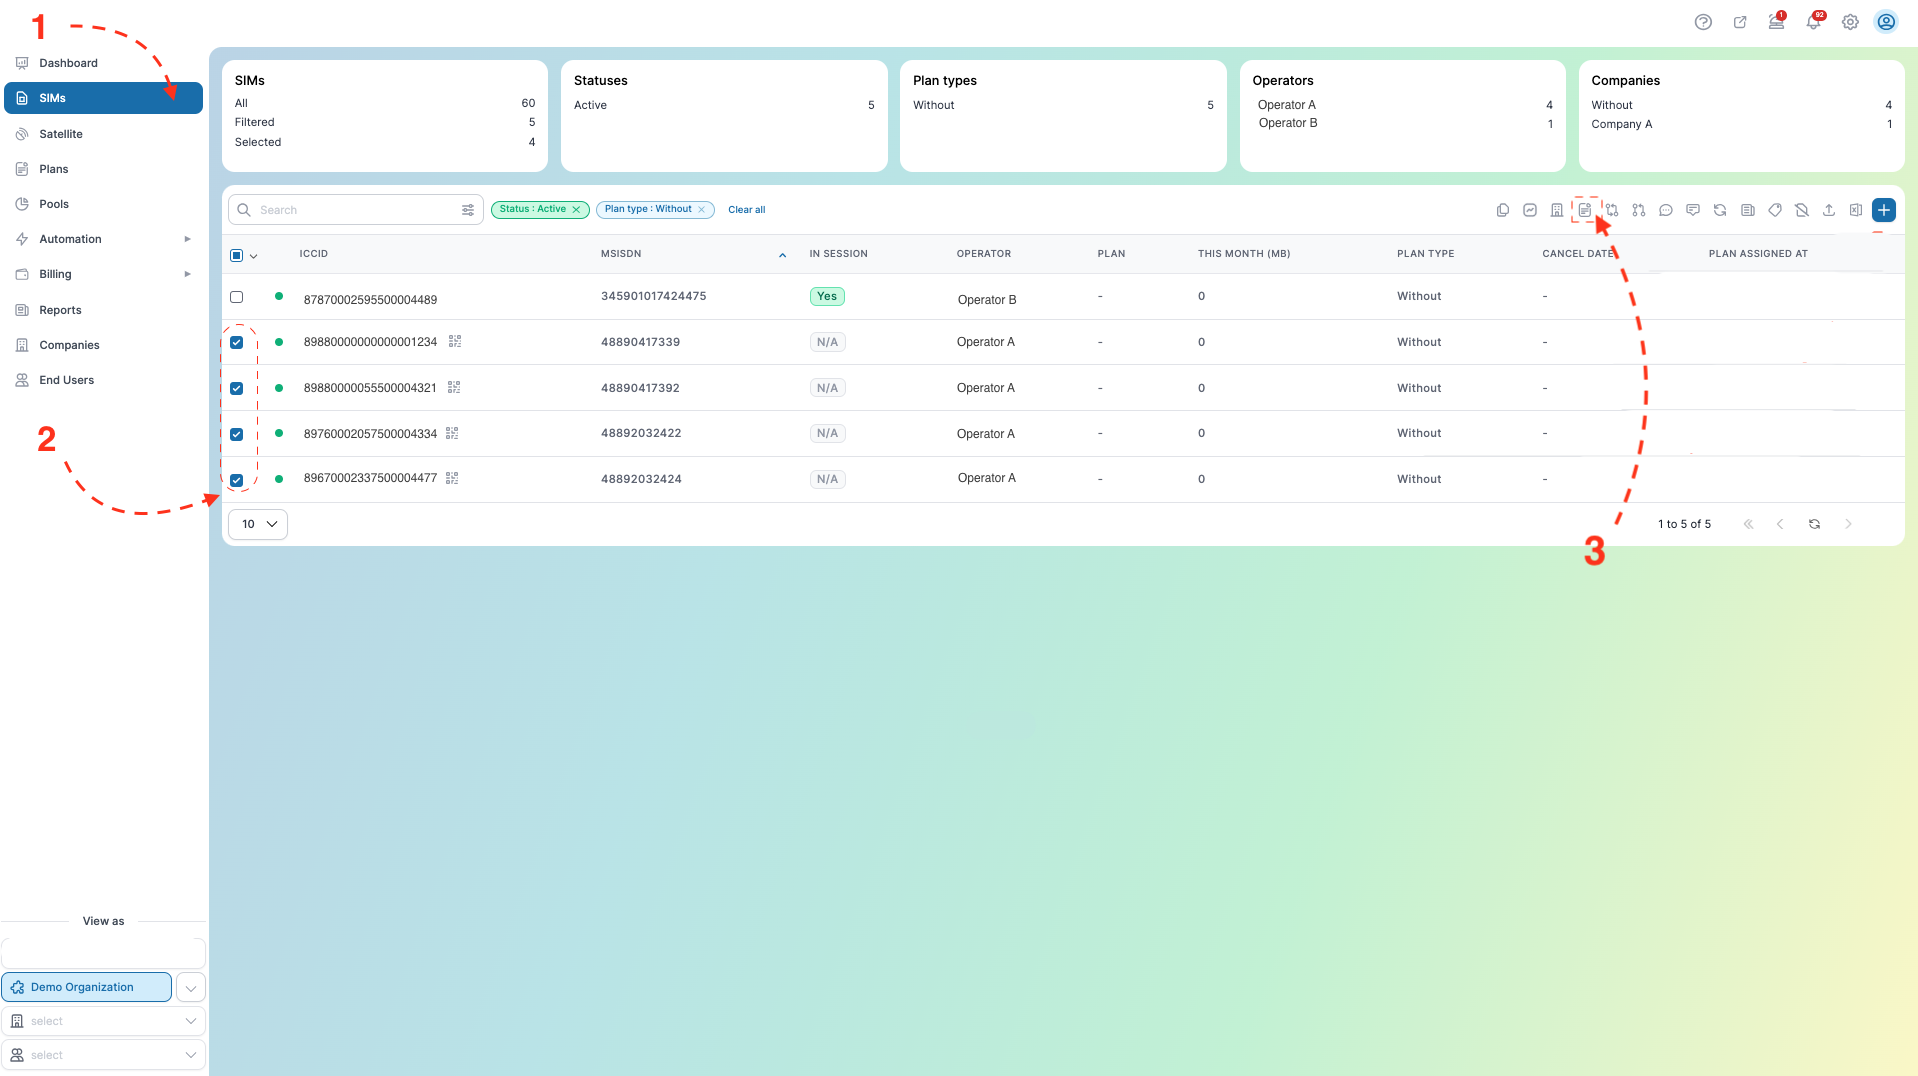
1. Go to the “**SIMs**” on your left side of the navigation menu&#x20;
2. Select the necessary SIM(s).
3. Click the **PLUS** button on the left in the toolbar.

<figure><img src="https://2408445593-files.gitbook.io/~/files/v0/b/gitbook-x-prod.appspot.com/o/spaces%2FxYJmxgUa2SDfD4byrJY1%2Fuploads%2FyS1Hh5MjE4iIrPgEUz0r%2FAssign%20Plan%20to%20SIMs.png?alt=media&amp;token=151ee8cf-c9a9-4d41-adda-dc0a9d089d2f" alt=""><figcaption></figcaption></figure>

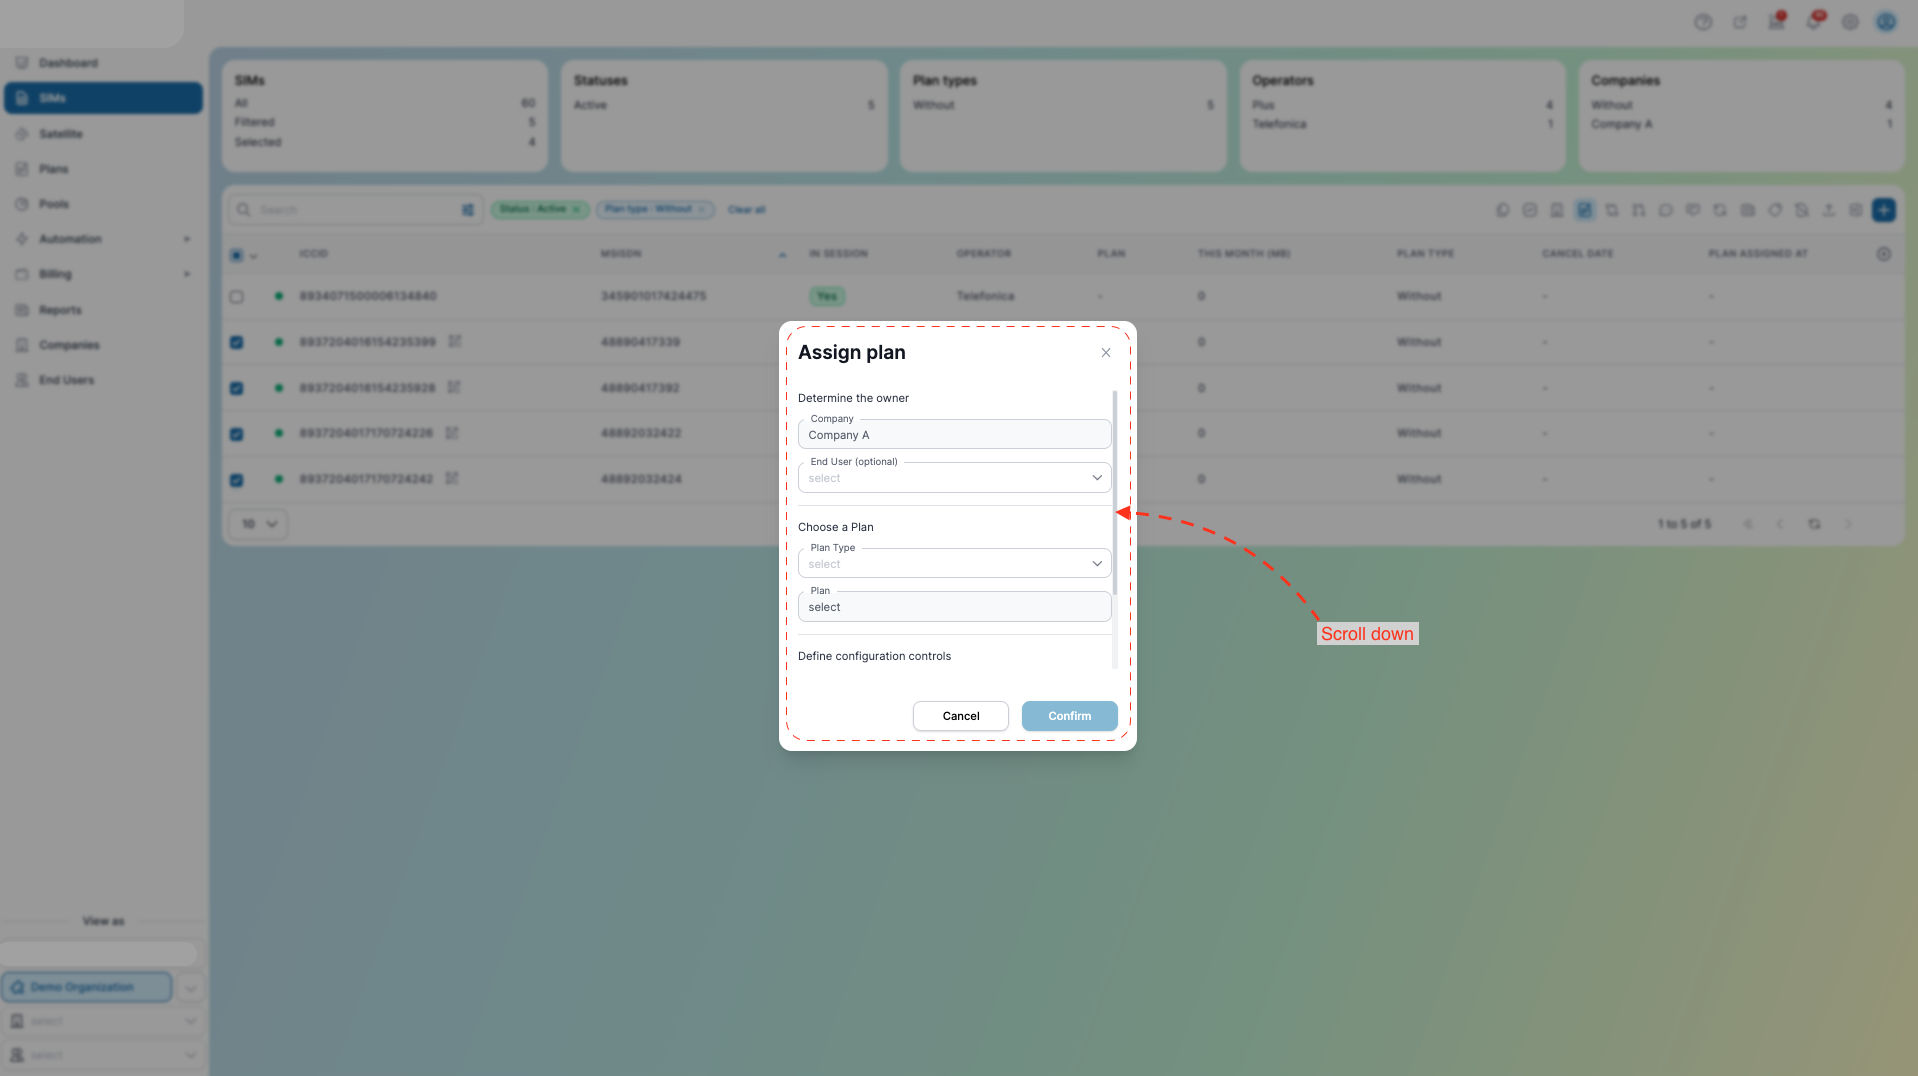
4. The Modal window will open. Select the corresponding Plan Type, Plan, and other corresponding fields

* The company is already indicated in the **Company** field.
* ICCIDs are automatically uploaded to the **SIMs** field.
* Click the **Confirm** button.

<div data-full-width="true"><figure><img src="https://2408445593-files.gitbook.io/~/files/v0/b/gitbook-x-prod.appspot.com/o/spaces%2FxYJmxgUa2SDfD4byrJY1%2Fuploads%2F6itqSPZ2J4uMAJKjnhO8%2FPlan%20Assign.png?alt=media&amp;token=cb41cc89-28f4-4fc1-adeb-98fb97b3fb92" alt="" width="563"><figcaption></figcaption></figure></div>

By completing these steps, you have successfully created a "Product" by associating your SIM(s) with a specific company and plan.<br>


# Optional settings

<table data-view="cards"><thead><tr><th></th><th data-hidden data-card-target data-type="content-ref"></th></tr></thead><tbody><tr><td><ol><li>Account Settings</li></ol></td><td><a href="/onboarding-guide/optional-settings/1.-account-settings">1. Account Settings</a></td></tr><tr><td><ol start="2"><li>User Profile</li></ol></td><td><a href="/onboarding-guide/optional-settings/2.-user-profile">2. User Profile</a></td></tr><tr><td><ol start="3"><li>PSP Inegration</li></ol></td><td><a href="/onboarding-guide/optional-settings/3.-psp-integration">3. PSP Integration</a></td></tr><tr><td><ol start="4"><li>Invoice Software Integration</li></ol></td><td><a href="/onboarding-guide/optional-settings/4.-invoice-integration">4. Invoice Integration</a></td></tr><tr><td><ol start="5"><li>Create Pools</li></ol></td><td><a href="/onboarding-guide/optional-settings/5.-create-pools">5. Create Pools</a></td></tr><tr><td><ol start="6"><li>Invite Staff</li></ol></td><td><a href="/onboarding-guide/optional-settings/6.-invite-staff">6. Invite Staff</a></td></tr><tr><td><ol start="7"><li>Customize Columns</li></ol></td><td><a href="/onboarding-guide/optional-settings/7.-customize-columns">7. Customize Columns</a></td></tr><tr><td><ol start="8"><li>Notifications</li></ol></td><td><a href="/onboarding-guide/optional-settings/8.-notifications">8. Notifications</a></td></tr><tr><td><ol start="9"><li>Communications</li></ol></td><td><a href="/onboarding-guide/optional-settings/9.-communication">9. Communication</a></td></tr></tbody></table>


# 1. Account Settings

For invoices and VAT collection, all this information is required to calculate the correct VAT and ensure everything is reflected in the invoicing file

### <mark style="background-color:blue;">**Complete the following steps:**</mark>

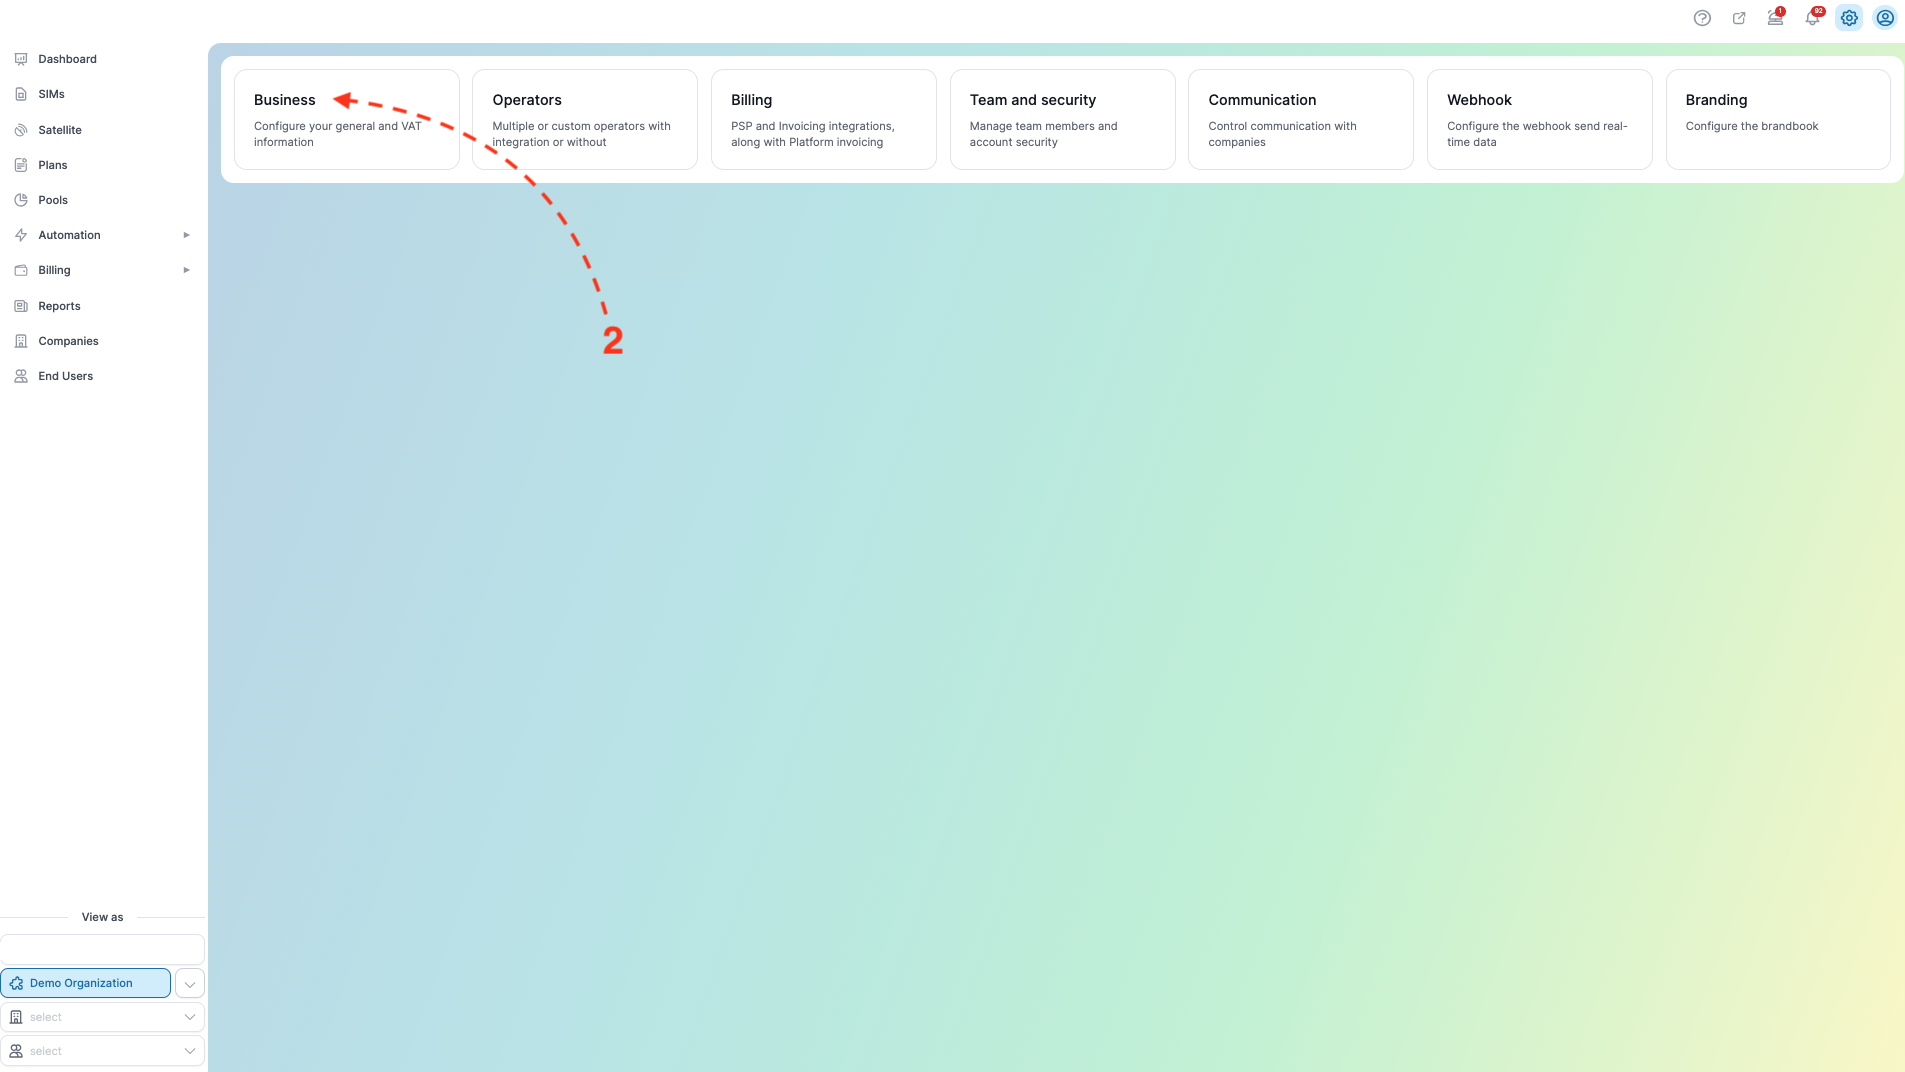
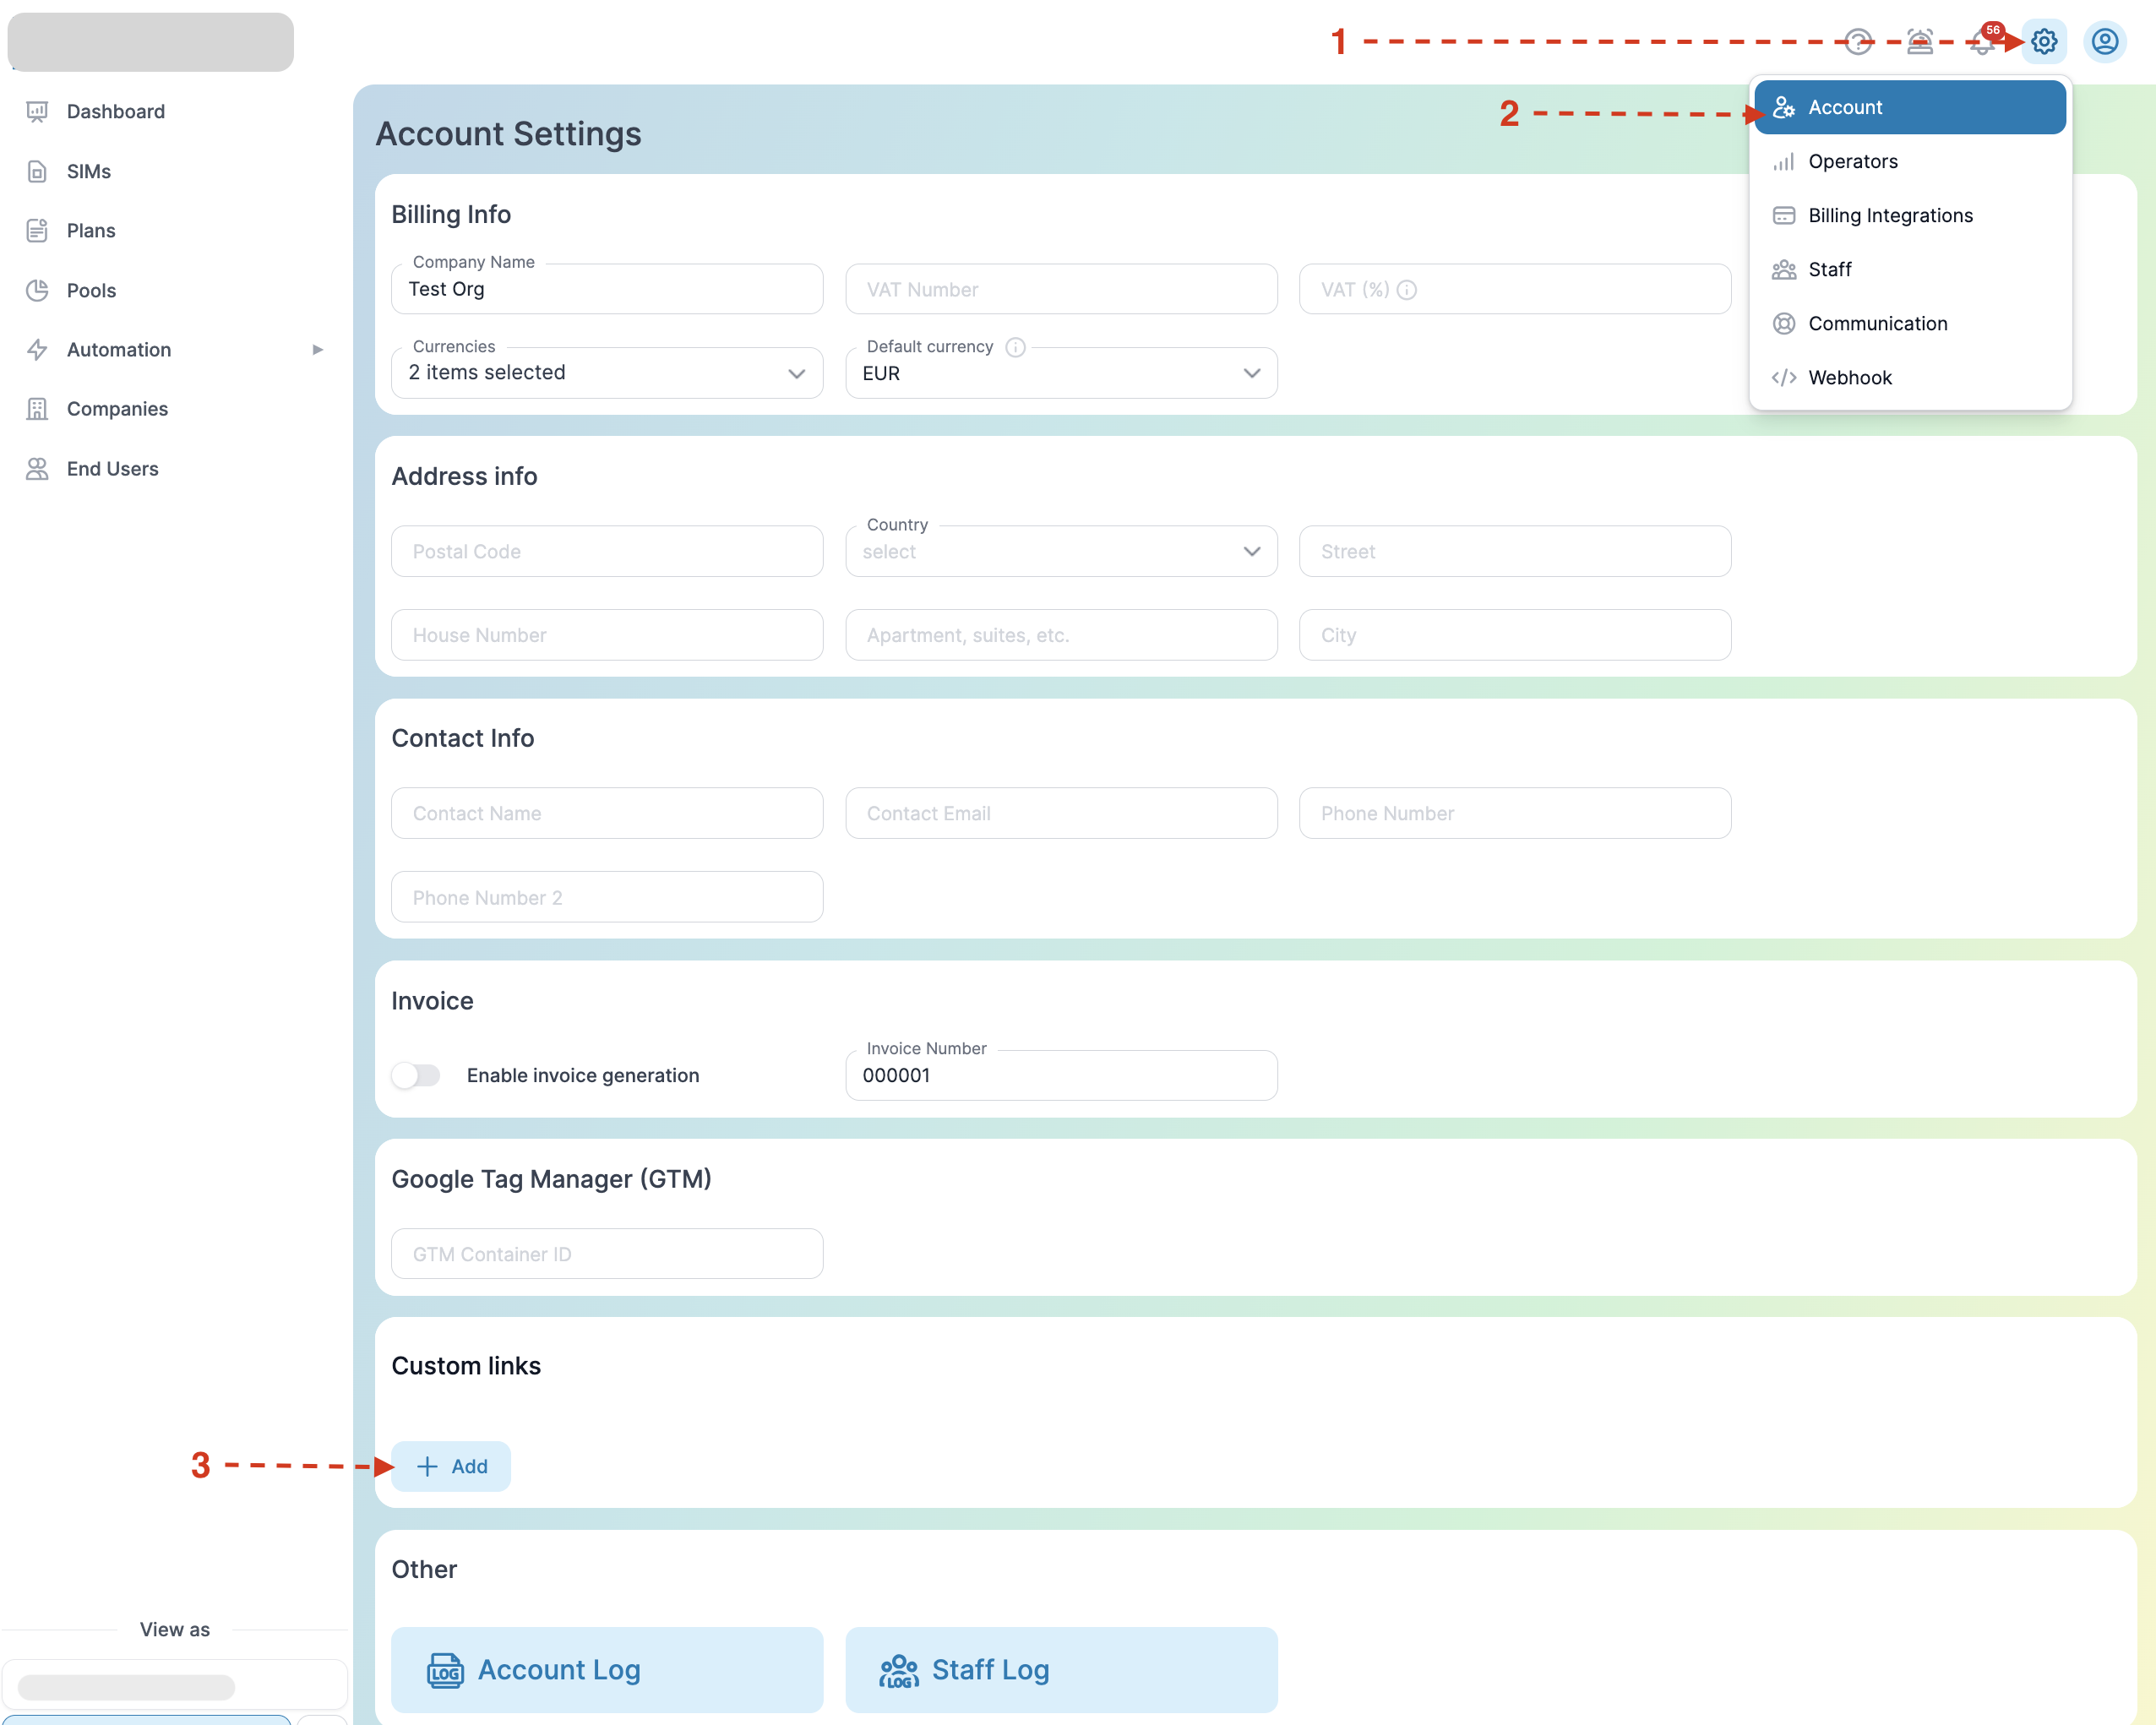
1. Go to Settings&#x20;

<figure><img src="https://2408445593-files.gitbook.io/~/files/v0/b/gitbook-x-prod.appspot.com/o/spaces%2FxYJmxgUa2SDfD4byrJY1%2Fuploads%2FZxRNzK9xW57zH0J37eG1%2Fsettings.png?alt=media&amp;token=95bc6e02-df92-4698-8263-8e1cfa5ef762" alt=""><figcaption></figcaption></figure>

2. Choose “Business”&#x20;

<div data-full-width="true"><figure><img src="https://2408445593-files.gitbook.io/~/files/v0/b/gitbook-x-prod.appspot.com/o/spaces%2FxYJmxgUa2SDfD4byrJY1%2Fuploads%2FLyi8h3GVjhQK1tWHhw6b%2FBusiness.png?alt=media&amp;token=3b11fcf4-242a-4807-a419-70a9d8f32878" alt="" width="563"><figcaption></figcaption></figure></div>

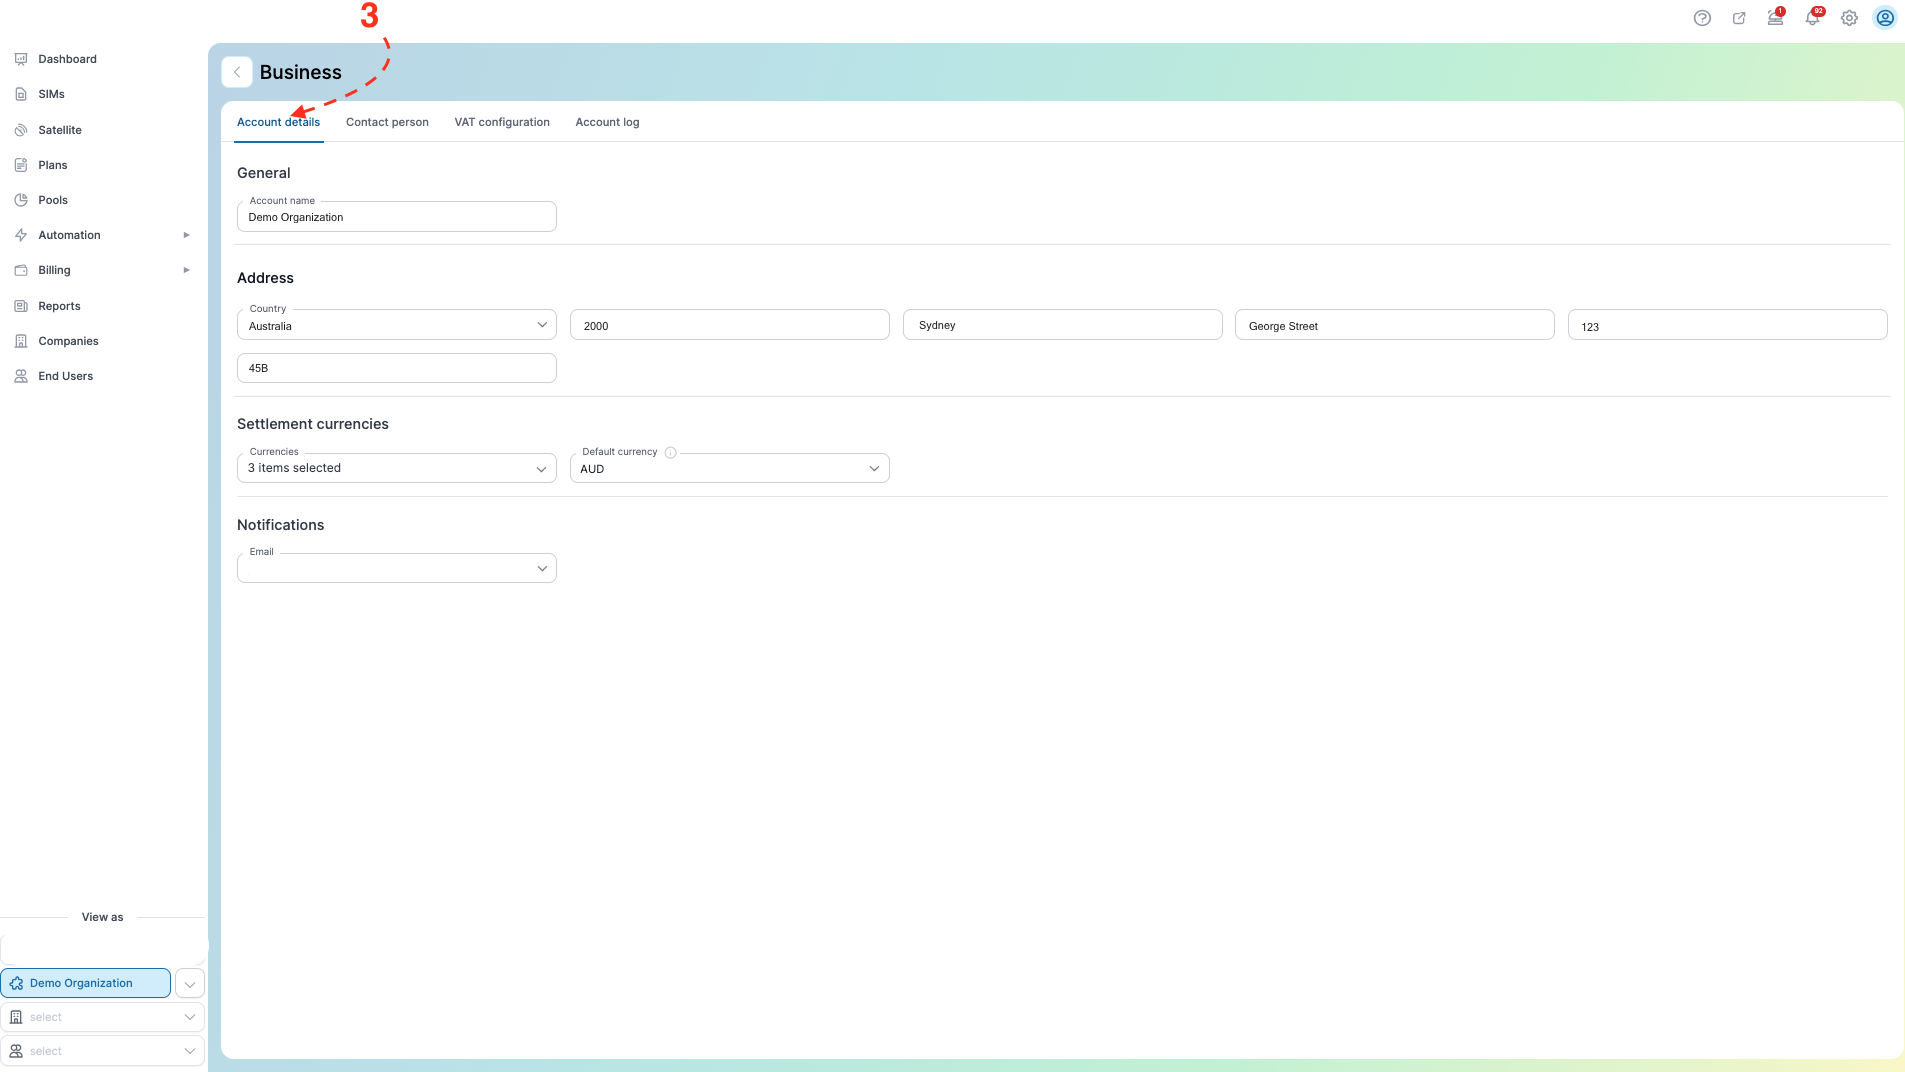
3. Click on the **Account Details tab** – Fill in all the required fields

<div data-full-width="true"><figure><img src="https://2408445593-files.gitbook.io/~/files/v0/b/gitbook-x-prod.appspot.com/o/spaces%2FxYJmxgUa2SDfD4byrJY1%2Fuploads%2FRlFG83wQpDkaPlPxyHNa%2FACC%20Det.png?alt=media&amp;token=5110b793-d675-4e19-8df8-93e0fbf220f6" alt="" width="563"><figcaption></figcaption></figure></div>

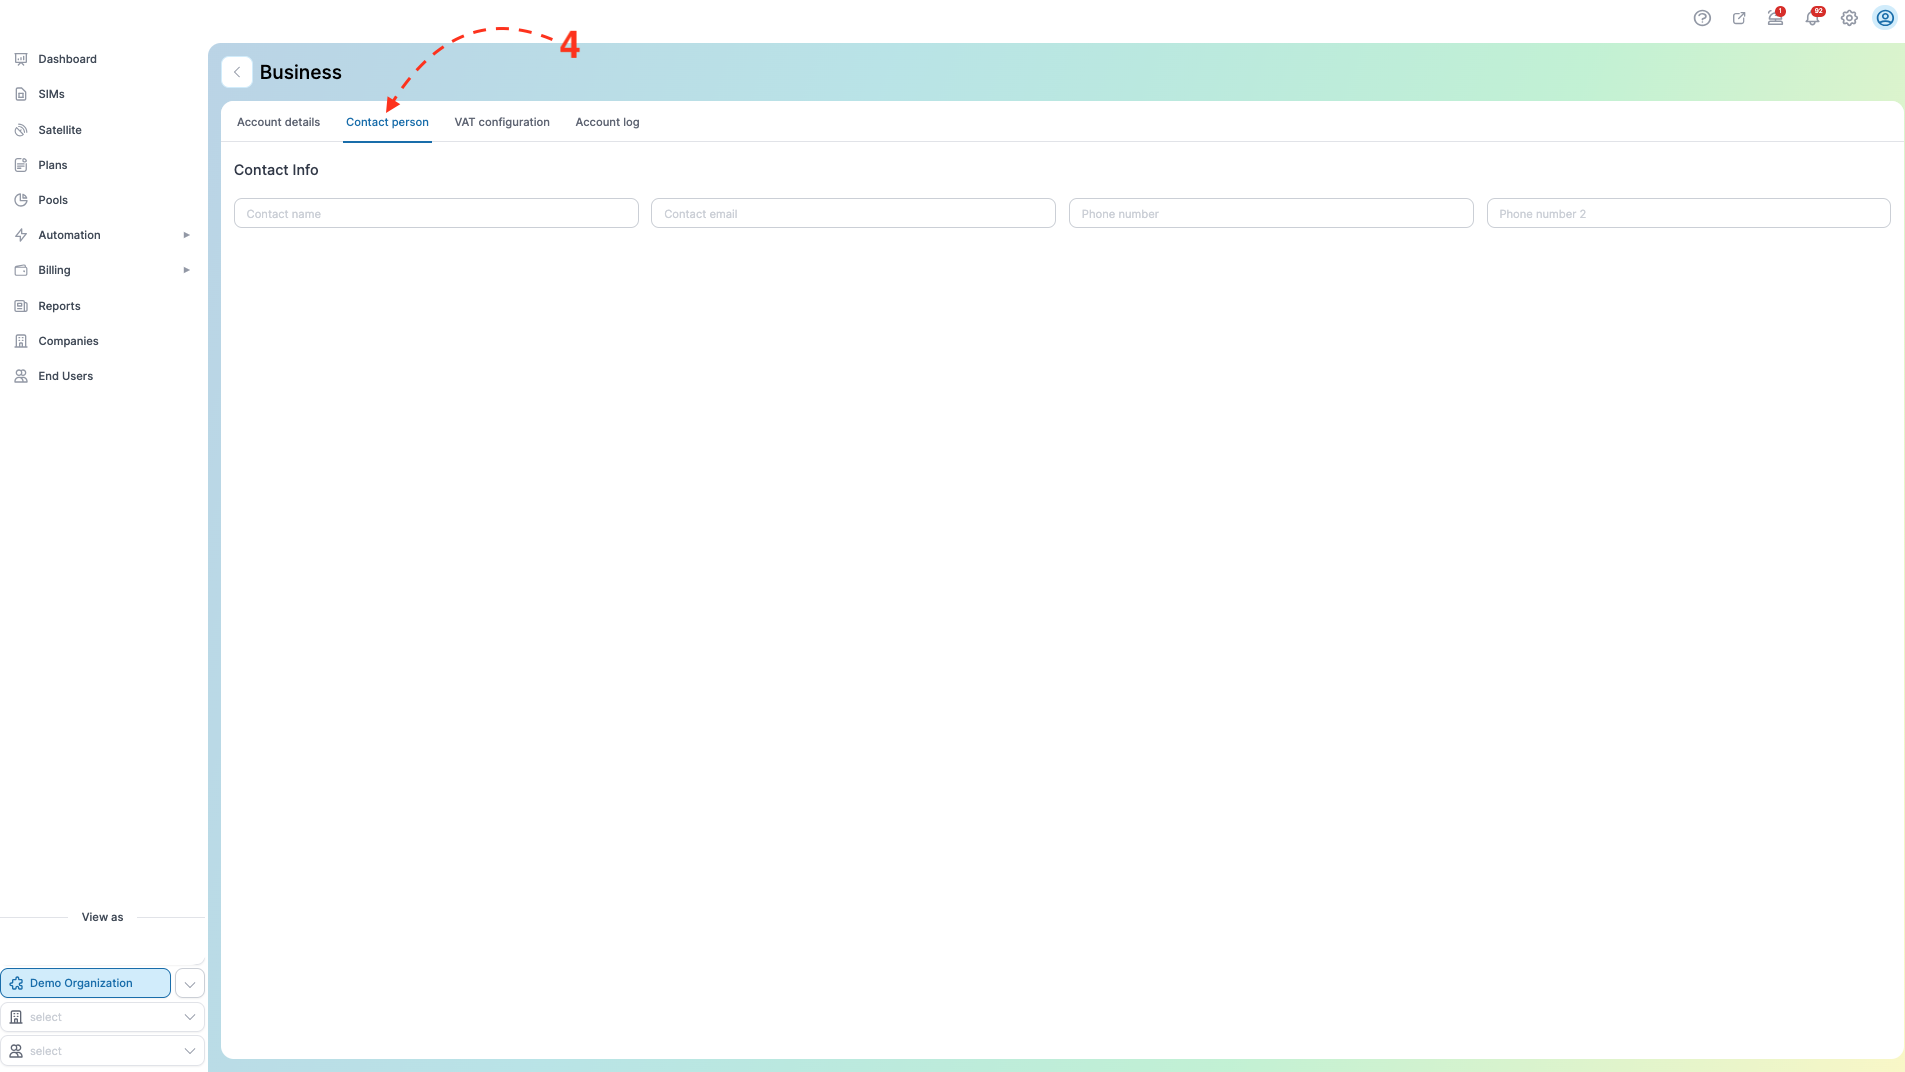
4. Click on the **Contact Person tab** – Provide the relevant contact information.
<div data-full-width="true"><figure><img src="https://2408445593-files.gitbook.io/~/files/v0/b/gitbook-x-prod.appspot.com/o/spaces%2FxYJmxgUa2SDfD4byrJY1%2Fuploads%2FUR58D4dbfalPS0pT2AIc%2FContact%20details.png?alt=media&amp;token=0f29ad70-d138-4f34-b943-c6f4844628ab" alt="" width="563"><figcaption></figcaption></figure></div>

5. Click on the **VAT Configuration tab** – If you would like VAT to be applied to the account, please activate the toggle.
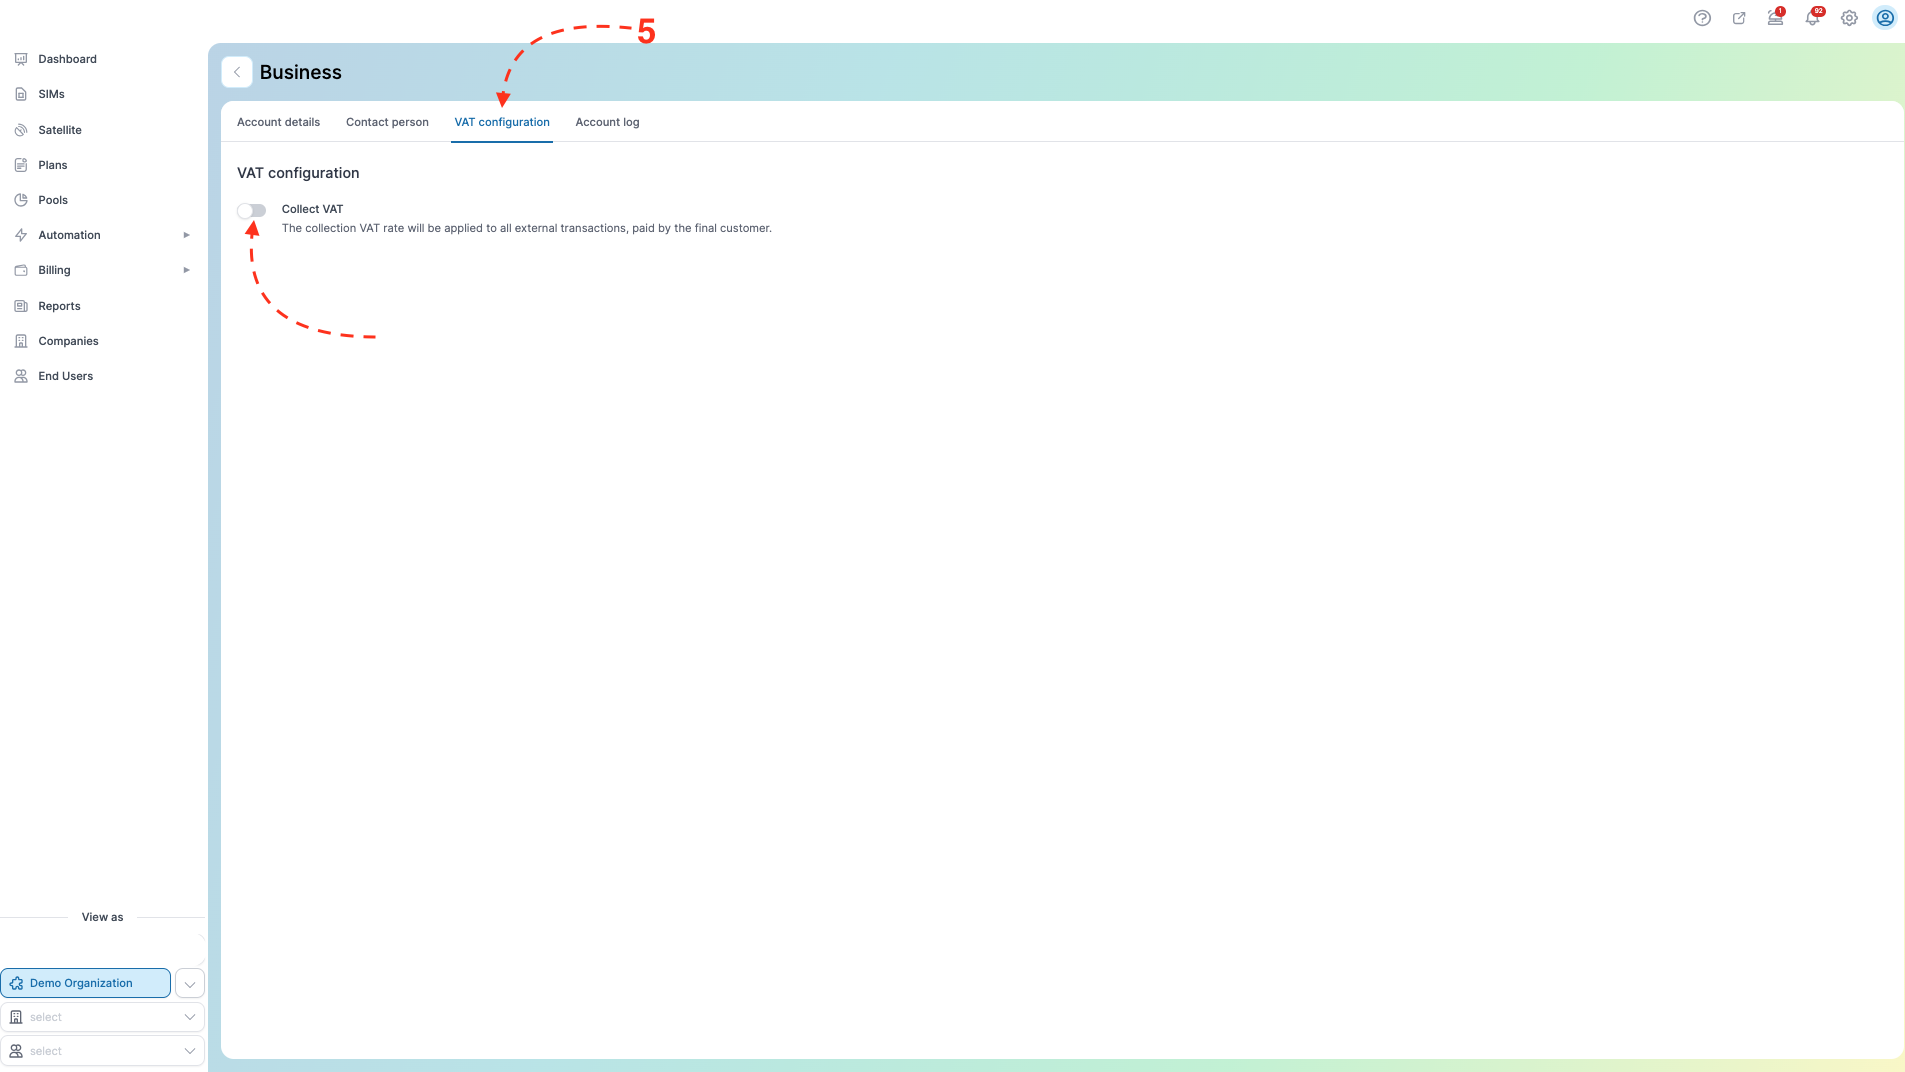
<div data-full-width="true"><figure><img src="https://2408445593-files.gitbook.io/~/files/v0/b/gitbook-x-prod.appspot.com/o/spaces%2FxYJmxgUa2SDfD4byrJY1%2Fuploads%2FSVBKfMuqjmO59D0TMIBE%2FVAT.png?alt=media&amp;token=327a3ea3-ea10-4c47-985d-a14c9c604798" alt="" width="563"><figcaption></figcaption></figure></div>

* Enter the VAT number and percentage, then click Save
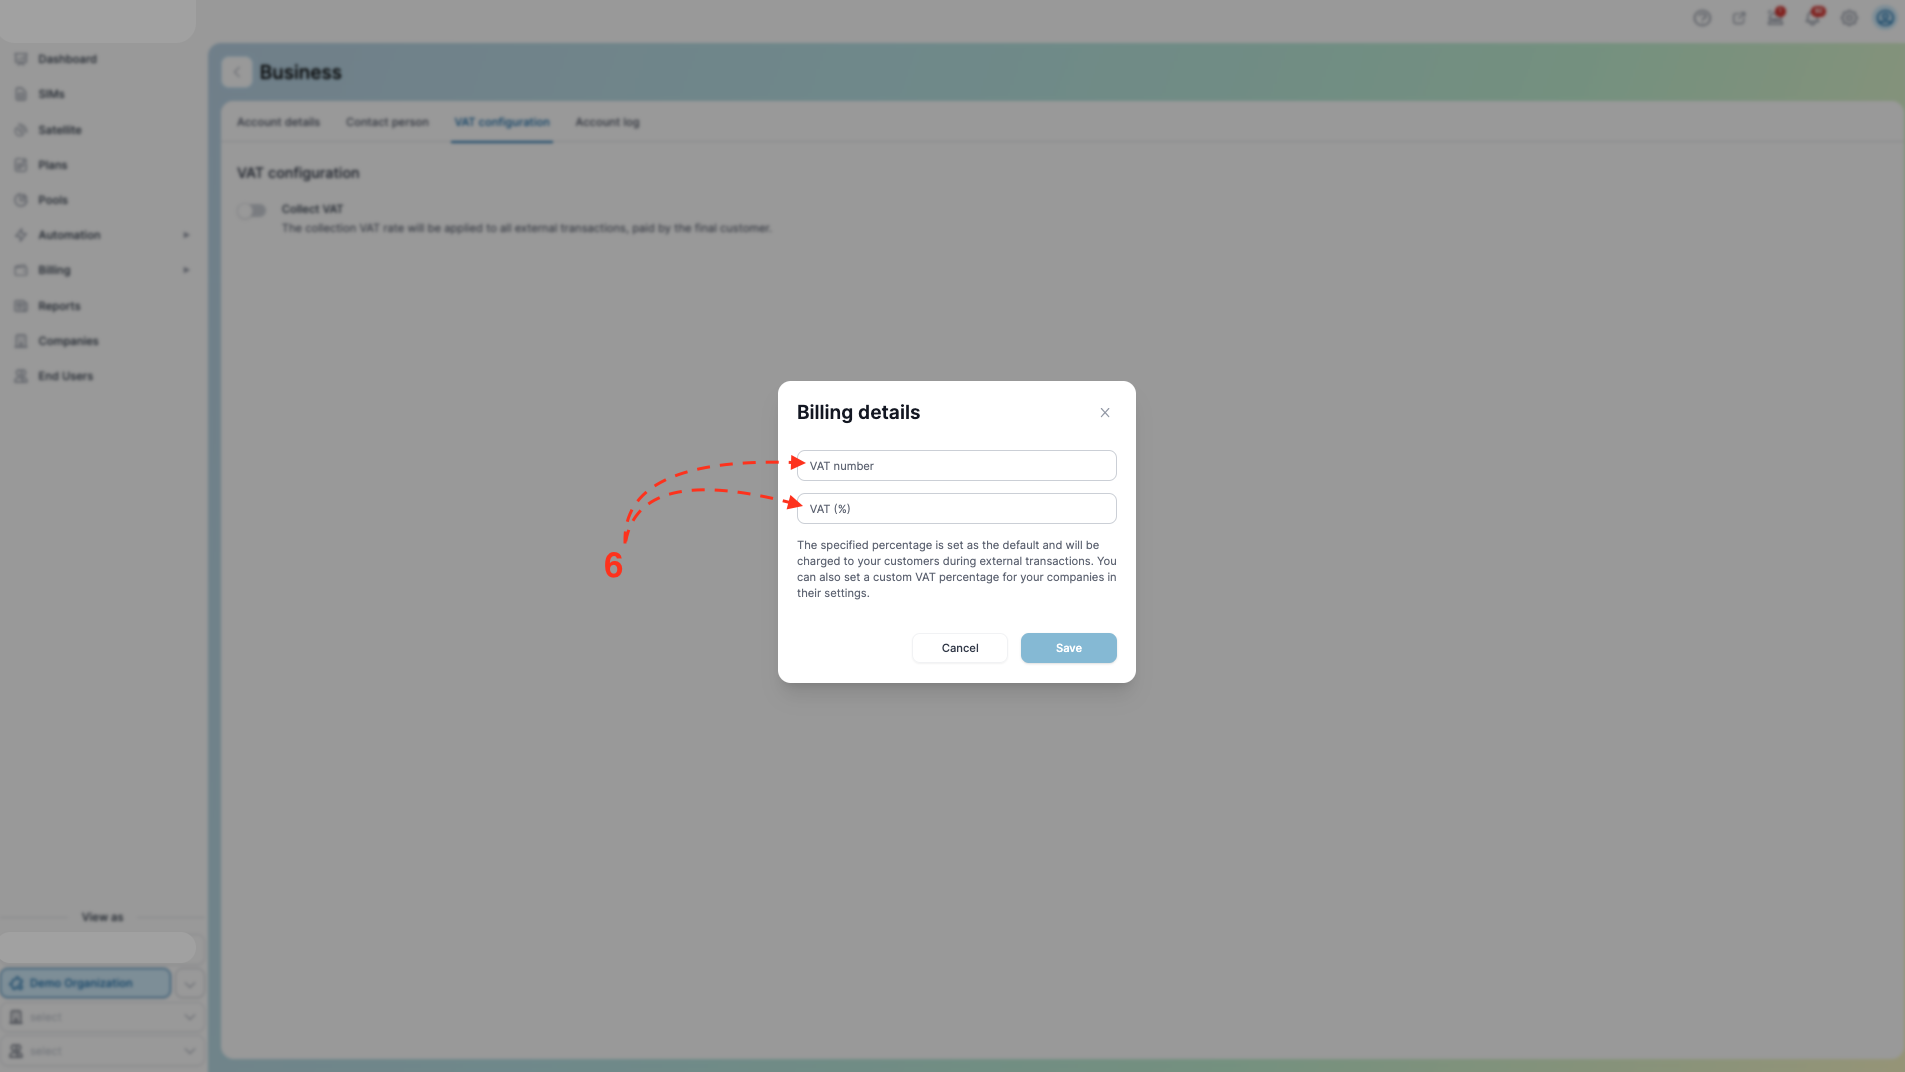
<div data-full-width="true"><figure><img src="https://2408445593-files.gitbook.io/~/files/v0/b/gitbook-x-prod.appspot.com/o/spaces%2FxYJmxgUa2SDfD4byrJY1%2Fuploads%2FYDAvxLwq0rjVviIBQcY9%2FVAT%20number%3A%25.png?alt=media&amp;token=e11568b4-a747-48c3-a9b2-eb41ac0fcd5a" alt="" width="563"><figcaption></figcaption></figure></div>


# 2. User Profile

For the security of the account

### <mark style="background-color:blue;">**Complete the following steps:**</mark>

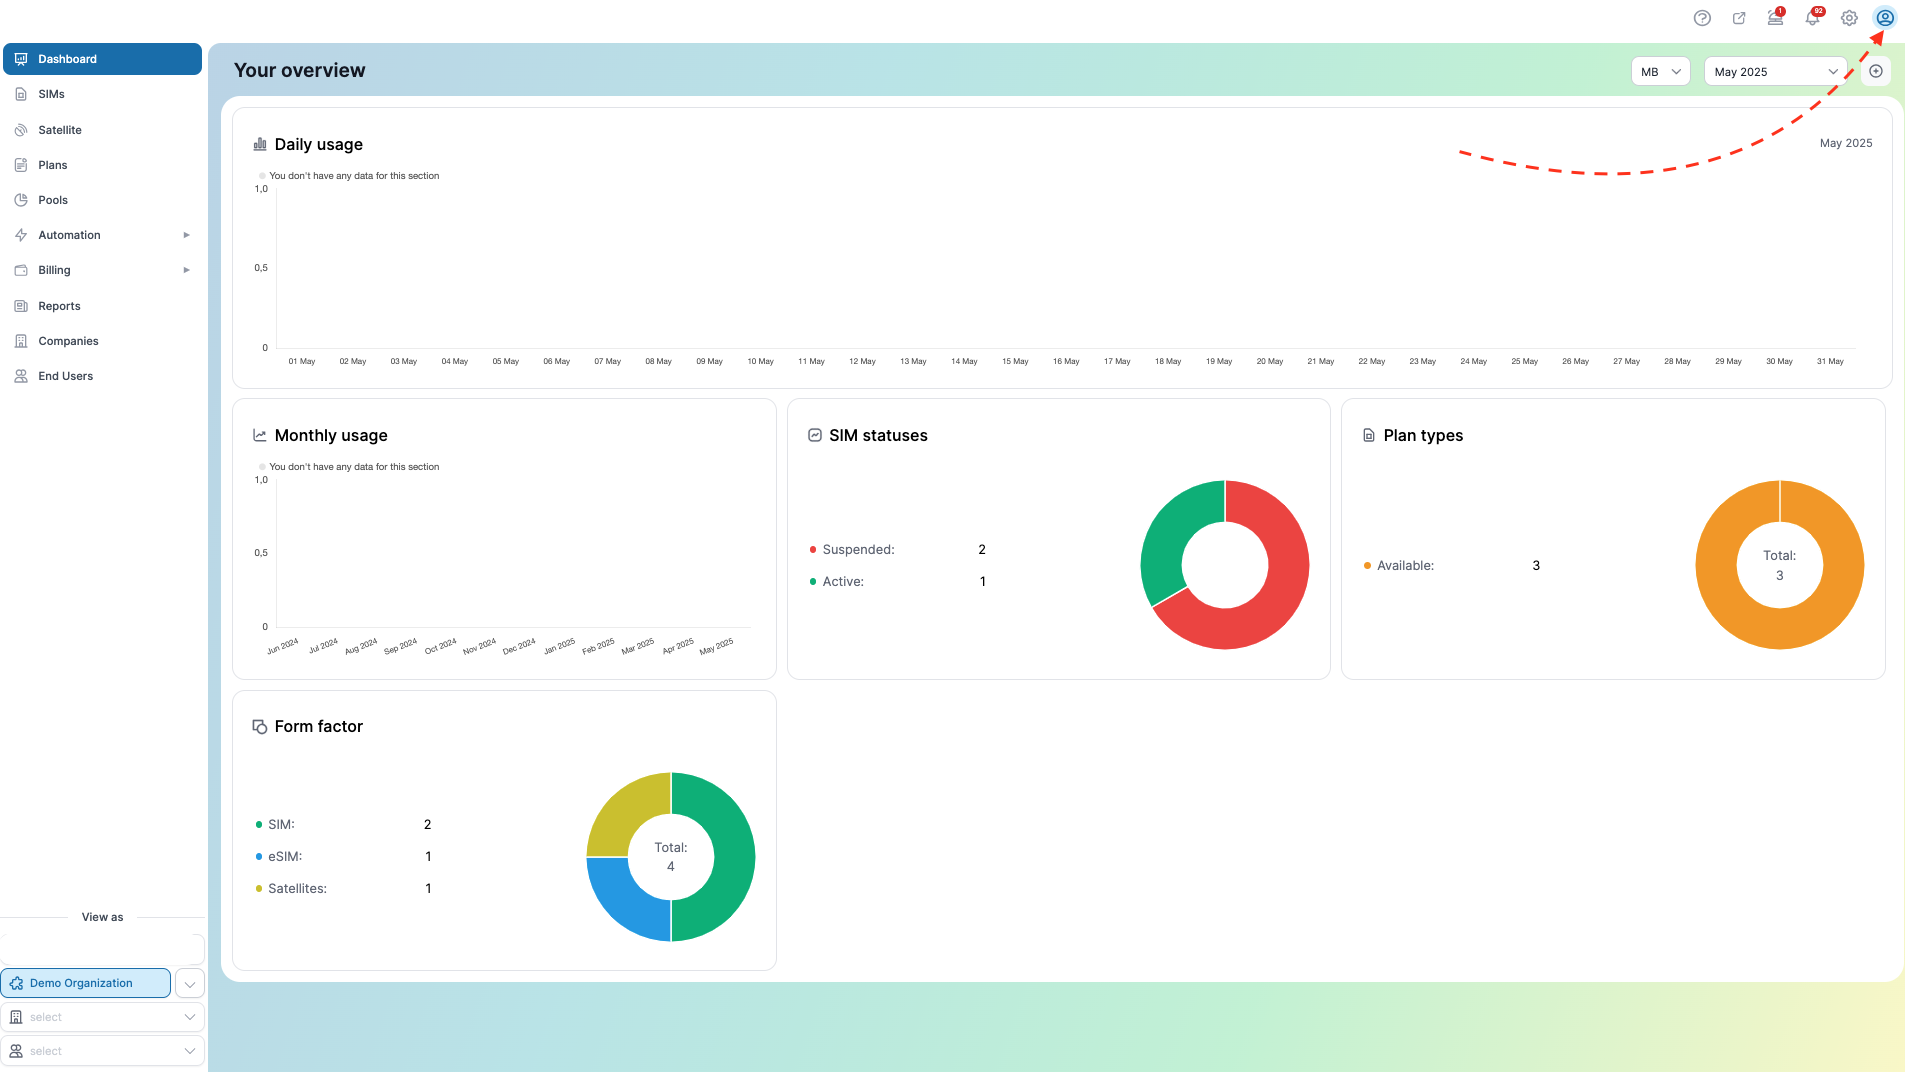
1. Go to select the user profile icon.

<div data-full-width="true"><figure><img src="https://2408445593-files.gitbook.io/~/files/v0/b/gitbook-x-prod.appspot.com/o/spaces%2FxYJmxgUa2SDfD4byrJY1%2Fuploads%2FwYci9Zqw2IRHrLolBDRW%2FYour%20Acc.png?alt=media&amp;token=9ae9ee74-0dbf-44cb-84ee-51f734d4f1bf" alt="" width="563"><figcaption></figcaption></figure></div>

2. Fill in your personal info, multi-factor authentication, and time zone.
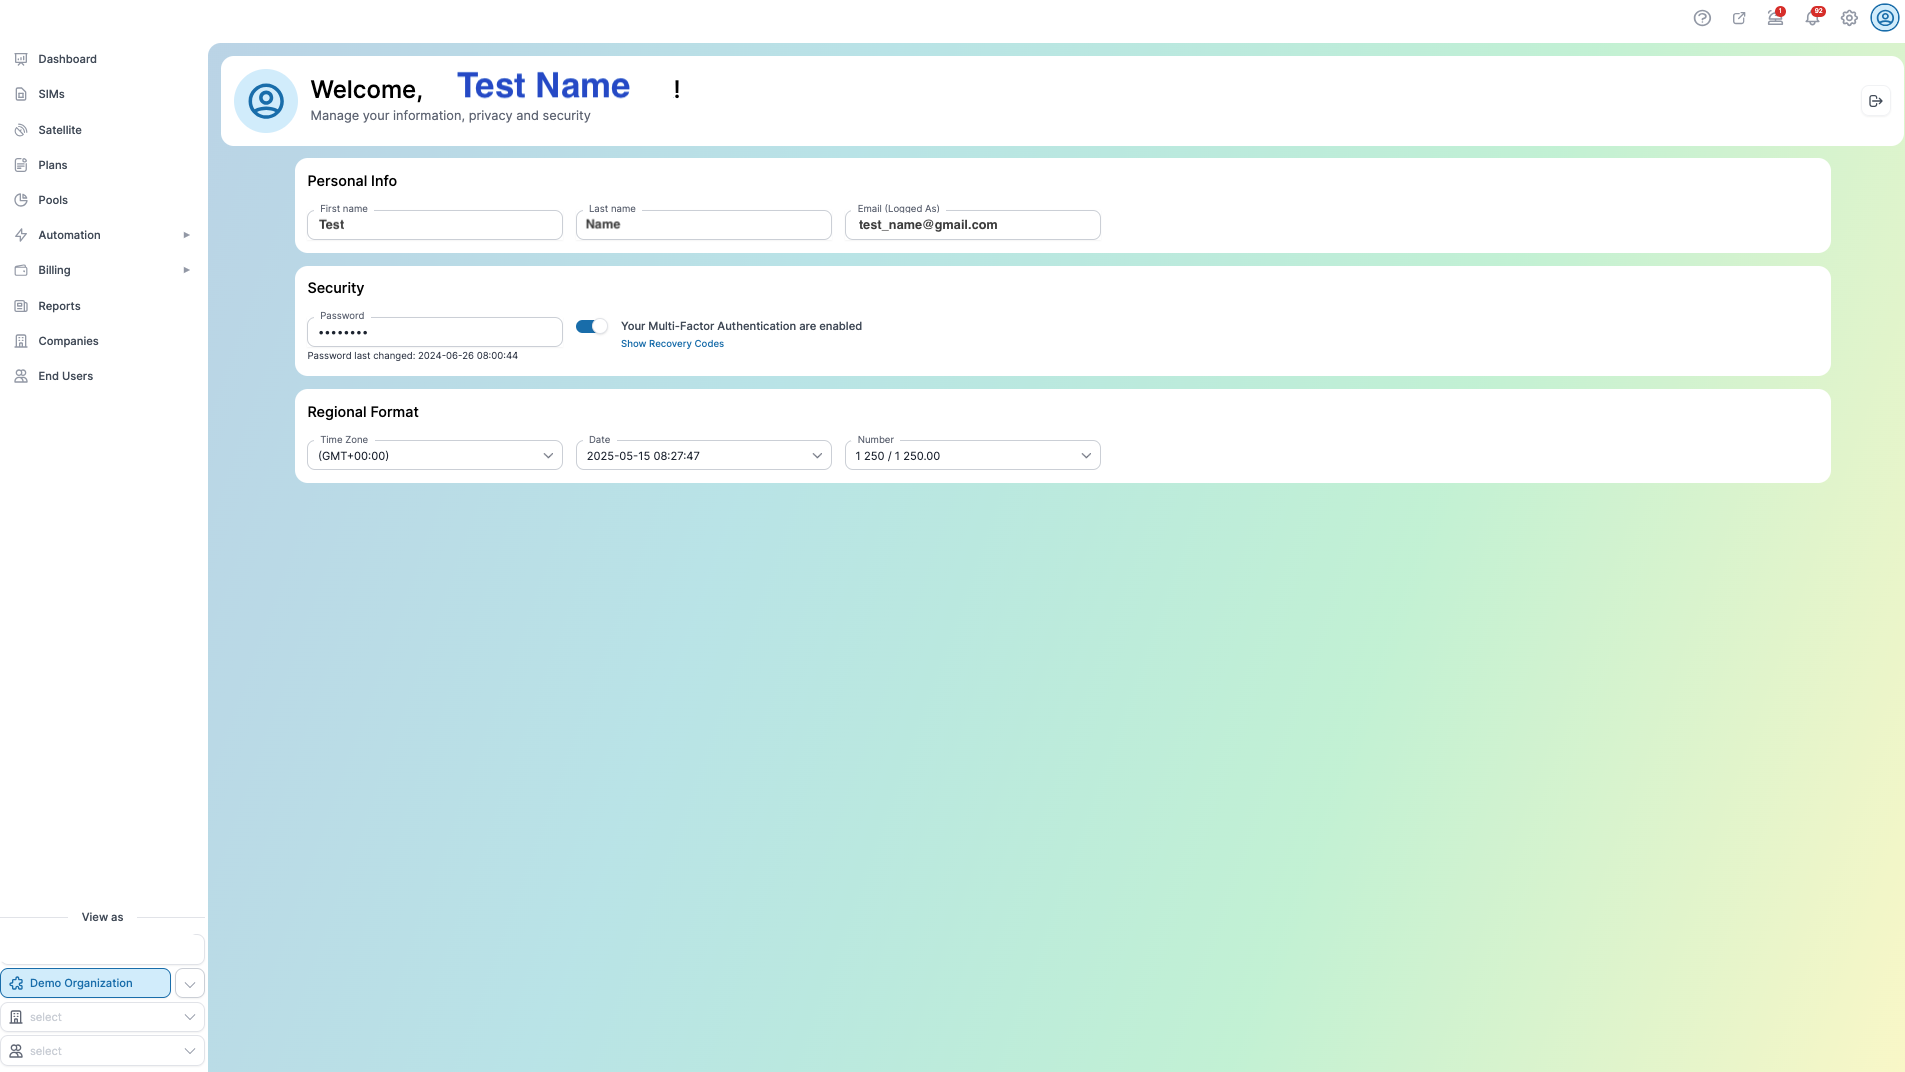
<div data-full-width="true"><figure><img src="https://2408445593-files.gitbook.io/~/files/v0/b/gitbook-x-prod.appspot.com/o/spaces%2FxYJmxgUa2SDfD4byrJY1%2Fuploads%2FWJ39Boe9SgjwlIC2dI9H%2FWelcome.png?alt=media&amp;token=9fa29f81-fb4a-4f34-bac4-9b721aa776bd" alt="" width="563"><figcaption></figcaption></figure></div>

***

### <mark style="background-color:blue;">If</mark> <mark style="background-color:blue;"></mark><mark style="background-color:blue;">**you want to change your password:**</mark>

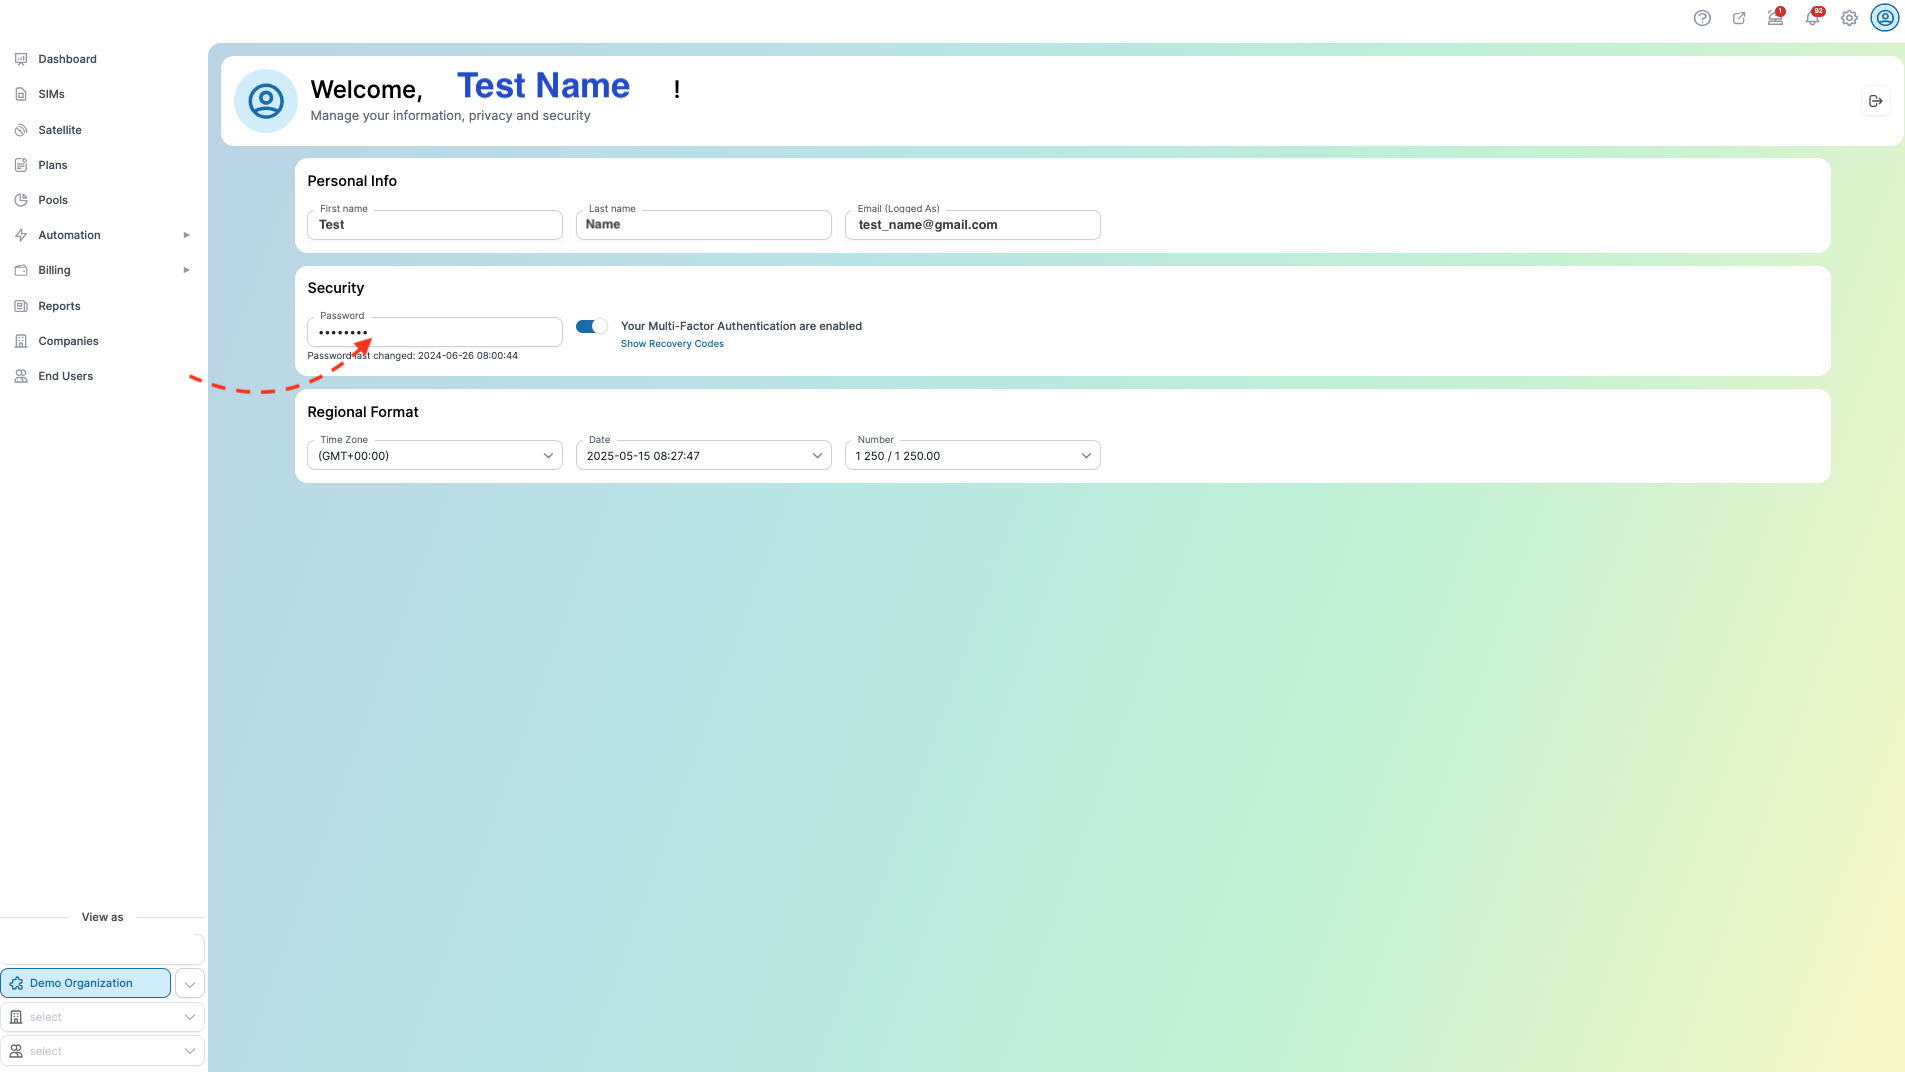
1. Click on the password field.

<div data-full-width="true"><figure><img src="https://2408445593-files.gitbook.io/~/files/v0/b/gitbook-x-prod.appspot.com/o/spaces%2FxYJmxgUa2SDfD4byrJY1%2Fuploads%2FNJxr6dNTsOEl5gl3hsE9%2FWelcome%20PSS.png?alt=media&amp;token=a9d1c8cd-3181-4159-aef9-337169d1924b" alt="" width="563"><figcaption></figcaption></figure></div>

2. A wizard will appear where you can update your password.
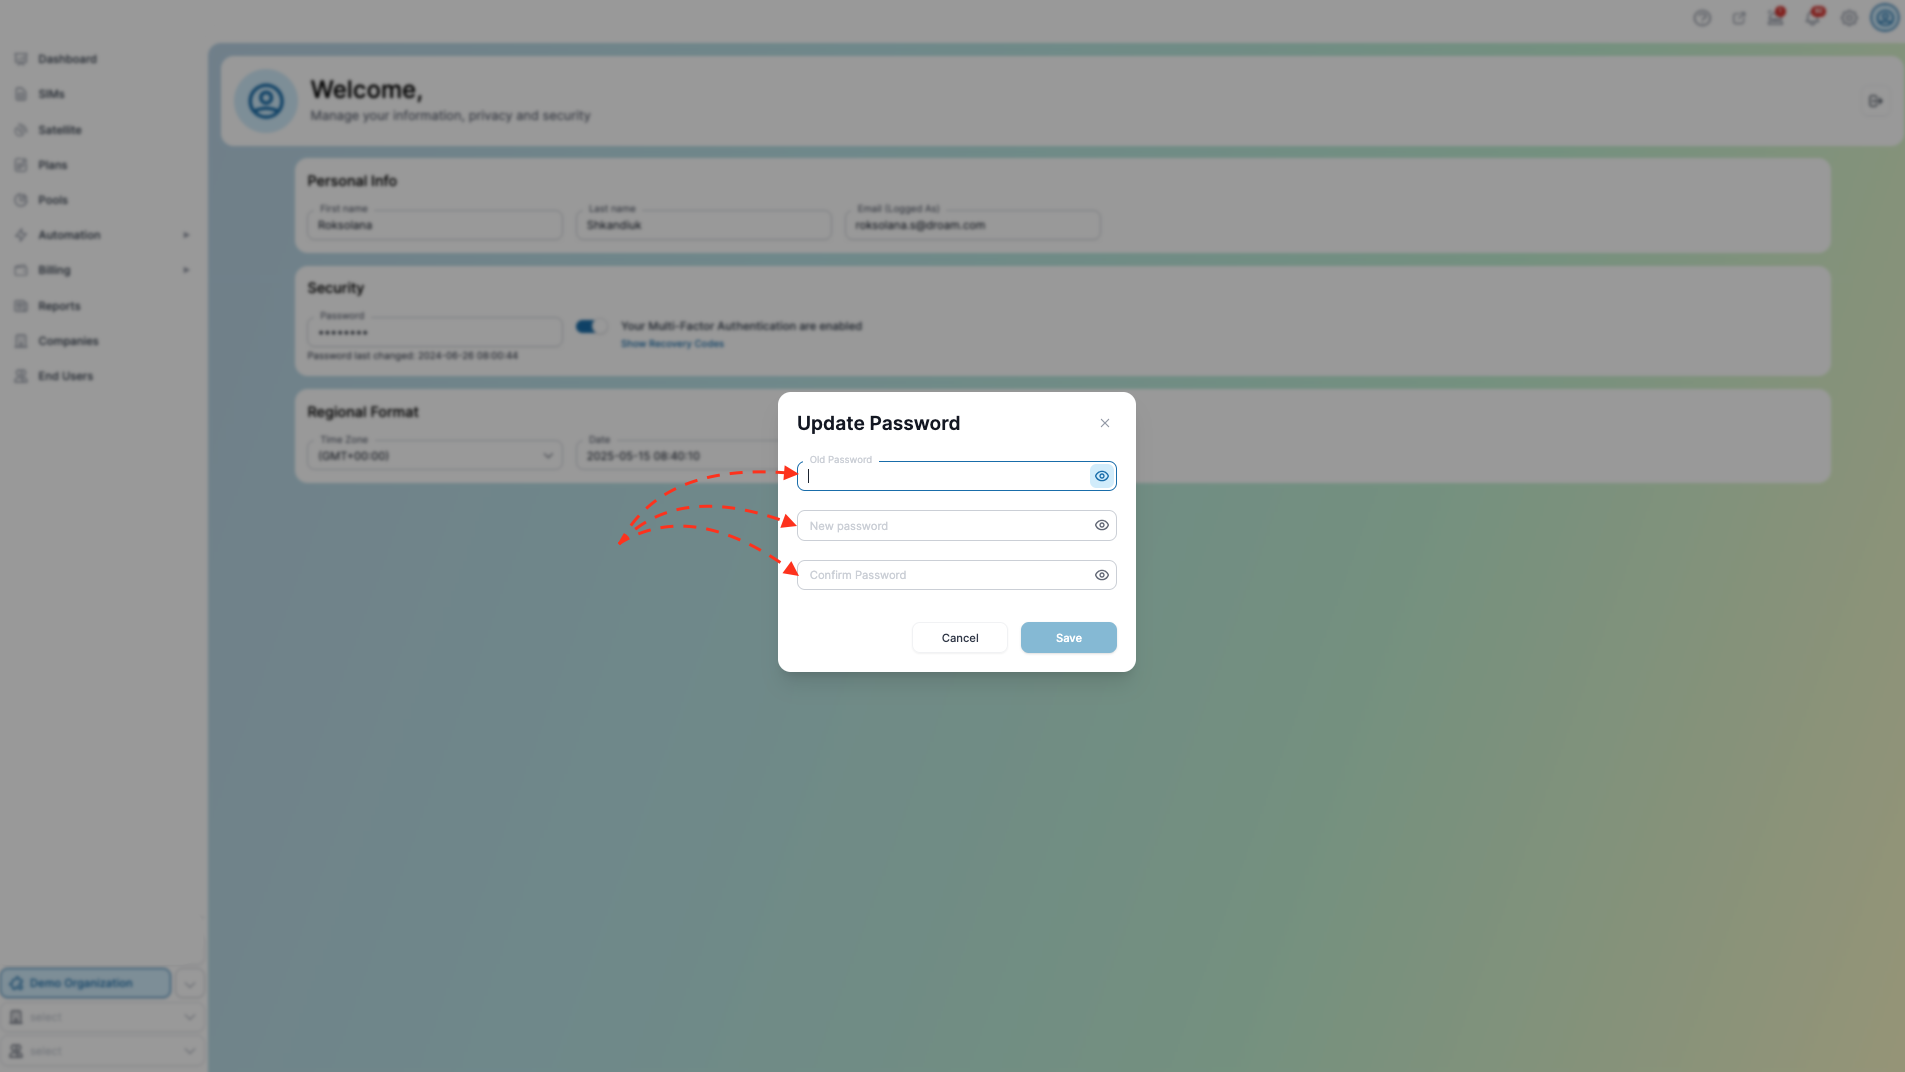
<div data-full-width="true"><figure><img src="https://2408445593-files.gitbook.io/~/files/v0/b/gitbook-x-prod.appspot.com/o/spaces%2FxYJmxgUa2SDfD4byrJY1%2Fuploads%2FOfc8ZPJCbdtktQBJUqjV%2FModal%20window.png?alt=media&amp;token=ebc63019-151d-4182-baf1-f586b8e84ef1" alt="" width="563"><figcaption></figcaption></figure></div>

3. Follow the instructions.


# 3. PSP Integration

PSP - (Payment Service Provider) - This integration handles payment processing for the following actions: 1) Refilling your account;  2) Purchasing an eSIM from the eStore;  3) Refilling your wallet.

<mark style="background-color:blue;">**Complete the following steps:**</mark>

1. Go to Settings&#x20;

<div data-full-width="true"><figure><img src="https://2408445593-files.gitbook.io/~/files/v0/b/gitbook-x-prod.appspot.com/o/spaces%2FxYJmxgUa2SDfD4byrJY1%2Fuploads%2FZxRNzK9xW57zH0J37eG1%2Fsettings.png?alt=media&amp;token=95bc6e02-df92-4698-8263-8e1cfa5ef762" alt="" width="563"><figcaption></figcaption></figure></div>

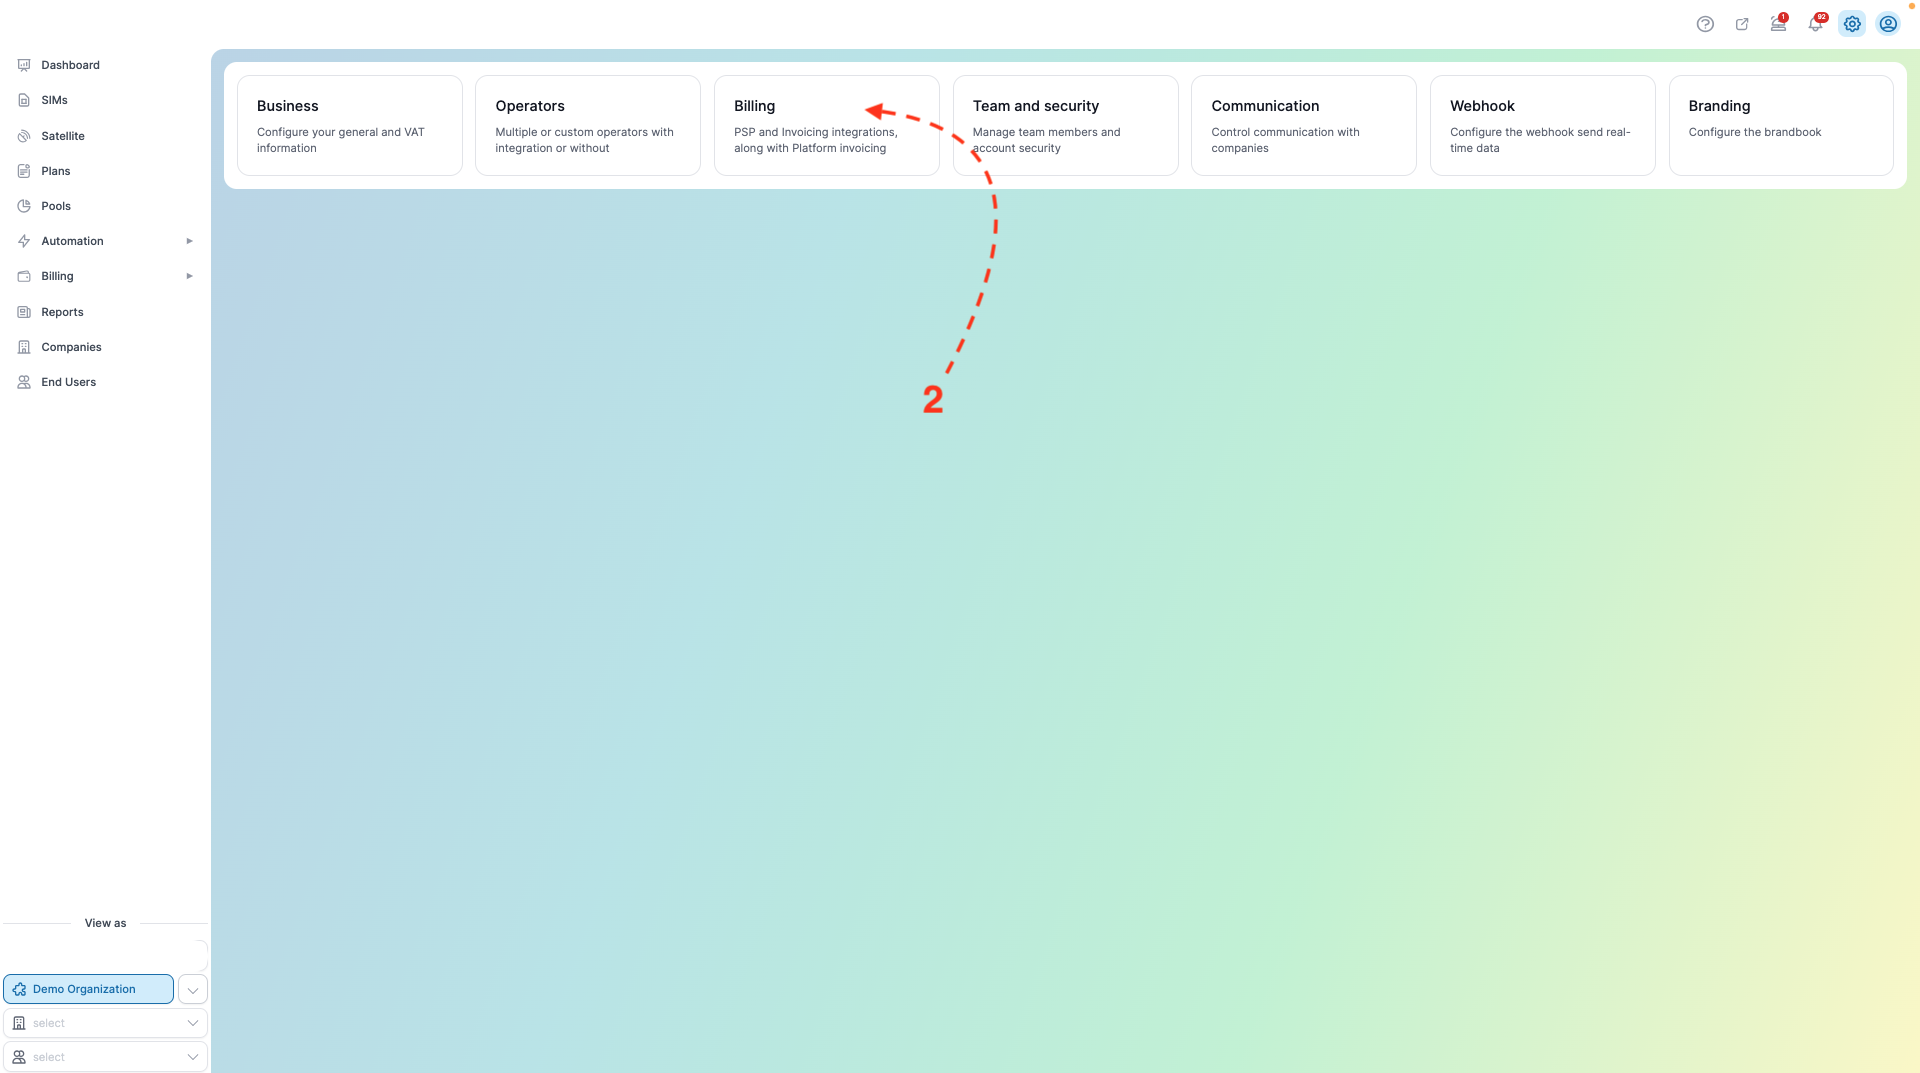
2. Choose “Billing”&#x20;

<div data-full-width="true"><figure><img src="https://2408445593-files.gitbook.io/~/files/v0/b/gitbook-x-prod.appspot.com/o/spaces%2FxYJmxgUa2SDfD4byrJY1%2Fuploads%2FKSxvHIzufG4xy7Wdfx4p%2FBilling.png?alt=media&amp;token=ca598ef4-b825-481e-8860-fe335a897722" alt="" width="563"><figcaption></figcaption></figure></div>

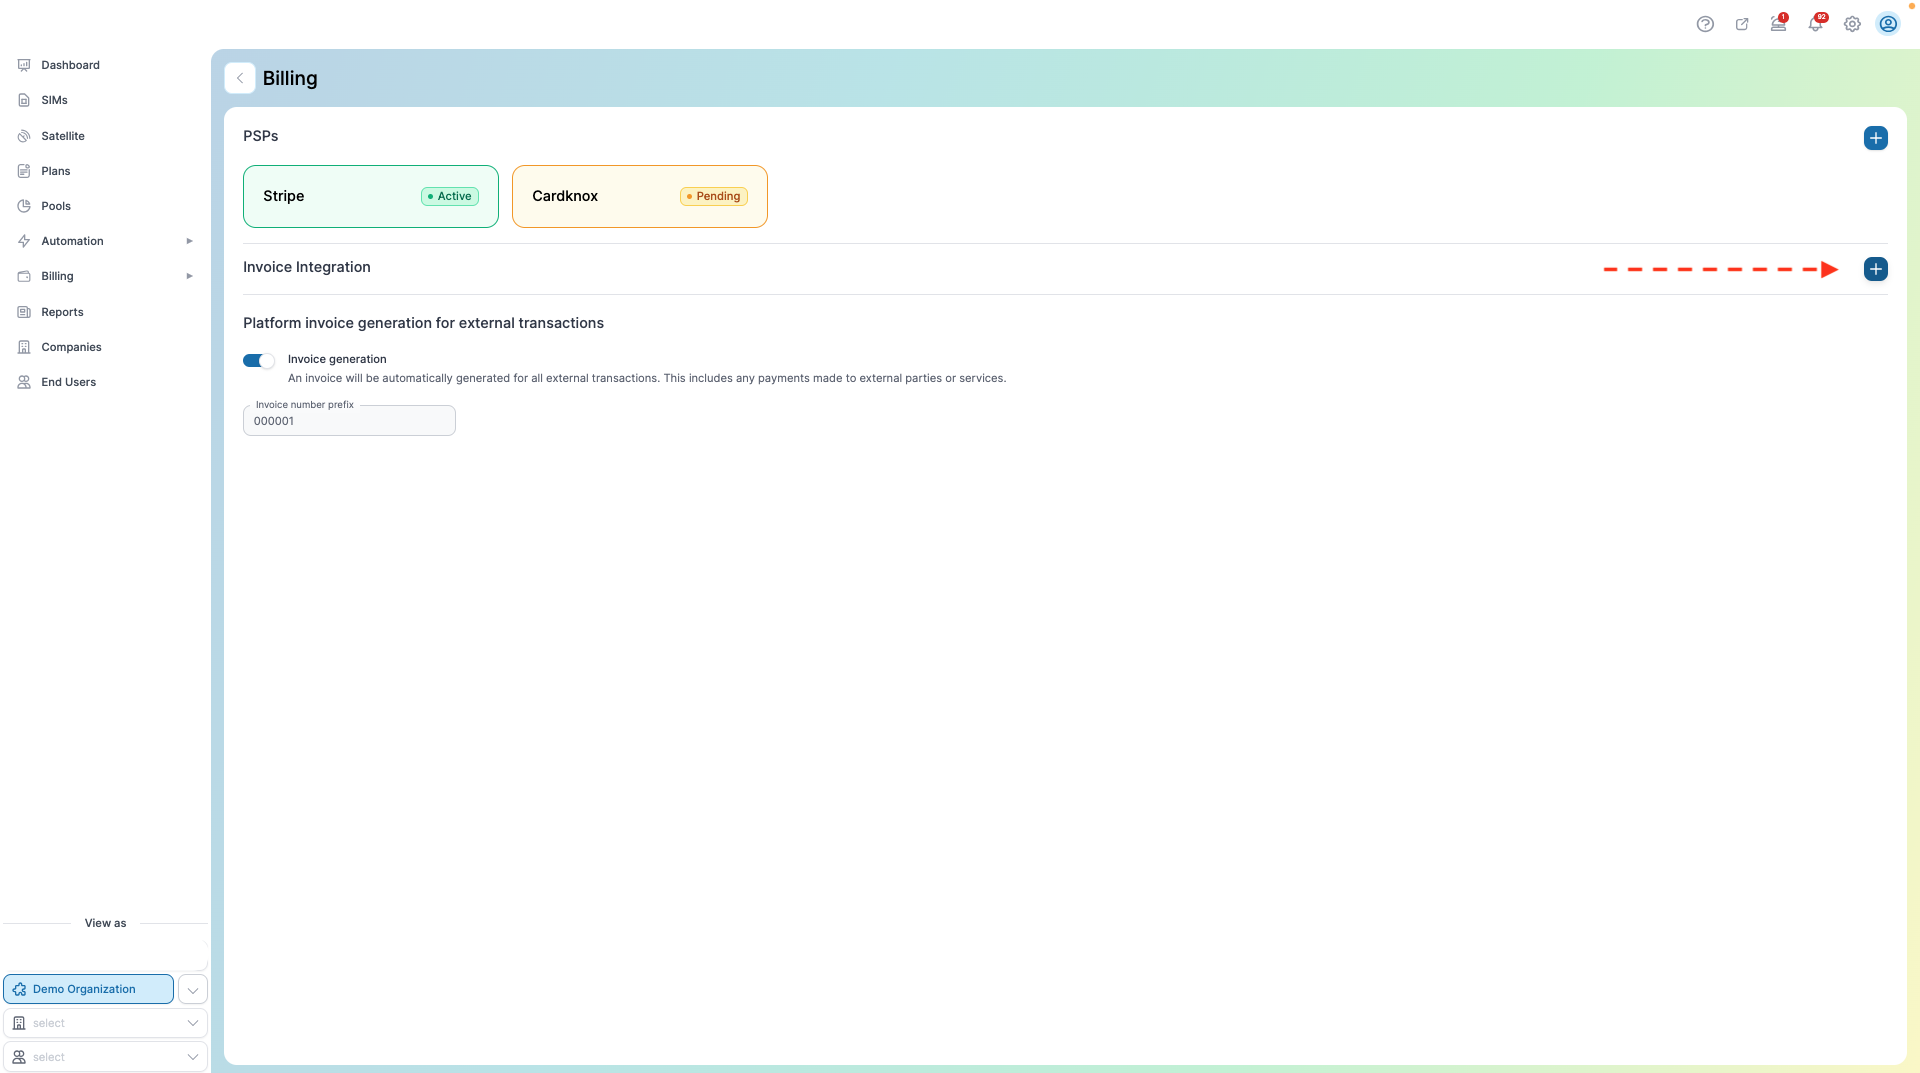
3. In the newly opened window, choose the PSPs you will use to collect money
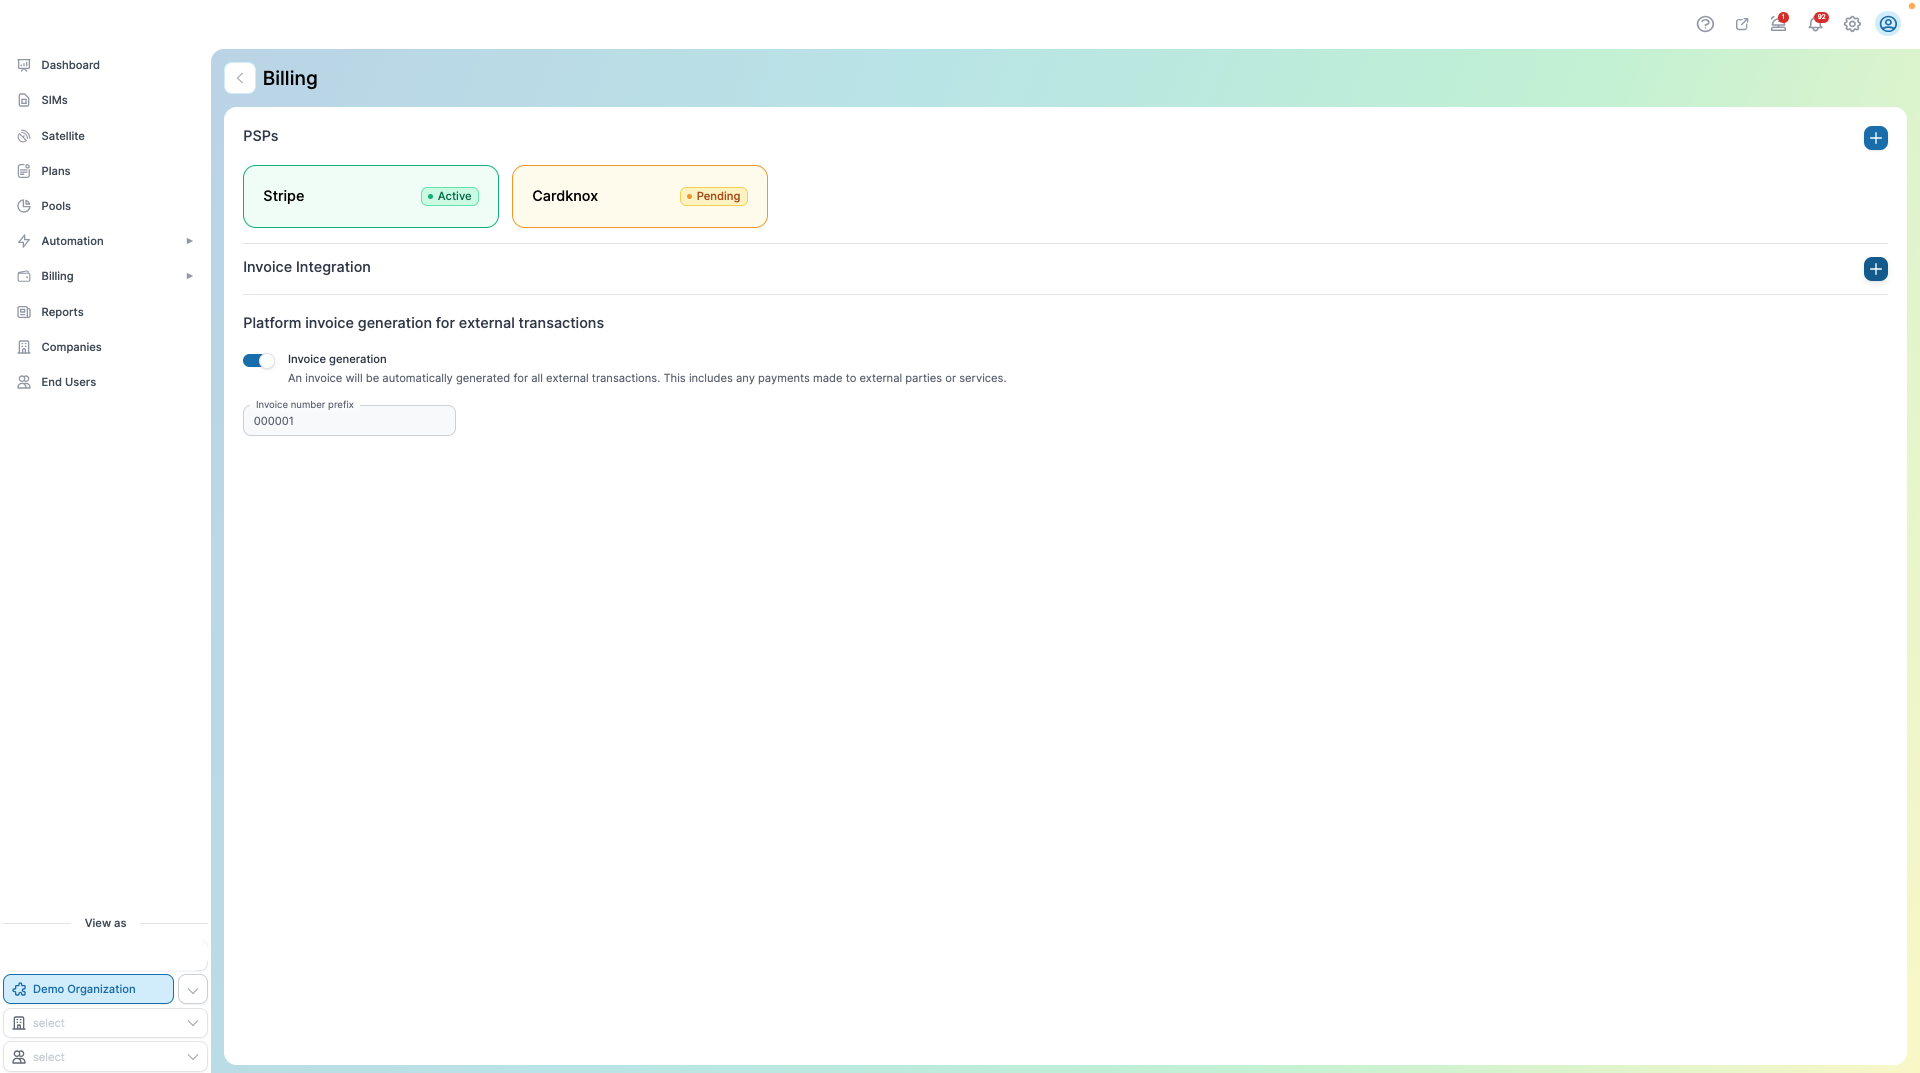
<div data-full-width="true"><figure><img src="https://2408445593-files.gitbook.io/~/files/v0/b/gitbook-x-prod.appspot.com/o/spaces%2FxYJmxgUa2SDfD4byrJY1%2Fuploads%2Fl1W7Ah4VMm52azk2zoVa%2Finvoice%20gen.png?alt=media&amp;token=9eb64724-486b-47ee-a788-3eda6418de49" alt="" width="563"><figcaption></figcaption></figure></div>

### <mark style="background-color:yellow;">**1) Stripe**</mark>

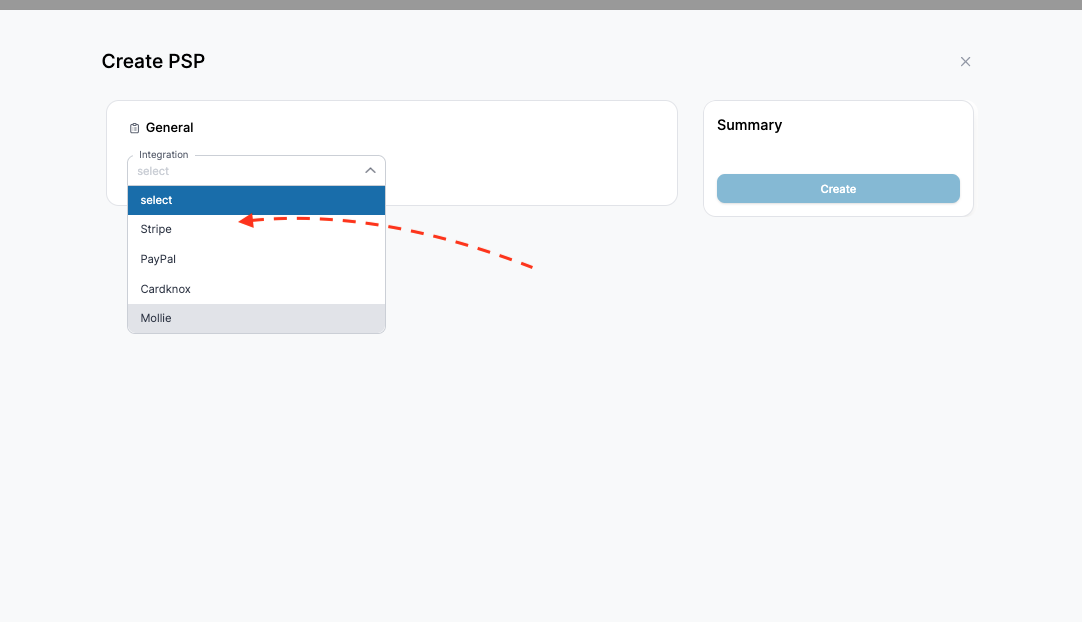
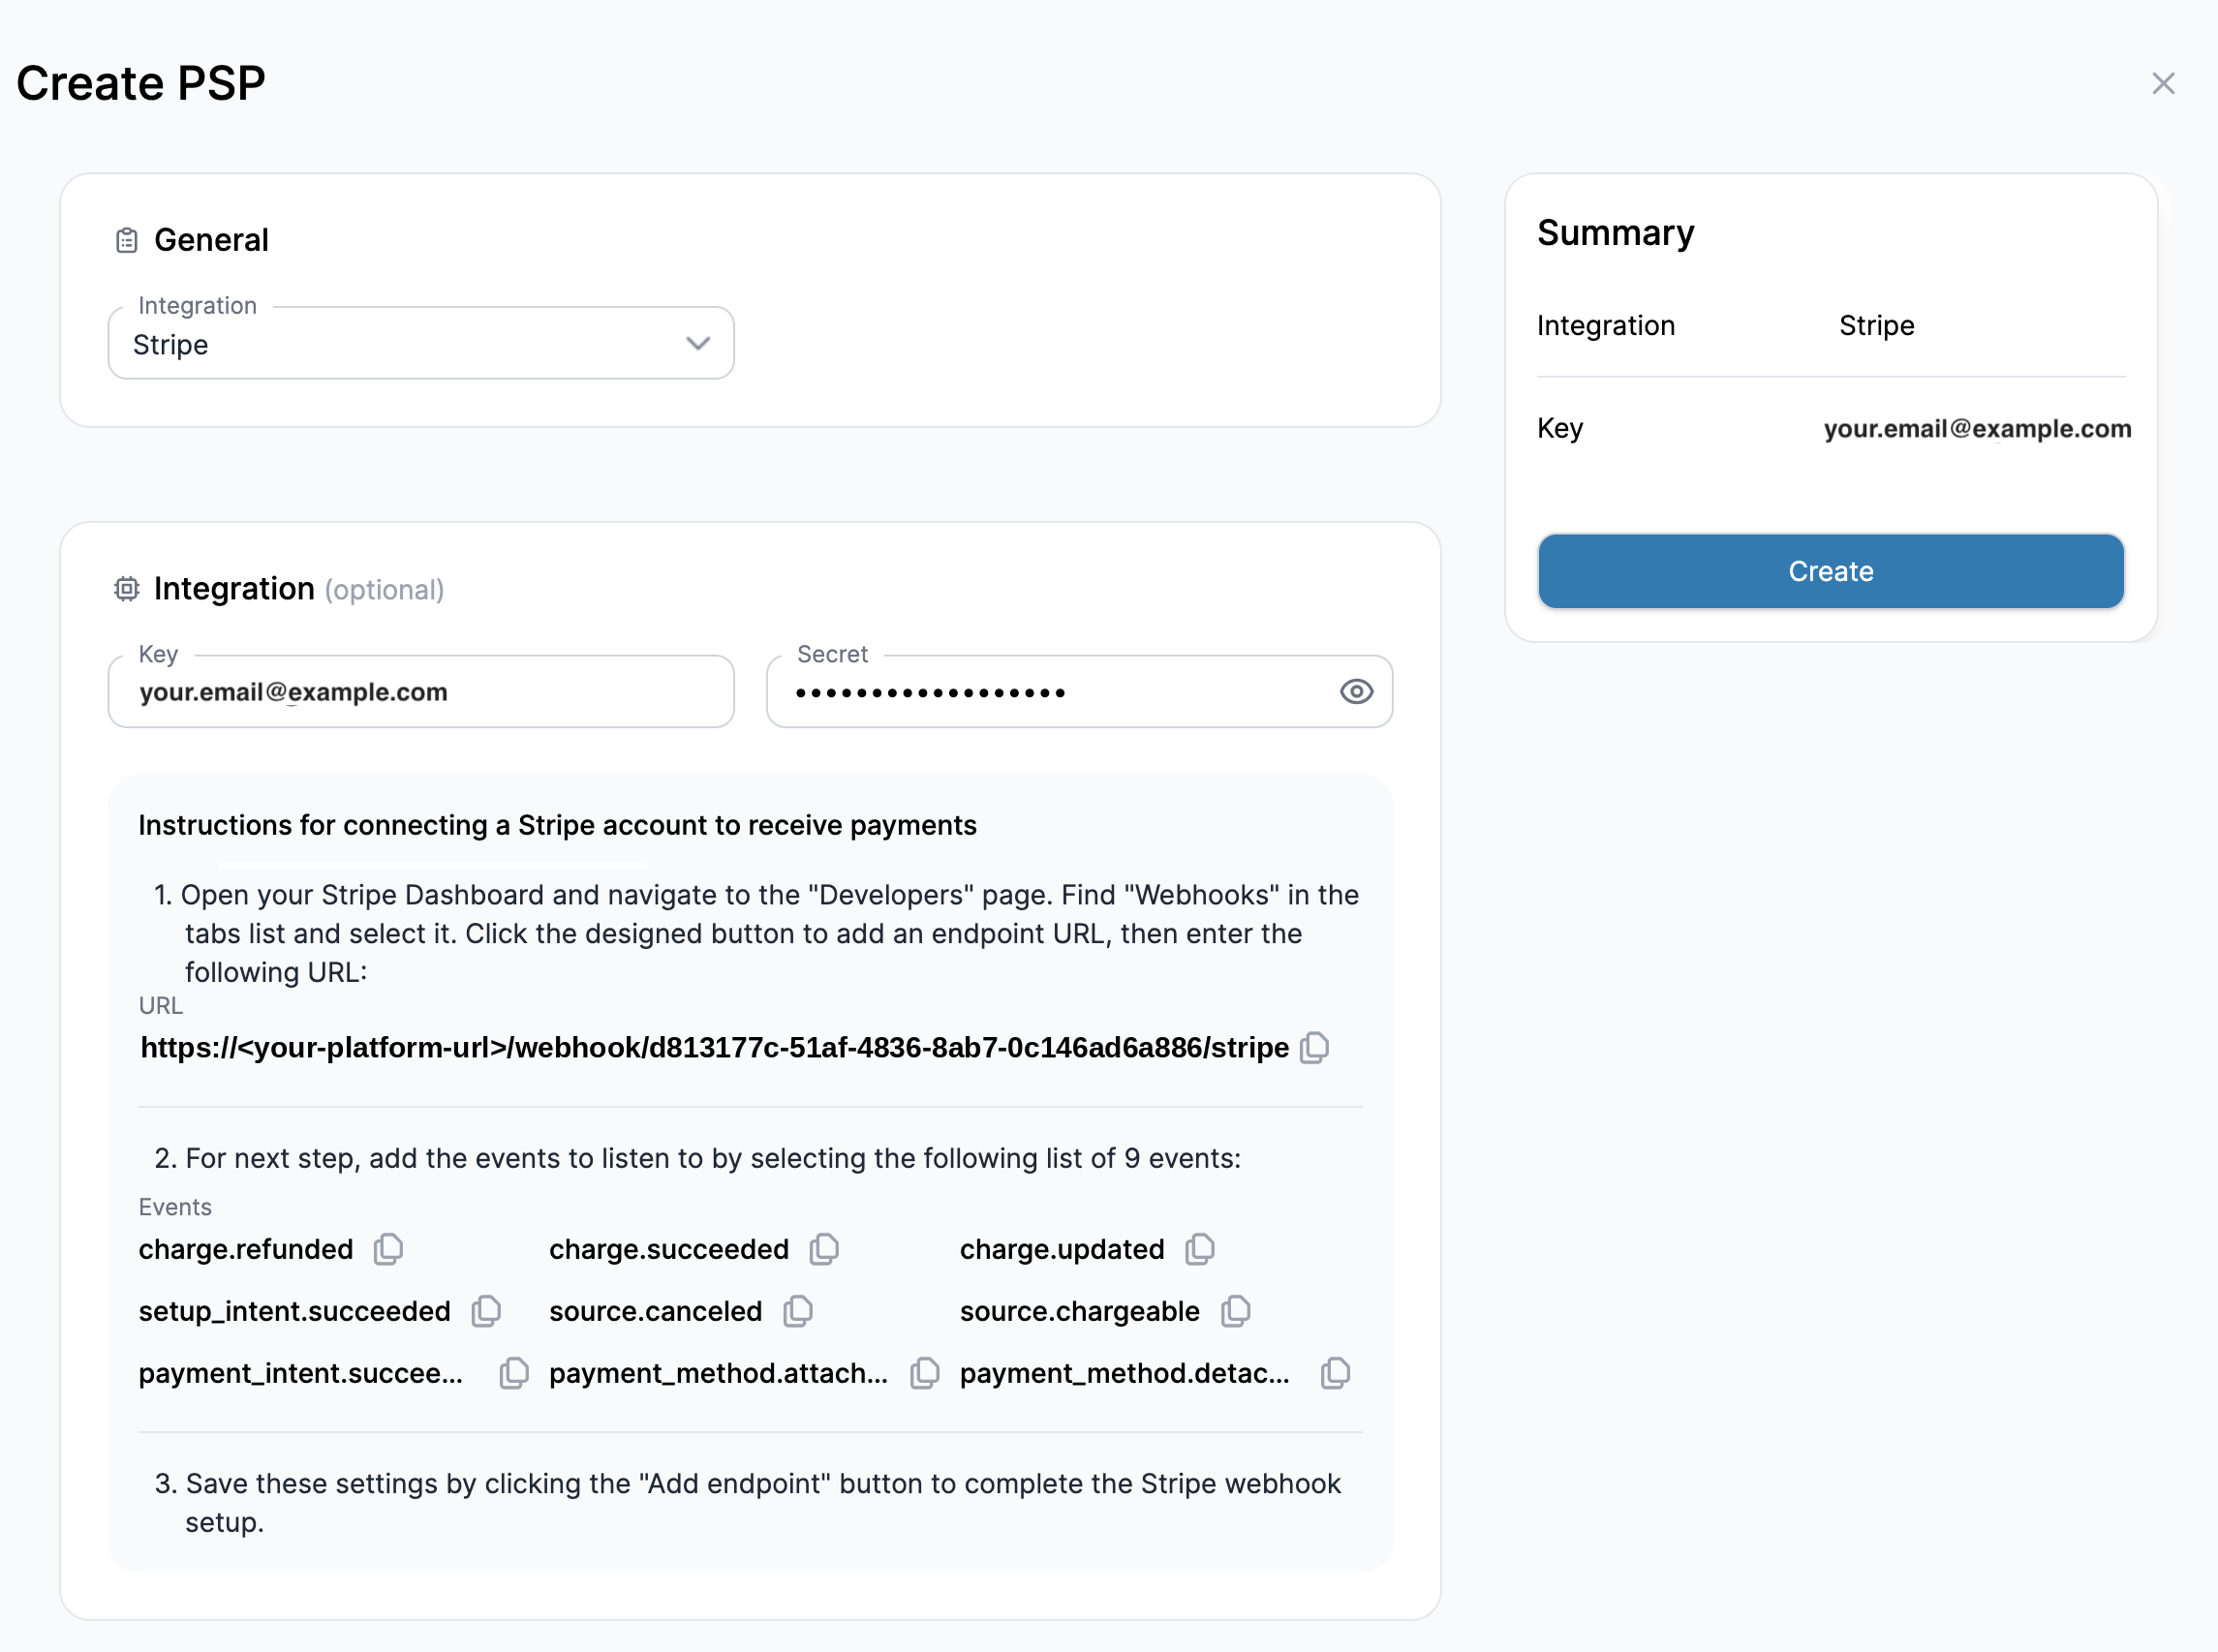
1. Click the **+ button** next to the **PSPs** section and **choose Stripe** from the list of integrations.

<div data-full-width="true"><figure><img src="https://2408445593-files.gitbook.io/~/files/v0/b/gitbook-x-prod.appspot.com/o/spaces%2FxYJmxgUa2SDfD4byrJY1%2Fuploads%2FhFkpNOeUGGfaQfCJ2aKE%2FList%20of%20psp.png?alt=media&amp;token=b238b4da-10c2-4ad3-bfb1-b8faedbc389e" alt="" width="563"><figcaption></figcaption></figure></div>

2. To set up the integration with Stripe, you will need to enter your **Key** and **Secret**.

<figure><img src="https://2408445593-files.gitbook.io/~/files/v0/b/gitbook-x-prod.appspot.com/o/spaces%2FxYJmxgUa2SDfD4byrJY1%2Fuploads%2F7RshIMwwhSIdCjyBStbL%2F%20Stripe.png?alt=media&amp;token=3b3d7c93-5b9a-4c5c-9b19-a5febd110d5f" alt=""><figcaption></figcaption></figure>

3. Follow up on the instructions in the Platform

* Open your Stripe Dashboard and navigate to the "Developers" page. Find "Webhooks" in the tabs list and select it. Click the designed button to add an endpoint URL.  Next, follow your unique, personalized link **available on the platform.**&#x20;
* For the next step, add the events to listen to by selecting the following list of 9 events:
  * charge.refunded
  * charge.succeeded
  * charge.updated
  * setup\_intent.succeeded
  * source.canceled
  * source.chargeable
  * payment\_intent.succeeded
  * payment\_method.attached
  * payment\_method.detached
* Save these settings by clicking the "Add endpoint" button to complete the Stripe webhook setup.

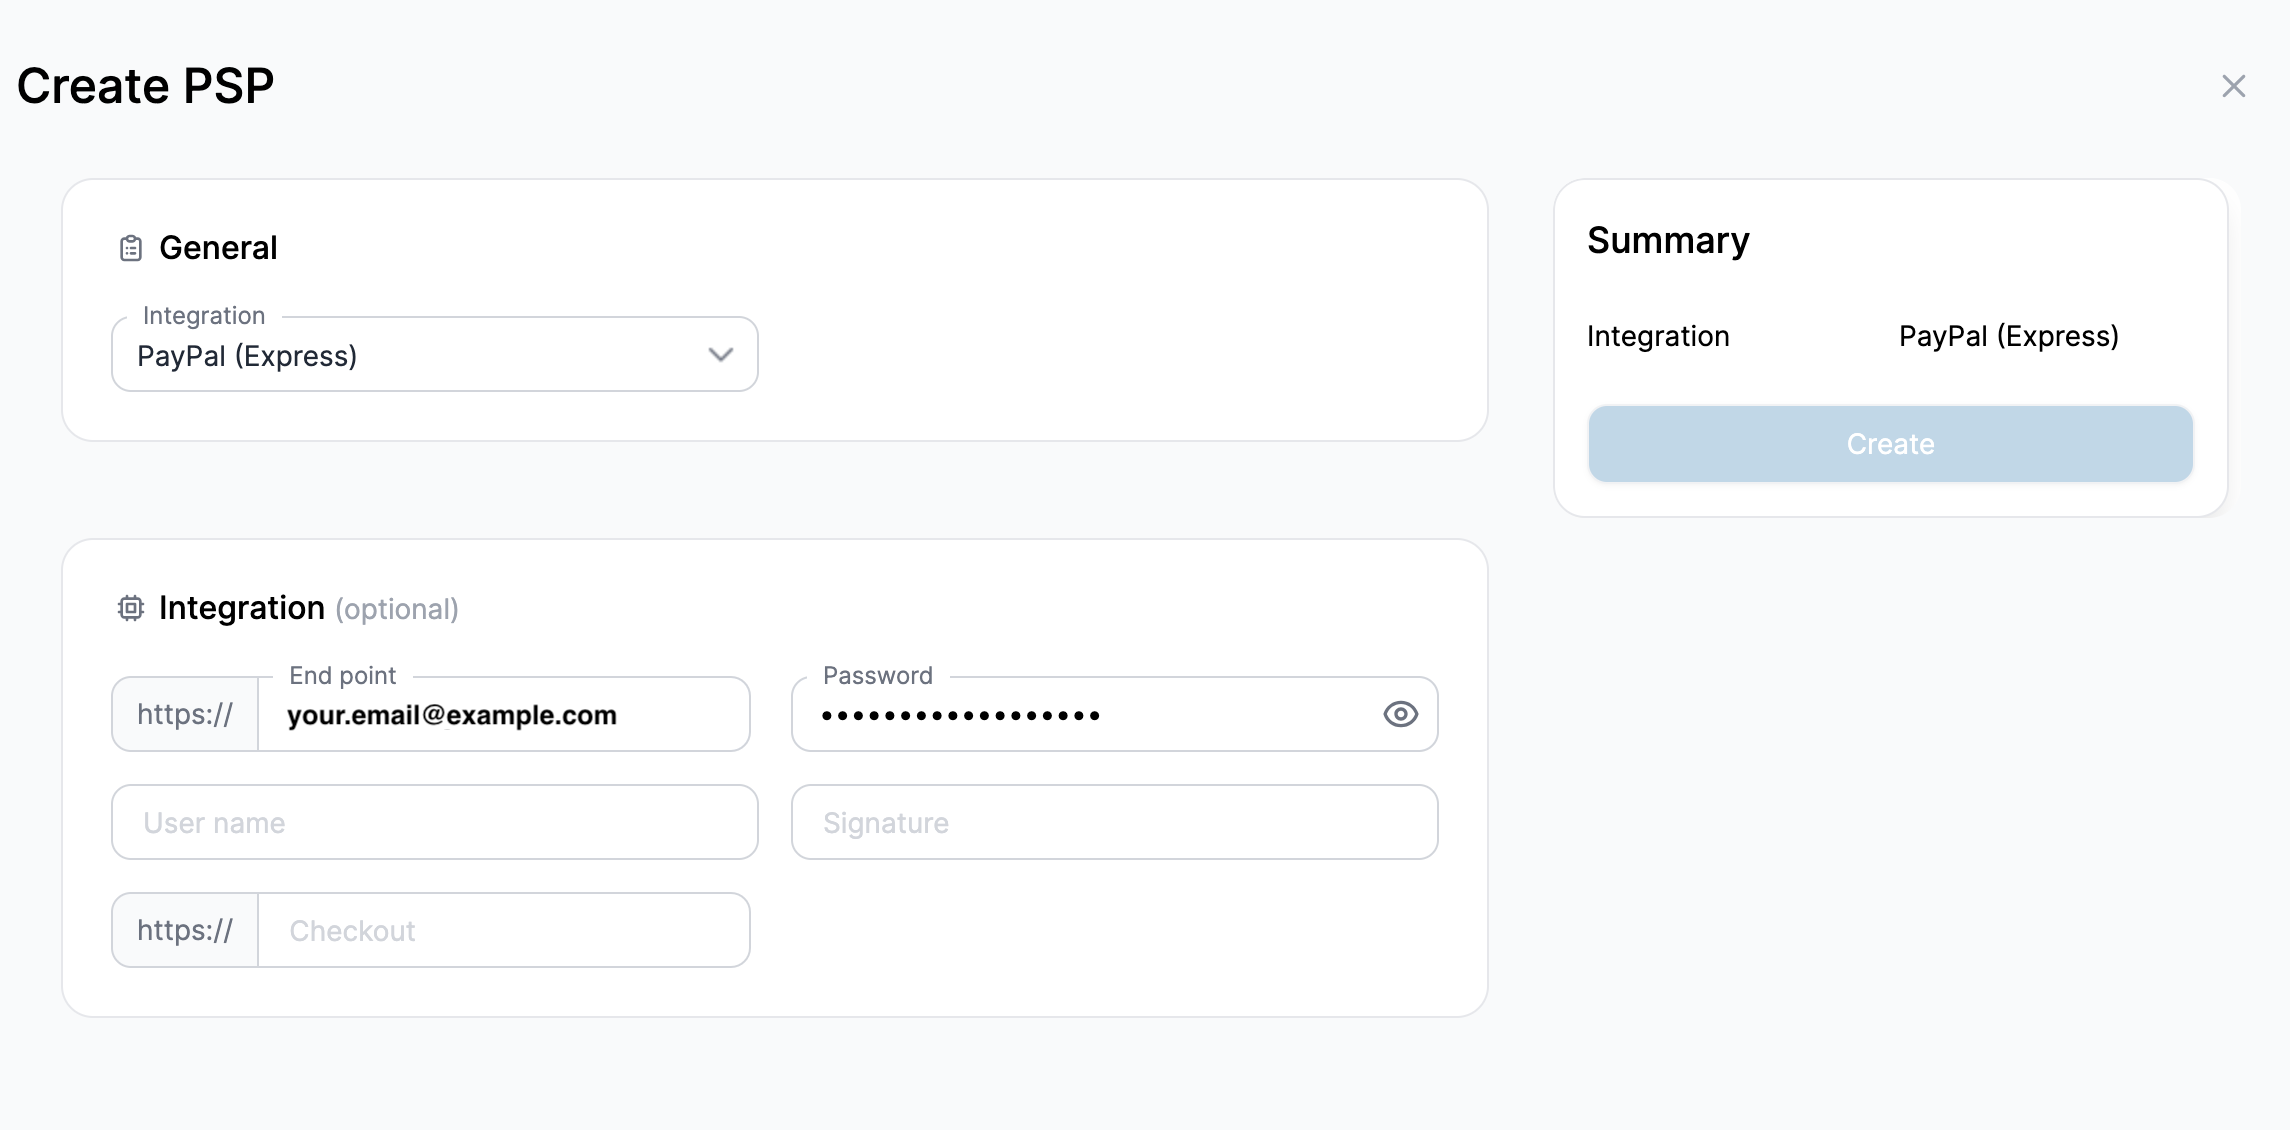
### <mark style="background-color:yellow;">**2) PayPal**</mark>

<figure><img src="https://2408445593-files.gitbook.io/~/files/v0/b/gitbook-x-prod.appspot.com/o/spaces%2FxYJmxgUa2SDfD4byrJY1%2Fuploads%2FeimS0fHMDTCa0UuOOi1k%2FPayPal.png?alt=media&amp;token=845d2541-b7d5-4b6b-94a9-435e966ee55f" alt=""><figcaption></figcaption></figure>

To integrate with PayPal, you will need to provide the following details:&#x20;

* Endpoint
* Username
* &#x20;Password
* Checkout
* Signature

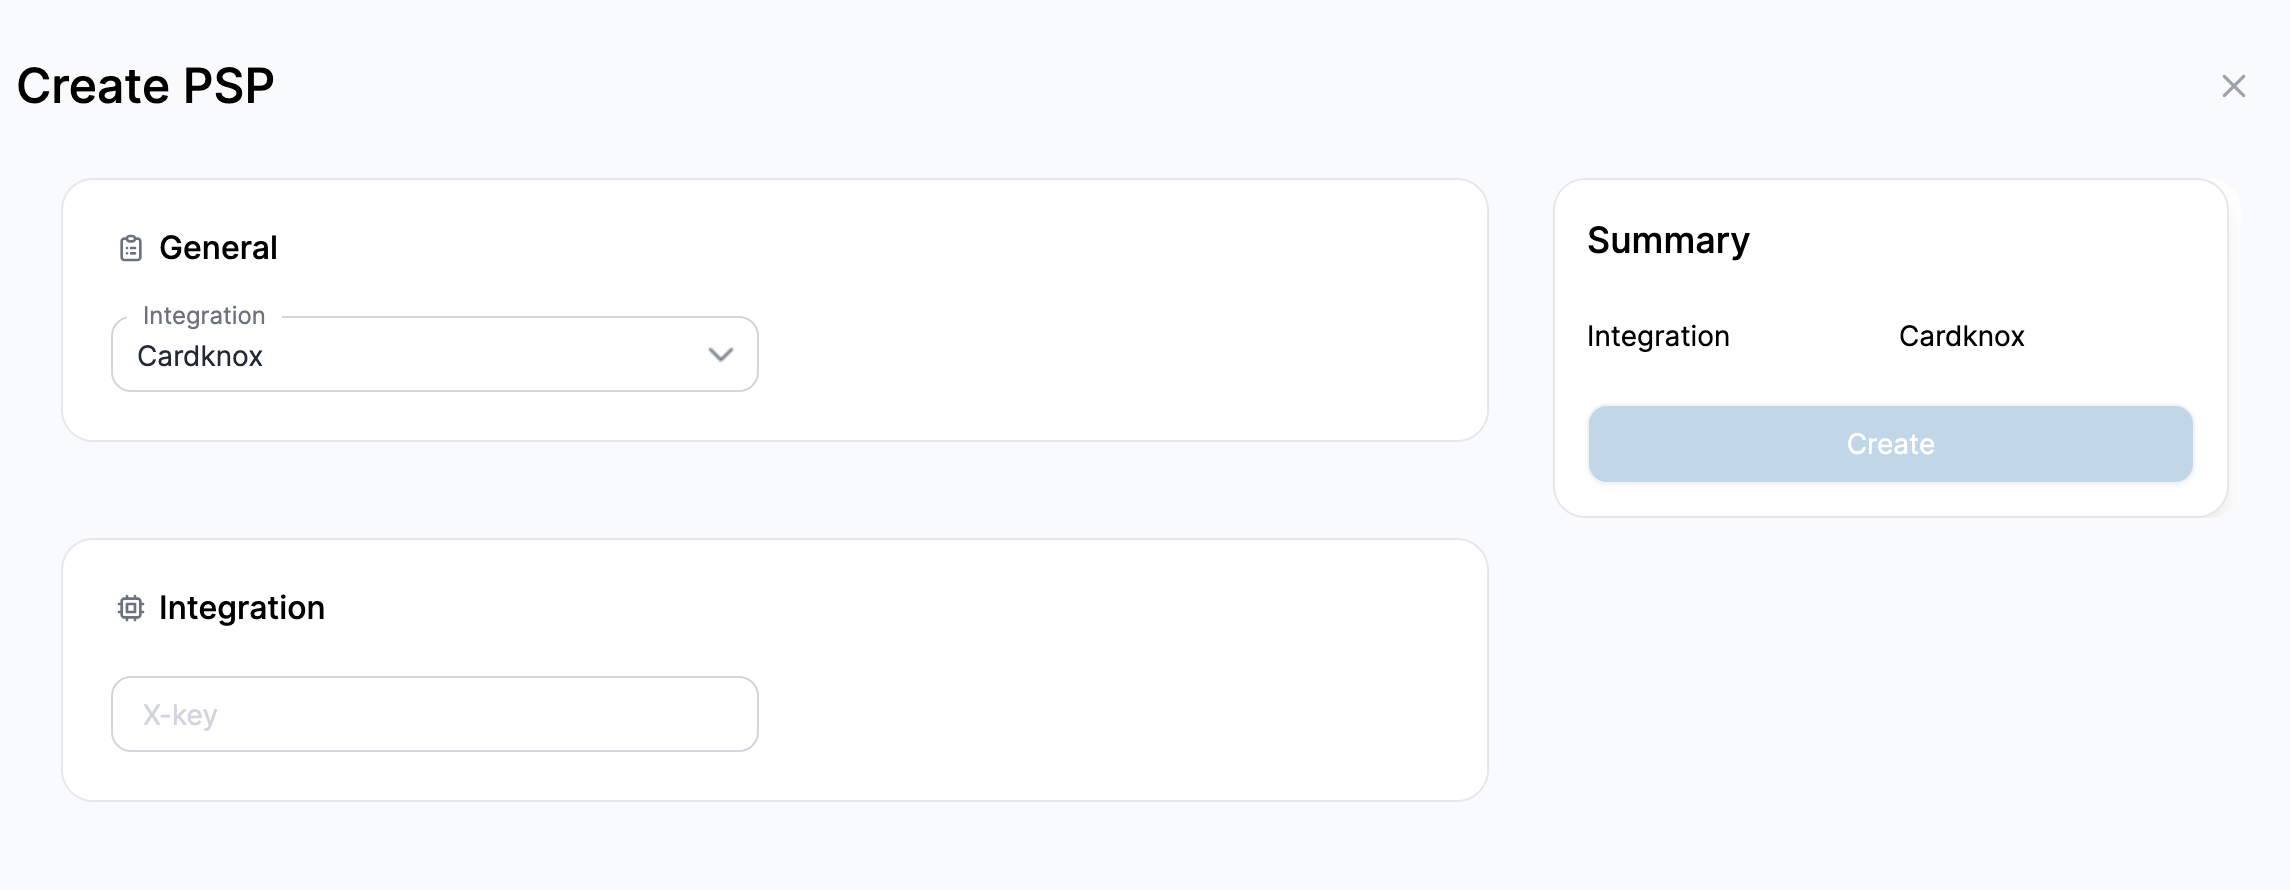
### <mark style="background-color:yellow;">**3) Cardknox**</mark>**&#x20;(pending)**

<figure><img src="https://2408445593-files.gitbook.io/~/files/v0/b/gitbook-x-prod.appspot.com/o/spaces%2FxYJmxgUa2SDfD4byrJY1%2Fuploads%2Fv6VCrltPF8WM6AwHjHk4%2FCardknox.png?alt=media&amp;token=5fde29df-510b-465d-af11-8670bfd73709" alt=""><figcaption></figcaption></figure>

To integrate with Cardknox, you will need to provide the **X-key**

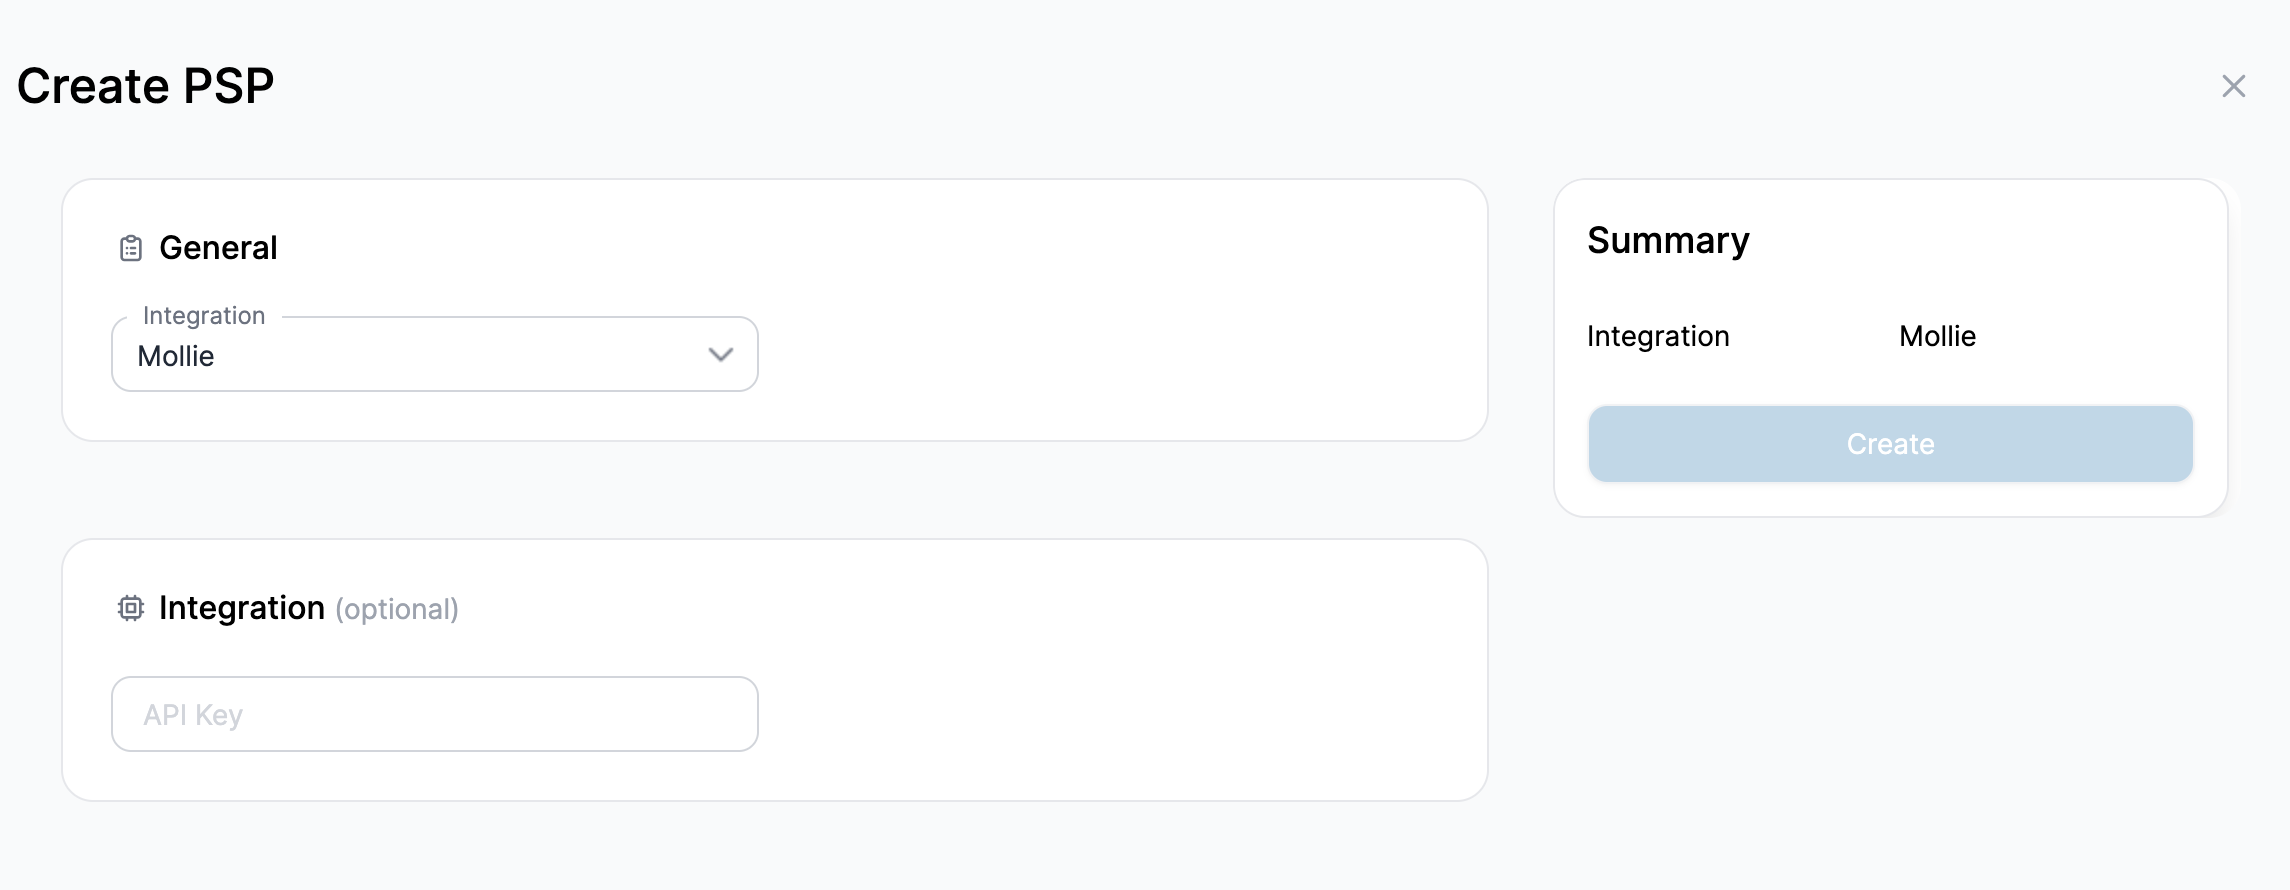
### <mark style="background-color:yellow;">**4) Mollie**</mark>

<figure><img src="https://2408445593-files.gitbook.io/~/files/v0/b/gitbook-x-prod.appspot.com/o/spaces%2FxYJmxgUa2SDfD4byrJY1%2Fuploads%2FsZ0m3jKiMkD7lG7zl5jA%2FMollie.png?alt=media&amp;token=bf005fd0-396a-437f-b9d2-0f1d3b3fca62" alt=""><figcaption></figcaption></figure>

To integrate with Cardknox, you will need to provide the **API Key**

{% hint style="warning" %}
If you plan to use only the Subscription type, PSP is not needed
{% endhint %}


# 4. Invoice Integration

To create Invoices in your Invoicing Software Platform

### <mark style="background-color:blue;">**Complete the following steps:**</mark>

### <mark style="background-color:yellow;">**1) Xero**</mark>

1. You need to create a Xero account. [https://www.xero.com/ ](https://www.xero.com/)
2. The next step will be to directly create a billing integration on the\
   platform (you must have permissions):

<figure><img src="https://2408445593-files.gitbook.io/~/files/v0/b/gitbook-x-prod.appspot.com/o/spaces%2FxYJmxgUa2SDfD4byrJY1%2Fuploads%2Fb4291ggleOsU2TeawfSz%2Finvoice%20gen%202.png?alt=media&amp;token=642d2fdc-982a-4434-a8d8-96755d598a20" alt=""><figcaption></figcaption></figure>

3. Select “Xero” from the selection menu:
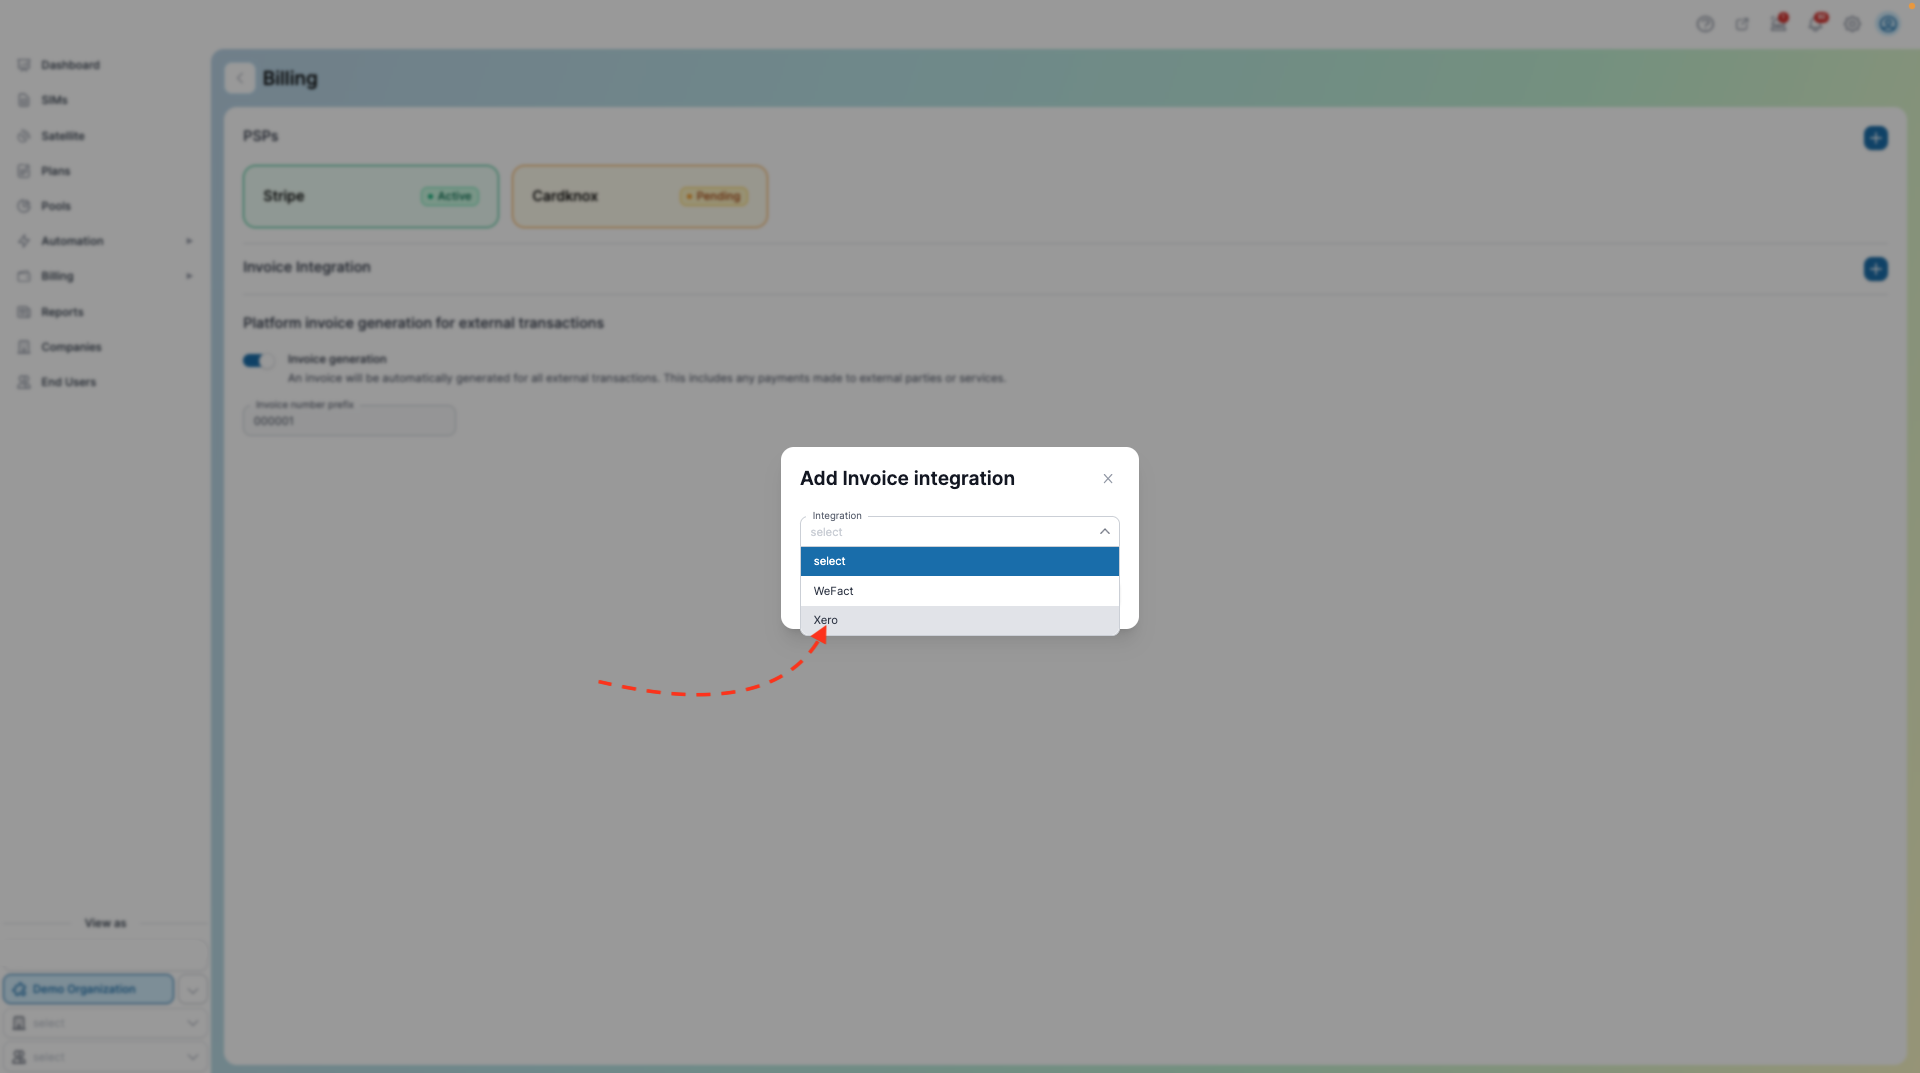
<div data-full-width="true"><figure><img src="https://2408445593-files.gitbook.io/~/files/v0/b/gitbook-x-prod.appspot.com/o/spaces%2FxYJmxgUa2SDfD4byrJY1%2Fuploads%2F1sNAwpX8optEDJh2lKuH%2Fxero.png?alt=media&amp;token=42becf50-8be2-4900-bbee-e1ba75d7090e" alt="" width="563"><figcaption></figcaption></figure></div>

Enter the previously generated Client ID and Client Secret key, and confirm the action by clicking "Confirm".&#x20;

With valid credentials and a redirect URI, you will be redirected to the Xero authorization page. There, you will need to confirm access to your organization.&#x20;

4\. You will be redirected to the Xero authorization page. There, you will need to confirm access to your organization:
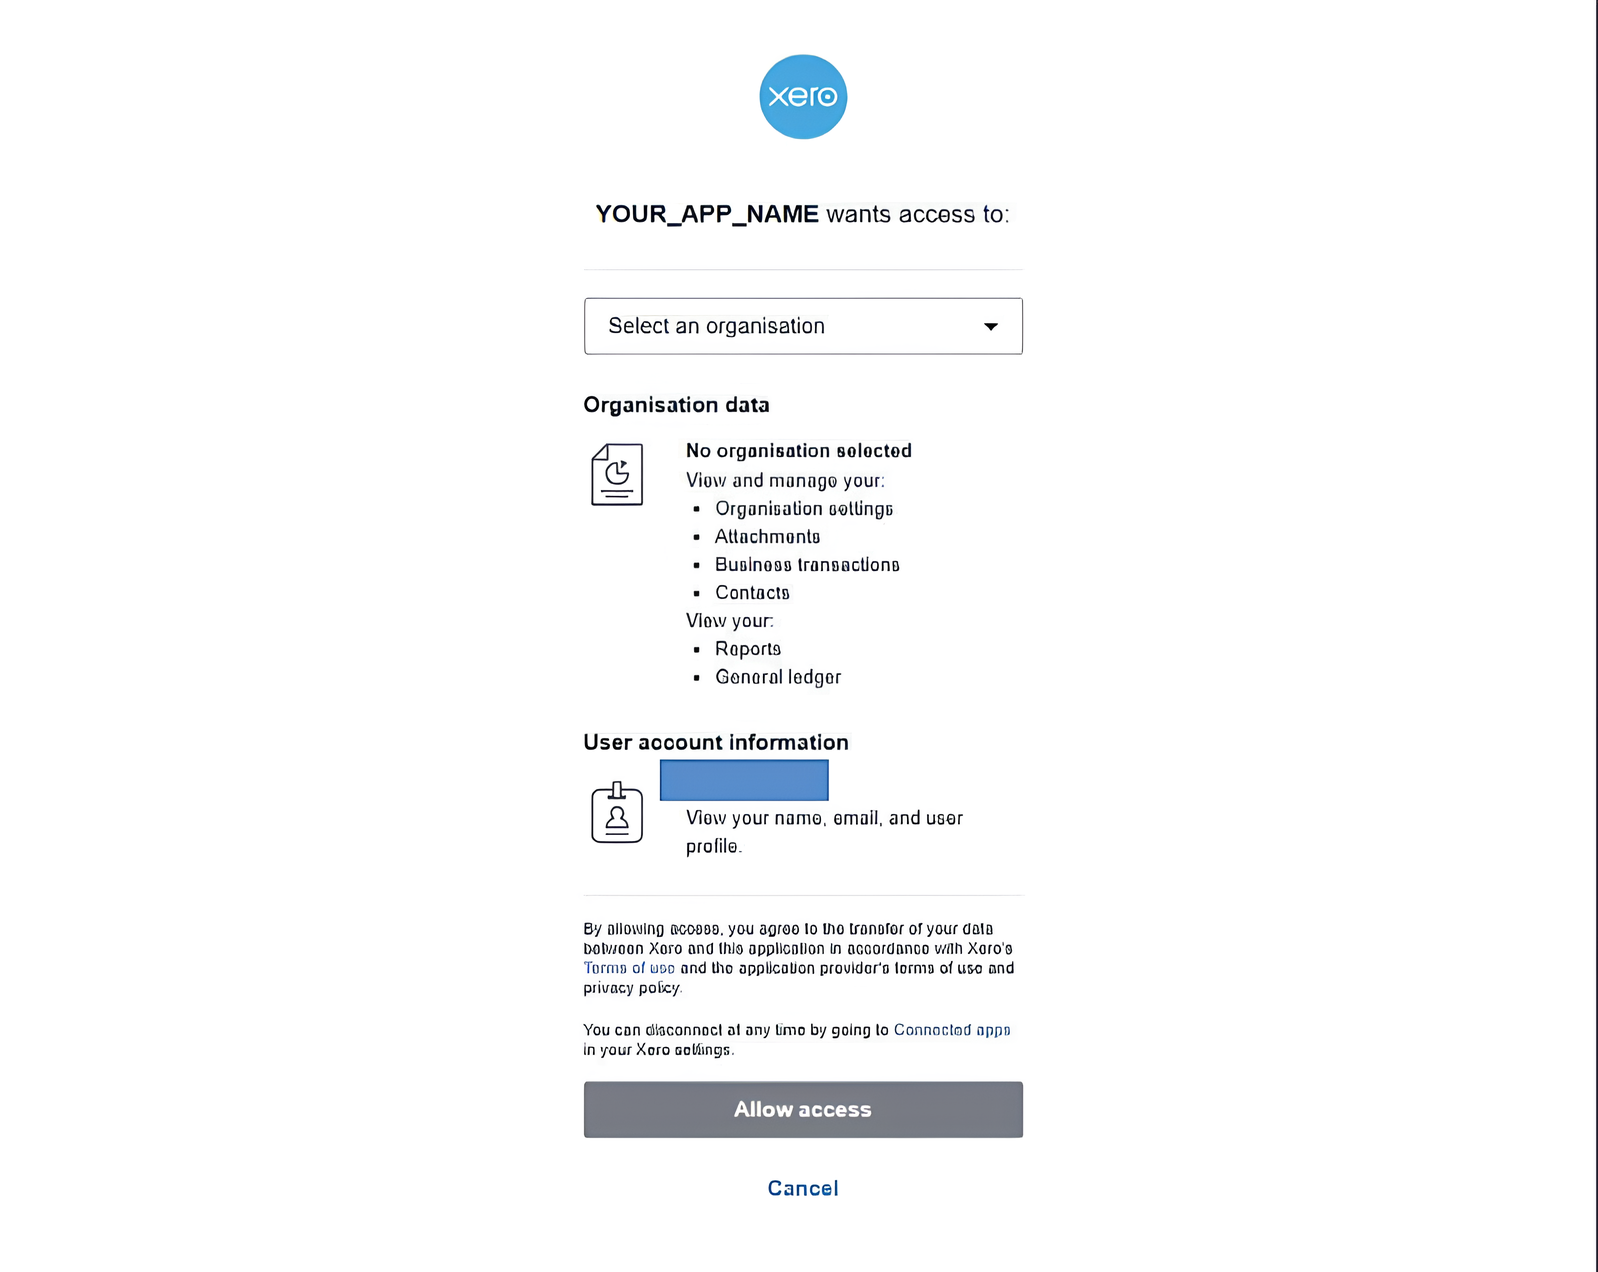
<div data-full-width="true"><figure><img src="https://2408445593-files.gitbook.io/~/files/v0/b/gitbook-x-prod.appspot.com/o/spaces%2FxYJmxgUa2SDfD4byrJY1%2Fuploads%2FPgRHD5iXg9LEO2GJrulr%2FXerp%20-Prg.png?alt=media&amp;token=de11807c-9fb6-4846-b838-f3cbe785bcdb" alt="" width="563"><figcaption></figcaption></figure></div>

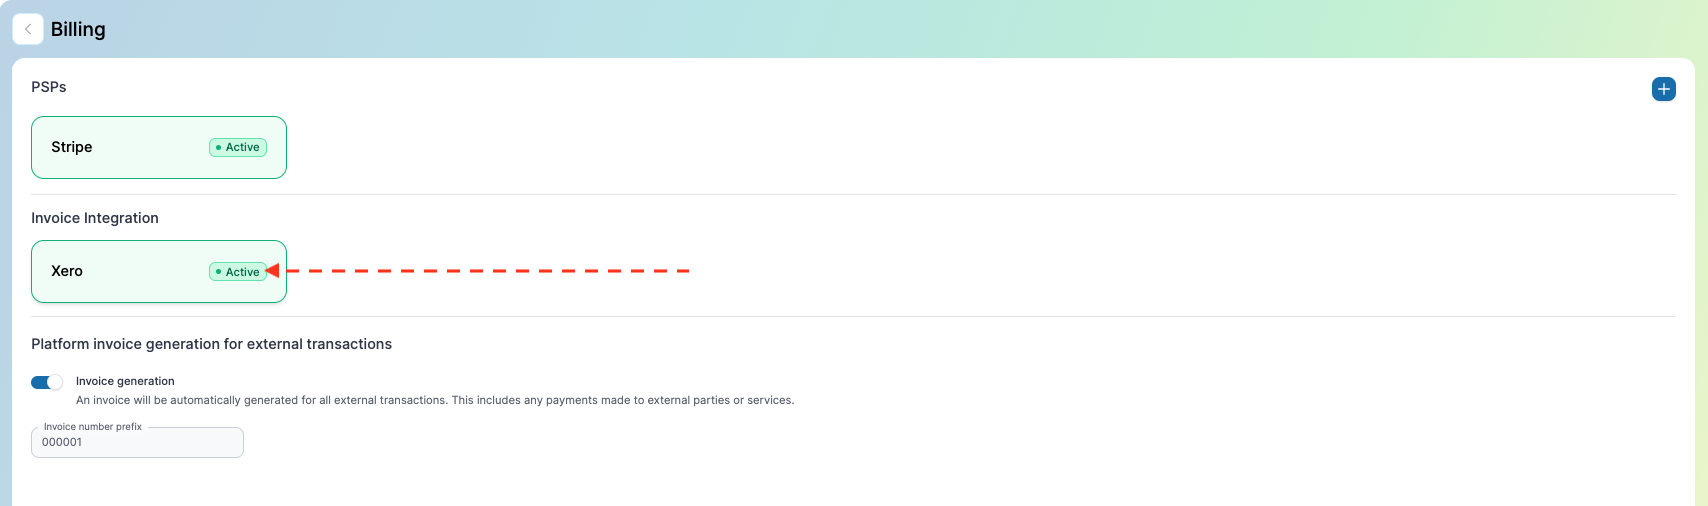
5. After confirmation and successful access, you will be returned to the\
   billing integration page, where the created billing integration will be\
   displayed:

<div data-full-width="true"><figure><img src="https://2408445593-files.gitbook.io/~/files/v0/b/gitbook-x-prod.appspot.com/o/spaces%2FxYJmxgUa2SDfD4byrJY1%2Fuploads%2F9o3Ub7ZUo8NPdUFa4QST%2FXero-Billing.png?alt=media&amp;token=4d9330c7-1386-44c8-a181-3ac2acfb2b1f" alt="" width="563"><figcaption></figcaption></figure></div>

{% hint style="warning" %}
**IMPORTANT!**\
Your billing integration will be valid for 60 days from the moment of\
creation. If you do not perform any actions related to\
this integration during this period, you will have to reconfirm access to the application!
{% endhint %}

<mark style="background-color:orange;">**Xero App Creating Guide**</mark>

1. This can be done by following the link:\
   [https://developer.xero.com/app/manage/ ](https://developer.xero.com/app/manage/)

and selecting “My Apps”, click on the “New app” button:

<div data-full-width="true"><figure><img src="https://2408445593-files.gitbook.io/~/files/v0/b/gitbook-x-prod.appspot.com/o/spaces%2FxYJmxgUa2SDfD4byrJY1%2Fuploads%2FNtn20FrjtGqvqonNVpch%2FDeveloper.png?alt=media&amp;token=1b358144-ac76-470e-8479-e2647daead45" alt="" width="563"><figcaption></figcaption></figure></div>

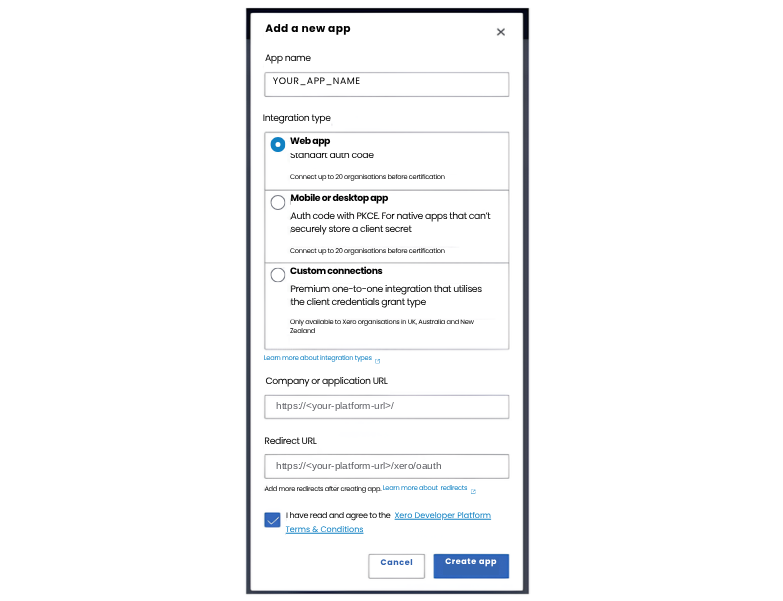
2. You should see the following window:

<div data-full-width="true"><figure><img src="https://2408445593-files.gitbook.io/~/files/v0/b/gitbook-x-prod.appspot.com/o/spaces%2FxYJmxgUa2SDfD4byrJY1%2Fuploads%2FqsEE1IiXw16scd1Tmbp3%2FApp%20name.png?alt=media&amp;token=0e573474-e26d-4174-925f-a9f774e2e568" alt="" width="563"><figcaption></figcaption></figure></div>

3. To correctly create the application, you must enter the following data:<br>

* Integration type: Web app
* App name: \<YOUR APP NAME>
* Company or application URL: <https://platform.droam.com/>
* Redirect URL: <https://platform.droam.com/xero/oauth>&#x20;

4. Click on the “Create app” button. After that, you will be redirected to the next page
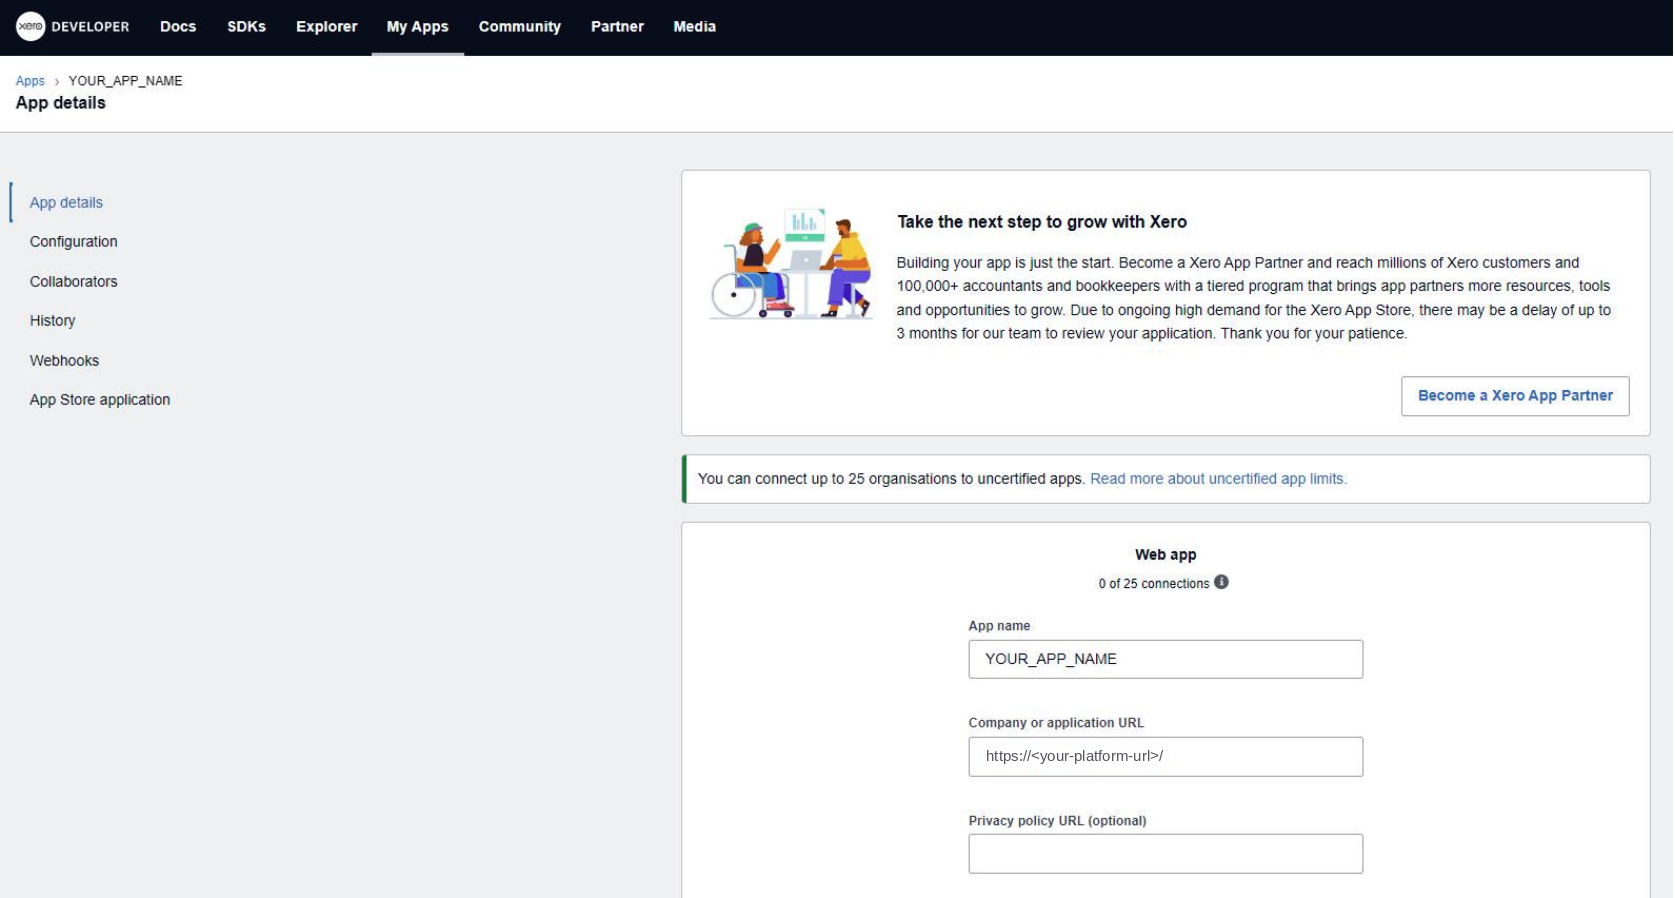
<div data-full-width="true"><figure><img src="https://2408445593-files.gitbook.io/~/files/v0/b/gitbook-x-prod.appspot.com/o/spaces%2FxYJmxgUa2SDfD4byrJY1%2Fuploads%2F9eqjK9XfjkPcOfkNl0IV%2FApp%20details.png?alt=media&amp;token=4fc12dc9-4659-453a-954d-50852b7701e3" alt="" width="563"><figcaption></figcaption></figure></div>

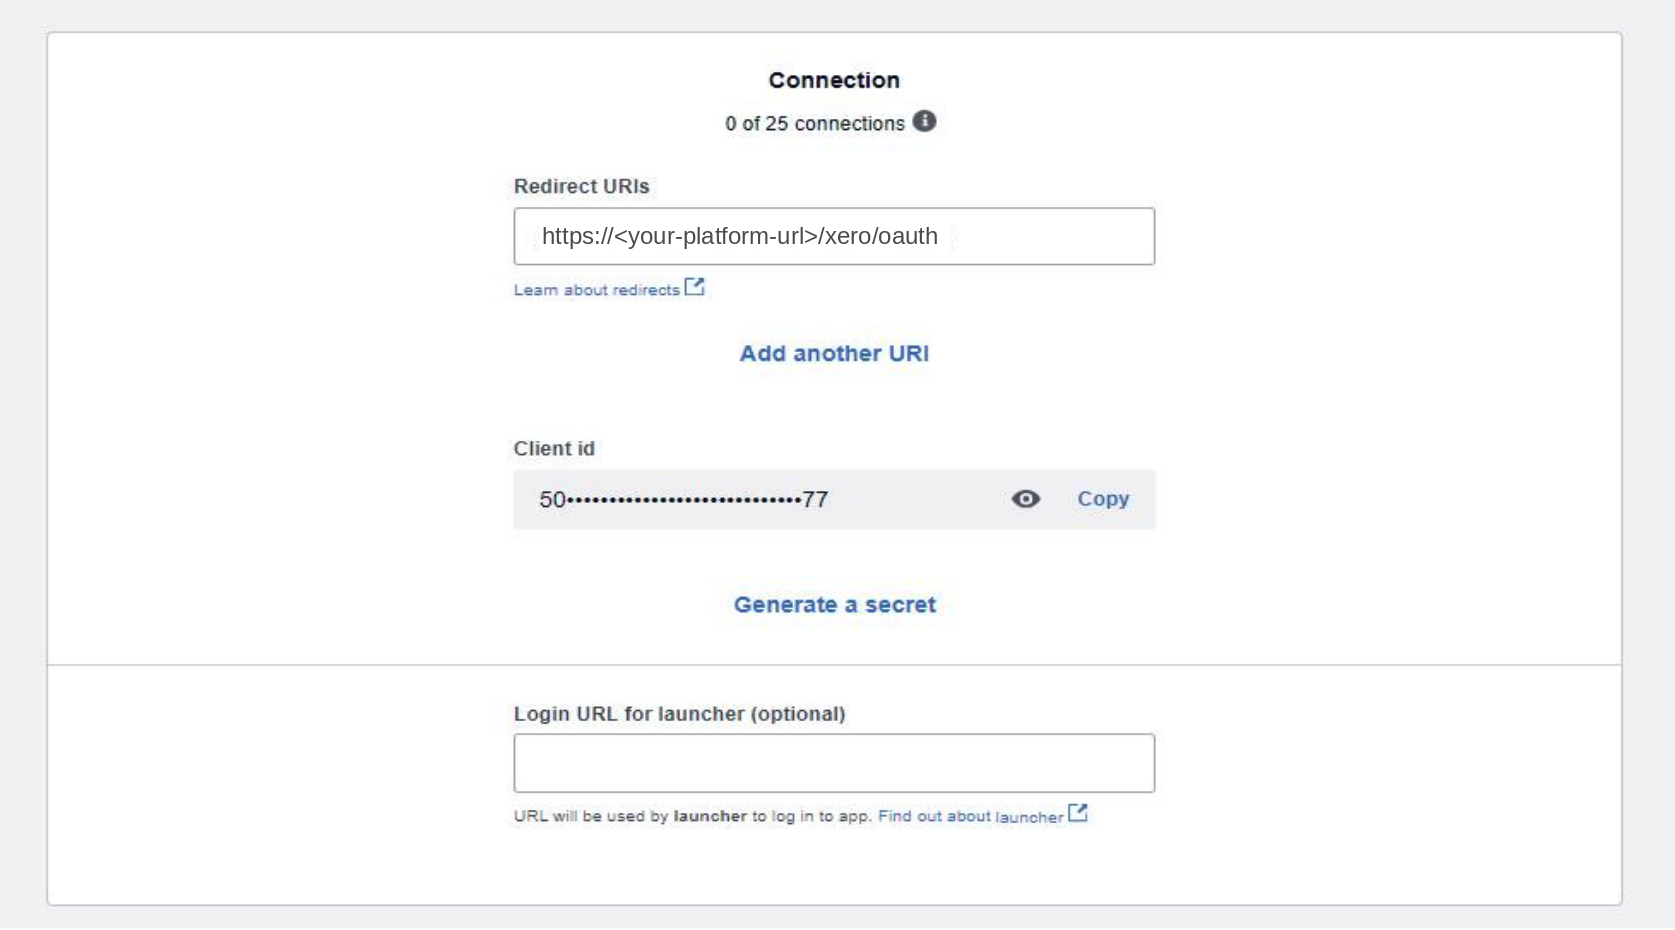
4. Here you can get your Client ID and Client Secret key, which are necessary to add integration on the platform. To do this, go to the "Configuration" tab
<div data-full-width="true"><figure><img src="https://2408445593-files.gitbook.io/~/files/v0/b/gitbook-x-prod.appspot.com/o/spaces%2FxYJmxgUa2SDfD4byrJY1%2Fuploads%2FHwkRRmvVp0Wl3ECLPdVR%2FConnection.png?alt=media&amp;token=4a2423b8-cf0f-4d5d-bb15-b80a1aaa2d2a" alt="" width="563"><figcaption></figcaption></figure></div>

6. Generate your Client Secret key by clicking on the box “Generate a secret” (you can generate a new Client Secret key by performing the same action).

{% hint style="warning" %}
**IMPORTANT!**\
KEEP YOUR CLIENT ID AND CLIENT SECRET!\
This completes the creation of the application.
{% endhint %}

{% hint style="info" %}
You should add this if you want to create documents via WeFact or Xero. However, it's not mandatory, as you can create invoice drafts directly in our platform without using additional integrations.
{% endhint %}

{% hint style="info" %}
As our client, you can submit requests to integrate the platform with new payment systems if the one you need is not listed above.
{% endhint %}

{% hint style="info" %}
If your invoicing software is not integrated, please use the Export feature to transfer all invoices to your invoicing software.
{% endhint %}

<br>


# 5. Create Pools

{% hint style="warning" %}
To create pools, you first need to create a plan with the 'Subscription Static Pool' type<br>
{% endhint %}

### <mark style="background-color:blue;">**Complete the following steps:**</mark>

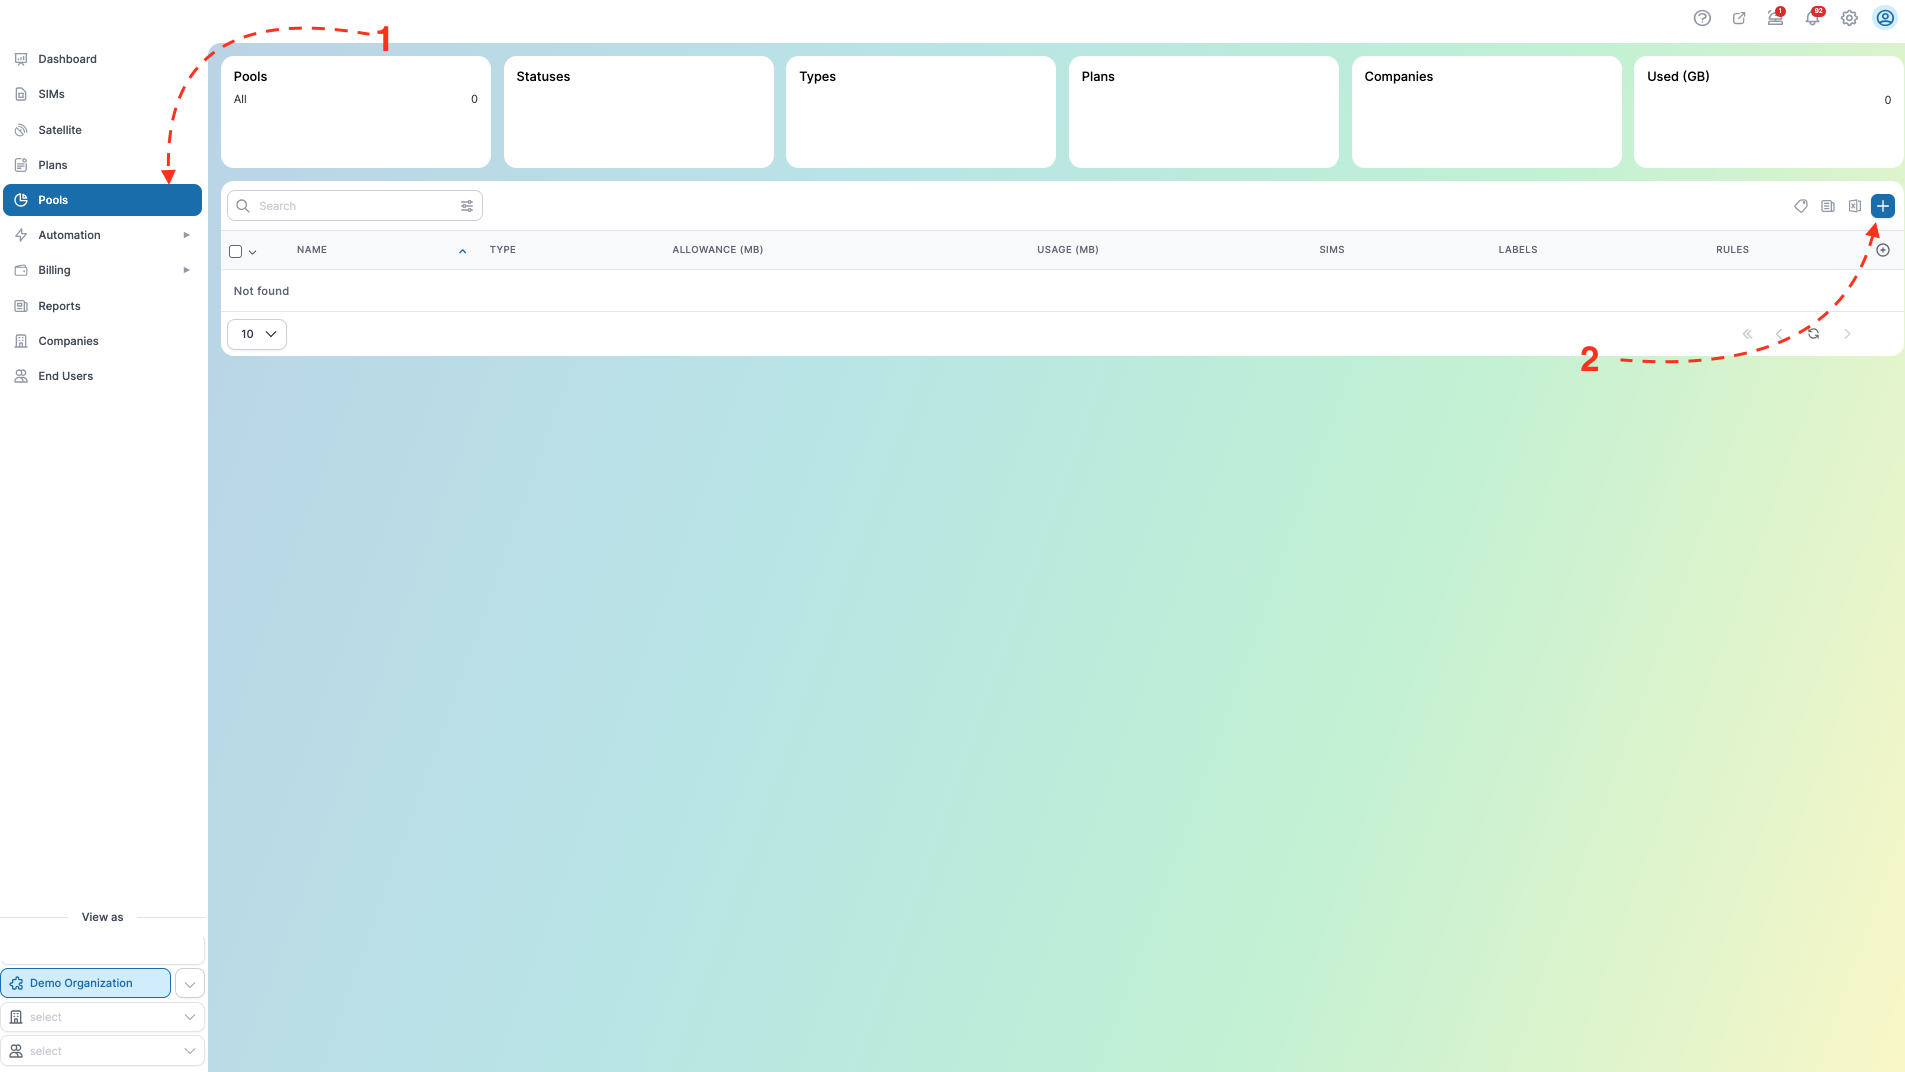
1. Navigate to the "Pools" section by clicking the corresponding button in the left-hand side navigation menu.
2. On the left side, click the "plus" (+) button, then select the type of pool you wish to create from the options provided.
<div data-full-width="true"><figure><img src="https://2408445593-files.gitbook.io/~/files/v0/b/gitbook-x-prod.appspot.com/o/spaces%2FxYJmxgUa2SDfD4byrJY1%2Fuploads%2FY4gdXqbbJ0BZDgYgSGlI%2FPools.png?alt=media&amp;token=c482afcf-4a68-42a0-8dfe-05df1312c407" alt="" width="563"><figcaption></figcaption></figure></div>

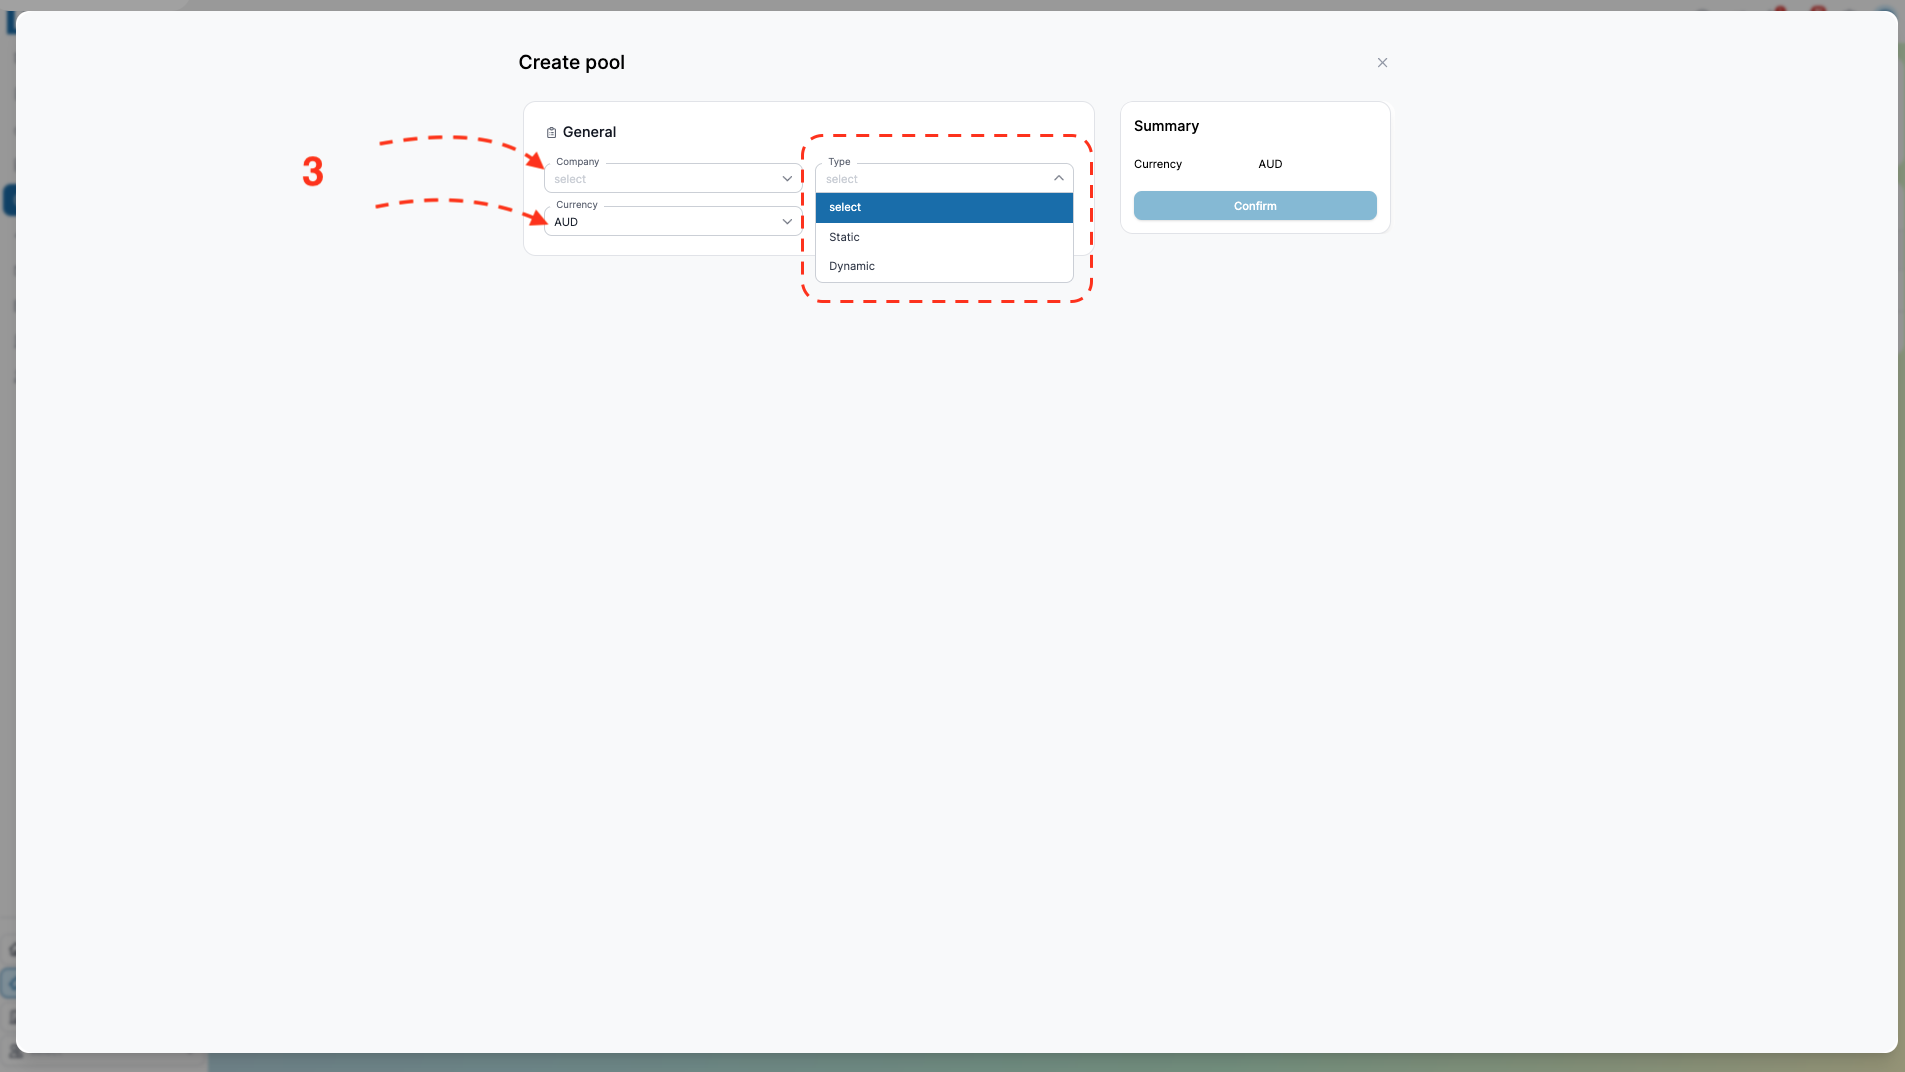
3. Complete all fields and choose the pool type: [Static or Dynamic](https://faq.droam.com/menu/pools)

<div data-full-width="true"><figure><img src="https://2408445593-files.gitbook.io/~/files/v0/b/gitbook-x-prod.appspot.com/o/spaces%2FxYJmxgUa2SDfD4byrJY1%2Fuploads%2FMCqY0S6QDWeAFEwrLZYx%2FPool%20type.png?alt=media&amp;token=d96dbc94-2ff6-4530-914c-91657add1728" alt="" width="563"><figcaption></figcaption></figure></div>

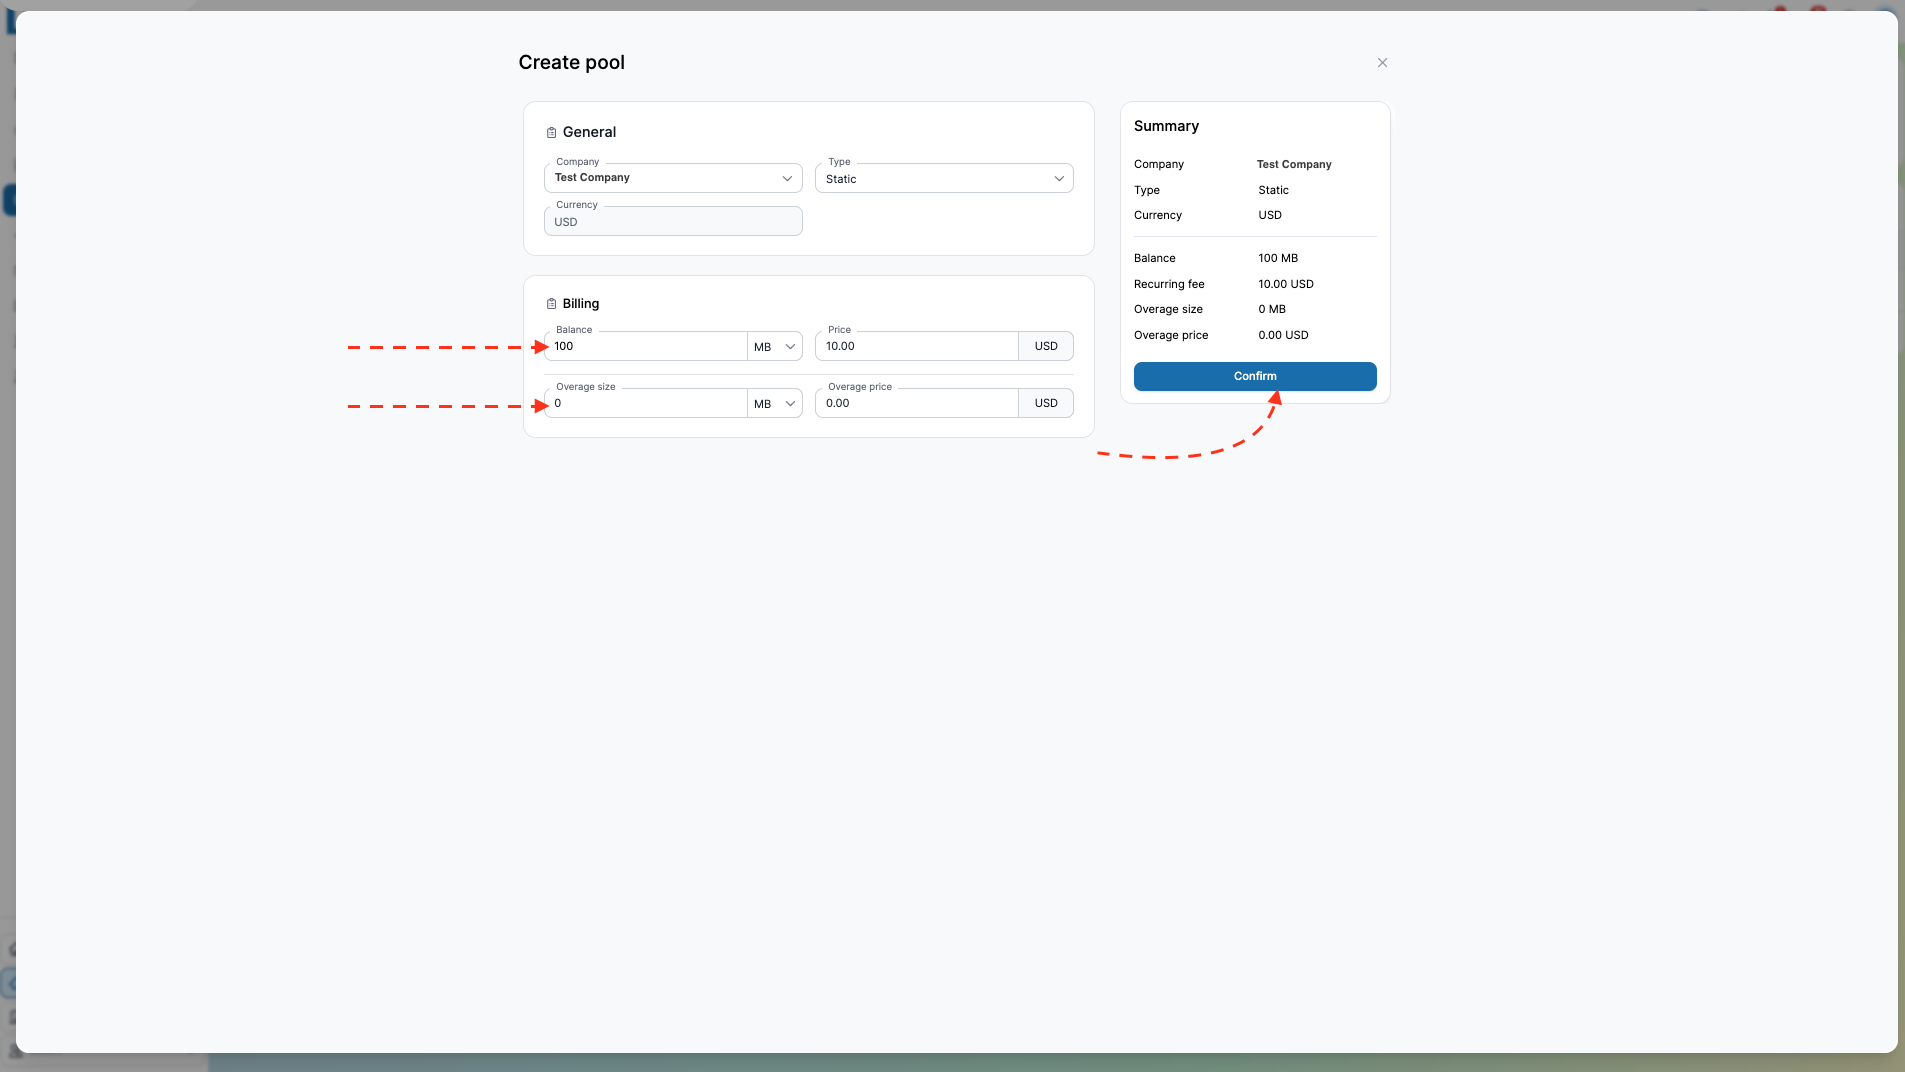
* **If you selected the Static pool type**, fill in the following information in the **Billing** section:

  * Balance
  * Price
  * Overage Size&#x20;
  * Overage Price&#x20;

  Review the information in the column on the right, then click **Confirm**.

<div data-full-width="true"><figure><img src="https://2408445593-files.gitbook.io/~/files/v0/b/gitbook-x-prod.appspot.com/o/spaces%2FxYJmxgUa2SDfD4byrJY1%2Fuploads%2F60PsNINCfKaeQkfuhTCZ%2FStatic.png?alt=media&amp;token=d6d7fe8a-81d0-4e21-8aba-99b8453f1f29" alt="" width="563"><figcaption></figcaption></figure></div>

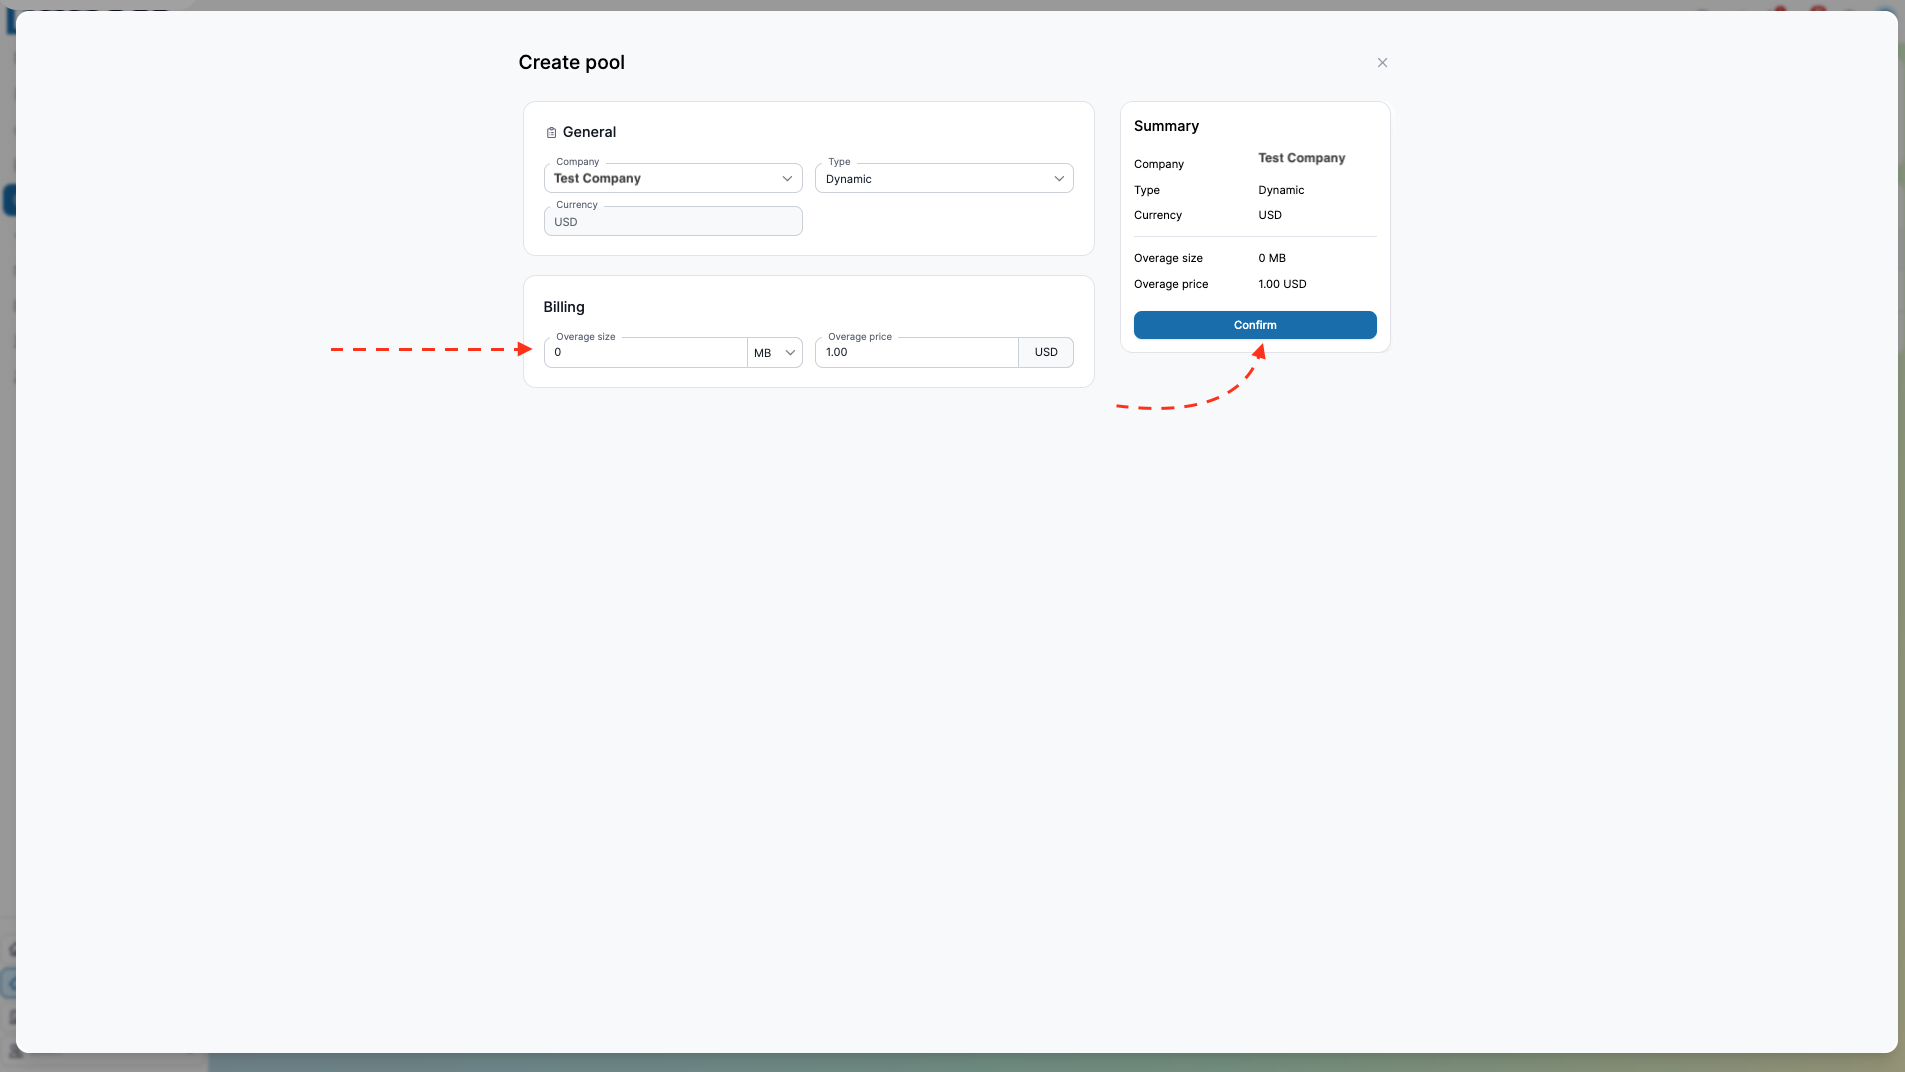
* **If you selected the Dynamic pool type**, fill in the following information in the **Billing** section:

  * **Overage Size** &#x20;
  * **Overage Price**

  Review the information in the column on the right, then click **Confirm**.

<div data-full-width="true"><figure><img src="https://2408445593-files.gitbook.io/~/files/v0/b/gitbook-x-prod.appspot.com/o/spaces%2FxYJmxgUa2SDfD4byrJY1%2Fuploads%2FPu8jIN6fNKY7JASGYBlt%2FDynamic.png?alt=media&amp;token=06361026-a963-4a51-a3fb-00634c0e1600" alt="" width="563"><figcaption></figcaption></figure></div>

{% hint style="warning" %}
One pool may be assigned to one company only
{% endhint %}


# 6. Invite Staff

{% hint style="warning" %}
You may invite staff in case not only the account owner will work with SIMs
{% endhint %}

### <mark style="background-color:blue;">**Complete the following steps:**</mark>

1. Go to **Settings**.

<figure><img src="https://2408445593-files.gitbook.io/~/files/v0/b/gitbook-x-prod.appspot.com/o/spaces%2FxYJmxgUa2SDfD4byrJY1%2Fuploads%2FZxRNzK9xW57zH0J37eG1%2Fsettings.png?alt=media&amp;token=95bc6e02-df92-4698-8263-8e1cfa5ef762" alt=""><figcaption></figcaption></figure>

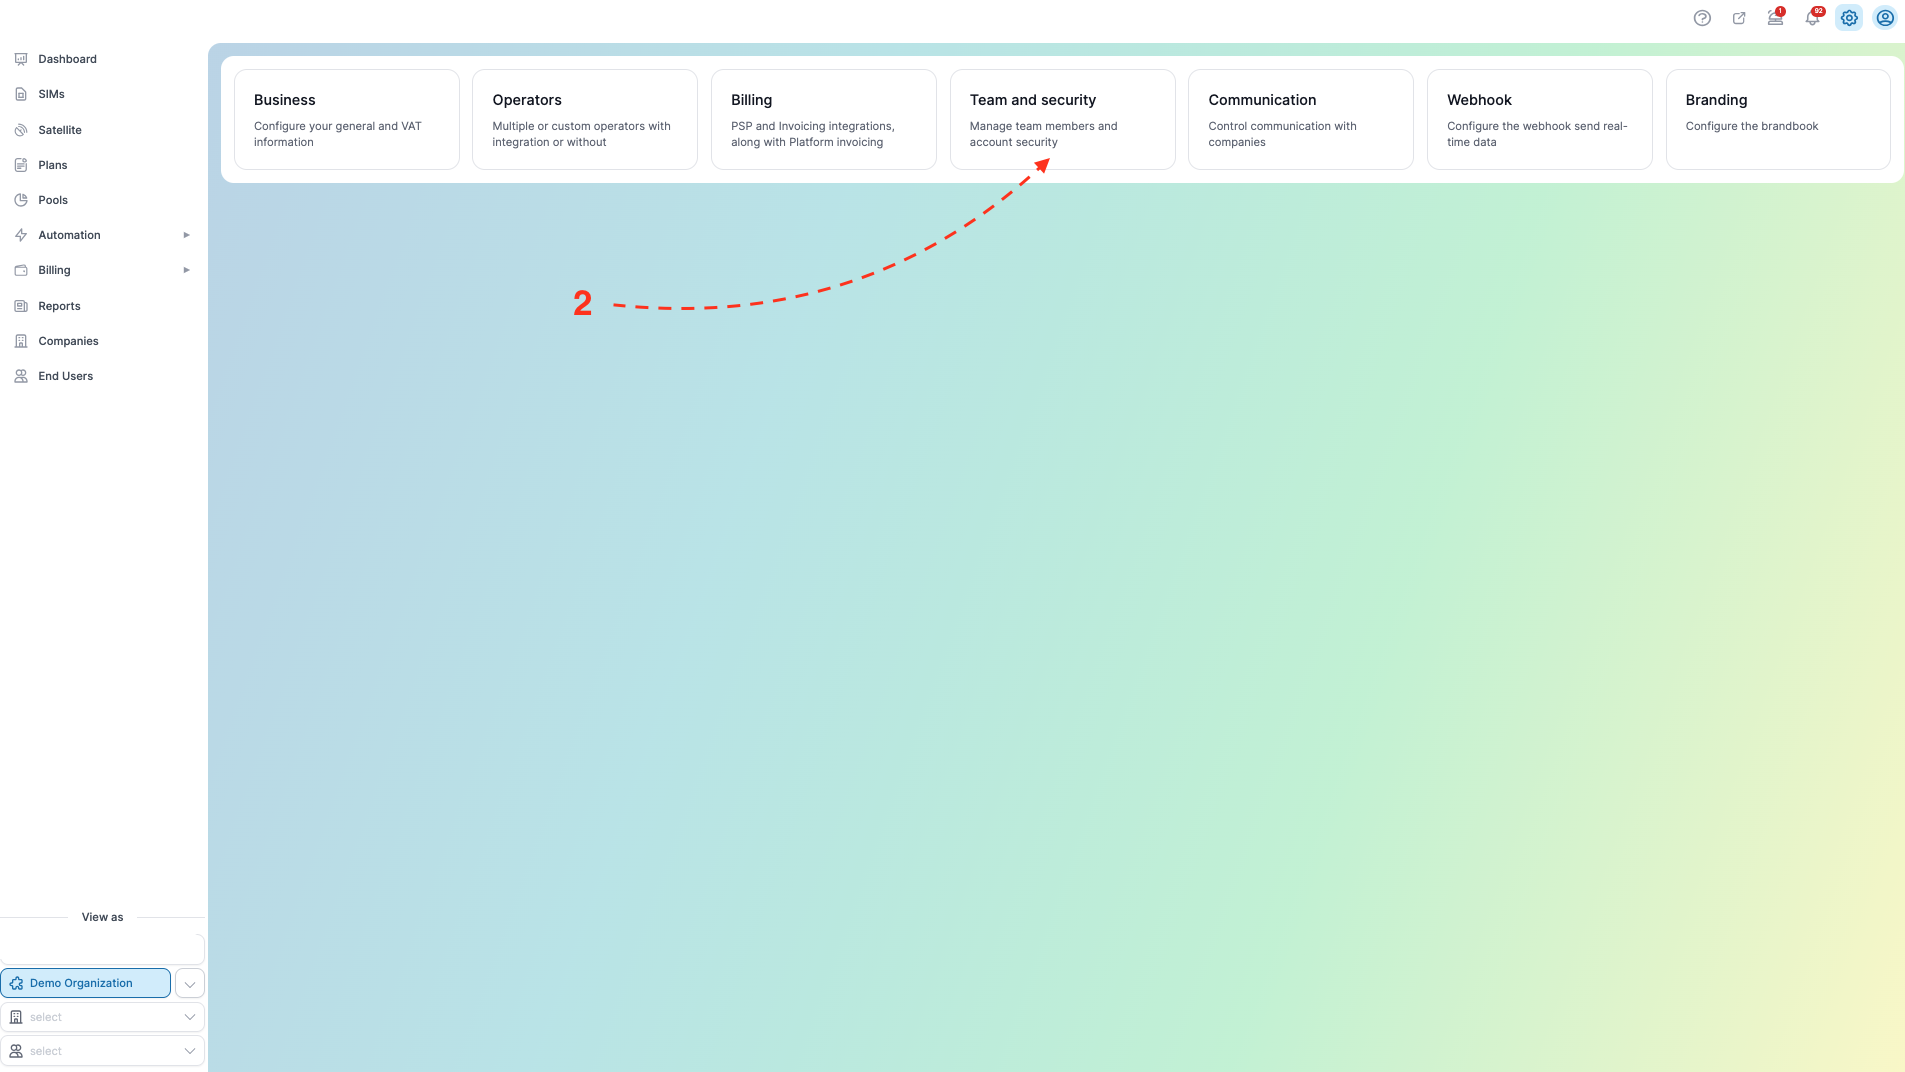
2. Click on  **Team and Security**&#x20;

<div data-full-width="true"><figure><img src="https://2408445593-files.gitbook.io/~/files/v0/b/gitbook-x-prod.appspot.com/o/spaces%2FxYJmxgUa2SDfD4byrJY1%2Fuploads%2FoHVMAQBnOTMnNSfQdyD5%2FTeam%20and%20Security.png?alt=media&amp;token=e8c5bc0a-7625-4c6b-aa5e-35c22837562f" alt="" width="563"><figcaption></figcaption></figure></div>

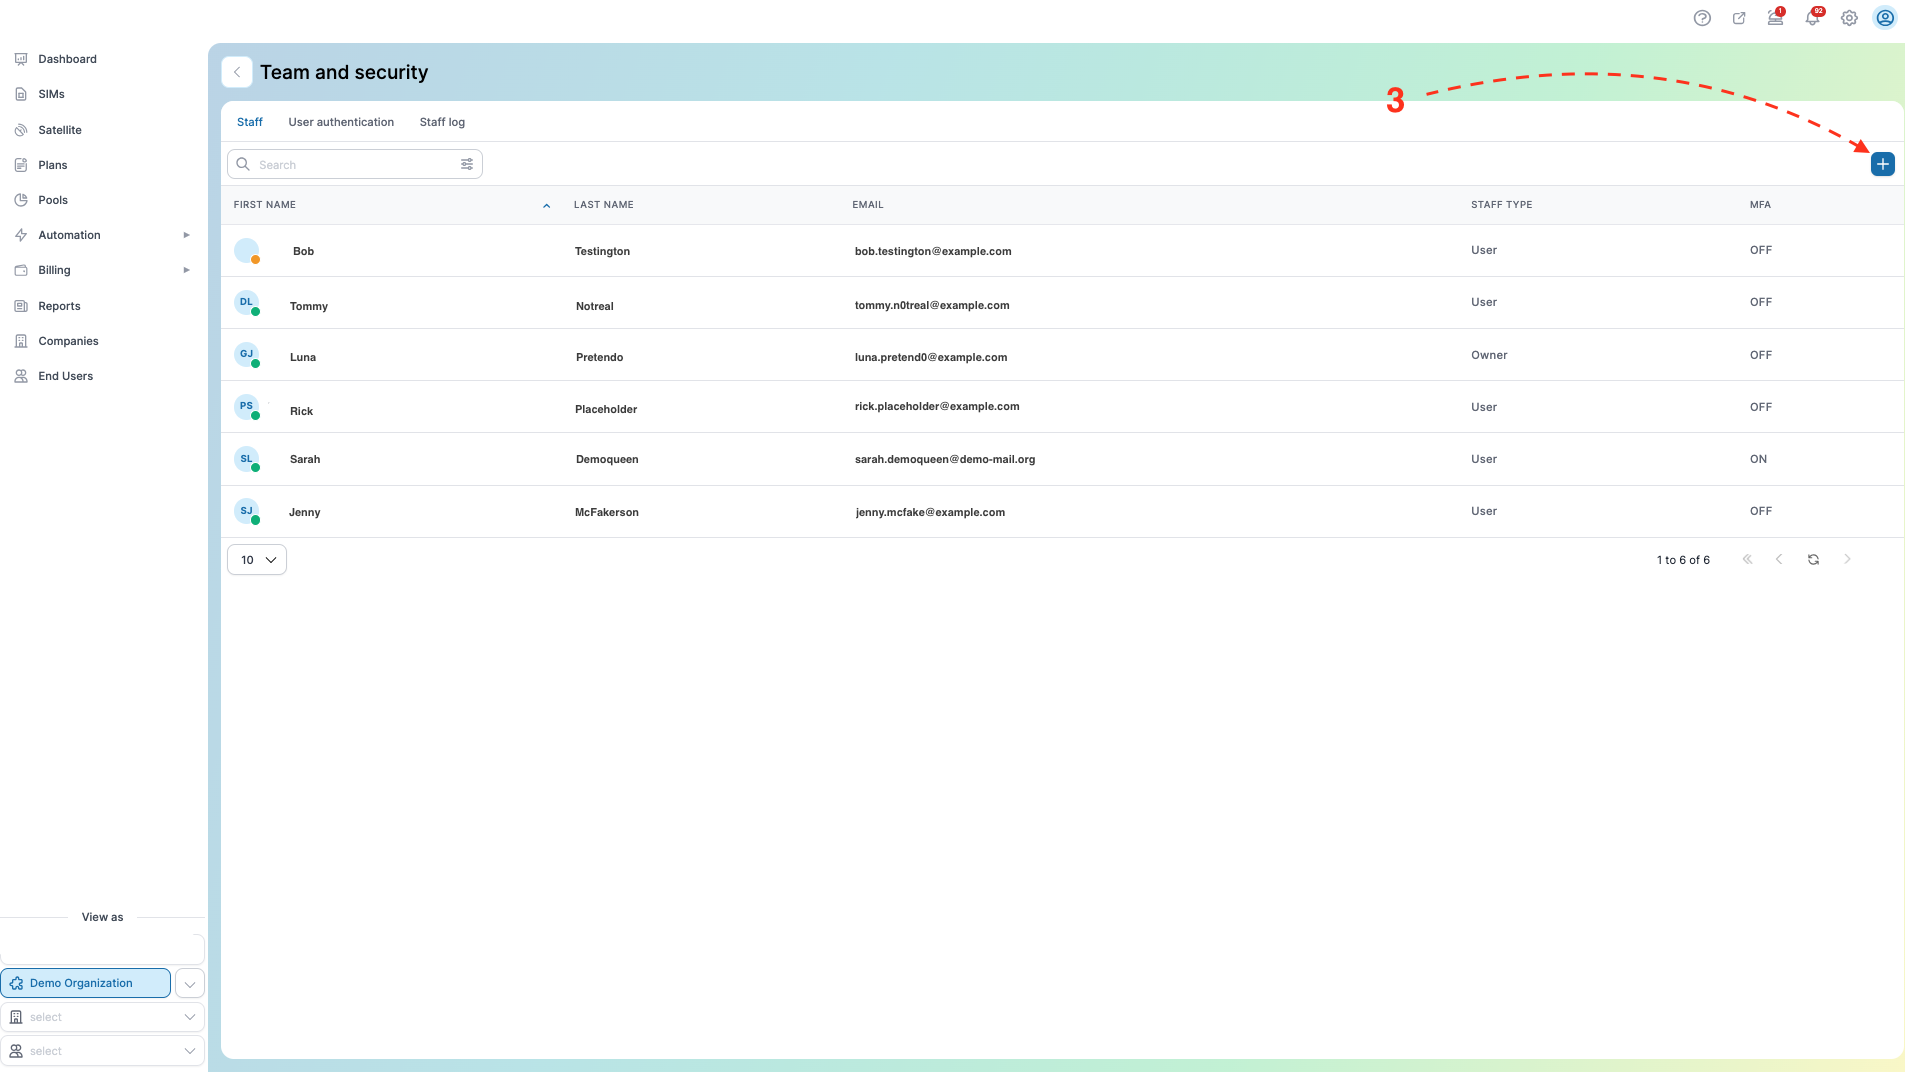
3. Click the **'+'** button on the right-hand side.

<div data-full-width="true"><figure><img src="https://2408445593-files.gitbook.io/~/files/v0/b/gitbook-x-prod.appspot.com/o/spaces%2FxYJmxgUa2SDfD4byrJY1%2Fuploads%2F8ioA8tPsI8WyccoAkxVn%2FStaff%20list.png?alt=media&amp;token=5108ff01-ff34-473a-a73f-d1b8c6063cb1" alt="" width="563"><figcaption></figcaption></figure></div>

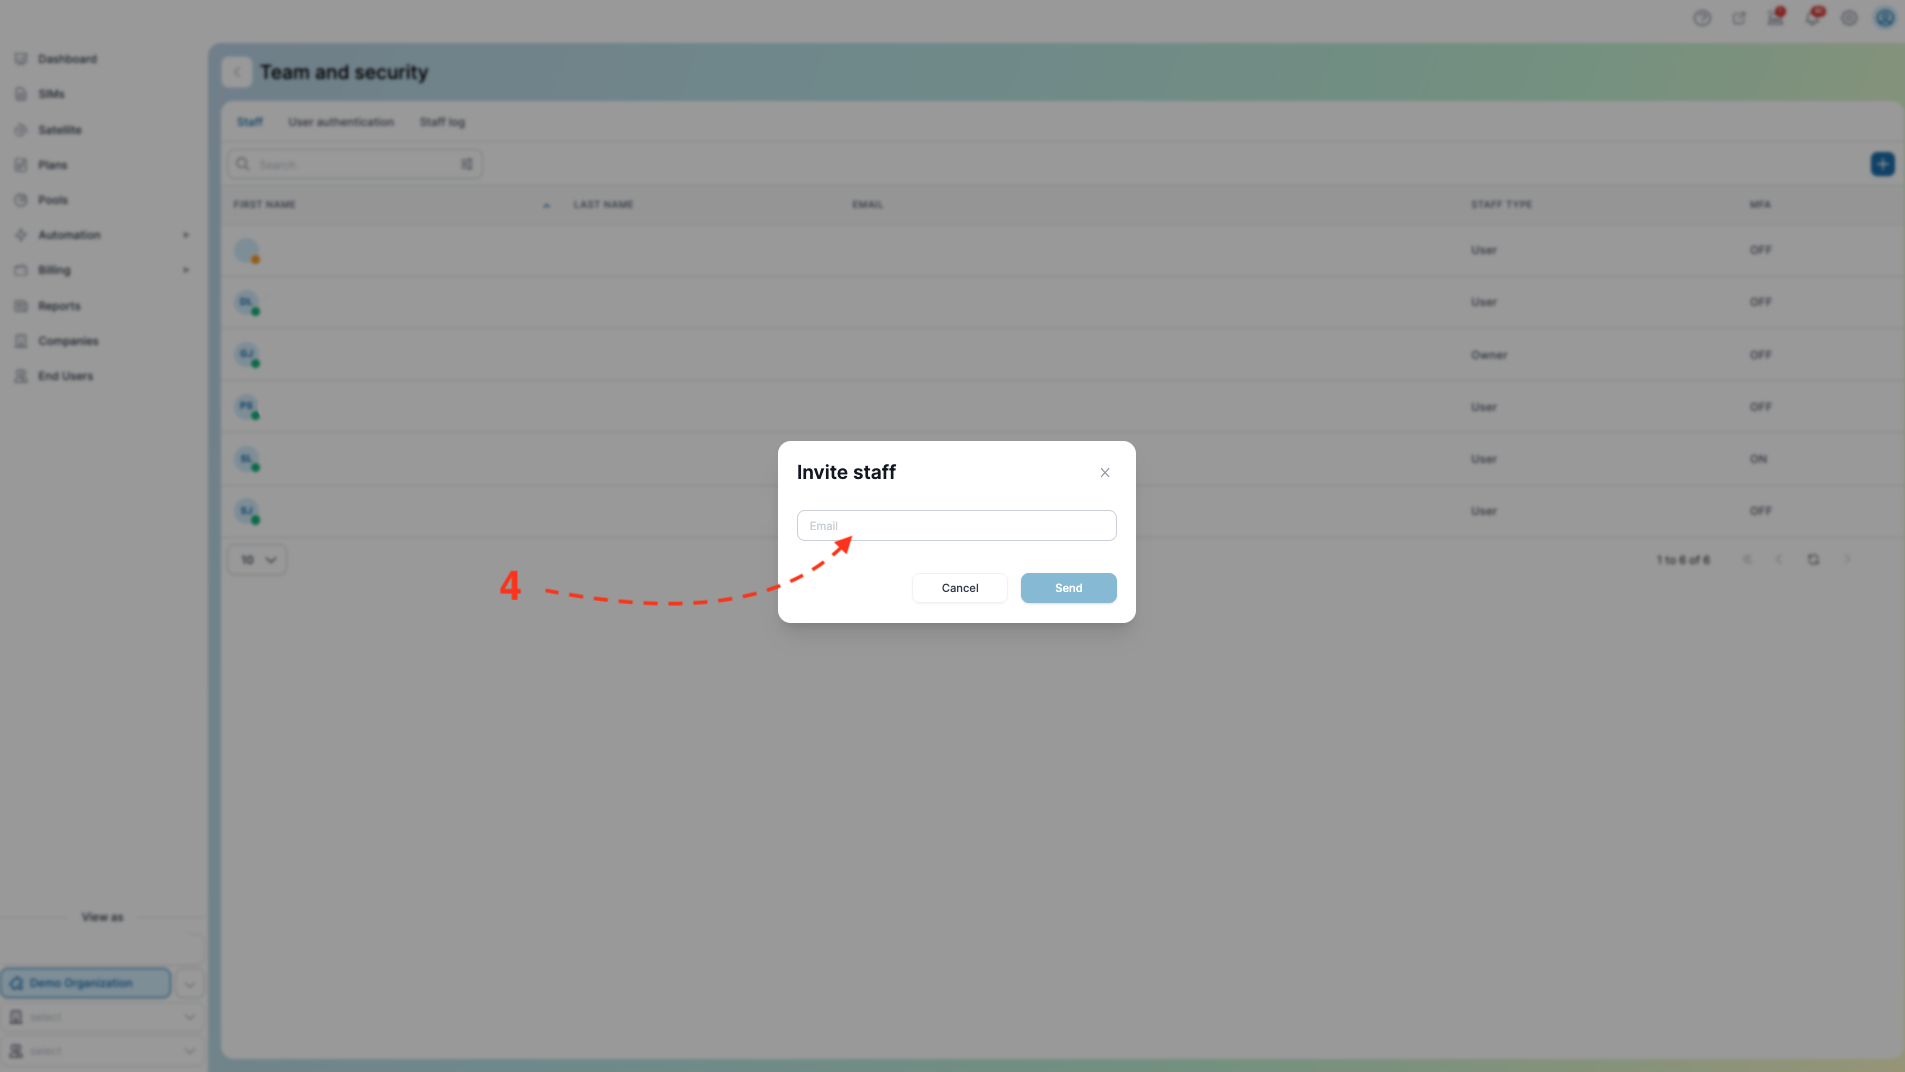
4. In the **'Invite Staff'** wizard, enter the email address of the person you want to invite.
<div data-full-width="true"><figure><img src="https://2408445593-files.gitbook.io/~/files/v0/b/gitbook-x-prod.appspot.com/o/spaces%2FxYJmxgUa2SDfD4byrJY1%2Fuploads%2F98ClTtYqXGG2MbxJ0YX7%2FInvite%20staff%20member.png?alt=media&amp;token=bace849f-52bf-41b3-aedb-ca25617a8fd7" alt="" width="563"><figcaption></figcaption></figure></div>

5. The invited staff member will receive an email with instructions on how to create their account.

{% hint style="info" %}
This action can be performed at any point while using the platform.
{% endhint %}

***

## <mark style="background-color:blue;">Permissions</mark>

The **Staff** page allows the Organization to register team members and manage their access rights on the platform. This functionality ensures that each staff member has the appropriate permissions to perform their tasks while maintaining security and control over sensitive information.

### <mark style="background-color:blue;">**Complete the following steps:**</mark>

1. Go to **Settings**.

<figure><img src="https://2408445593-files.gitbook.io/~/files/v0/b/gitbook-x-prod.appspot.com/o/spaces%2FxYJmxgUa2SDfD4byrJY1%2Fuploads%2FZxRNzK9xW57zH0J37eG1%2Fsettings.png?alt=media&amp;token=95bc6e02-df92-4698-8263-8e1cfa5ef762" alt=""><figcaption></figcaption></figure>

2. Click on  **Team and Security**&#x20;

<div data-full-width="true"><figure><img src="https://2408445593-files.gitbook.io/~/files/v0/b/gitbook-x-prod.appspot.com/o/spaces%2FxYJmxgUa2SDfD4byrJY1%2Fuploads%2FoHVMAQBnOTMnNSfQdyD5%2FTeam%20and%20Security.png?alt=media&amp;token=e8c5bc0a-7625-4c6b-aa5e-35c22837562f" alt="" width="563"><figcaption></figcaption></figure></div>

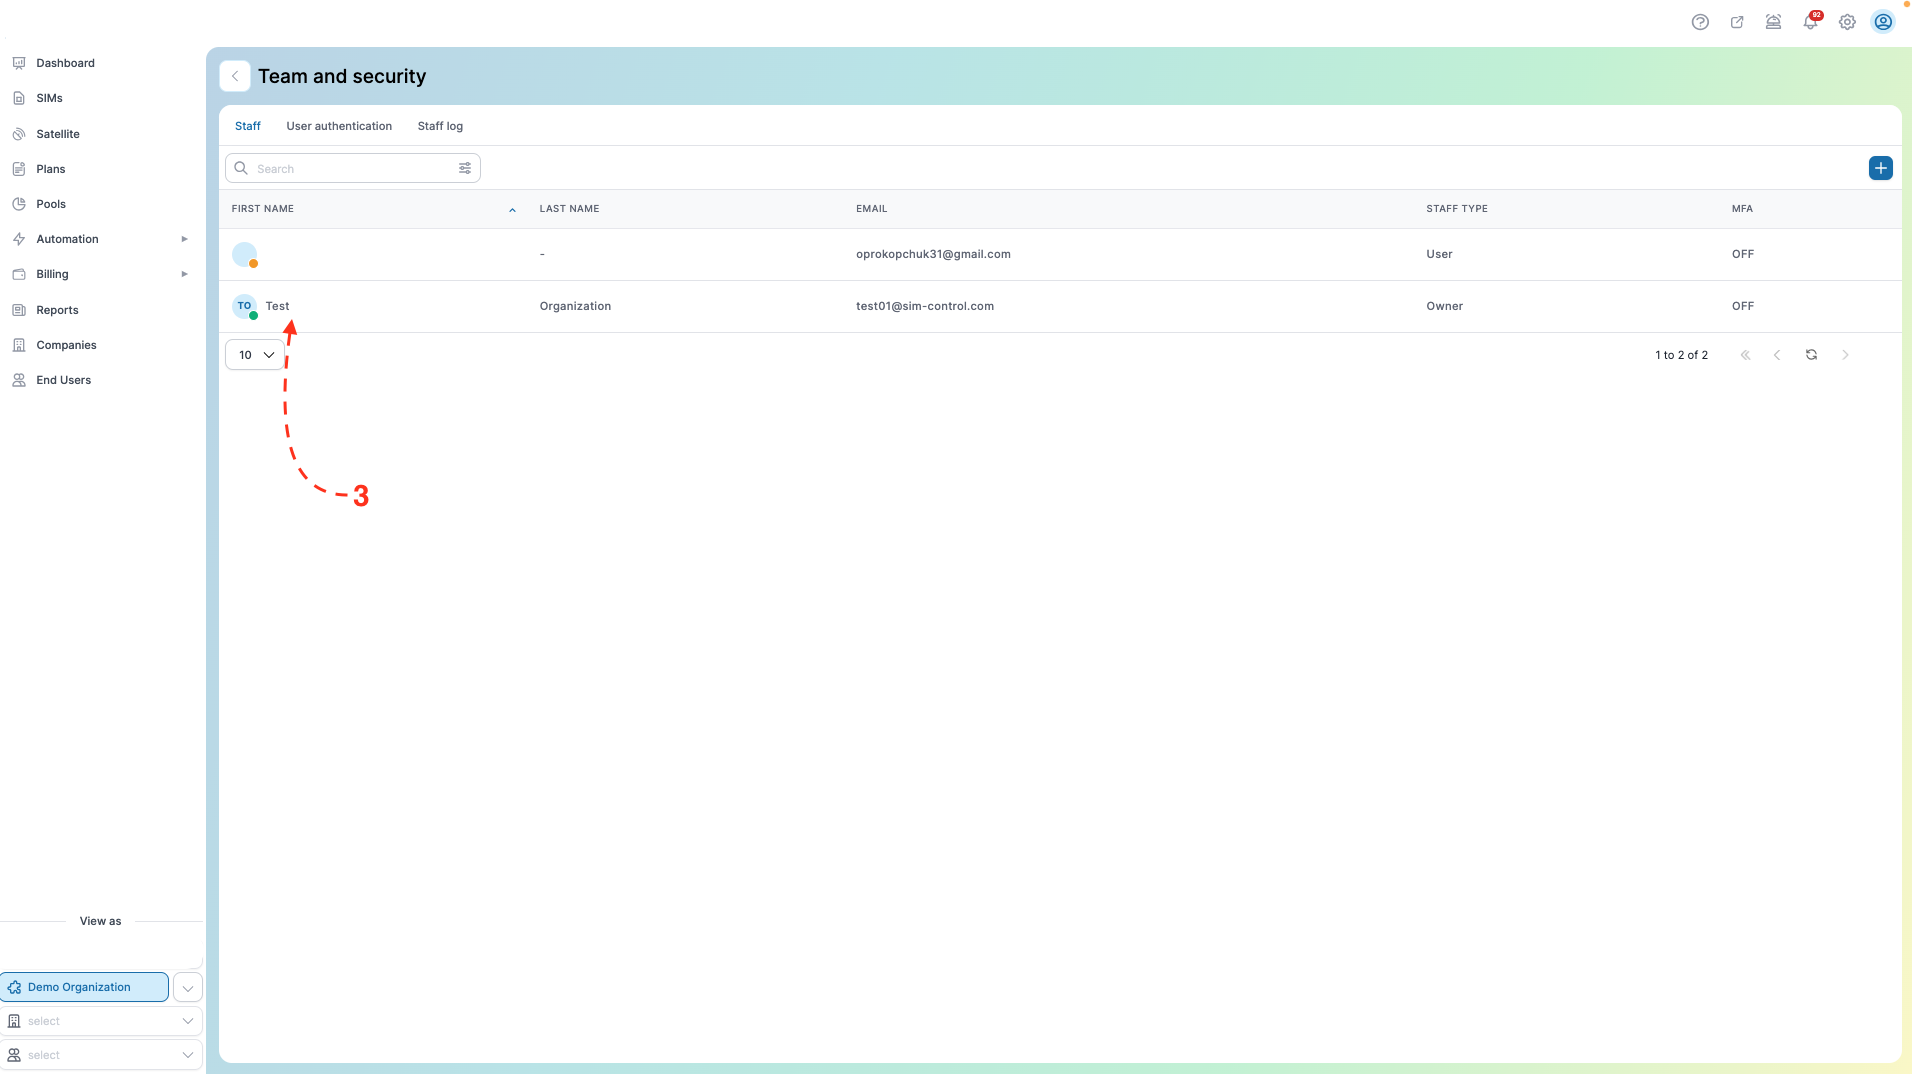
3. Click on the Staff member you want to edit access for
<figure><img src="https://2408445593-files.gitbook.io/~/files/v0/b/gitbook-x-prod.appspot.com/o/spaces%2FxYJmxgUa2SDfD4byrJY1%2Fuploads%2FwizFv0VAezu8nOXbOsQv%2FStaff%20member.png?alt=media&amp;token=7d9ac466-a550-4a05-ac11-0b32ae93f869" alt=""><figcaption></figcaption></figure>

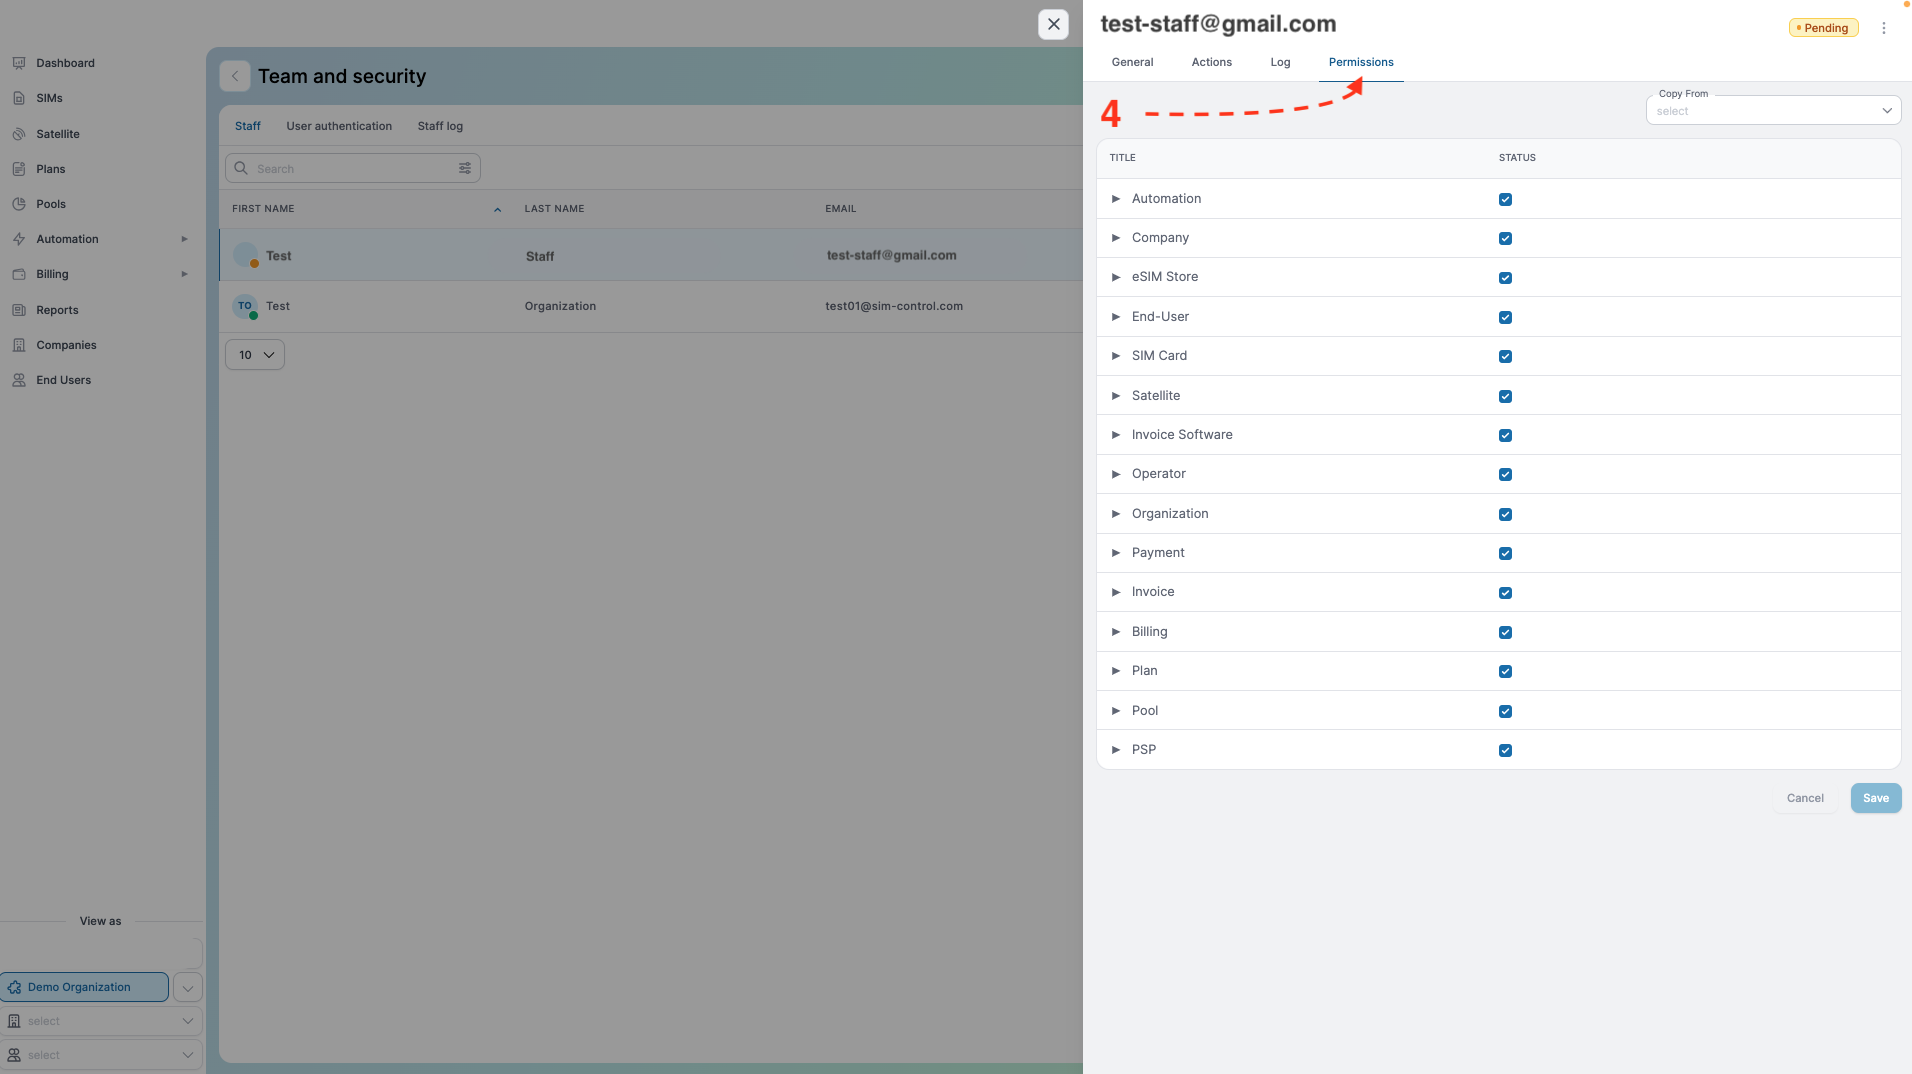
4. Go to the Permissions tab and check or uncheck the appropriate box next to the relevant field.
<div data-full-width="true"><figure><img src="https://2408445593-files.gitbook.io/~/files/v0/b/gitbook-x-prod.appspot.com/o/spaces%2FxYJmxgUa2SDfD4byrJY1%2Fuploads%2F6ZYQUoYjCRzfTa4yKuxJ%2FPermissions.png?alt=media&amp;token=dd81c516-57cf-4200-aa33-2bc8beef23f7" alt="" width="563"><figcaption></figcaption></figure></div>


# 7. Customize Columns

{% hint style="info" %}
This action can be performed at any point while using the platform.
{% endhint %}

### <mark style="background-color:blue;">**Complete the following steps:**</mark>

1. Go to the '**SIMs**' button in the left sidebar of the navigation menu
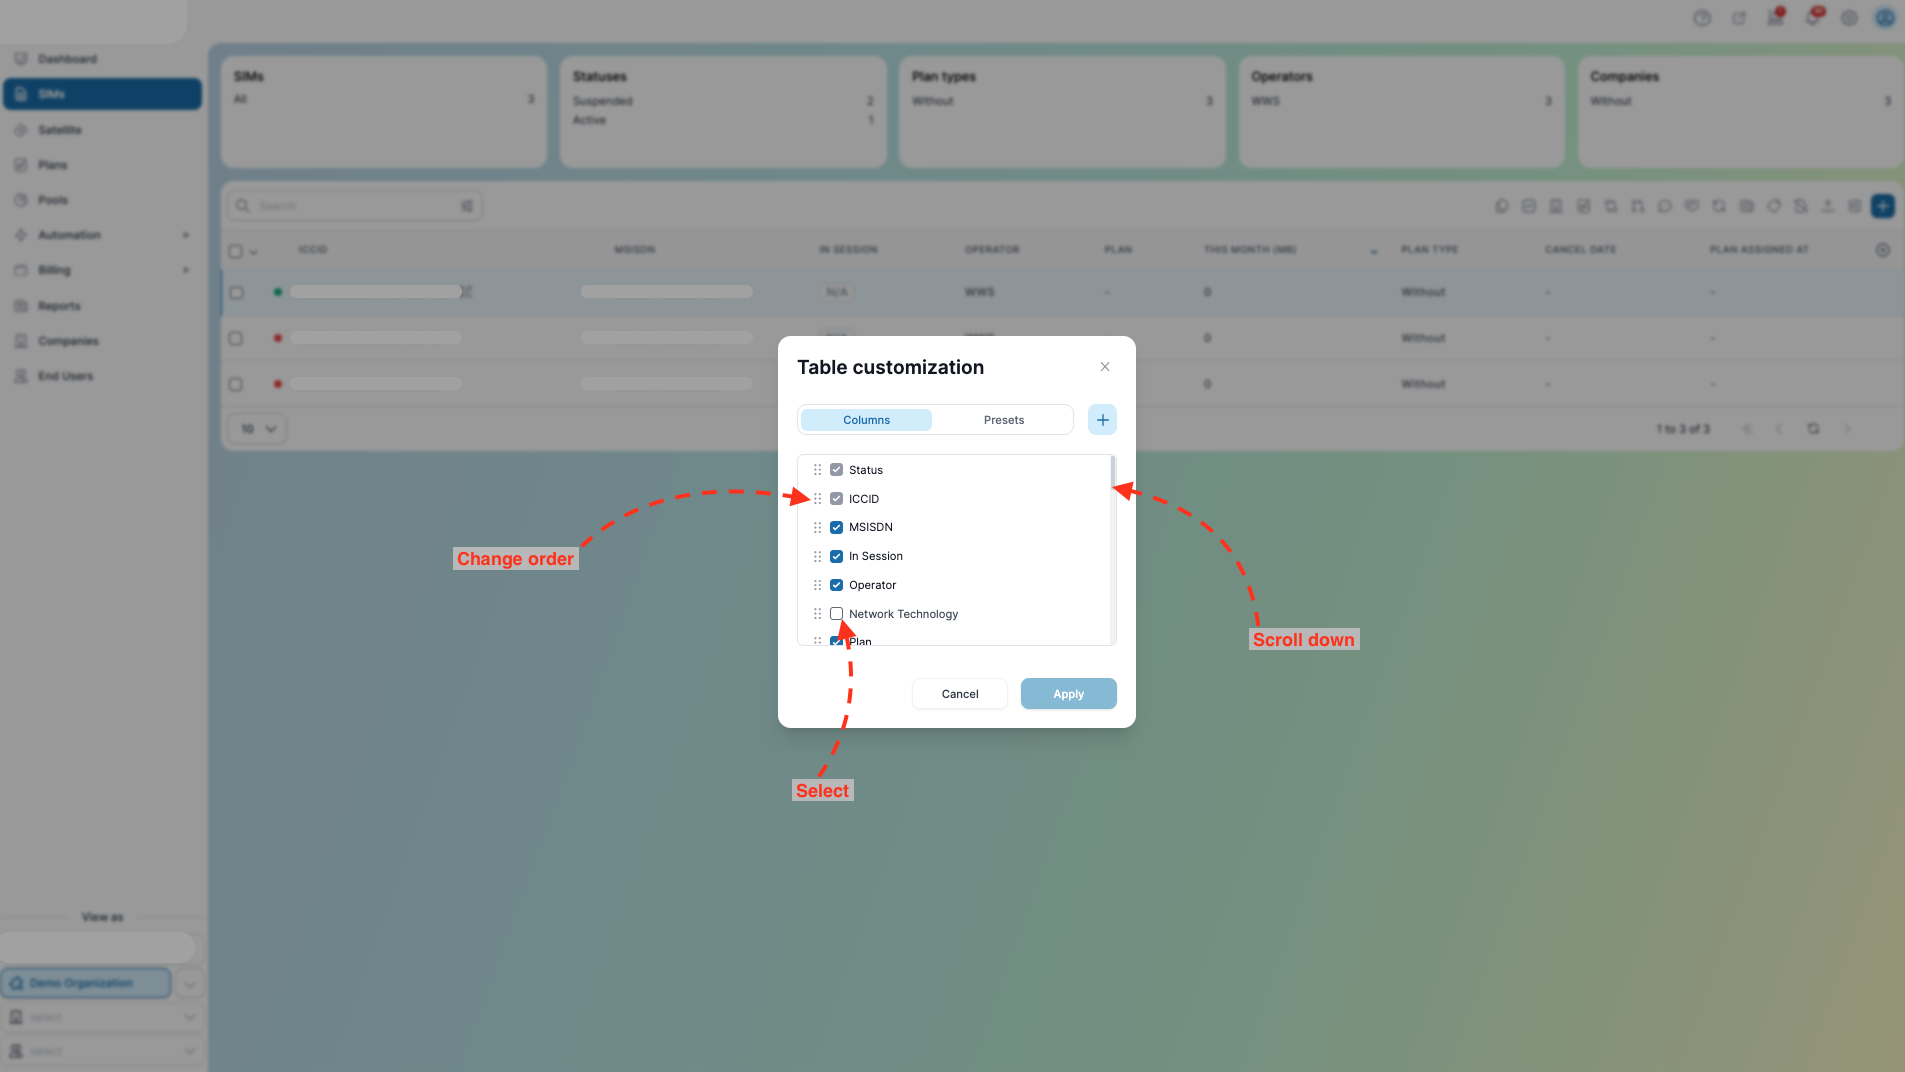
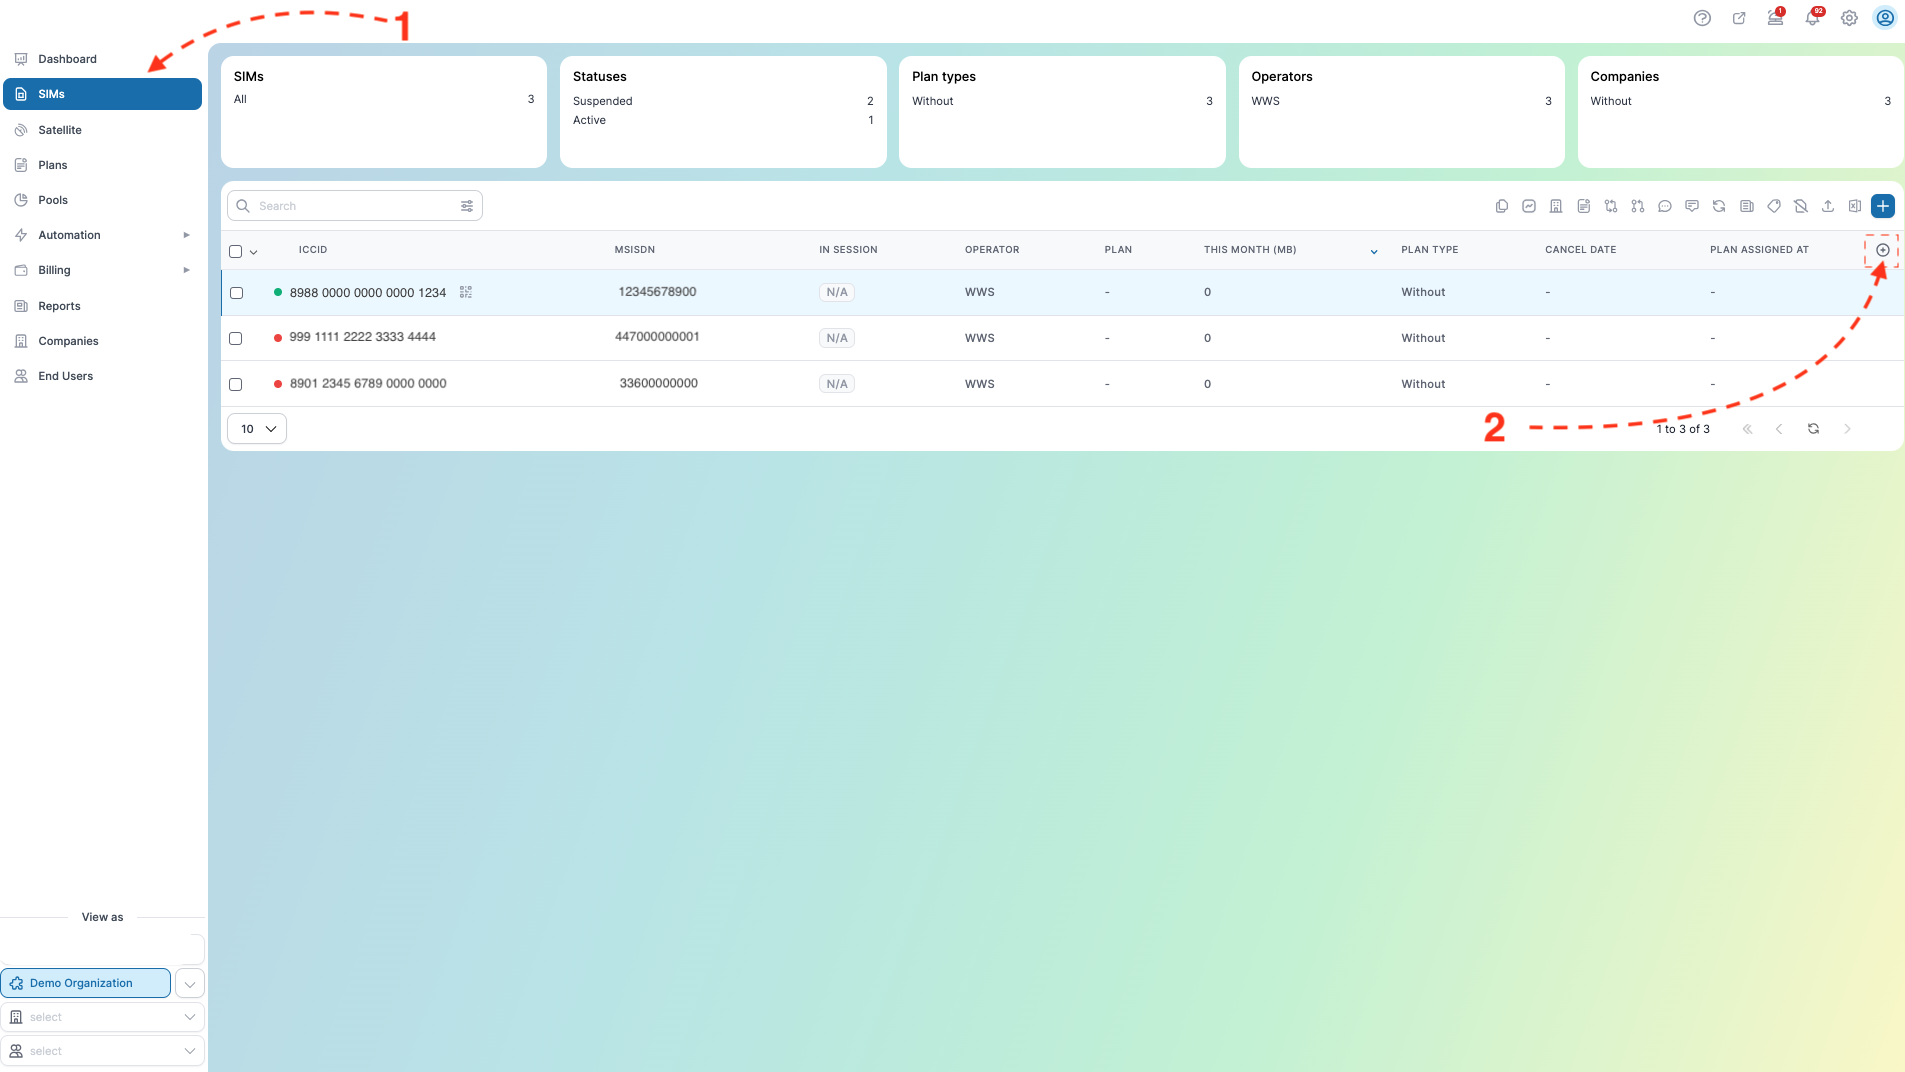
2. Click the **'+'** button in the table header, and a wizard with a list of all column names will appear.&#x20;

<div data-full-width="true"><figure><img src="https://2408445593-files.gitbook.io/~/files/v0/b/gitbook-x-prod.appspot.com/o/spaces%2FxYJmxgUa2SDfD4byrJY1%2Fuploads%2F6Nf7YAIfgwmv6H21itmv%2FSim%20%26plus%20.png?alt=media&amp;token=29950340-c08b-4fc3-a35c-3f9f5accea52" alt="" width="563"><figcaption></figcaption></figure></div>

3. Select the columns you want to display in the table. In the same wizard window, you can also choose the order of the columns (press and hold the dots, then drag up or down). Click **Apply** to save your changes.

<div data-full-width="true"><figure><img src="https://2408445593-files.gitbook.io/~/files/v0/b/gitbook-x-prod.appspot.com/o/spaces%2FxYJmxgUa2SDfD4byrJY1%2Fuploads%2FAywoCUyKam0wfBzqFk3J%2FCustomization.png?alt=media&amp;token=7caa4d0b-e960-40d1-b616-86a420f24209" alt="" width="563"><figcaption></figcaption></figure></div>

<br>


# 8. Notifications

Our platform provides a few types of notifications, allowing you to stay informed about key updates and service changes. Here's how they work for different service types and how you can customize them to fit your needs.

<table><thead><tr><th width="154">Type</th><th width="204">Levels</th><th>Description</th></tr></thead><tbody><tr><td>Notifications</td><td><p>Organizations</p><p>Companies<br>End Users</p></td><td>Automatic alerts are sent to end users or companies. They can be categorized as mandatory and optional</td></tr><tr><td>Webhook Notifications</td><td><p>Organizations</p><p>Companies<br>End Users</p></td><td>Automatically send real-time updates to your system through webhooks. This allows seamless integration with your internal processes.</td></tr></tbody></table>

### <mark style="background-color:blue;">1.</mark> <mark style="background-color:blue;"></mark><mark style="background-color:blue;">**Prepaid Services Notifications**</mark>

For Prepaid services, end users will receive reminders when their balance is about to expire:

* **10 days remaining**: "You have 10 days left, and your balance will expire."
* **5 days remaining**: "You have 5 days left, and your balance will expire."

These notifications help end users avoid service interruptions by giving them enough time to top up their accounts.

### <mark style="background-color:blue;">2.</mark> <mark style="background-color:blue;"></mark><mark style="background-color:blue;">**Subscription and PAYGO Services**</mark>

For subscription and PAYGO (pay-as-you-go) services, you can choose where notifications are sent:

* Set a **default email** where notifications will always be delivered.
* Send notifications to specific emails within the company.
* Use the **end user’s email** if needed.

This ensures that both internal teams and customers are informed at the right time.


# 9. Communication

On this page, you, as an organization, can set up direct links to make it easier for your customers to connect with you.&#x20;

<div data-full-width="true"><figure><img src="https://2408445593-files.gitbook.io/~/files/v0/b/gitbook-x-prod.appspot.com/o/spaces%2FxYJmxgUa2SDfD4byrJY1%2Fuploads%2FfueydTsJ3O3nkssD9Kty%2FCommunication.png?alt=media&amp;token=5aea9597-3761-4722-a4c1-8345d0038f78" alt="" width="563"><figcaption></figcaption></figure></div>

Here’s what you can do:

### <mark style="background-color:blue;">1.</mark> <mark style="background-color:blue;"></mark><mark style="background-color:blue;">**Contact Us**</mark>

* Add a link to your external contact page.
* Once you set it up, your customers will see a new menu item that takes them directly to this link.
* You can easily replace or remove the link whenever needed.

### <mark style="background-color:blue;">2.</mark> <mark style="background-color:blue;"></mark><mark style="background-color:blue;">**Report an Issue**</mark>

* Provide a link where your customers can report any issues.
* This could be a Google Form, a page on your website that sends requests to your email, or any other platform you prefer.
* After you set it up, your customers will see a new menu item directing them to this link.
* You’re free to change or delete the link at any time.

### <mark style="background-color:blue;">3.</mark> <mark style="background-color:blue;"></mark><mark style="background-color:blue;">**Order New SIM**</mark>

* Add a link where customers can request a new SIM card.
* Once added, your customers will see a menu item that points them to this link.
* You can update or remove this link whenever you want.

***

### <mark style="background-color:blue;">4. Google Tag Manager (GTM)</mark>

**Step 1: Sign up for Google Tag Manager**

* Go to [https://tagmanager.google.com](https://tagmanager.google.com/).
* Sign in with your Google account or create a new account.

**Step 2: Create a Container**

**Step 3: Add a Script to the Container**

* In the container dashboard, click **Add a new tag**.
* Choose the tag type you want to use (e.g., Reamaze).
* Save the tag

**Step 4: Get the Container ID**

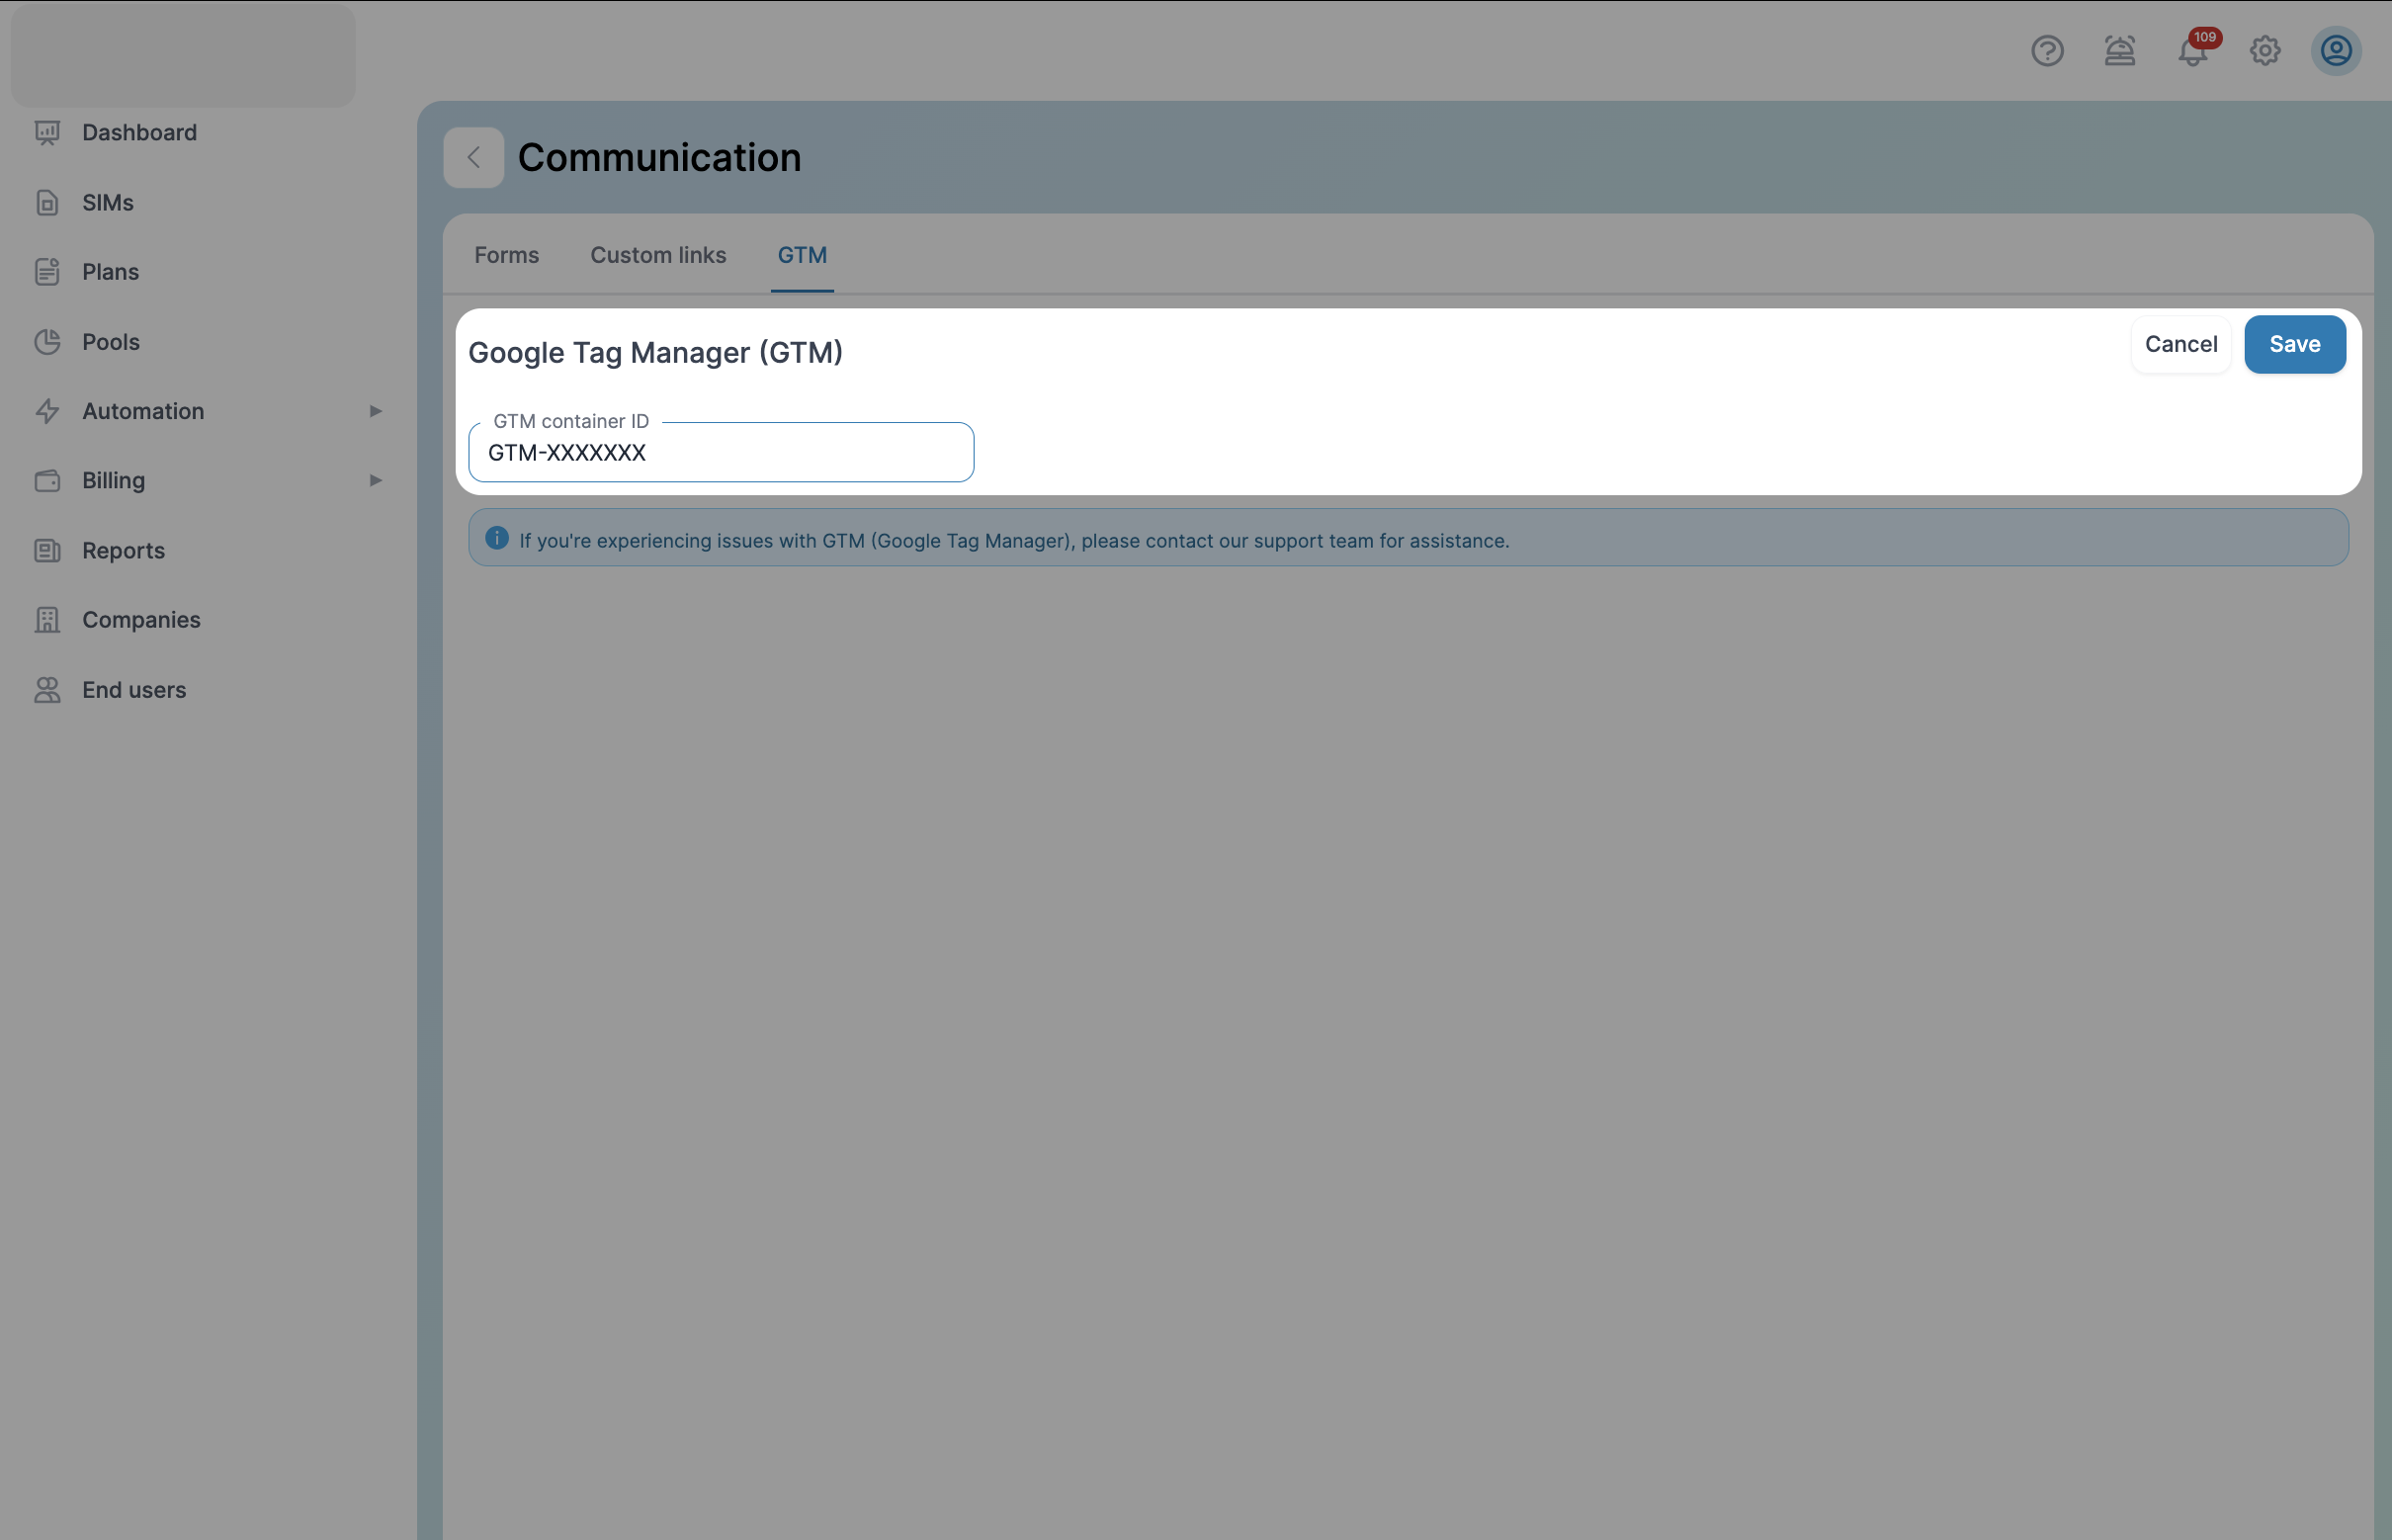
* On the container dashboard, copy the **GTM-XXXXXX**   ID.

**Step 5: Add the Container ID to the Platform**

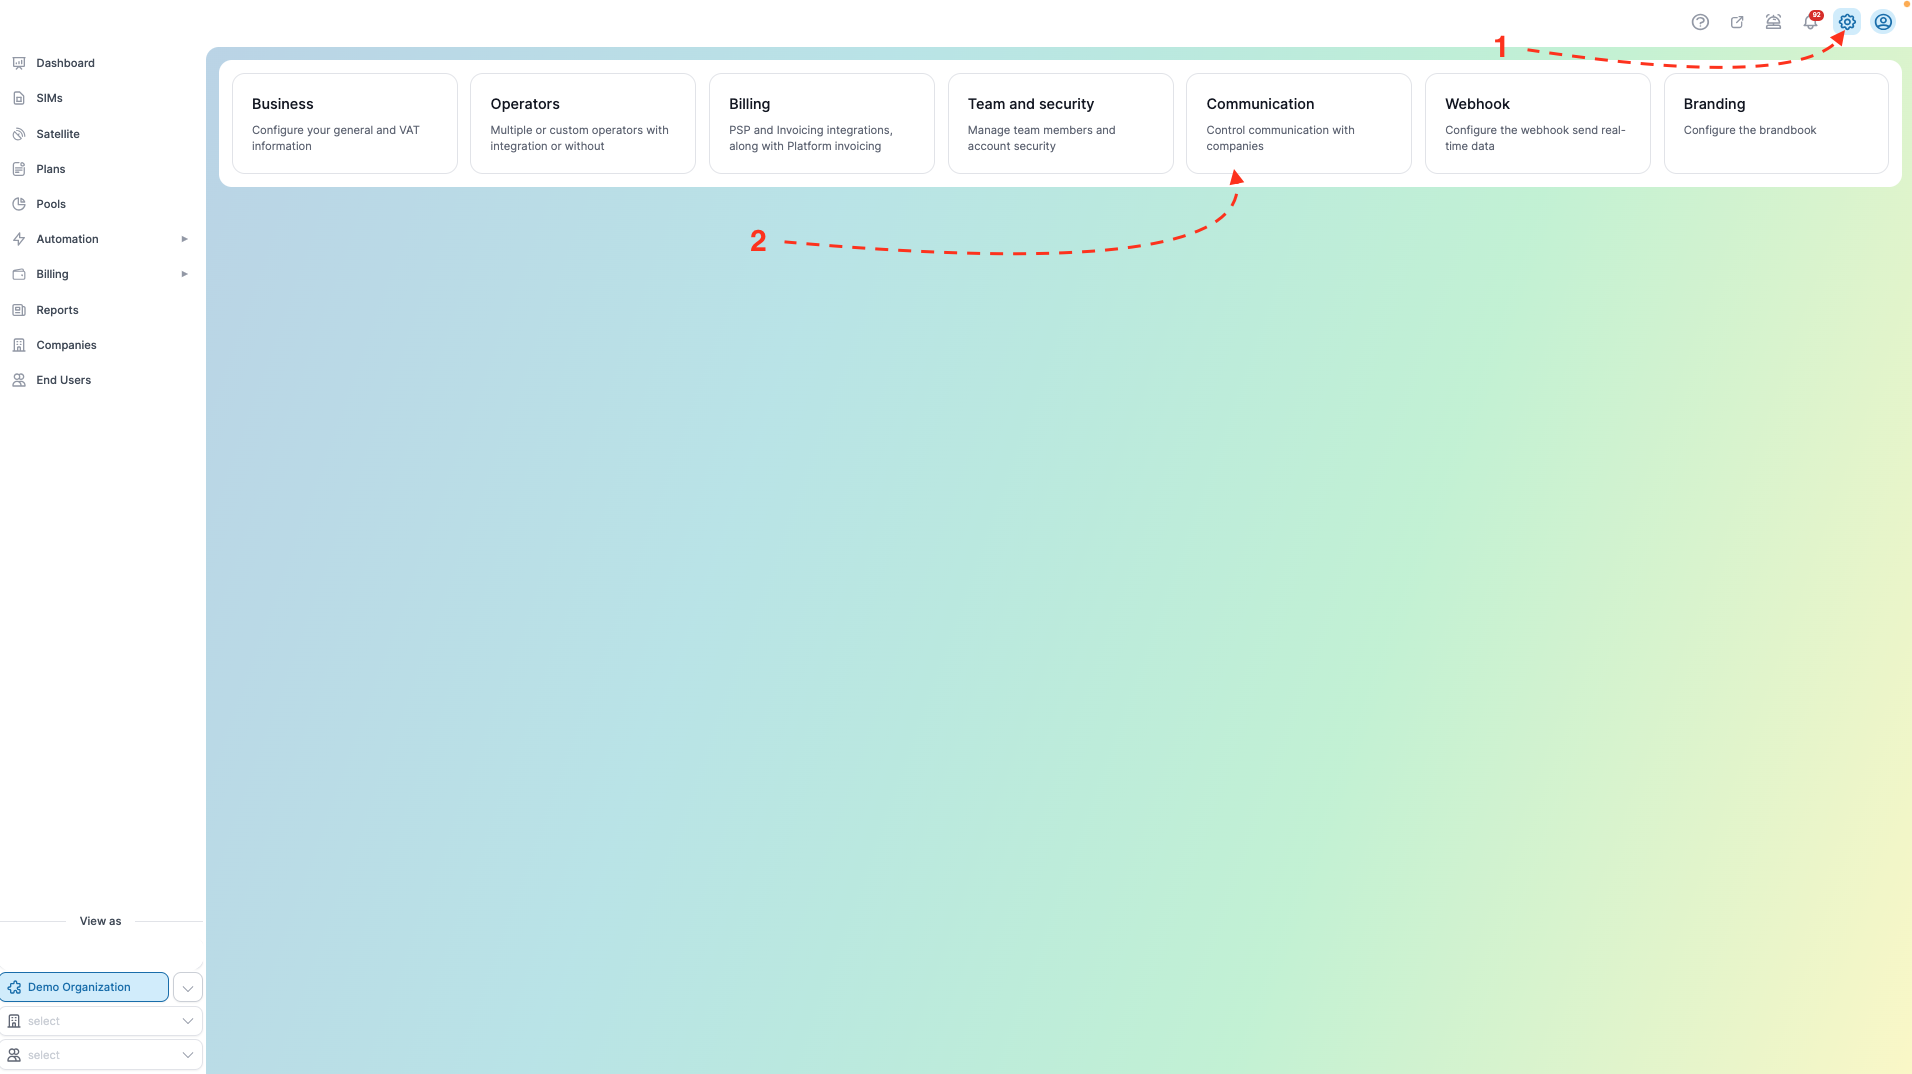
* Go to your account settings on the platform.
* Navigate to **Communication** → **GTM** tab.
* Paste the GTM container ID.
* Save the settings.

<div data-full-width="true"><figure><img src="https://2408445593-files.gitbook.io/~/files/v0/b/gitbook-x-prod.appspot.com/o/spaces%2FxYJmxgUa2SDfD4byrJY1%2Fuploads%2FsY206NXX6op3t26oQDk6%2FGTM%20tag.png?alt=media&amp;token=c2d31827-d683-410d-8d4d-817b6044d59b" alt="" width="563"><figcaption></figcaption></figure></div>


# Roles on the platform

### <mark style="background-color:blue;">1.  Organization</mark>

An Organization is the level at which contracts with operators are signed and SIM cards are issued. At this level, you can include one or multiple Companies, and it is responsible for managing all the Companies within its structure.

On this level, an Organization can:

* Add SIM cards
* Holds contracts with operators
* Adds its payment systems (Stripe, PayPal)
* Integrate SIM cards with operators or simply store information about them
* Create appropriate plans, although SIM cards do not necessarily have to be integrated with operators

An Organization can also add SIM cards without integrations. This means Organizations can use our platform as a place to store all their SIM cards.&#x20;

**Example:**

if an Organization has 1,000 SIM cards, but the operator does not have integration with our platform or the integration has not been implemented yet, the Organization can still:

* View all their SIM cards
* Assign them to their clients
* Track which clients are using these SIM cards and which Company they belong to

***

### <mark style="background-color:blue;">2. Company</mark>

* Belongs to an Organization
* Created for business clients or virtual Companies
* Can be used to sell SIM cards to end consumers
* End Users are associated with the Company
* Can switch to the level: End User

A Company **always belongs to an Organization**. We cannot create a Company without an Organization. This means that a Company is a business client that belongs to an Organization.

Each Company can have its own settings, plans, and users. Even if the Organization does not have business clients (companies) and wants to sell SIM cards directly to end consumers, it still needs to create a virtual Company that will not be visible to customers but will represent, for example, a point of sale.

**Example:**

* An Organization has a prepaid product and wants to sell it through Amazon. To do this, the Organization needs to create a Company and name it, for instance, “Amazon Band.” Thus:
  * The SIM cards sold on Amazon will be linked to this Company.
  * End consumers who purchase these SIM cards will register on our platform and automatically be associated with the created Company “Amazon Band.”

***

### <mark style="background-color:blue;">3. End User</mark>

* Has login credentials (username, password, can set up 2FA)
* Is associated with a Company, which in turn is associated with an Organization
* End Users cannot configure or use rules. SIM card management rules can only be configured at the Organization or Company level

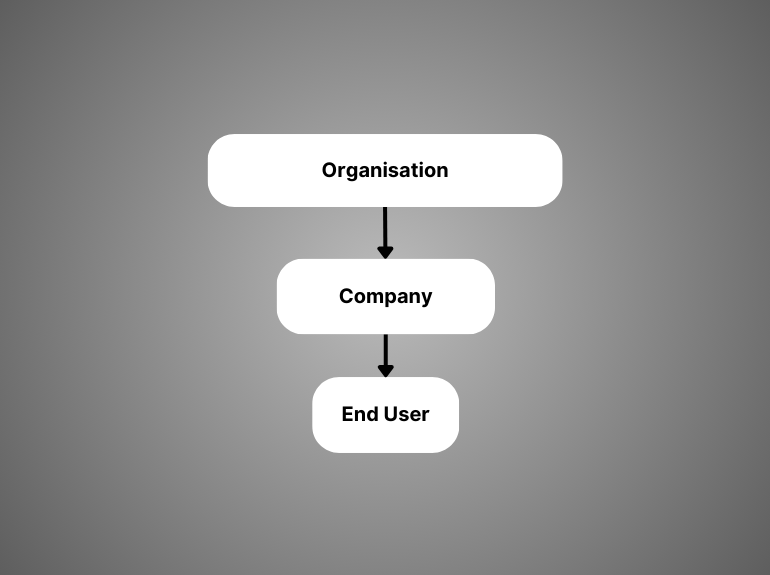
End Users are linked to a Company, and the Company is linked to an Organization.

This structure is immutable. We cannot link an end user directly to an Organization. The End User is only linked to a Company, which in turn is linked to an Organization.

<figure><img src="https://2408445593-files.gitbook.io/~/files/v0/b/gitbook-x-prod.appspot.com/o/spaces%2FxYJmxgUa2SDfD4byrJY1%2Fuploads%2Fq7PLefVuLbXIX7hm60u5%2FOrganisation%20(1).png?alt=media&amp;token=414419ff-b767-4e32-837d-6070336c5813" alt="" width="375"><figcaption></figcaption></figure>

{% hint style="warning" %}
**Important**

The platform has a clear hierarchy: there is an admin, which branches into Organizations, each Organization can see its Companies, and each Company can have End Users. This structure does not change!&#x20;

**Example:**

An End User cannot be linked directly to an Organization. The end user is linked to a Company, and the Company is linked to an Organization.&#x20;

* Organizations can see their companies
* Companies can have end users
  {% endhint %}


# SIMs

The **SIMs** page provides convenient access to essential information about each SIM card, including their statuses, SIM types, operators, associated companies, and end users.&#x20;

This enables to easily tracking of data usage, remaining days on active plans, and viewing detailed information for each card, such as ICCID, operator, plan, company, and other relevant details.

<table data-view="cards"><thead><tr><th></th><th data-hidden data-card-cover data-type="files"></th><th data-hidden data-card-target data-type="content-ref"></th></tr></thead><tbody><tr><td>SIM Statuses</td><td><a href="https://2408445593-files.gitbook.io/~/files/v0/b/gitbook-x-prod.appspot.com/o/spaces%2FxYJmxgUa2SDfD4byrJY1%2Fuploads%2FyzZ5WdLdqeCgAOwNOx66%2FSIM%20Statuses.png?alt=media&amp;token=09a4bb39-4e55-4eff-8e58-0fcd801a27a9">SIM Statuses.png</a></td><td><a href="/menu/publish-your-docs/sim-statuses">SIM Statuses</a></td></tr><tr><td>General Terms</td><td><a href="https://2408445593-files.gitbook.io/~/files/v0/b/gitbook-x-prod.appspot.com/o/spaces%2FxYJmxgUa2SDfD4byrJY1%2Fuploads%2FNpNCeA0Ld279pj5NKie9%2FGeneral%20Terms.png?alt=media&amp;token=ed23c711-dcab-497e-a1c0-eefb655175c9">General Terms.png</a></td><td><a href="/menu/publish-your-docs/general-terms">General Terms</a></td></tr><tr><td>Key Features</td><td><a href="https://2408445593-files.gitbook.io/~/files/v0/b/gitbook-x-prod.appspot.com/o/spaces%2FxYJmxgUa2SDfD4byrJY1%2Fuploads%2Fo3tIed3ptoKB05XexaH9%2FKey%20Features.png?alt=media&amp;token=3c5992ee-c7e2-4021-9619-ff3a90d726df">Key Features.png</a></td><td><a href="/menu/publish-your-docs/key-features">Key Features</a></td></tr><tr><td>Q&#x26;A</td><td><a href="https://2408445593-files.gitbook.io/~/files/v0/b/gitbook-x-prod.appspot.com/o/spaces%2FxYJmxgUa2SDfD4byrJY1%2Fuploads%2Fpc2VPTwedJNEUsfw1cpP%2FQ%26A.png?alt=media&amp;token=3998d559-d60e-4472-a00e-89b29c16aa2a">Q&amp;A.png</a></td><td><a href="/menu/publish-your-docs/q-and-a">Q&amp;A</a></td></tr></tbody></table>


# SIM Types

## <mark style="background-color:blue;">SIM Types:</mark>

### **1.**[ **Prepaid**](/menu/plans/prepaid)

* A SIM card with a certain balance. When the balance runs out, you can refill it yourself or through auto-refills,  and the SIM card will continue to work.

### **2.** [**Subscription**](/menu/plans/subscription)

* A subscription is a product type where the SIM card is used for a month, and at the end of the month, an invoice is issued for all expenses according to the plan (usage). Payment for the usage is deducted at the end of the month.

**Types of Subscription:**

* [**Static Pool**](https://faq.droam.com/menu/publish-your-docs/pages/JZRWnnRzP0JkYZSyOTU7#id-4.-static-pool)
* [**Dynamic Pool**](https://faq.droam.com/menu/publish-your-docs/pages/JZRWnnRzP0JkYZSyOTU7#id-5.-dynamic-pool)
* [**Unlimited**](https://faq.droam.com/menu/publish-your-docs/pages/JZRWnnRzP0JkYZSyOTU7#id-3.-unlimited)
* [**Monthly Bundle**](https://faq.droam.com/menu/publish-your-docs/pages/JZRWnnRzP0JkYZSyOTU7#id-1.-monthly-bundle)
* [**Pay per Megabyte**](/menu/plans/subscription#pay-per-megabyte)

### **3.** [**PAYGO**](/menu/plans/paygo)&#x20;

* PAYGO (pay-as-you-go in real time) is a flexible data billing product that charges users per megabyte of data used, offering advanced features and seamless integration. Unlike standard pay-per-megabyte models, PAYGO allows operators to set prices not only based on total data consumption but also for specific countries.


# SIM Statuses

### <mark style="background-color:blue;">SIM Statuses</mark>:

1. **Not available** – No integration.
2. **Pending** – Being checked by the integrator because it was just added to the platform, or operations are being performed on it.
3. **Invalid** – Something went wrong with the integration.
4. **Active** – Operating in normal mode - stored for record-keeping or historical reference.
5. **Suspended** – Manually or systemically suspended (e.g., expired).
6. **Blank** - The physical SIM without MSISDN. Needs to be swapped before use.
7. **Archived** – The SIM card is no longer in use.


# General Terms

### <mark style="background-color:blue;">General terms in the SIMs section:</mark>&#x20;

* **ICCID -** The unique identifier for each SIM card. For eSIMs, the number is displayed along with a QR code, making it easy to distinguish between physical SIMs and eSIMs.
* **In session:**
  * Yes - the SIM is currently online and in use.
  * No - the SIM is currently offline and not in use.
  * N/A - the status of the SIM is undetermined because the integration does not support it.
* **Operator -** The mobile network provider associated with the SIM, such as Telefonica, Vodafone UK, HOT Mobile, Odido, Orange France, Partner, Plus, WWS.
* **Plan -** Shows the name of the current plan, which is automatically generated but can be customized if needed
* **Company -** Company name to which the SIM card is assigned.
* **End User -** The email address of the end user linked to the SIM.
* **Data left (MB) -** Remaining data allowance for the SIM.
* **Days left -** The remaining days before the plan or SIM expires.
* **This month (MB) -** Data usage for the current month.
* **Note -** A field for any additional notes or comments.
* **Rules -** Customizable rules applied to the SIM
* **Labels -** Customizable labels for organizing SIMs.
* **SIM type -** Indicates whether the SIM is Prepaid, Subscription, or PAYGO.


# Key Features

###

<table data-view="cards"><thead><tr><th></th><th data-hidden data-card-target data-type="content-ref"></th></tr></thead><tbody><tr><td><strong>Dynamic Table</strong></td><td><a href="/menu/publish-your-docs/key-features/dynamic-table">Dynamic Table</a></td></tr><tr><td><strong>Bulk Operations</strong> </td><td><a href="/menu/publish-your-docs/key-features/bulk-operations">Bulk Operations</a></td></tr><tr><td><strong>SIM Swap</strong></td><td><a href="/menu/publish-your-docs/key-features/sim-swap">SIM Swap</a></td></tr></tbody></table>


# Dynamic Table

You can adjust the order of displayed data, add new columns from the existing list, or hide columns that are not needed. This flexibility allows you to customize the interface to meet your specific needs.

[**Step-by-Step Instruction**](/onboarding-guide/optional-settings/7.-customize-columns)

<figure><img src="https://2408445593-files.gitbook.io/~/files/v0/b/gitbook-x-prod.appspot.com/o/spaces%2FxYJmxgUa2SDfD4byrJY1%2Fuploads%2F6Nf7YAIfgwmv6H21itmv%2FSim%20%26plus%20.png?alt=media&amp;token=29950340-c08b-4fc3-a35c-3f9f5accea52" alt=""><figcaption></figcaption></figure>

2. <mark style="background-color:blue;">**By clicking the "+" button, you can**</mark> Upload new SIM card(s) into the system

<div data-full-width="true"><figure><img src="https://2408445593-files.gitbook.io/~/files/v0/b/gitbook-x-prod.appspot.com/o/spaces%2FxYJmxgUa2SDfD4byrJY1%2Fuploads%2FUARHe7wdu1XnoBwCkm2M%2FSim%20%26add.png?alt=media&amp;token=1d175621-fefe-4789-94b6-9b8dd7ac3ba9" alt="" width="563"><figcaption></figcaption></figure></div>


# Bulk Operations

You can perform bulk actions such as:

* **Copy:** Copy selected ICCID(s) for easy access or later use.

***

* **Manage Traffic:**&#x20;

  Here you can easily change the status to:

  * **Active:** Quickly activate multiple SIMs at once.
  * **Suspend:** Suspend a group of SIMs, temporarily halting their services.
* **Send SMS:** Send text messages to multiple SIMs simultaneously for notifications, alerts, or updates.
* **Sync with Operator:** Synchronizes the selected SIMs with the operator to ensure the latest network data and settings are reflected.

***

* **Manage Company:** Assign multiple SIMs to a company for better organization.
* **Manage Labels:** Add or modify labels to categorize and organize multiple SIMs at once.
* **Manage Rules:** Apply or modify automation rules for the selected SIMs, such as data limits or notifications.
* **Manage Notes:** Modify or update notes for multiple SIMs to include new information or instructions.

***

* **Activate Plan:**  Assign the plan for several SIMs simultaneously to streamline plan management.
* **Change Plan:** Apply a new plan to multiple SIMs simultaneously.

{% hint style="warning" %}
The remaining balance will be erased and unavailable for use.
{% endhint %}

* **Cancel Plan:** Terminate the selected plan on the chosen execution date, define operator status, and specify which associated data and labels should be retained after cancellation.

***

* **Import:** Import SIM information from a file to update or add records for further management or analysis.
* **Export:** Export the information of selected SIMs to a file for further analysis or reporting.


# SIM Swap

A **SIM Swap** is the action of reassigning a phone number (MSISDN) from its current SIM card (ICCID) to a different SIM.

To initiate the SIM swap process, the user must select the setup SIM card and locate the ‘**Swap SIM**’ option in the actions menu.

To make a SIM swap process user needs to select the setup SIM card and find the ‘Swap SIM' action in the actions menu.

{% hint style="warning" %}
Users can only perform this action on operators that offer this feature.
{% endhint %}

### <mark style="background-color:blue;">Two</mark> <mark style="background-color:blue;"></mark><mark style="background-color:blue;">**SIM cards are required for the swap process:**</mark>

* **FROM**: The setup SIM (with MSISDN)
* **TO**: A blank SIM (without MSISDN)

Once the SIM swap process is successfully completed, users can select the appropriate status for the new SIM.<br>

{% hint style="warning" %}
During the confirmation phase, both SIMs will remain in *PENDING* status until the transfer is finalized.
{% endhint %}

Users can check the SIM cards that are in the swap process. After one hour of starting the process, users may retry the swap up to **5 times**, with a minimum interval of **20 minutes** between each attempt.

### <mark style="background-color:blue;">When</mark> <mark style="background-color:blue;"></mark><mark style="background-color:blue;">**the process is complete:**</mark>

**✅ Successful Swap:**

* The original **(FROM)** SIM card is moved to *ARCHIVE*.
* The NEW **(TO)** SIM card is set to the status selected by the user.

**❌ Failed Swap:**

* Both SIMs return to their previous states, based on the operator’s system.


# Q\&A

<details>

<summary>Why can't I see any usage?</summary>

There could be a couple of reasons for this.

1. The product has not been created (attach the SIM to a plan and a company)
2. Your SIM hasn't generated any usage so far.

</details>

<details>

<summary>What does the Activation Ready status mean?</summary>

This status means that the SIM is active with the operator, but there has been no usage yet. Once the SIM card is used, the status will change to "Active."

</details>

<details>

<summary>How do I refill?</summary>

You have two options for refilling your balance:

1. **Manual Refill**\
   You can refill your balance manually through your account page on the Platform. Simply log in to your account and follow the prompts to add funds.
2. **Auto-Refill**\
   Alternatively, you can set up an auto-refill option. This allows for automatic balance top-ups when your data falls below a specified threshold. To use this feature, you will need to provide a credit card on your account page.

Regardless of the method you choose, your data will be added immediately in real-time upon successful completion of the refill.

</details>


# Satellite

<table data-view="cards"><thead><tr><th></th><th data-hidden data-card-target data-type="content-ref"></th></tr></thead><tbody><tr><td>Terminal Statuses</td><td><a href="/menu/satellite/terminal-statuses">Terminal Statuses</a></td></tr><tr><td>Upload Terminals</td><td><a href="/menu/satellite/upload-terminals">Upload Terminals</a></td></tr></tbody></table>


# Terminal Statuses

### <mark style="background-color:blue;">Terminal Statuses</mark>:

1. **Pending** – Being checked by the integrator because it was just added to the platform, or operations are being performed on it.
2. **Invalid** – Something went wrong with the integration.
3. **Available -** Terminal is functional and available for next steps (e.g., linking to Company, Plan).
4. **Active** – Operating in normal mode - stored for record-keeping or historical reference.
5. **Suspended** – Manually or systemically suspended (e.g., expired).
6. **Archived** – The terminal is no longer in use.


# Upload Terminals

As an organization, you can upload SIMs to the platform by following these steps:

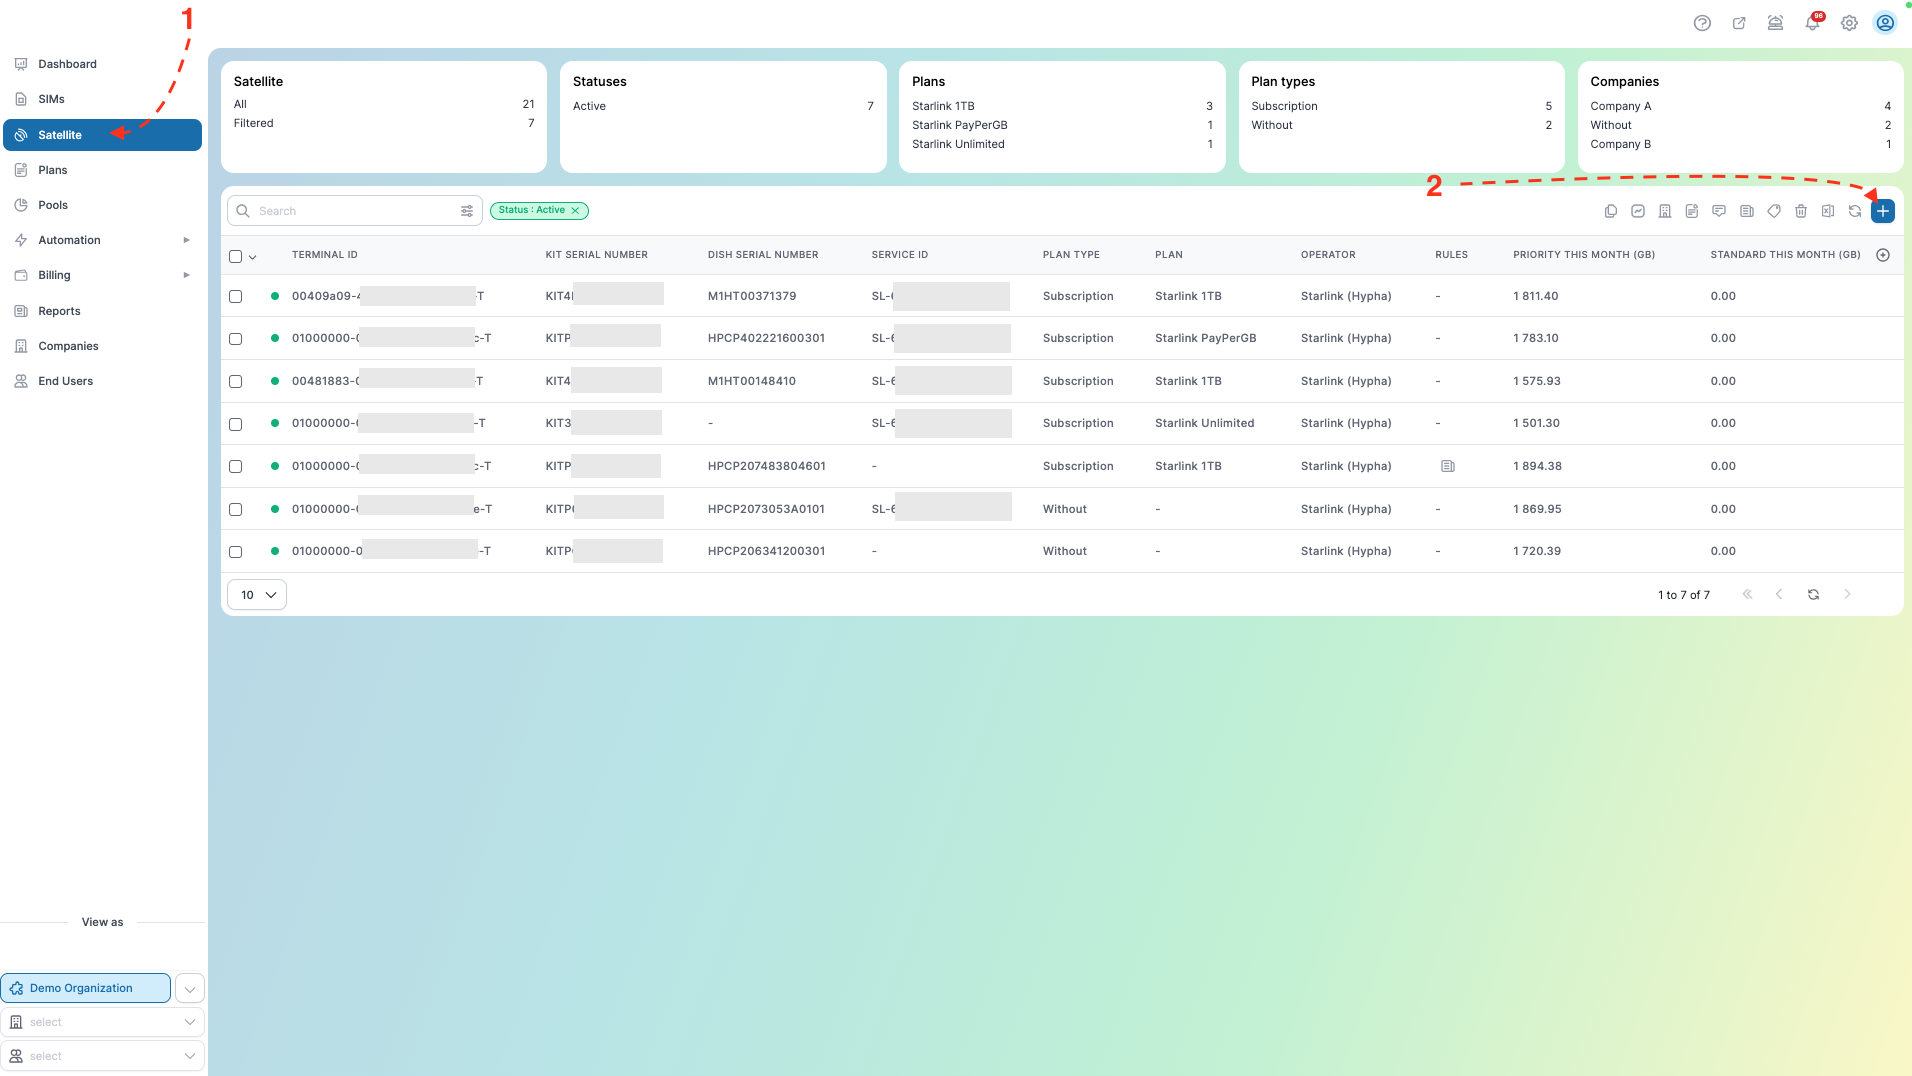
1. Go to the **Satellite** from the menu on the left.
2. Click the **plus (+)** button.

<div data-full-width="true"><figure><img src="https://2408445593-files.gitbook.io/~/files/v0/b/gitbook-x-prod.appspot.com/o/spaces%2FxYJmxgUa2SDfD4byrJY1%2Fuploads%2FW8Sw7VNETVQ8n8iwktNV%2FSatellite.png?alt=media&amp;token=40366ba2-26e1-46de-aad2-3b0ad4dbdf63" alt="" width="563"><figcaption></figcaption></figure></div>

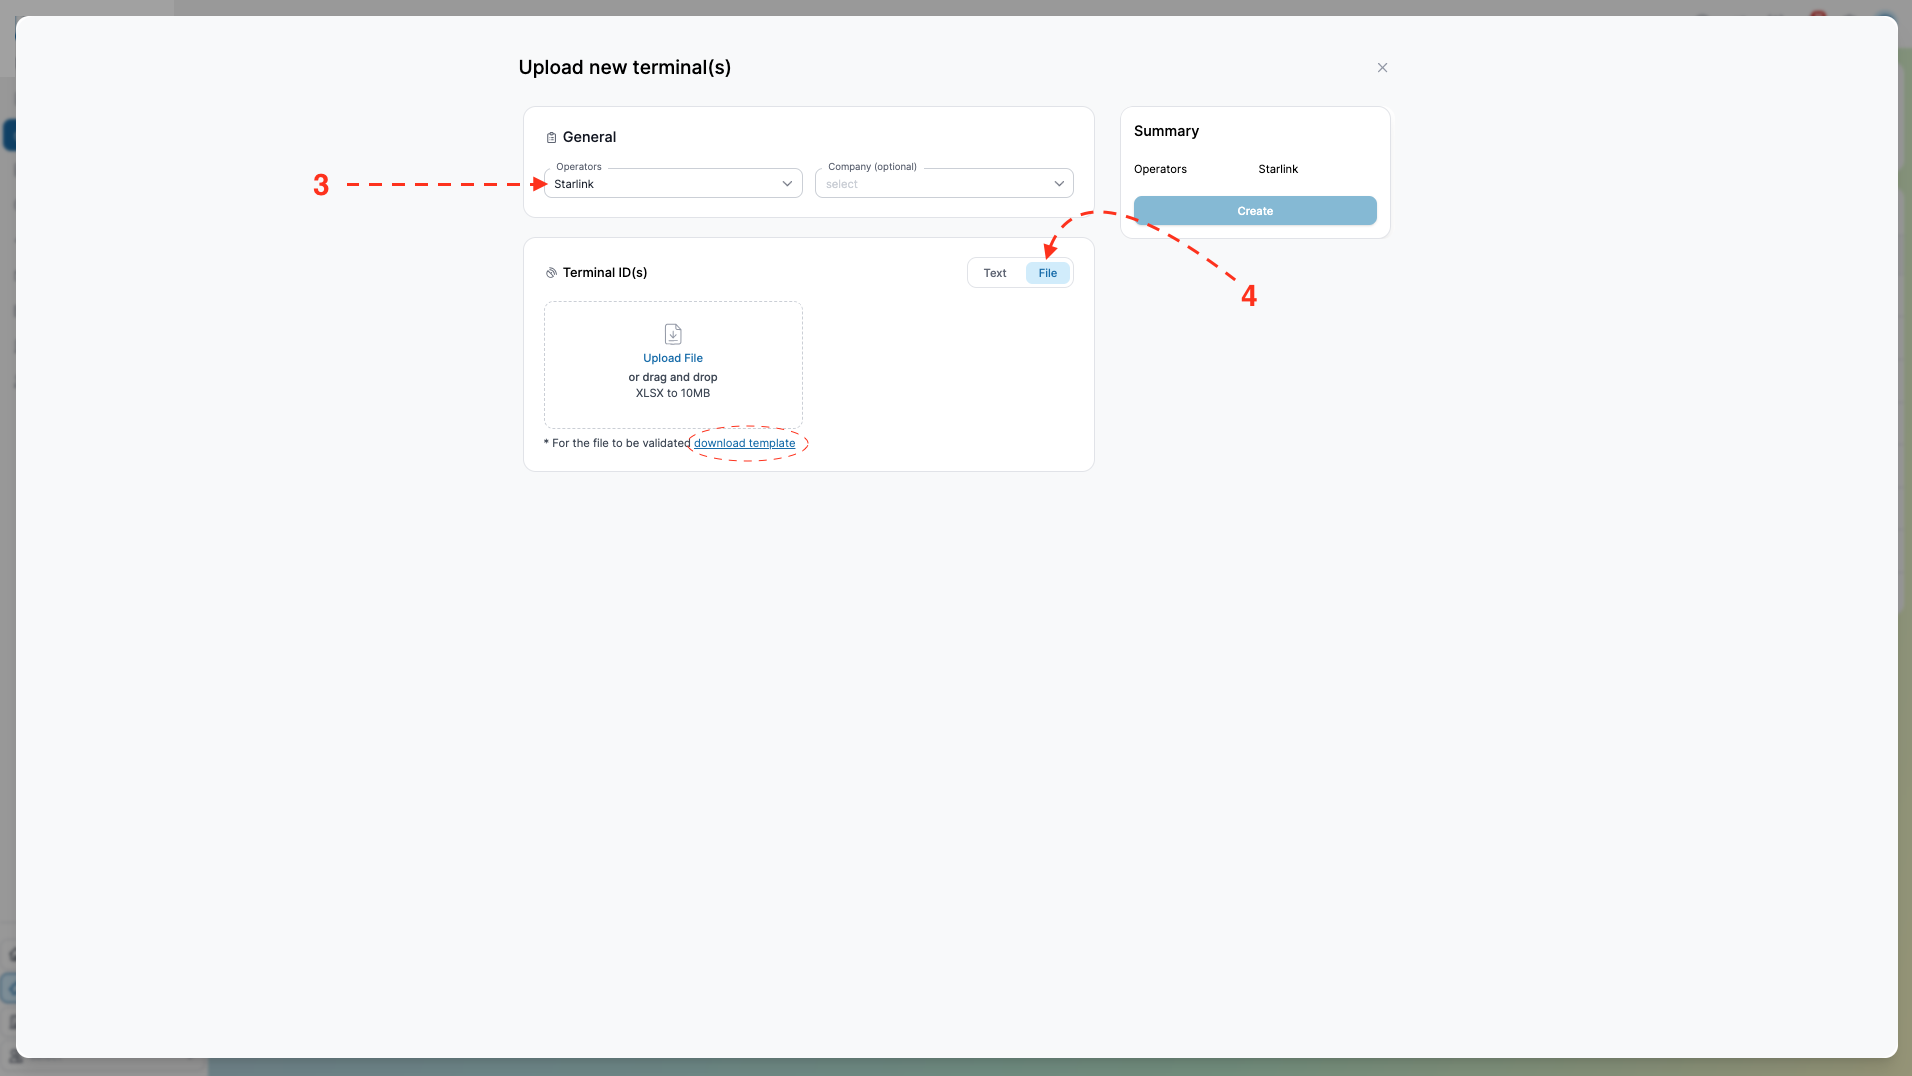
3. A modal window will open. Select the **Operator** Starlink and the **Company** (optional).
4. Click on **"File"** to upload your `.xlsx` file, then click **"Create."**

* A **template file** is also available for download to check which fields are needed for each Terminal.

<div data-full-width="true"><figure><img src="https://2408445593-files.gitbook.io/~/files/v0/b/gitbook-x-prod.appspot.com/o/spaces%2FxYJmxgUa2SDfD4byrJY1%2Fuploads%2Fn94D5laafhYfM68QwIMC%2FUpload%20Terminals.png?alt=media&amp;token=a589ecfe-a37c-4f2e-a572-900397aa9613" alt="" width="563"><figcaption></figcaption></figure></div>

The XLSX file can contain 10,000 Terminals or more. However, we recommend starting with a test upload of around 100 Terminals to ensure everything works as expected before uploading the full list.


# Key Features

<table data-view="cards"><thead><tr><th></th><th data-hidden data-card-target data-type="content-ref"></th></tr></thead><tbody><tr><td>Dynamic Table</td><td><a href="/menu/satellite/key-features/dynamic-table">Dynamic Table</a></td></tr><tr><td>Bulk Operations</td><td><a href="/menu/satellite/key-features/bulk-operations">Bulk Operations</a></td></tr></tbody></table>


# Dynamic Table

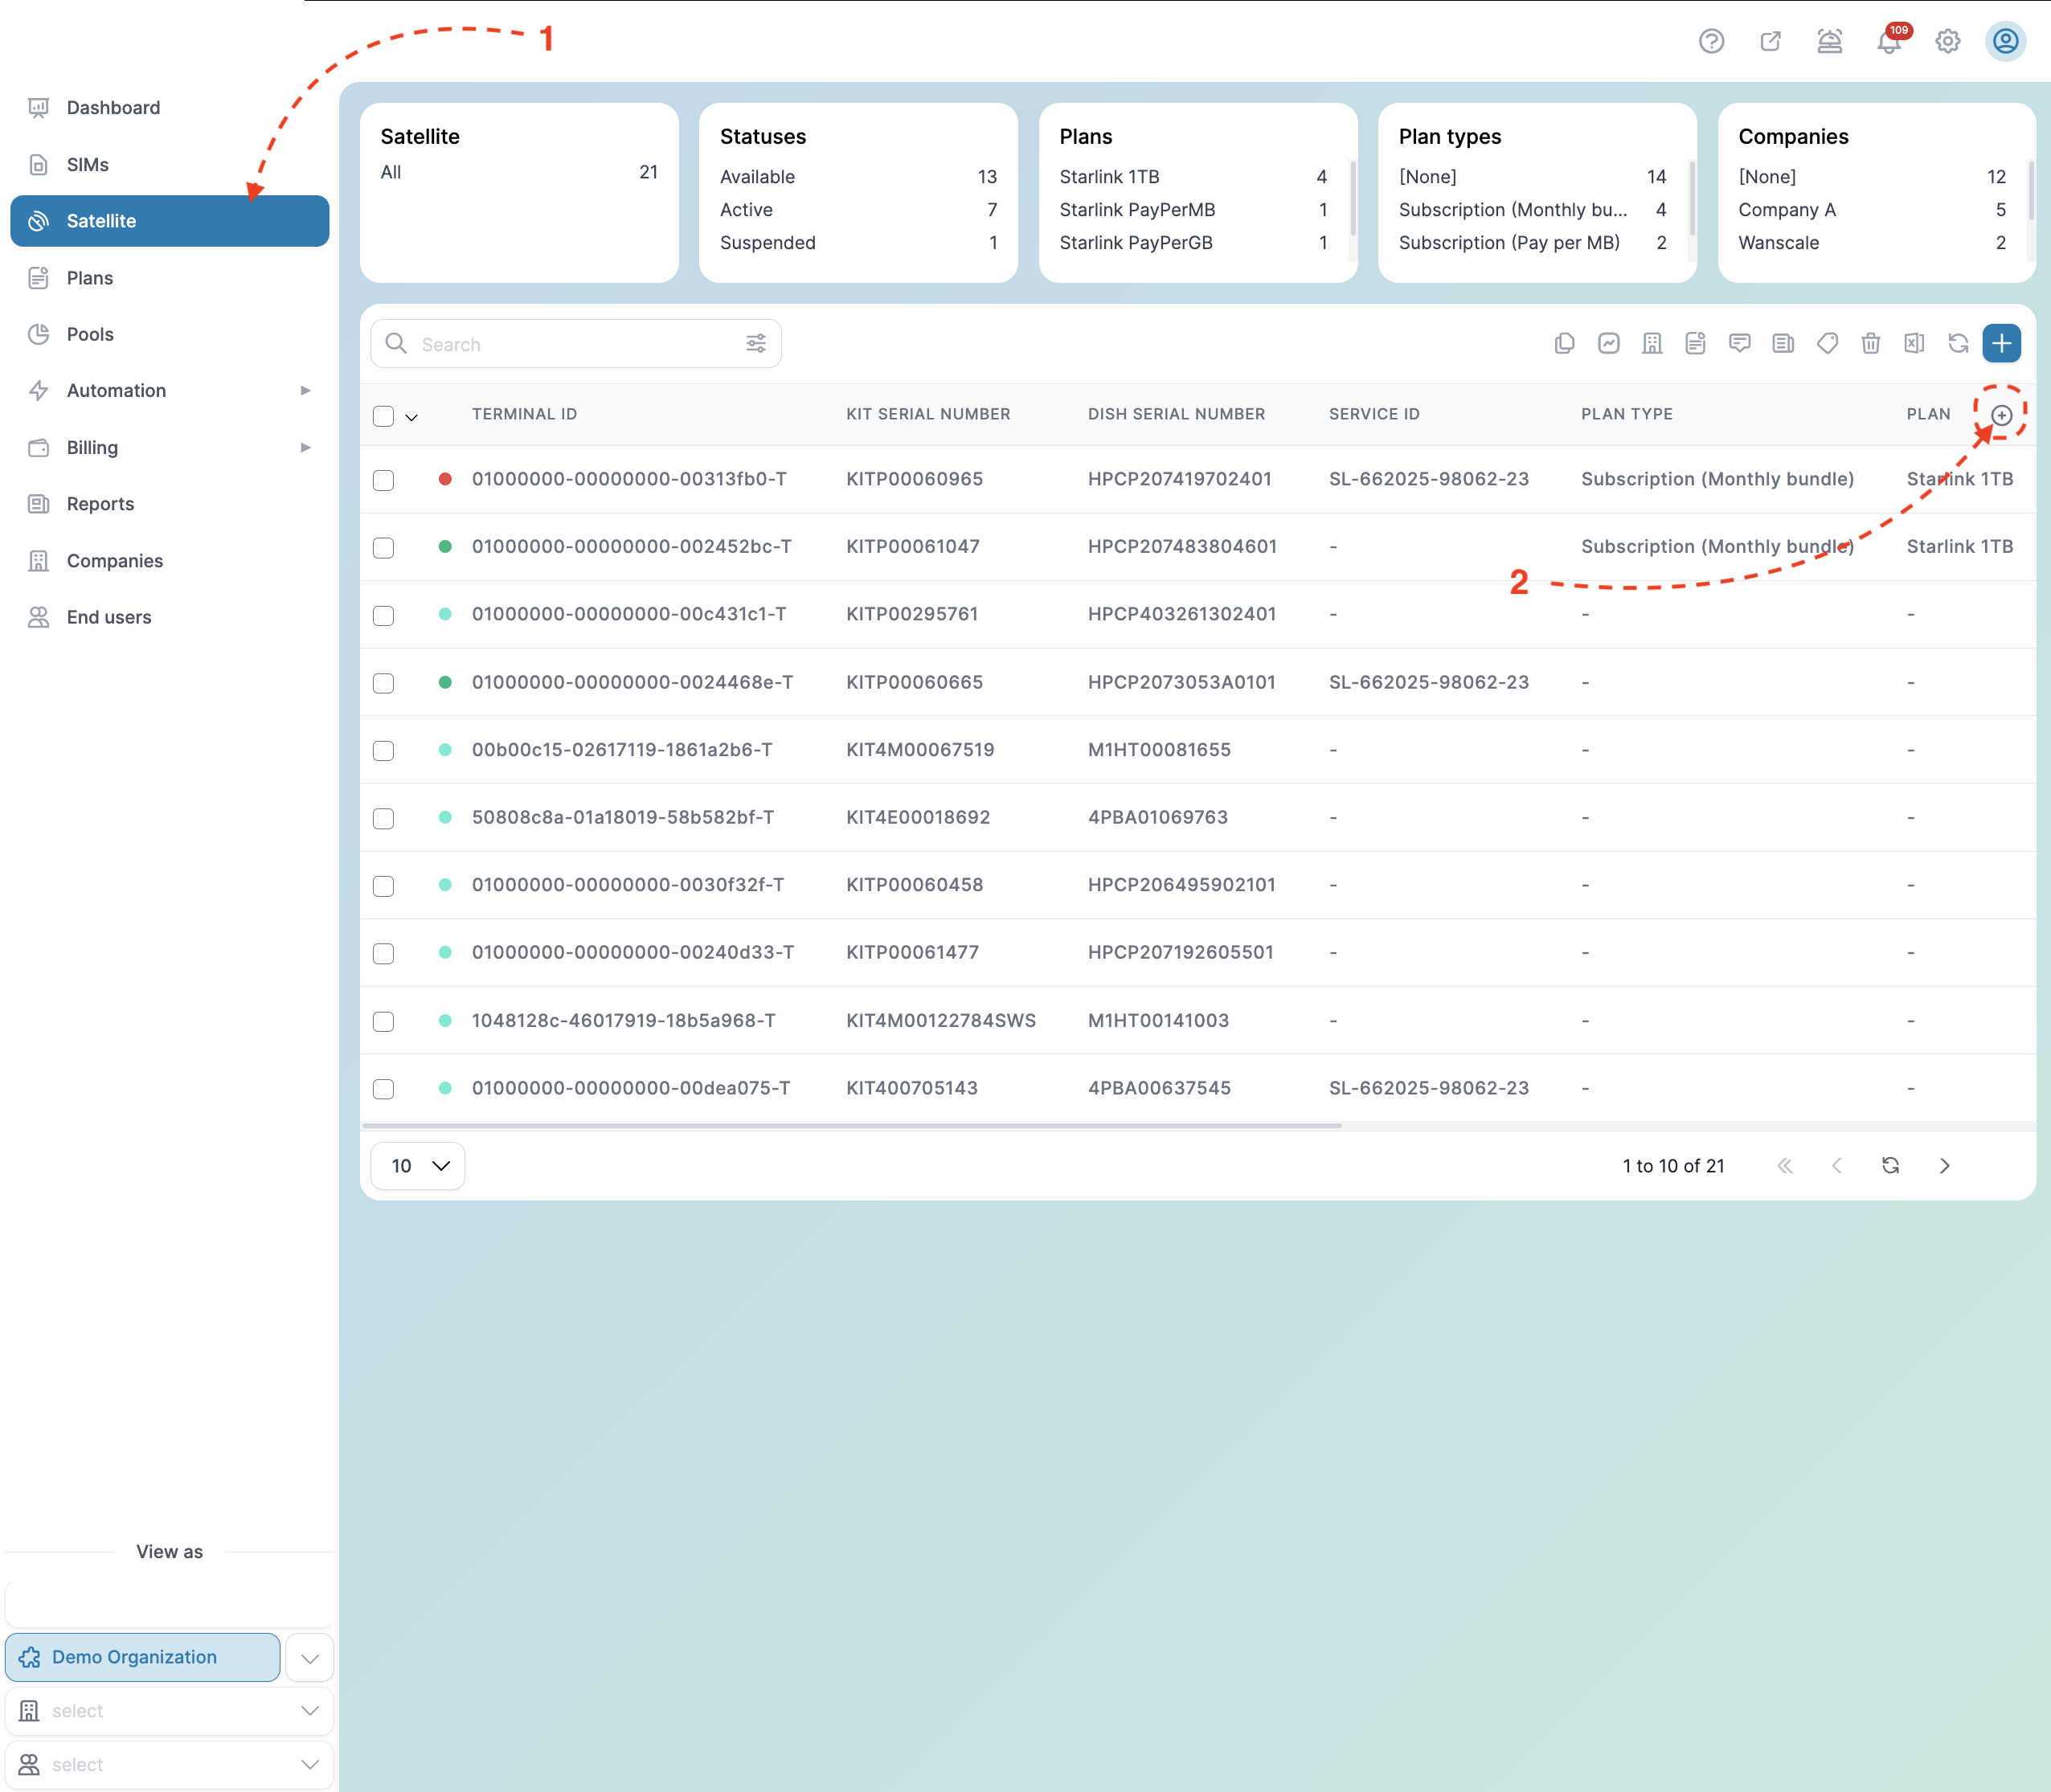
You can adjust the order of displayed data, add new columns from the existing list, or hide columns that are not needed. This flexibility allows you to customize the interface to meet your specific needs.

<div data-full-width="true"><figure><img src="https://2408445593-files.gitbook.io/~/files/v0/b/gitbook-x-prod.appspot.com/o/spaces%2FxYJmxgUa2SDfD4byrJY1%2Fuploads%2F6mpiD296DSlCdYGWmCDO%2FColumns.png?alt=media&amp;token=bf711fe2-bcf1-4ca3-88b4-19b2ffa3b78d" alt="" width="563"><figcaption></figcaption></figure></div>

1. Go to the '**Satellite**'  in the left sidebar of the navigation menu
2. Click the **'+'** button in the table header, and a wizard with a list of all column names will appear.
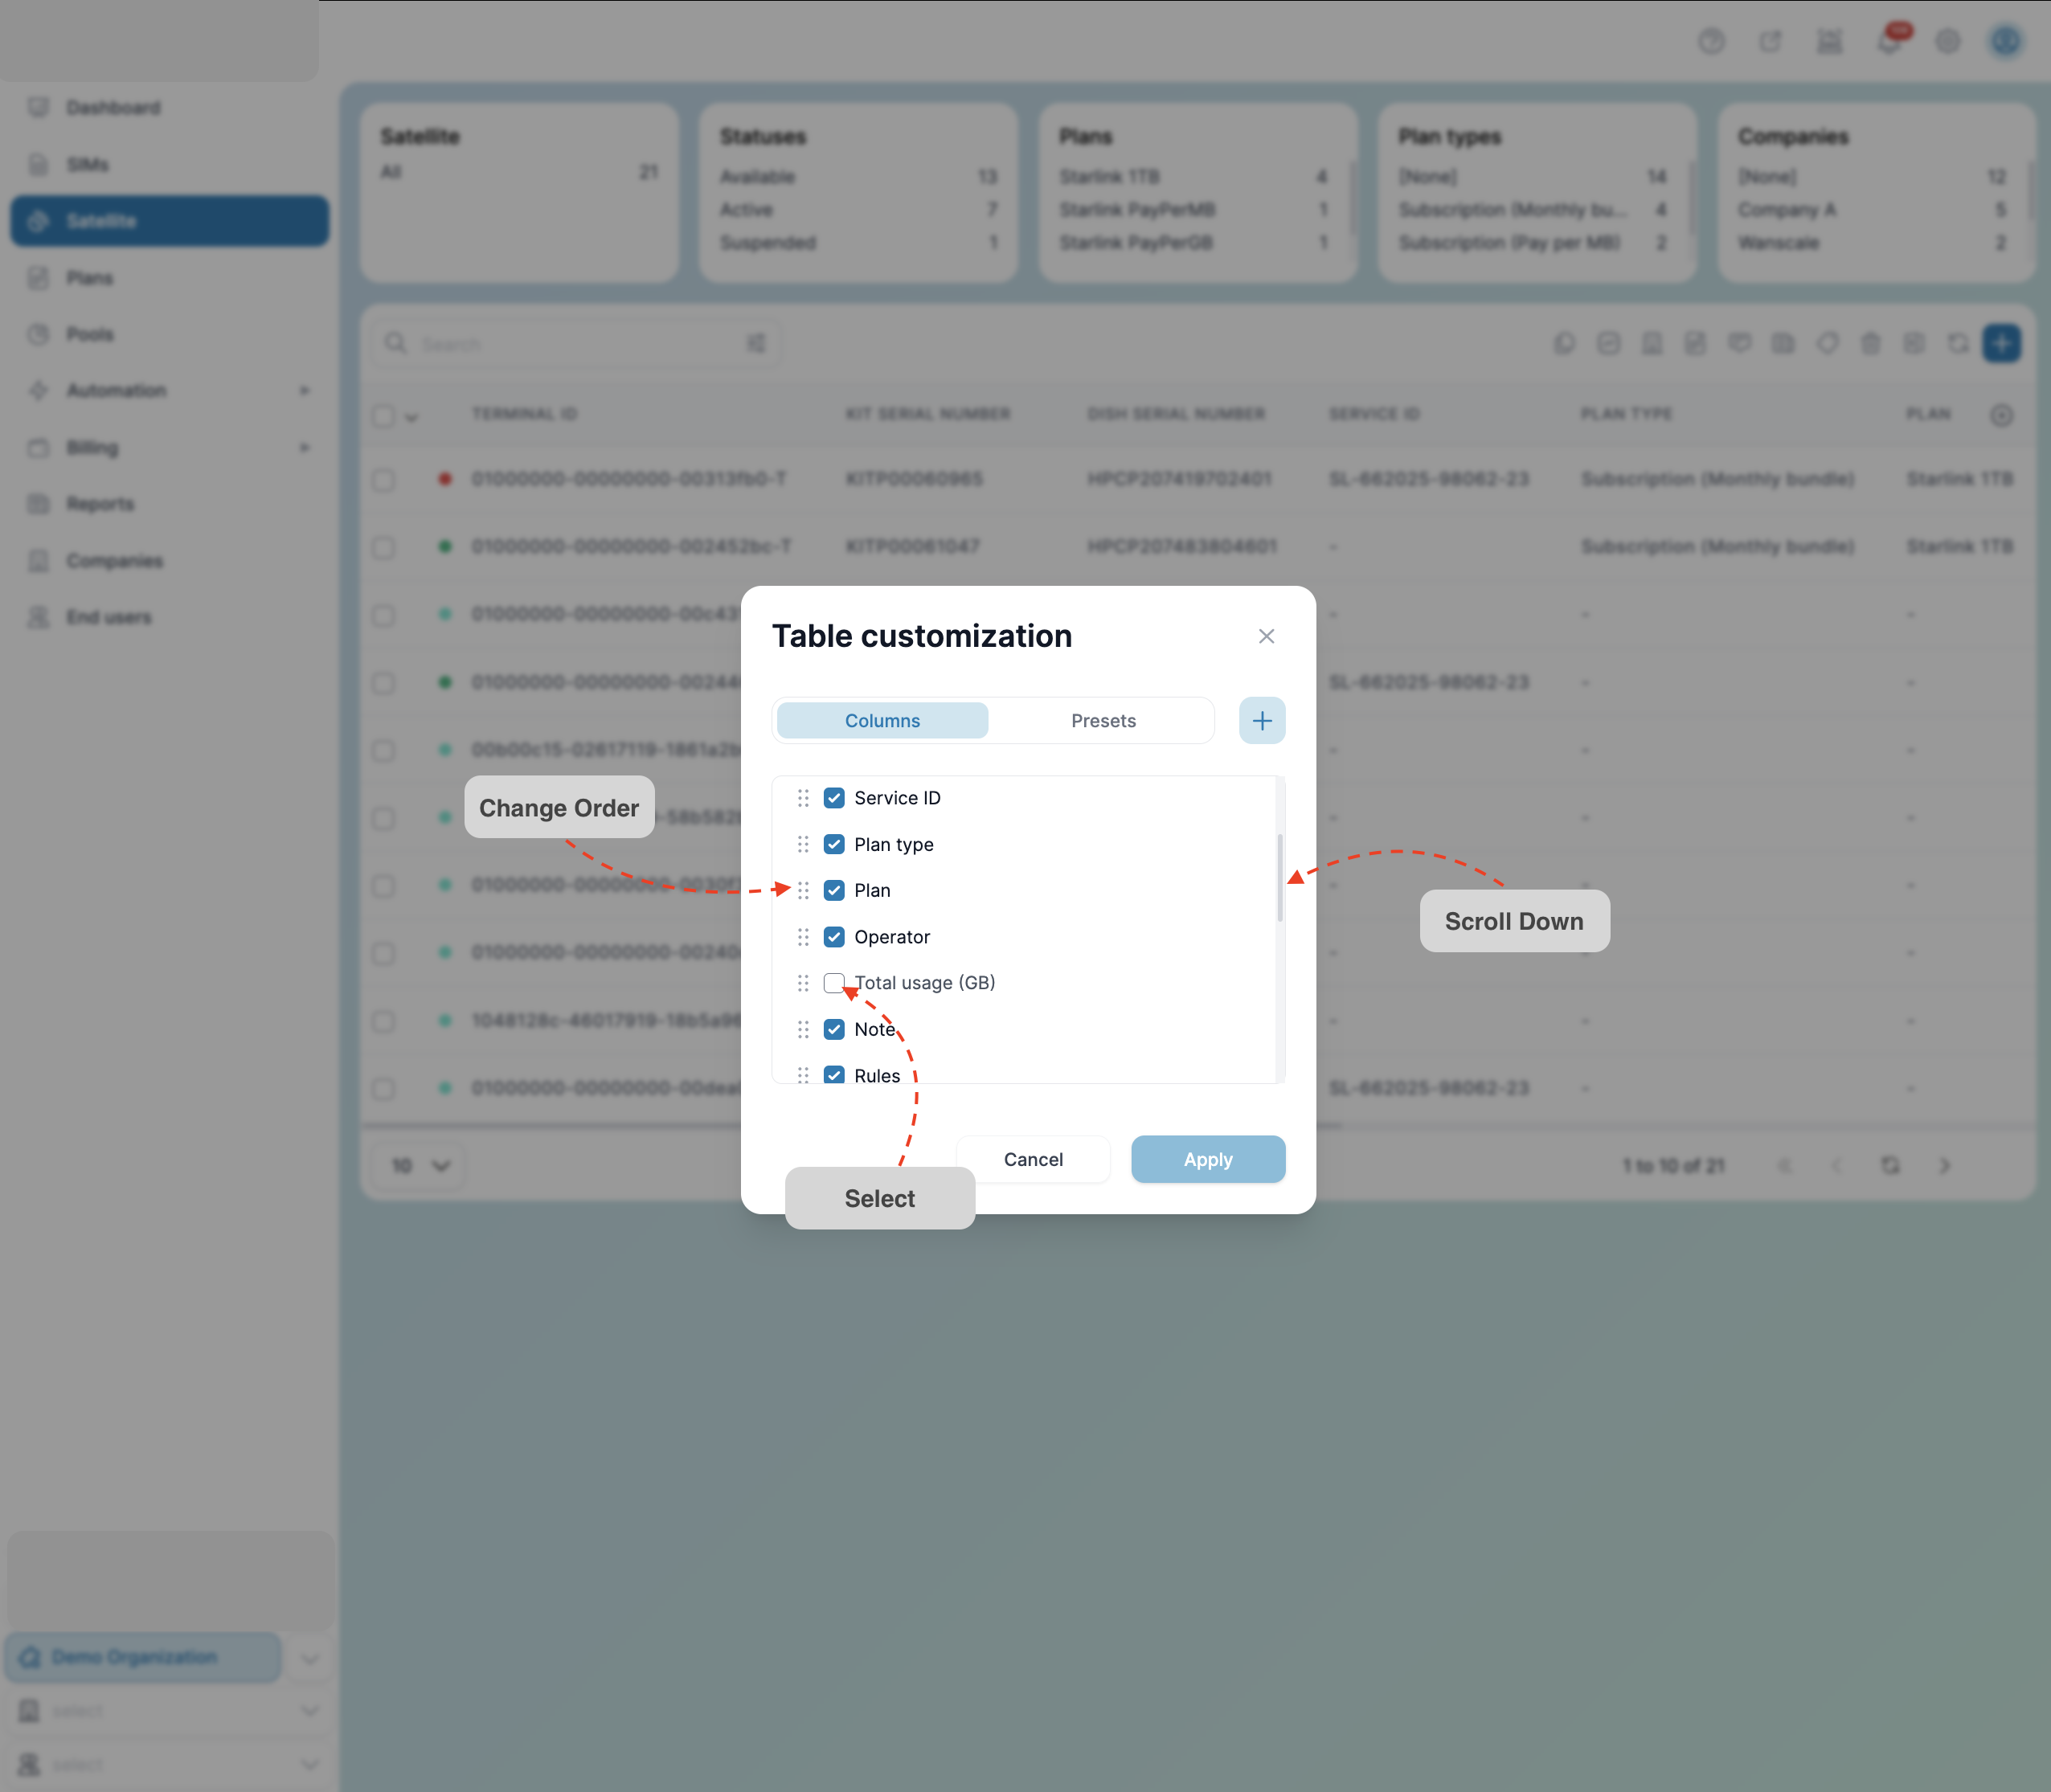
<div data-full-width="true"><figure><img src="https://2408445593-files.gitbook.io/~/files/v0/b/gitbook-x-prod.appspot.com/o/spaces%2FxYJmxgUa2SDfD4byrJY1%2Fuploads%2FI3m4Oky1tawvAEyD7pjn%2FTable%20Customization.png?alt=media&amp;token=a9a2007d-88aa-4265-81a1-a105e7aeede7" alt="" width="563"><figcaption></figcaption></figure></div>

3. Select the columns you want to display in the table. In the same wizard window, you can also choose the order of the columns (press and hold the dots, then drag up or down). Click **Apply** to save your changes.<br>


# Bulk Operations

You can perform bulk actions such as:

* **Copy:** Copy the IDs of the selected Terminals for easy access or later use

***

* **Sync with Operator:** Synchronizes the selected terminals with the operator to ensure the latest network data, configurations, and status are up to date.

***

* **Manage Company:** Assign multiple Terminals to a company for better organization.
* **Manage Labels:** Add or modify labels to categorize and organize multiple terminals at once.
* **Manage Rules:** Apply or modify automation rules for the selected terminals, such as usage limits, alerts, or notifications.
* **Change Notes:** Modify or update notes for multiple Terminals to include new information or instructions.

***

* **Activate Plan:** Assign a plan to multiple terminals simultaneously to streamline plan management and ensure consistent configuration.
* **Cancel Plan:** Deactivate selected Terminals and remove them from active use. This action unlinks the Terminal from its service line

***

* **Export:** Export the information of selected SIM cards to a file for further analysis or reporting.

<br>


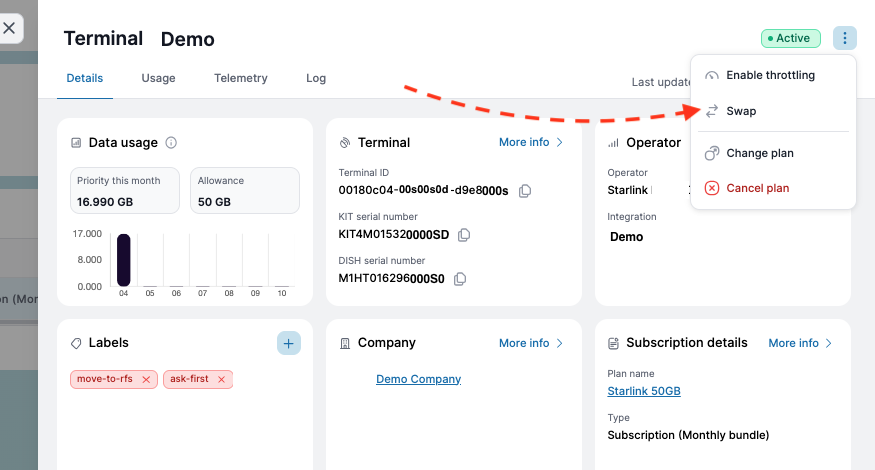
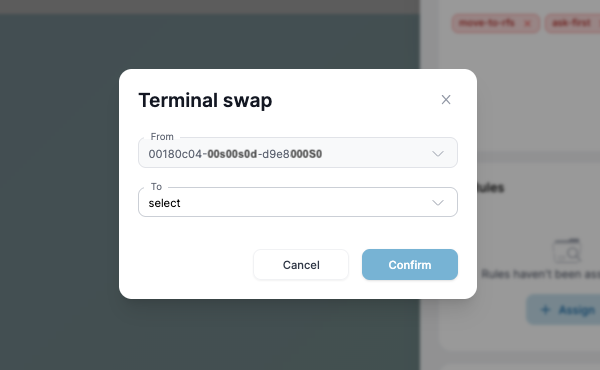
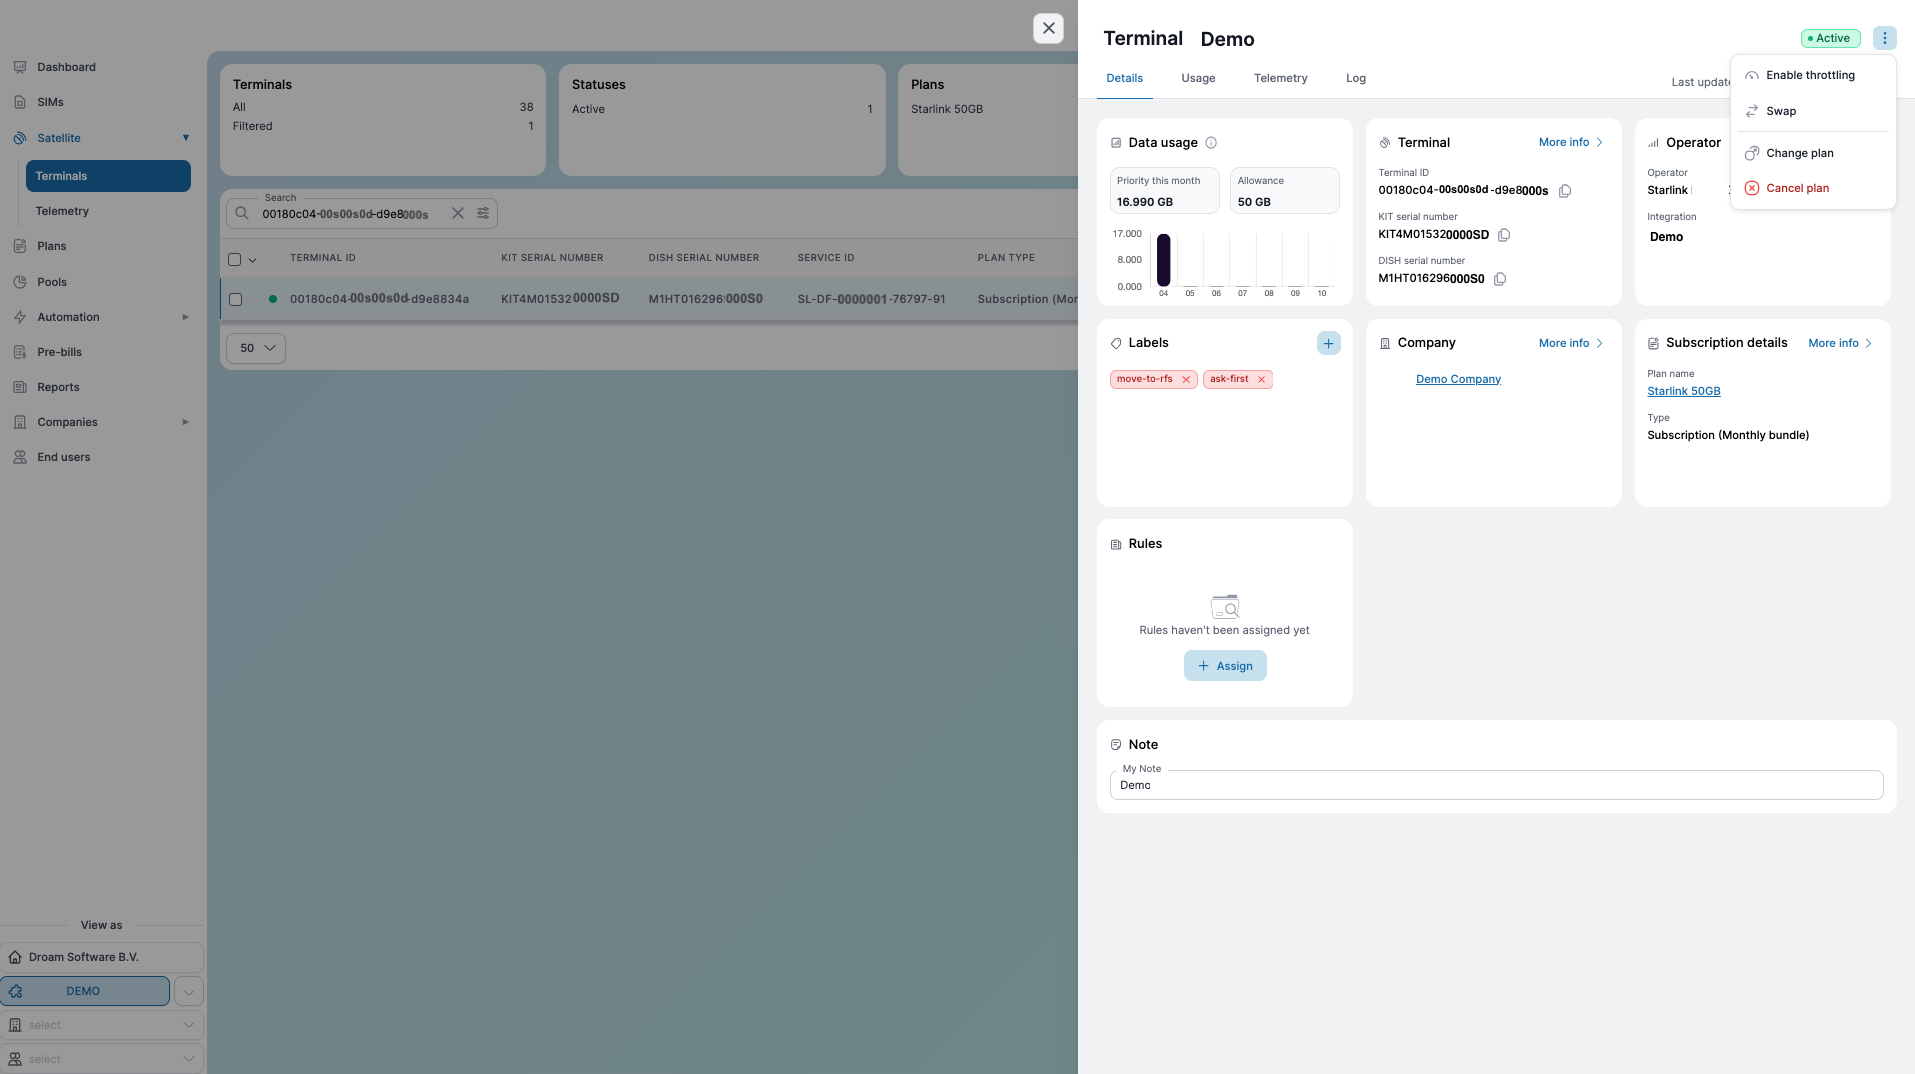
# Terminal Swap


# Telemetry

The Telemetry page provides an interactive view to monitor and manage terminals, with a list, filters, and a map showing device locations and status.

### General View

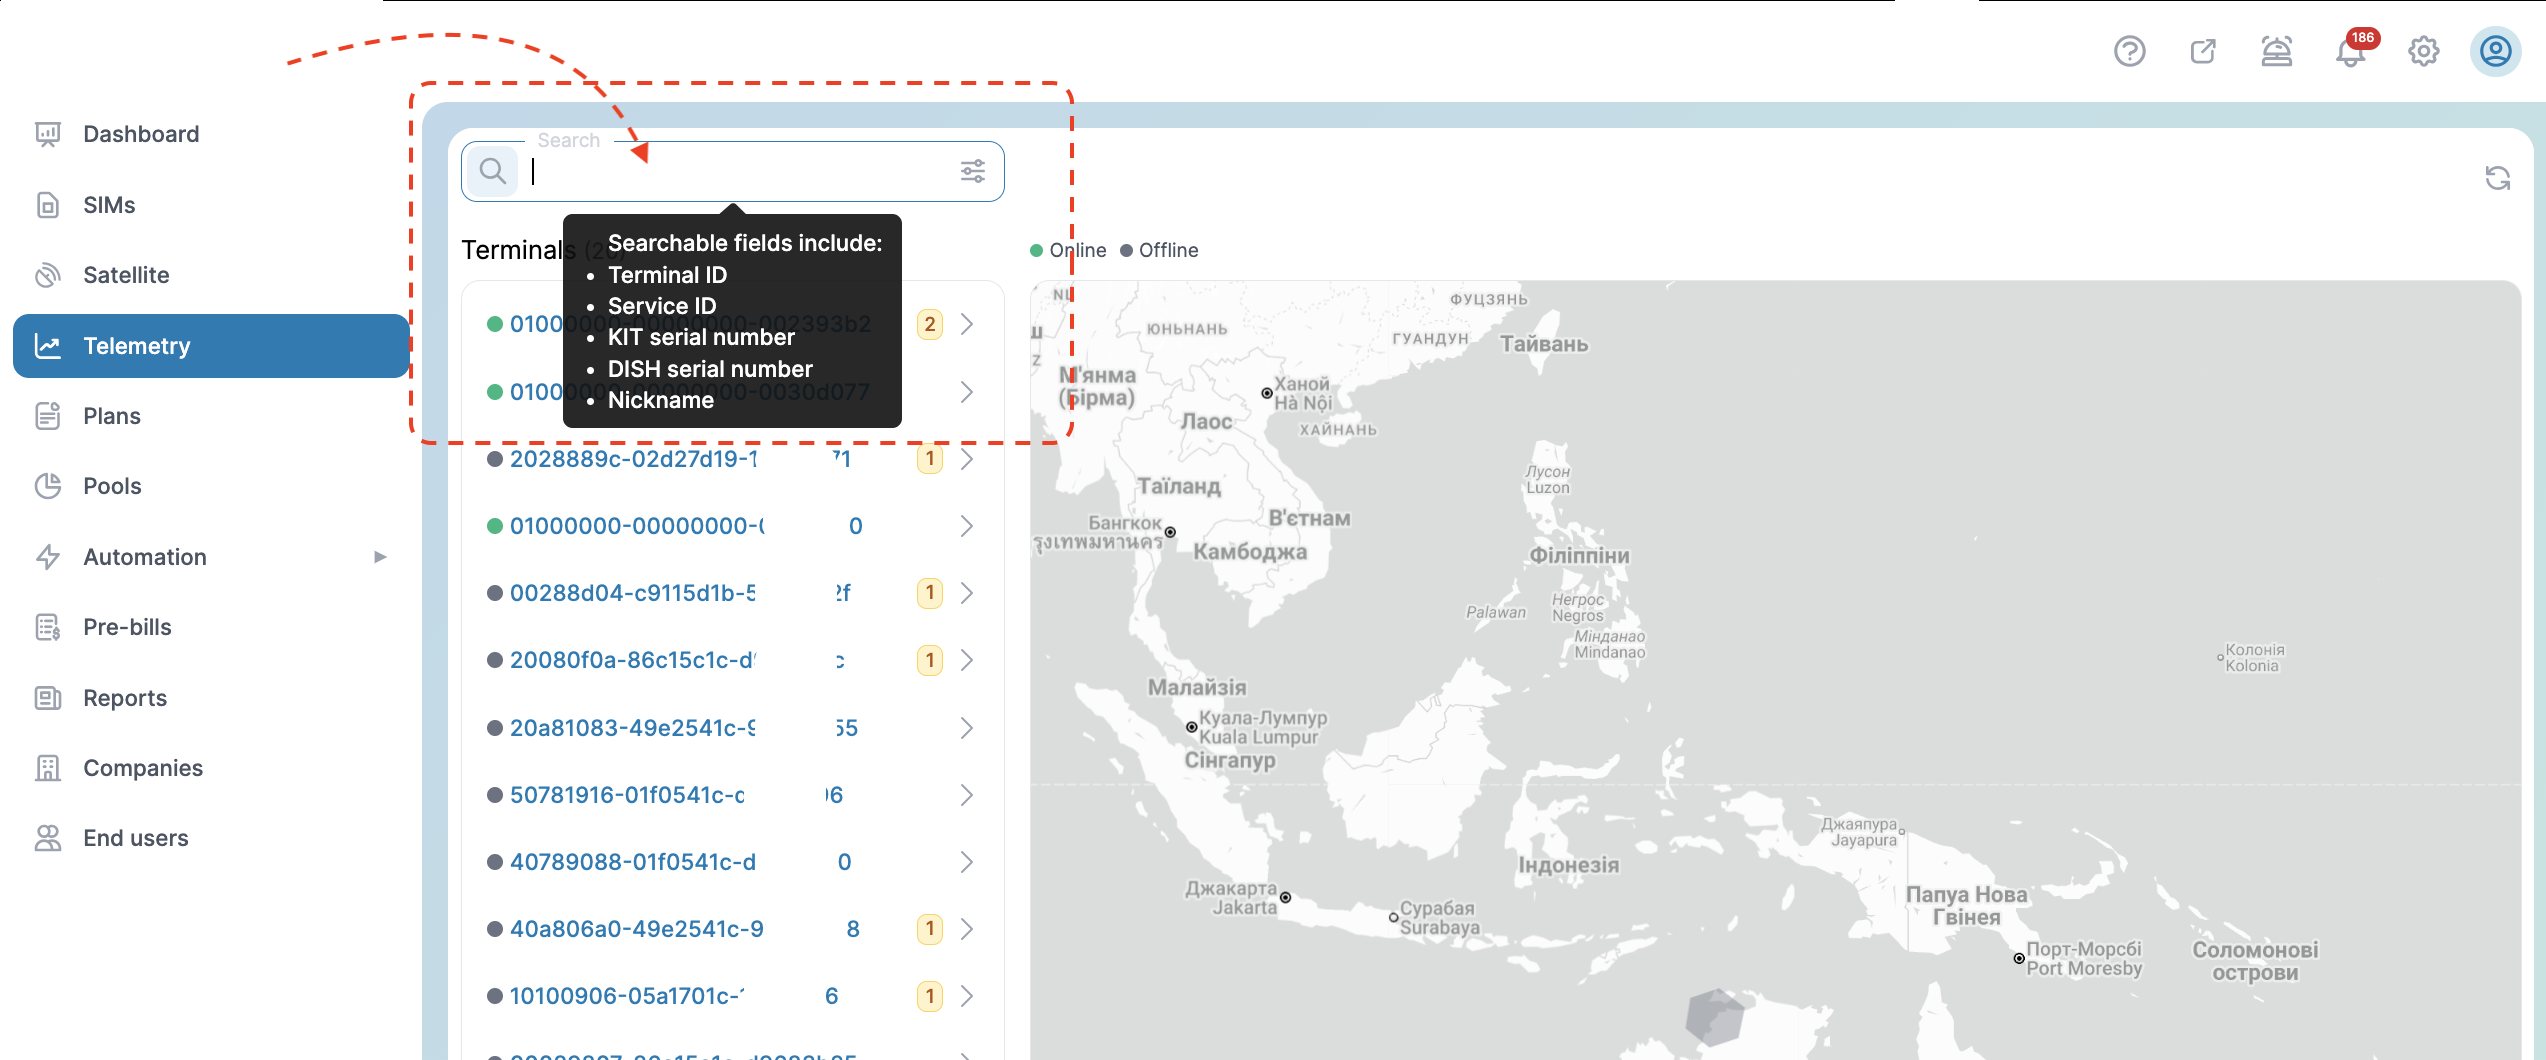
1. **Search Bar**

<div data-full-width="true"><figure><img src="https://2408445593-files.gitbook.io/~/files/v0/b/gitbook-x-prod.appspot.com/o/spaces%2FxYJmxgUa2SDfD4byrJY1%2Fuploads%2FxREbErJKxXkMHsQkeNPB%2FTelemetry_search.png?alt=media&amp;token=0f3397cb-4482-4532-8309-410c9a02cbca" alt="" width="563"><figcaption></figcaption></figure></div>

* Located at the top-left of the page.
* Allows users to quickly search for a specific terminal or SIM by ID or name.

***

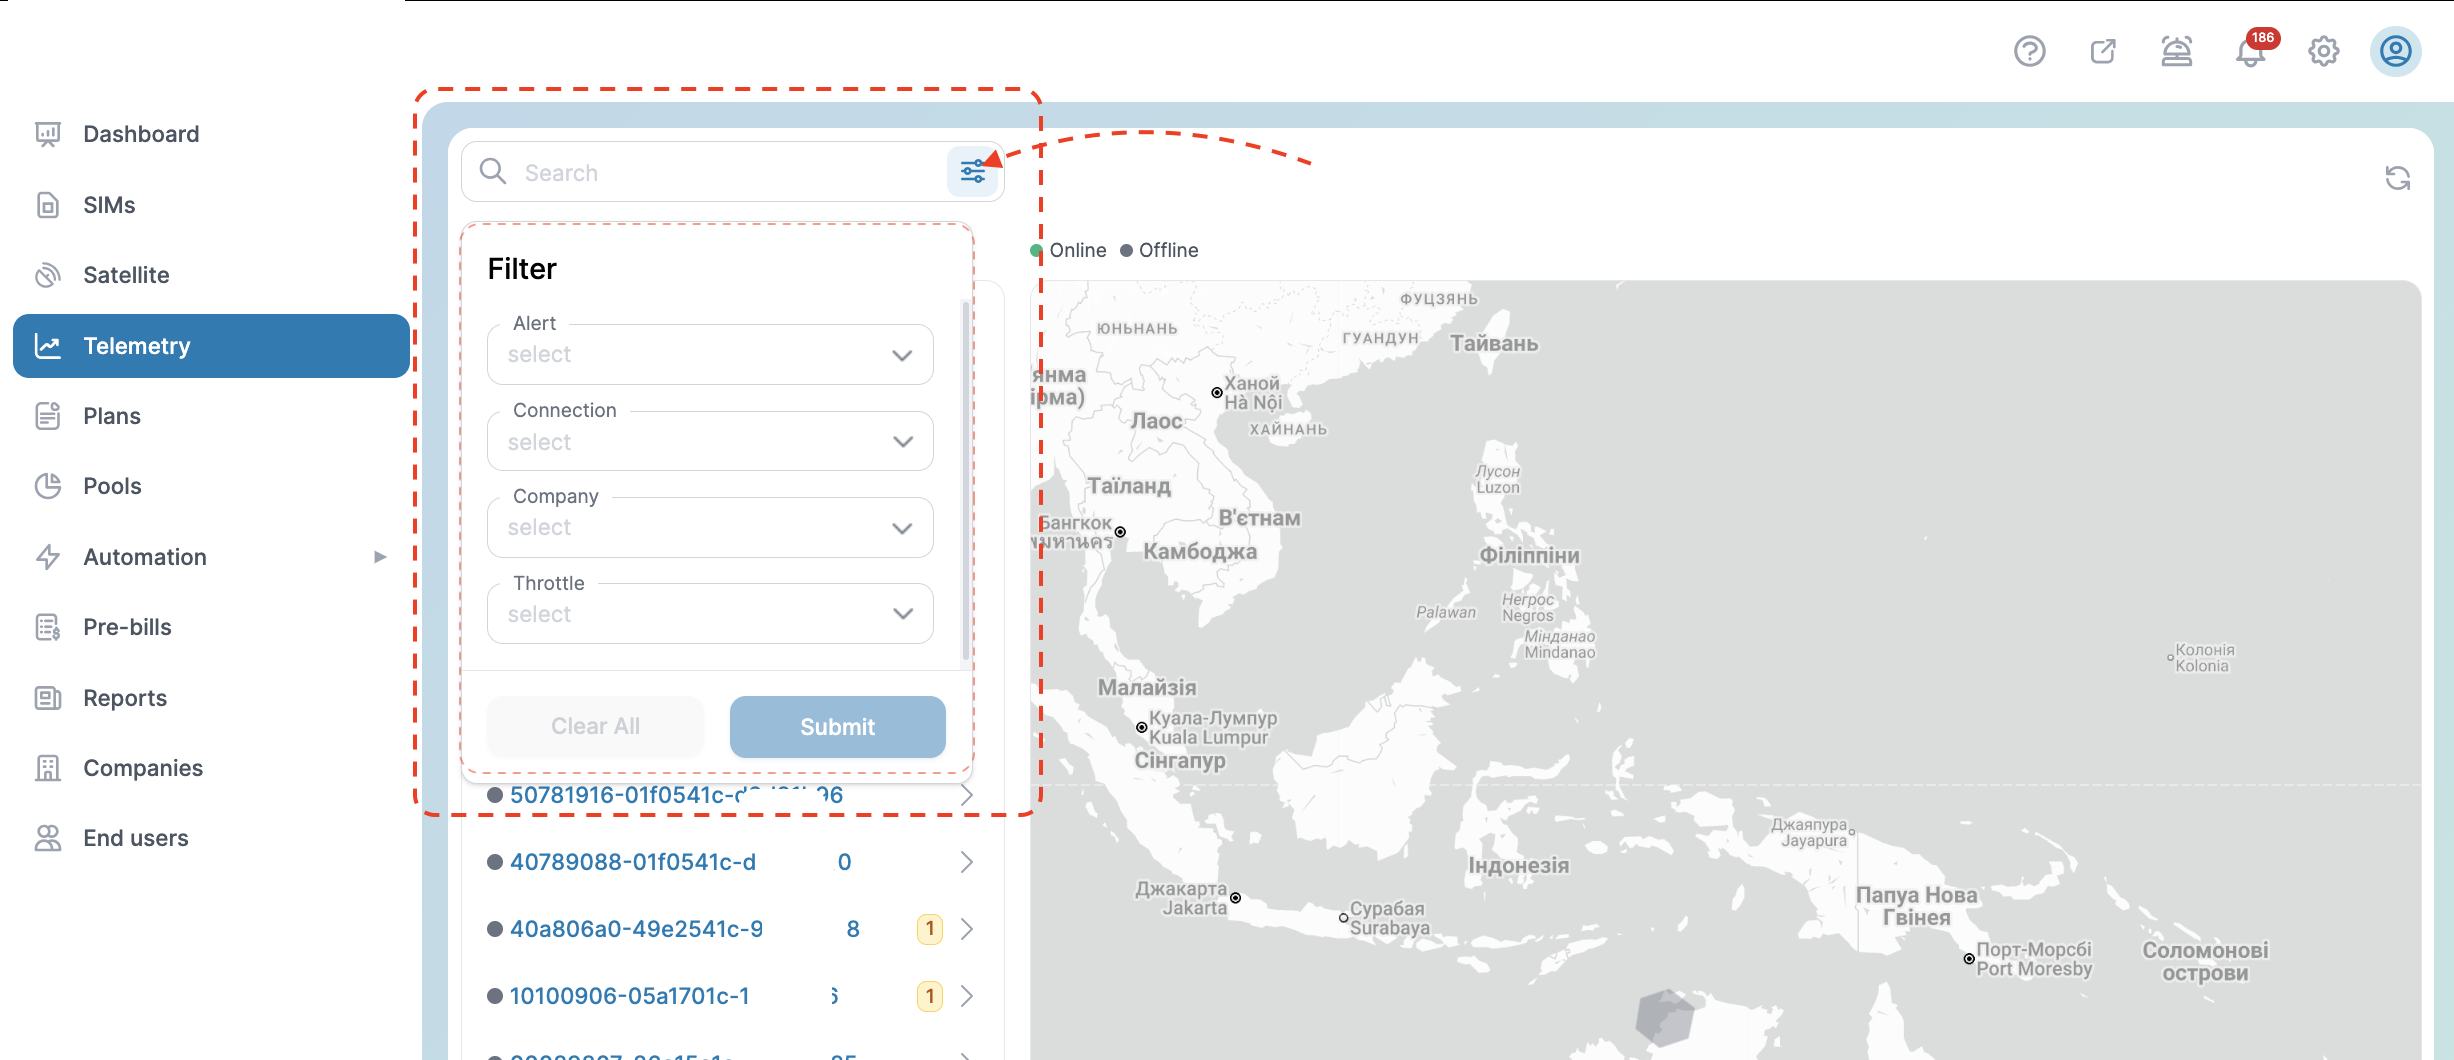
2. **Filter Panel**

<div data-full-width="true"><figure><img src="https://2408445593-files.gitbook.io/~/files/v0/b/gitbook-x-prod.appspot.com/o/spaces%2FxYJmxgUa2SDfD4byrJY1%2Fuploads%2FH5hYSNSIse33XSfSmhin%2FTelemetry_Filter.png?alt=media&amp;token=17b18aab-3b00-4b60-9041-cc079a0e702a" alt="" width="563"><figcaption></figcaption></figure></div>

* Provides advanced filtering options to narrow down the displayed terminals.
* Available filters include:
  * **Alert:** Filter devices by current alerts or notifications.
  * **Connection:** Filter based on network connection status.
  * **Company:** Filter devices associated with a specific company.
  * **Throttle:** Filter by data usage limits or throttling status.
* Buttons:
  * **Clear All:** Reset all applied filters.
  * **Submit:** Apply the selected filters.

***

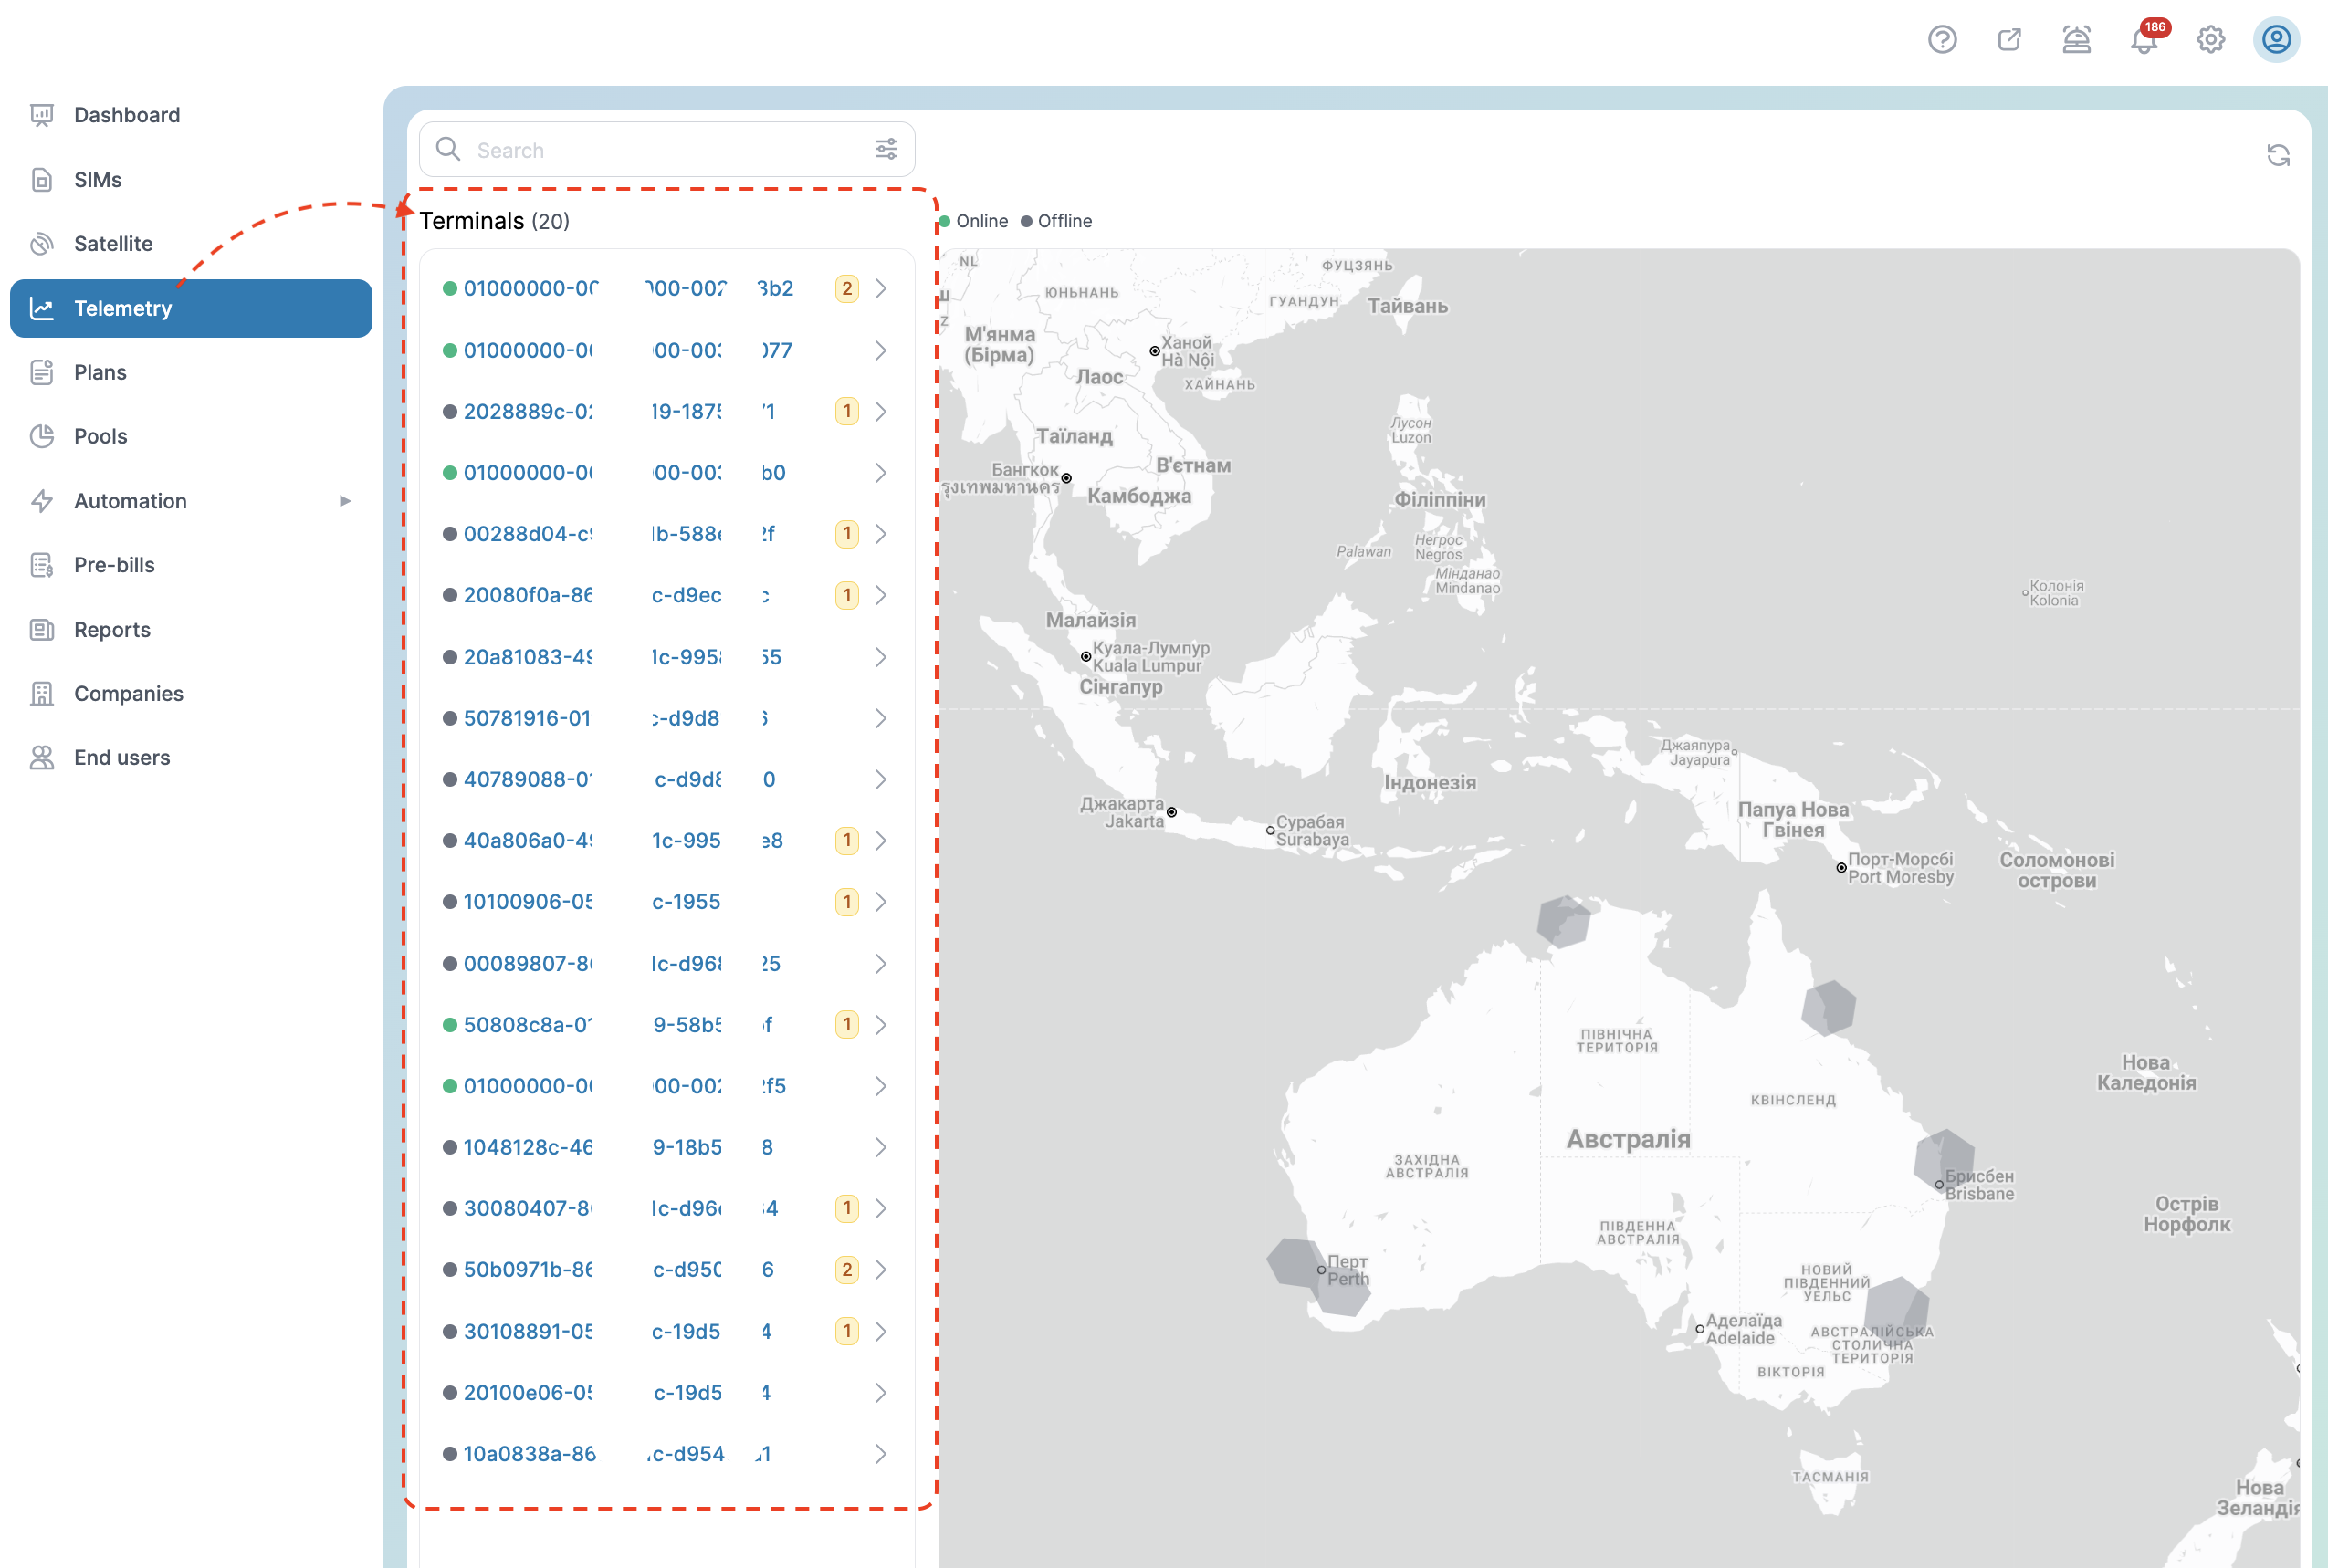
3. **Terminal List**

<div data-full-width="true"><figure><img src="https://2408445593-files.gitbook.io/~/files/v0/b/gitbook-x-prod.appspot.com/o/spaces%2FxYJmxgUa2SDfD4byrJY1%2Fuploads%2FPxXeYBBXf012taJAzcU5%2FTelemetry_Terminals.png?alt=media&amp;token=d2d2e744-6306-424d-9ca8-d5b72a5ef61c" alt="" width="563"><figcaption></figcaption></figure></div>

* Displayed on the left side of the page.
* Shows all terminals matching the current search or filter criteria.
* Each Terminal entry includes:
  * **Terminal ID:** Unique identifier for each terminal or SIM.
  * **Status Indicator:** Online (green dot) or offline (gray dot).
  * **Alert Count Badge:** Numeric badge indicating the number of active alerts for the device.

***

4. **Map View**

* Located on the right side of the page.
* Provides a geographic overview of all devices.
* Key features:
  * **Device Status Markers:** Green for online, gray for offline.
  * **Hexagonal Clusters:** Indicate regions with multiple devices for simplified visualization.
  * Interactive map with zoom and pan capabilities to focus on specific regions.

***

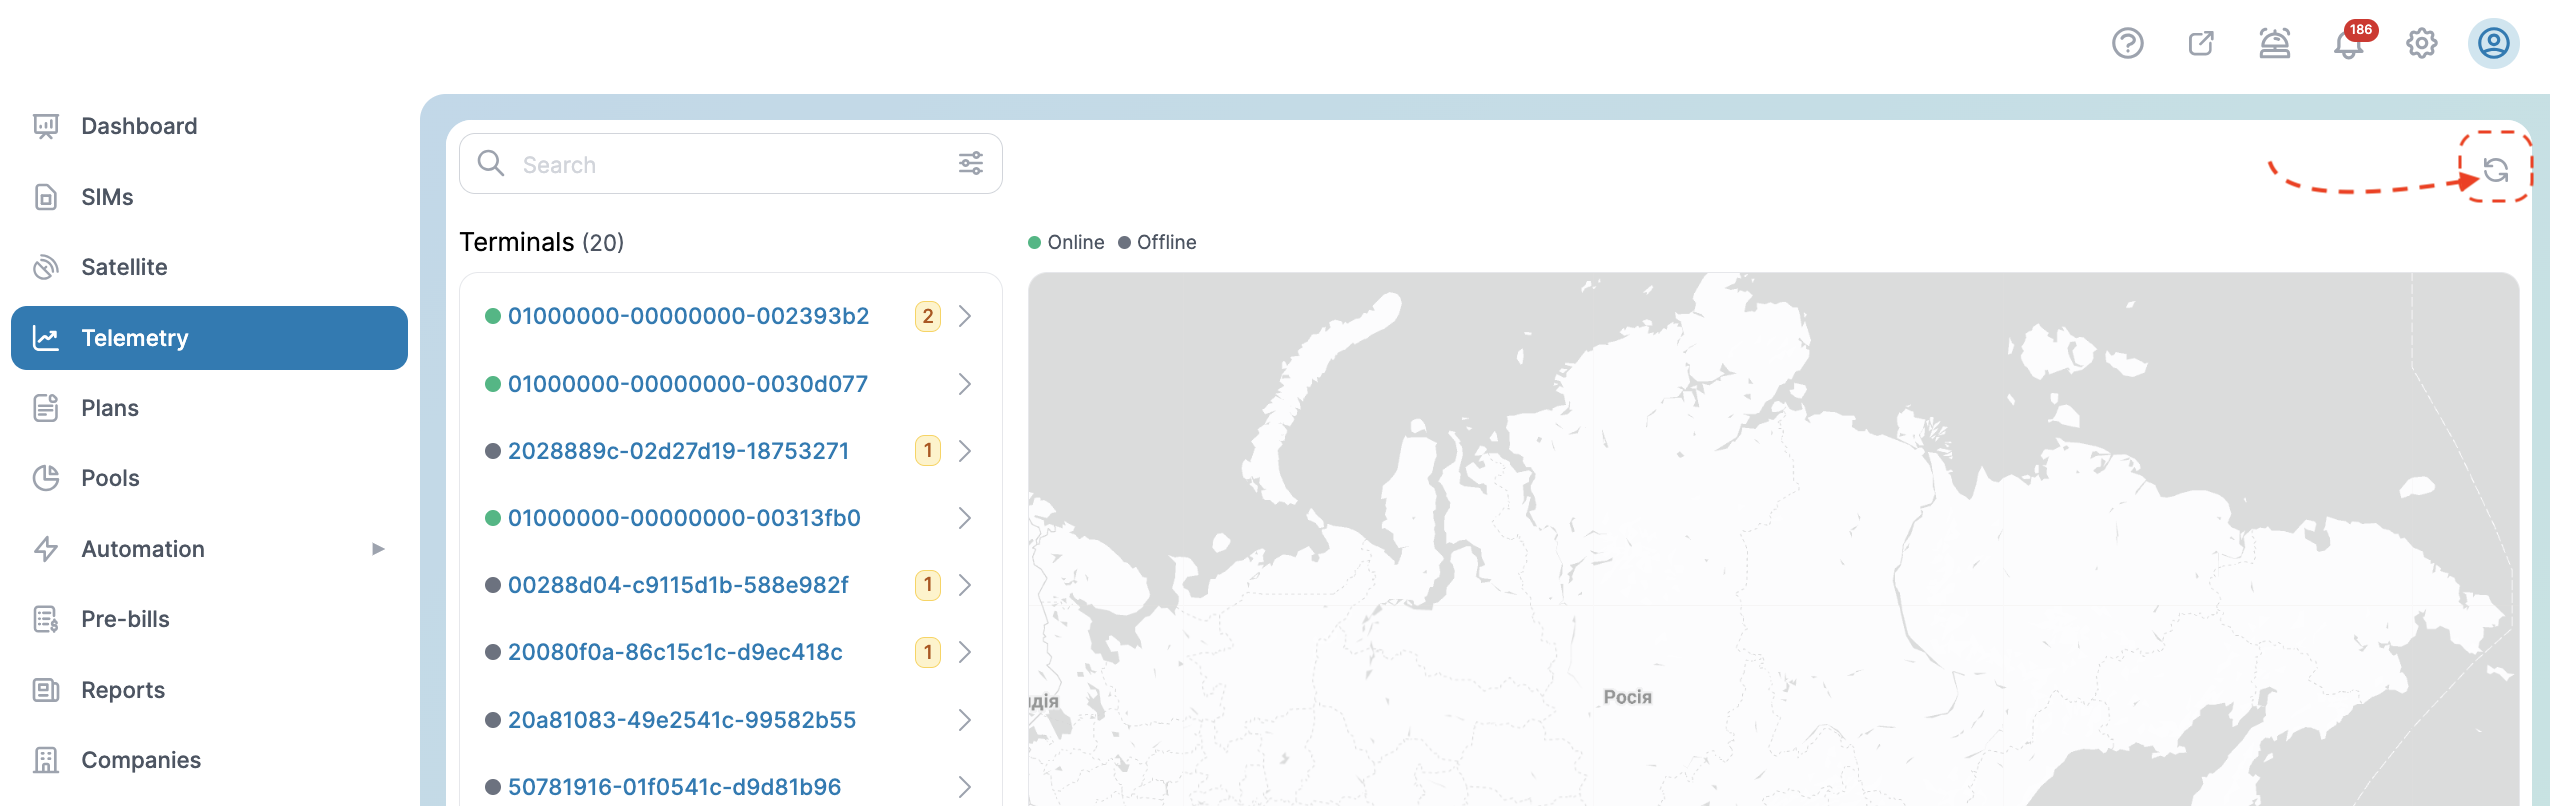
5. **Sync Button**

<div data-full-width="true"><figure><img src="https://2408445593-files.gitbook.io/~/files/v0/b/gitbook-x-prod.appspot.com/o/spaces%2FxYJmxgUa2SDfD4byrJY1%2Fuploads%2FHMQzivUYuaoZrHIZCeLw%2FTelemetry_Sync_Button.png?alt=media&amp;token=dd229d1c-36e0-4a0b-96e0-c313f0768edd" alt="" width="563"><figcaption></figcaption></figure></div>

* Allows users to refresh the displayed data to ensure up-to-date terminal statuses and locations.

***

### Telemetry Details

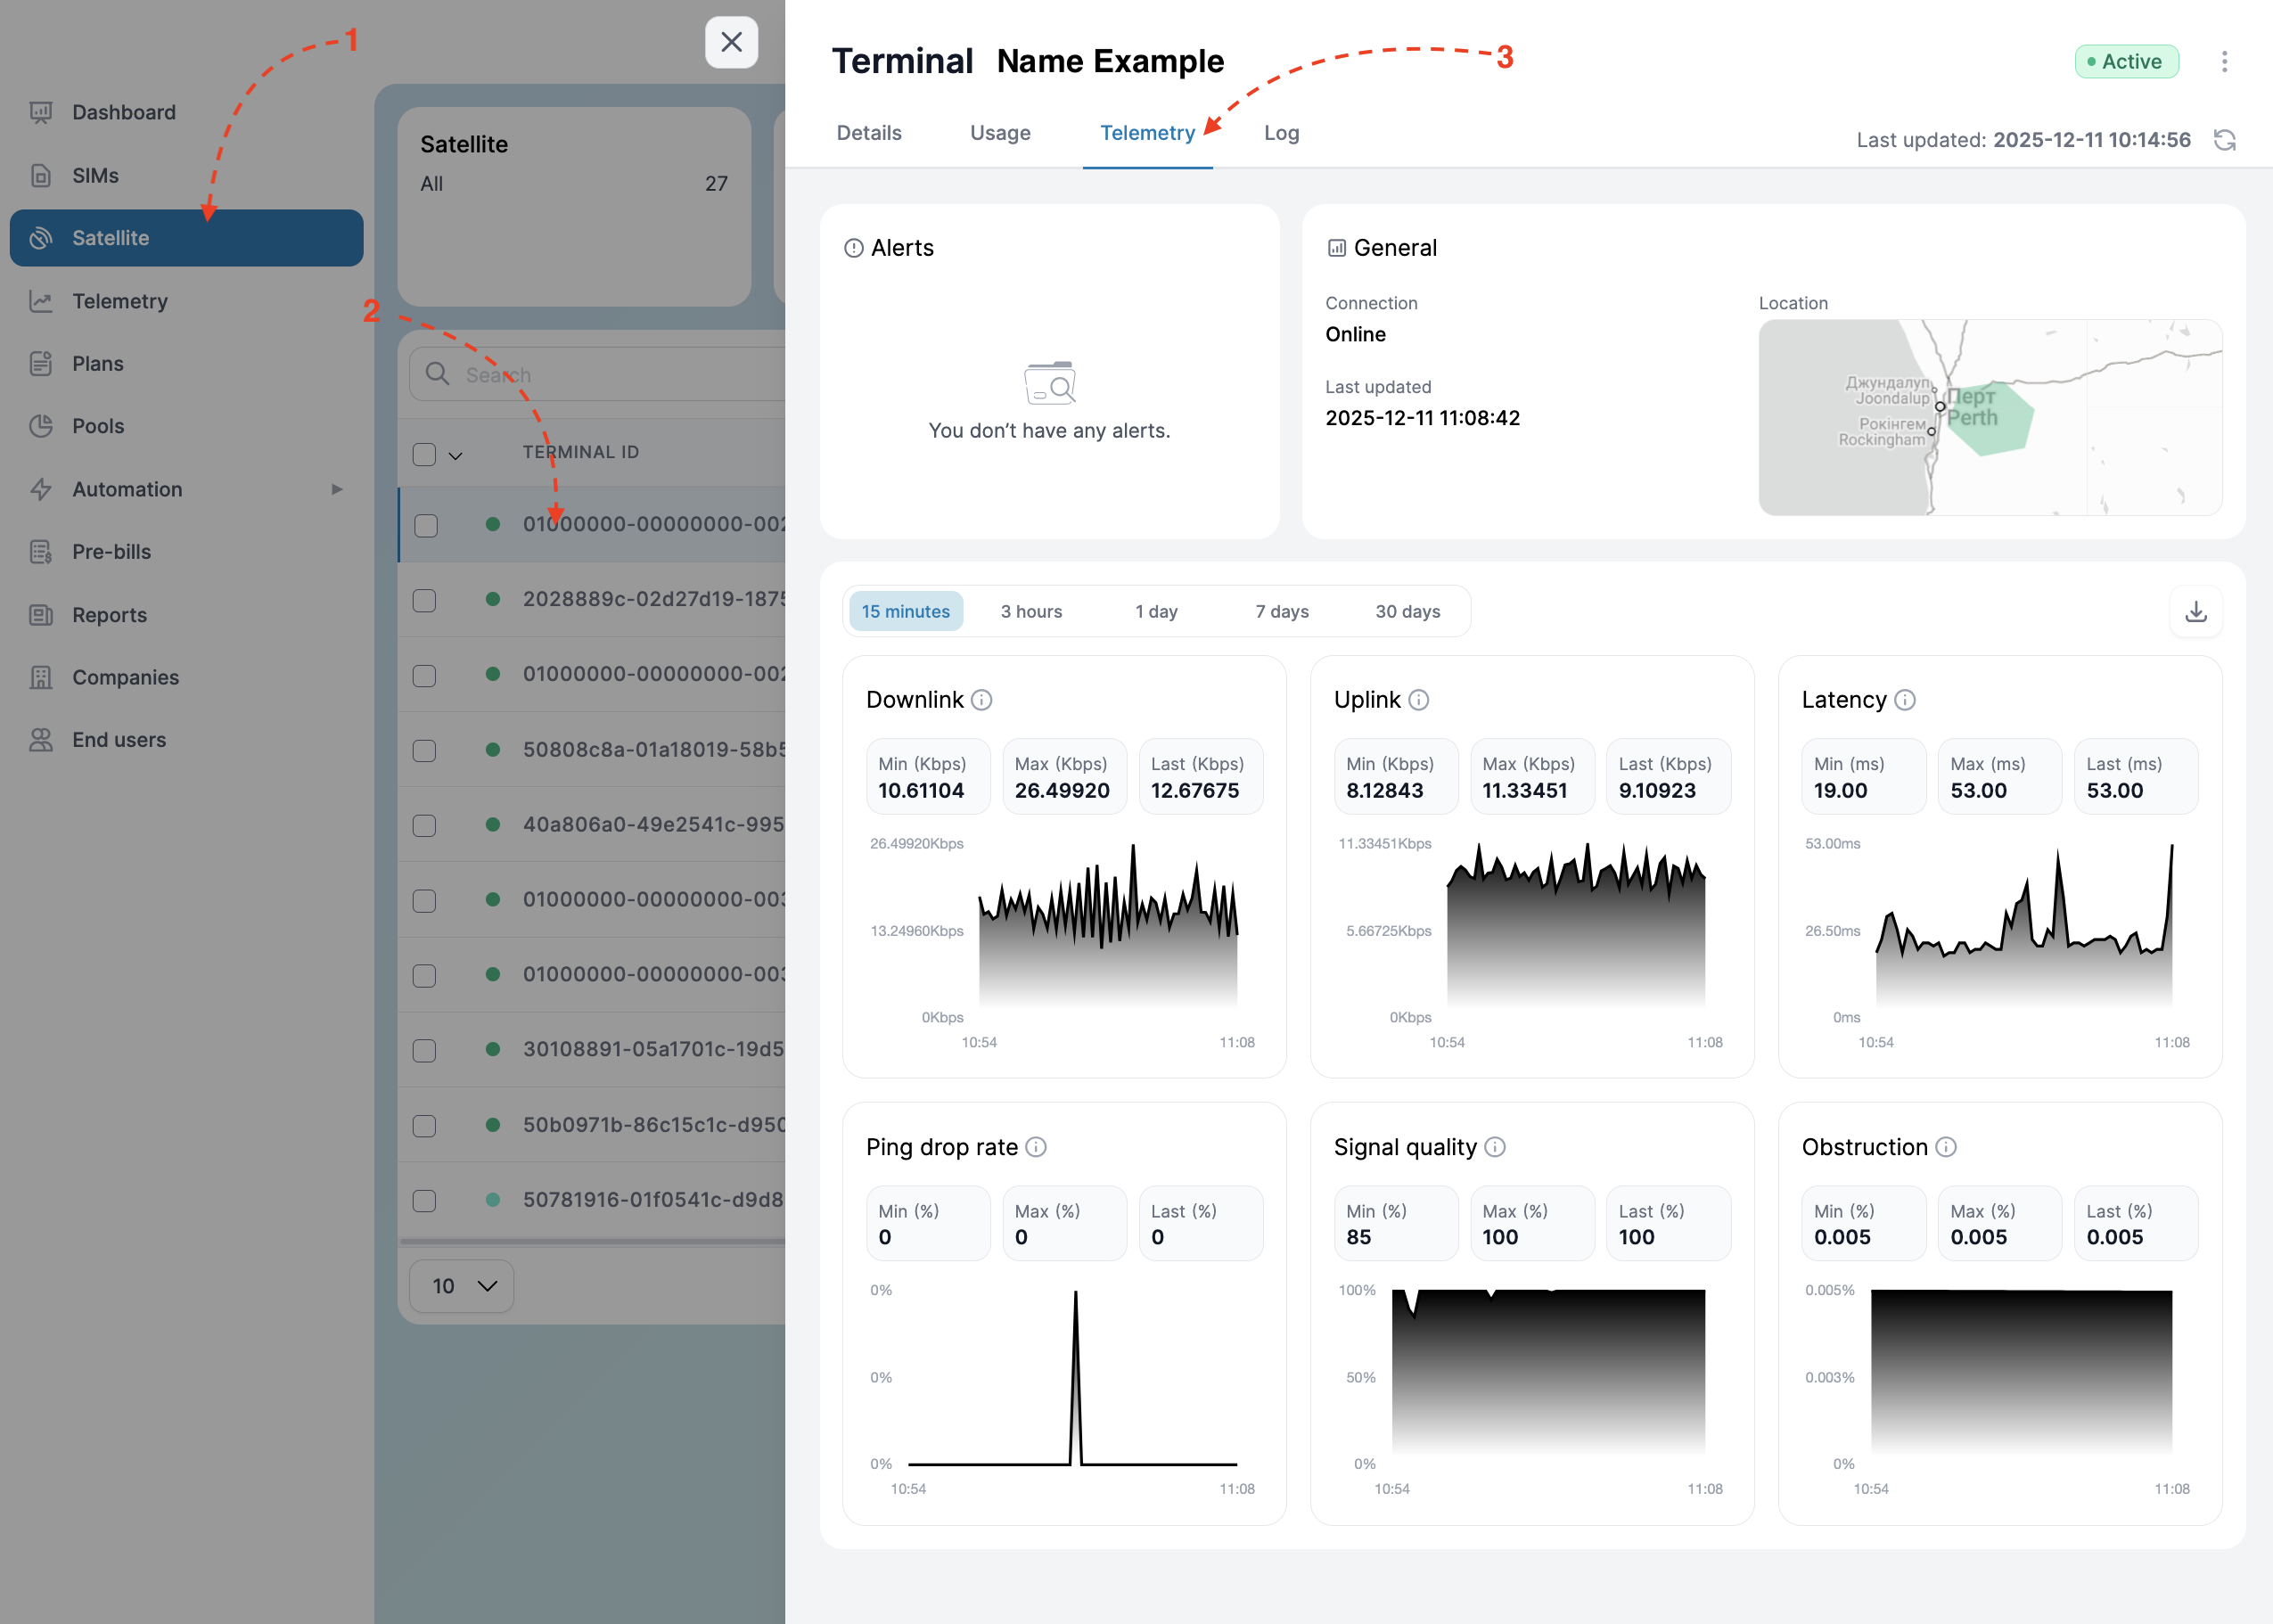
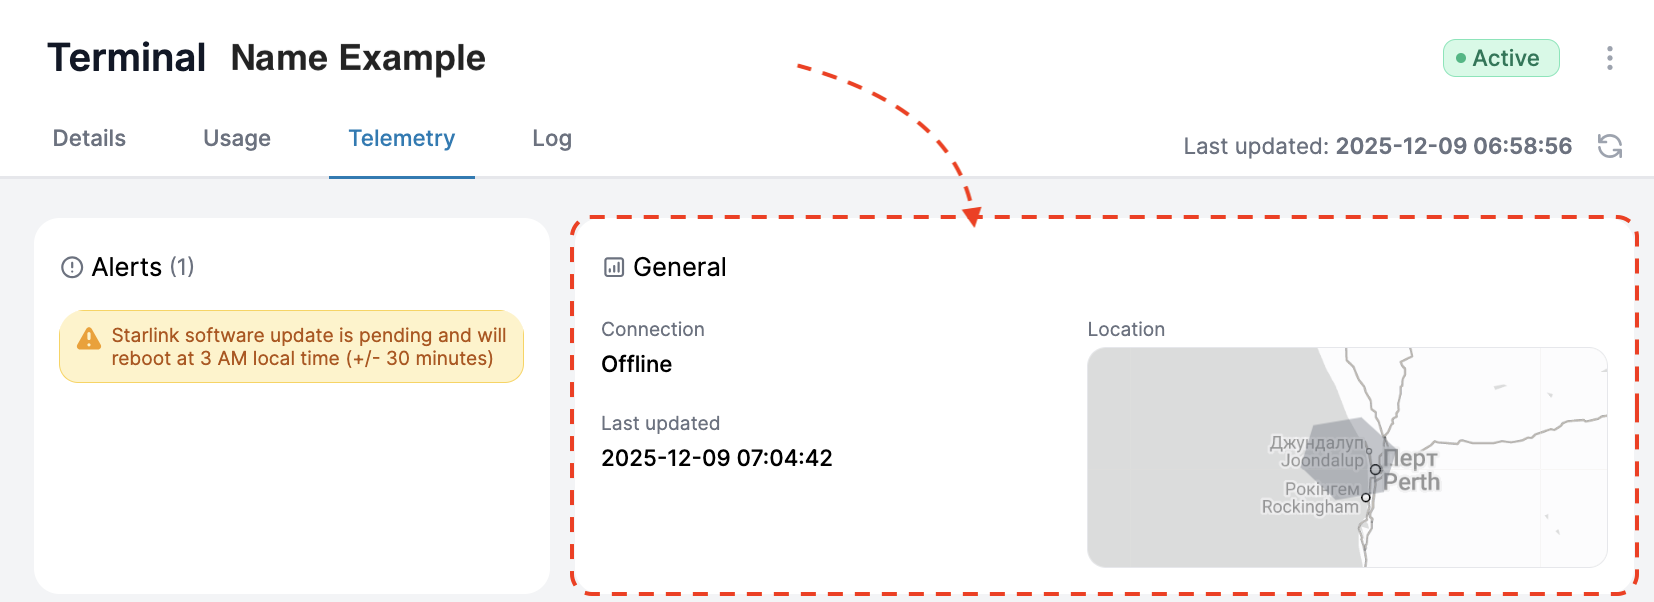
The page is divided into several sections: **Alerts**, **General**, a location map, and a set of telemetry charts.

<div data-full-width="true"><figure><img src="https://2408445593-files.gitbook.io/~/files/v0/b/gitbook-x-prod.appspot.com/o/spaces%2FxYJmxgUa2SDfD4byrJY1%2Fuploads%2FdSSI5mPi87gdj57ipNda%2FTelemetry_Table%20view.png?alt=media&amp;token=c33228e6-5a86-42e8-a735-20255af3b5a8" alt="" width="563"><figcaption></figcaption></figure></div>

1. Go to the Satellite page
2. Click on the terminal to view its telemetry details
3. Open the Telemetry tab

***

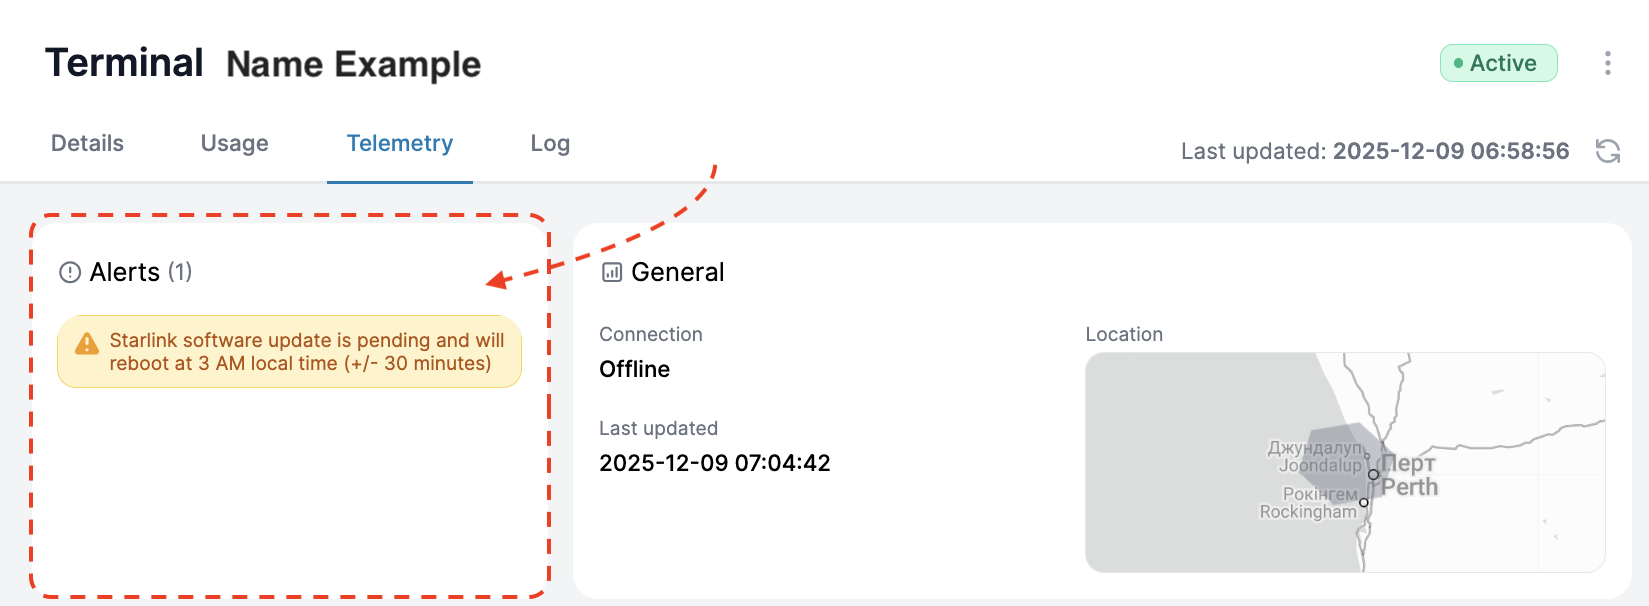
1. **Alerts Section**

<div data-full-width="true"><figure><img src="https://2408445593-files.gitbook.io/~/files/v0/b/gitbook-x-prod.appspot.com/o/spaces%2FxYJmxgUa2SDfD4byrJY1%2Fuploads%2FORD5lBaYhPXxU6WGYmgA%2FTelemetry_Alerts.png?alt=media&amp;token=bb3d9e6f-94af-42c8-8651-1ee4973eda3d" alt="" width="563"><figcaption></figcaption></figure></div>

* Shows active warnings or system issues related to the terminal.
* If no alerts are present, the interface displays: *“You don’t have any alerts.”*

***

**3. General Section**

<div data-full-width="true"><figure><img src="https://2408445593-files.gitbook.io/~/files/v0/b/gitbook-x-prod.appspot.com/o/spaces%2FxYJmxgUa2SDfD4byrJY1%2Fuploads%2FbWKIcrtiUkexSTMYovnK%2FTelemetry_Generl_Info.png?alt=media&amp;token=ee3e79cf-41c6-4f26-9d15-02d5157aee2d" alt="" width="563"><figcaption></figcaption></figure></div>

Provides essential information about the terminal’s connectivity:

* **Connection:** Online / Offline
* **Last updated:** Timestamp of the latest telemetry received
* **Location:** A map showing the approximate position of the terminal

***

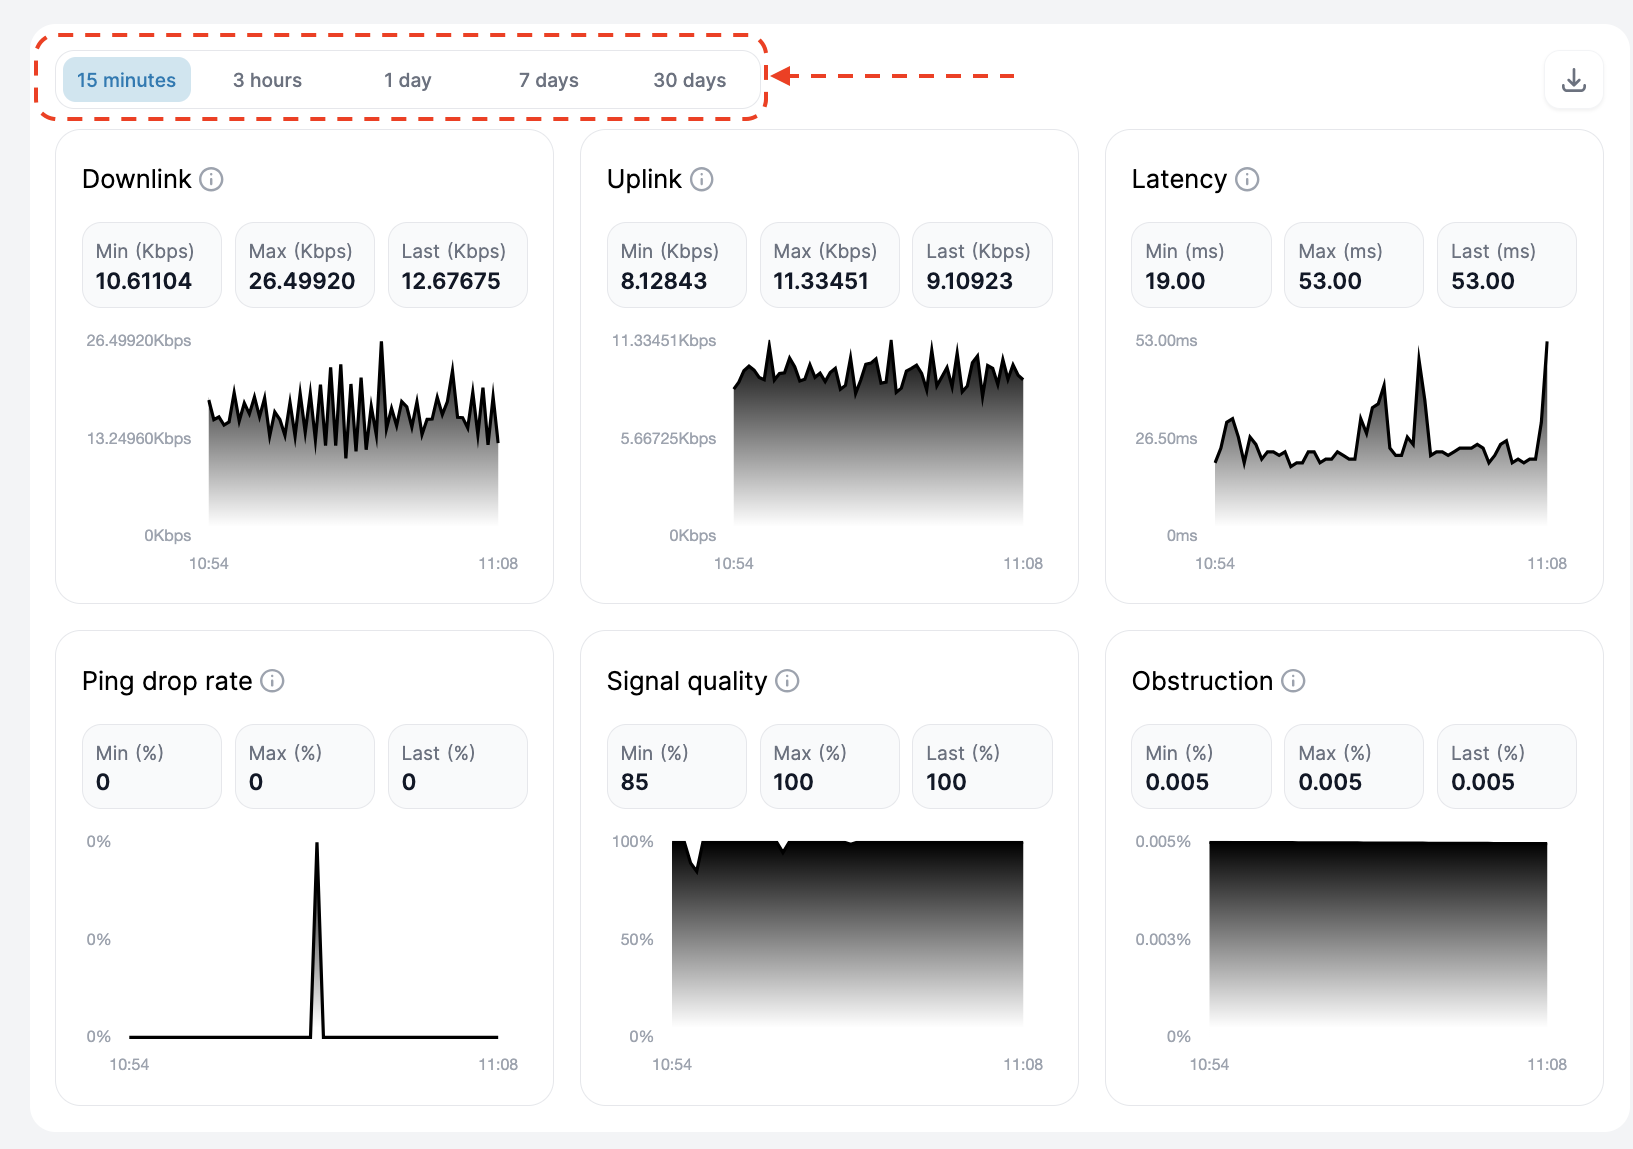
**4. Time Range Selector**

<div data-full-width="true"><figure><img src="https://2408445593-files.gitbook.io/~/files/v0/b/gitbook-x-prod.appspot.com/o/spaces%2FxYJmxgUa2SDfD4byrJY1%2Fuploads%2F7vw0u6PXASGnYSQJx3HX%2FTime%20range.png?alt=media&amp;token=38b733be-3061-465a-98ab-3f3a42c338f1" alt="" width="563"><figcaption></figcaption></figure></div>

Above the charts, users can choose the time interval for displayed telemetry:

* **15 minutes**
* **3 hours**
* **1 day**
* **7 days**
* **30 days**

{% hint style="info" %}
Changing the interval updates all charts simultaneously.
{% endhint %}

5. **Data Export**

A **Download** button located above the charts allows users to export telemetry data for offline analysis or reporting.

***

#### **Telemetry Charts**

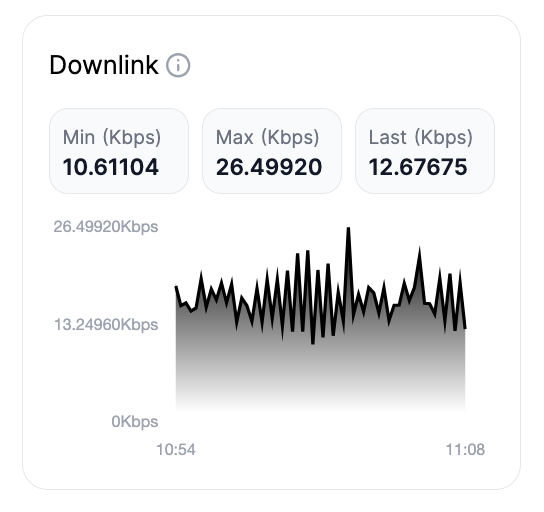
**1. Downlink (Kbps)**

<div data-full-width="true"><figure><img src="https://2408445593-files.gitbook.io/~/files/v0/b/gitbook-x-prod.appspot.com/o/spaces%2FxYJmxgUa2SDfD4byrJY1%2Fuploads%2FE9uCGZ8cTM9eD1TXcLxU%2FTelemetry_Downlink.png?alt=media&amp;token=94eff0b7-8b77-4c8b-8e9b-b97ada40e270" alt="" width="408"><figcaption></figcaption></figure></div>

Displays the terminal’s data-receive average download speed from the satellite:

* **Min** — Minimum value during the selected period
* **Max** — Maximum value
* **Last** — Most recent value
* The chart visualizes the fluctuation of downlink speeds over time.

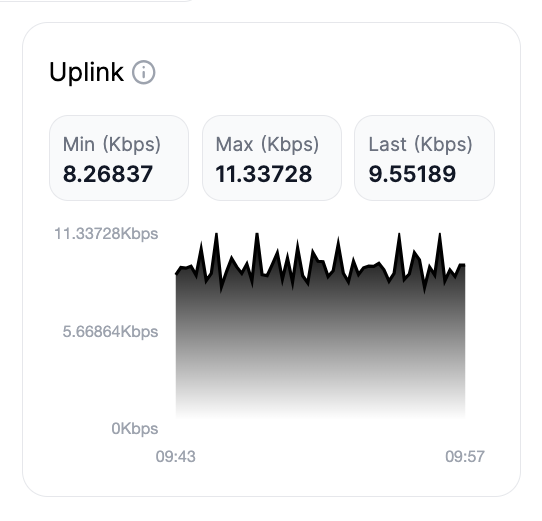
**2. Uplink (Kbps)**

<div data-full-width="true"><figure><img src="https://2408445593-files.gitbook.io/~/files/v0/b/gitbook-x-prod.appspot.com/o/spaces%2FxYJmxgUa2SDfD4byrJY1%2Fuploads%2FUd5Z9aqPAUX7HBcSfj8R%2FTelemetry_Uplink.png?alt=media&amp;token=aec045c8-9f29-4e5a-8411-b662f01d3670" alt="" width="407"><figcaption></figcaption></figure></div>

Shows the data transmission average download speed to the satellite:

* Contains the same metrics as Downlink
* The chart reflects uplink performance trends

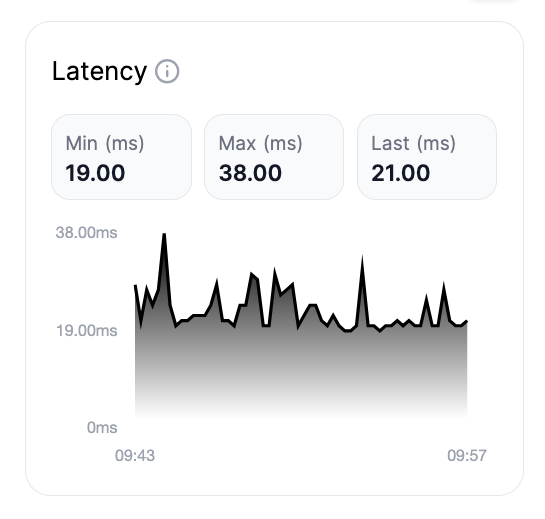
**3. Latency (ms)**

<div data-full-width="true"><figure><img src="https://2408445593-files.gitbook.io/~/files/v0/b/gitbook-x-prod.appspot.com/o/spaces%2FxYJmxgUa2SDfD4byrJY1%2Fuploads%2F3yYeQb9iCRtT40mbo4ie%2FTelemetry_Latency.png?alt=media&amp;token=0eee4bcf-0ba5-41c8-b317-14b45a89d508" alt="" width="409"><figcaption></figcaption></figure></div>

Average latency measured to the Starlink point of presence:

* **Min**, **Max**, **Last**
* The chart shows variation in latency over time.

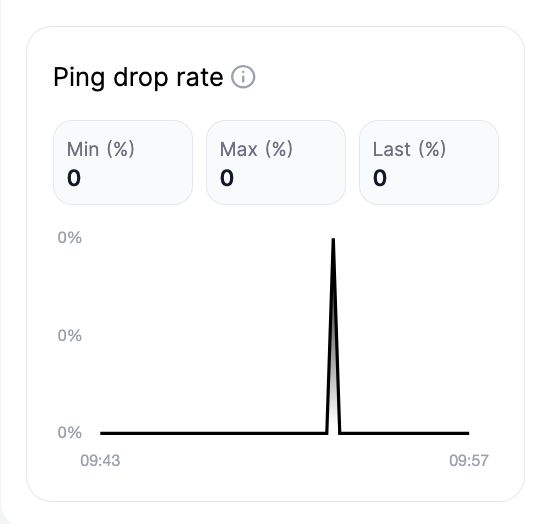
**4. Ping Drop Rate (%)**

<div data-full-width="true"><figure><img src="https://2408445593-files.gitbook.io/~/files/v0/b/gitbook-x-prod.appspot.com/o/spaces%2FxYJmxgUa2SDfD4byrJY1%2Fuploads%2FeSmATUxGwsw0oZ644gET%2FTelemetry_Ping_drop_rate.png?alt=media&amp;token=542892cf-1a08-4aef-93e2-743a296250bf" alt="" width="412"><figcaption></figcaption></figure></div>

Indicates the percentage of pings that are dropped:

* A healthy connection typically shows 0%
* The chart displays packet-loss occurrences within the selected timeframe

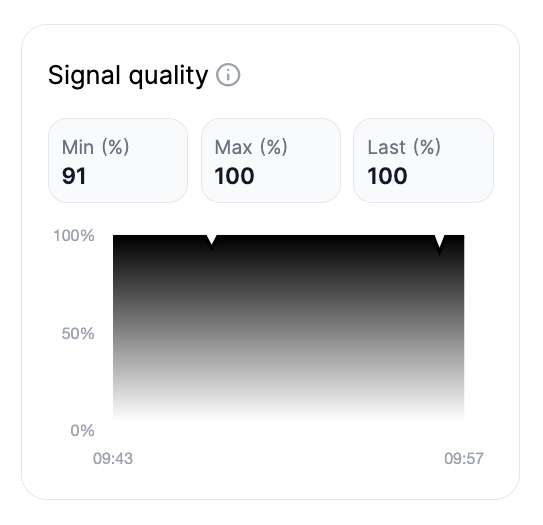
**5. Signal Quality (%)**

<div data-full-width="true"><figure><img src="https://2408445593-files.gitbook.io/~/files/v0/b/gitbook-x-prod.appspot.com/o/spaces%2FxYJmxgUa2SDfD4byrJY1%2Fuploads%2F6A4cM4r05ZsiyX01uHaM%2FTelemetry_Signal_quality.png?alt=media&amp;token=c7978039-7a53-4965-ae88-1778a6011daf" alt="" width="407"><figcaption></figcaption></figure></div>

Represents the quality of the received signal:

* Ranges from 0–100%
* Visualizes overall link stability

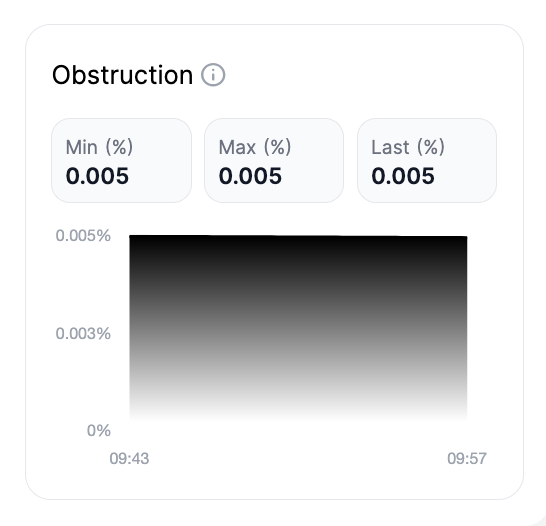
**6. Obstruction (%)**

<div data-full-width="true"><figure><img src="https://2408445593-files.gitbook.io/~/files/v0/b/gitbook-x-prod.appspot.com/o/spaces%2FxYJmxgUa2SDfD4byrJY1%2Fuploads%2FGuy0okoVsx81XYwf8PVn%2FTelemetry_Obstruction.png?alt=media&amp;token=3302a433-cf0f-4194-b3d3-09ad38163726" alt="" width="410"><figcaption></figcaption></figure></div>

Shows the percentage of time the terminal’s view of the satellite was obstructed:

* Very low values (e.g., 0.005%) indicate minimal interference
* Useful for diagnosing signal blockages from trees, buildings, etc.

***


# Pools

On the **Pools** page, you can manage data pools. You can also add preset configurations to ensure consistent data pool management.

### <mark style="background-color:blue;">Static Pool</mark> <br>

* **Purpose:** This pool has a fixed price, along with a fixed allowed balance and overage rate, regardless of the number of terminals or SIMs included. The total data usage of all Terminals/SIMs within the pool is aggregated.
* **Validity Period:** 1 calendar month
* **Payment Terms:** Monthly Fee
* **Payment Type:** Pre-Billing, Advanced Billing, Post-Billing, or Manual Invoice Creation. The system does not validate or enforce payment status (paid/unpaid)
* **Overage:** Yes - you can define a fixed rate that applies when usage exceeds the included balance.
* **Activation  Fee:** Yes. It is applied when a terminal or SIM is added, and included in the invoice at the start of the next billing period. Payment status is not tracked by the platform.
* **Prorate:** disabled
* **MRC:** No

***

### <mark style="background-color:blue;">Dynamic Pool</mark>

* **Purpose:** Every new Terminal/SIM added to the dynamic pool adds to the total amount of data and increases the pool price.
* **Validity Period:** 1 calendar  month
* **Payment Terms:** Monthly Fee
* **Payment Type:** Pre-Billing, Advanced Billing, Post-Billing, or Manual Invoice Creation. The platform does not validate or enforce payment status (paid/unpaid)
* **Overage:** Yes - you can define a fixed rate that applies when usage exceeds the included balance.
* **Activation  Fee:** Yes. It is applied when a terminal or SIM is added, and included in the invoice at the start of the next billing period. Payment status is not tracked by the platform.
* **Prorate:** enabled (optional)
* **MRC:** No

<br>


# Plans

On the **Plans** page, you can create and customize data bundles, assign SIM cards to Plans, and monitor Plan details. The table presents essential information about each Plan, including its name, type, associated operator, company, details, labels, and whether the Plan is prorated. You can also add preset configurations for quick and consistent Plan setup.

<table data-view="cards"><thead><tr><th></th><th data-type="rating" data-max="5"></th><th data-hidden data-card-target data-type="content-ref"></th><th data-hidden data-card-cover data-type="files"></th></tr></thead><tbody><tr><td>Prepaid Plan</td><td>5</td><td><a href="/menu/plans/prepaid">Prepaid</a></td><td><a href="https://2408445593-files.gitbook.io/~/files/v0/b/gitbook-x-prod.appspot.com/o/spaces%2FxYJmxgUa2SDfD4byrJY1%2Fuploads%2Fml6UWiKhQCiyiaXezxo3%2FPrepaid.png?alt=media&amp;token=bc0bcdb2-4099-47a6-adc6-8e8153bacf1b">Prepaid.png</a></td></tr><tr><td>Subscription Plan</td><td>5</td><td><a href="/menu/plans/subscription">Subscription</a></td><td><a href="https://2408445593-files.gitbook.io/~/files/v0/b/gitbook-x-prod.appspot.com/o/spaces%2FxYJmxgUa2SDfD4byrJY1%2Fuploads%2FlMBxY9xWwmVCC7nLME1L%2FSubscription.png?alt=media&amp;token=5d437465-1074-496a-b489-33f5c2c1f3b9">Subscription.png</a></td></tr><tr><td>PAYGO Plan</td><td>5</td><td><a href="/menu/plans/paygo">PAYGO</a></td><td><a href="https://2408445593-files.gitbook.io/~/files/v0/b/gitbook-x-prod.appspot.com/o/spaces%2FxYJmxgUa2SDfD4byrJY1%2Fuploads%2FCqw1ezAvMAoqfWinCQ90%2FPAYGO.png?alt=media&amp;token=84a4e07e-d0cd-4b93-b596-e3e3caafd8bc">PAYGO.png</a></td></tr></tbody></table>

## Q\&A

<details>

<summary>Why can't I select a company when creating a PAYGO plan?</summary>

The company list includes only companies that have Wallet enabled. PAYGO plans work exclusively with the Wallet feature, so if you don't have any companies with Wallet enabled, the company list will be empty when creating a PAYGO plan.

</details>


# Prepaid

### <mark style="background-color:blue;">Prepaid</mark>&#x20;

* **Purpose**: A fixed balance valid for a defined period and monitored in real-time. Once the balance is used, the Terminal can be refilled manually or automatically.
* **Validity Period:** The validity period is set by the specific prepaid product (for example, 365 days), based on the validity days of the chosen plan.
* **Payment Terms:** One-time payment / Refill
* **Payment Type:** Transactions via Stripe or Invoice
* **Overage:** No – usage stops when the balance or remaining days reach zero.
* **Activation  Fee:** No
* **Re-fill:** Yes, different balance with different price
* **Auto refill of Terminal/SIM:** Yes. Available for Companies
* **Manual Refill of Terminal/SIM:** Yes. Available for Organizations
* **Refill/Autorefill with wallet:** Yes

(Each refill extends the validity period of the prepaid product within the plan's validity days.)

* **Prorate:** No
* **MRC:**  No
* **Billing start date:** The billing cycle starts when the first usage occurs, and days are counted from that point.

### <mark style="background-color:blue;">**Additional Info**</mark>

* **Usage Terms**:

Prepaid SIM cards have specific terms based on the operator’s contract. For example, if a SIM card remains inactive (no refills) for three years, it may be deactivated. These details vary and are specified in the operator's contract.

* **Auto-Refill**:&#x20;

This feature automatically tops up the balance when it falls below a certain threshold (e.g., below 100 MB). The system charges either the company's card or the end user's card to the organization's account, and upon successful payment, the balance is updated instantly.

* **Wallet Balance**:&#x20;

This option allows the client to store a larger sum in advance for auto-refills. For instance, instead of topping up multiple SIM cards frequently with small amounts, the client can deposit $1,000 to cover auto-refills as needed.

* **Product Expiry**:

Each Prepaid product comes with a usage term. For example, 1 GB of data may be valid for 365 days. If the balance is not refilled within that period, any remaining balance will expire. However, with every refill, the validity period extends from the refill date, ensuring the product can be used for a longer time as long as the balance is regularly topped up.

***

### <mark style="background-color:blue;">**How to Create a Prepaid Plan**</mark>

### **Complete the following steps:**

1. Go to the “Plans”  button on your left side of the navigation menu&#x20;
2. On your right, press the “plus” button and choose the plan type you want to create&#x20;

<div data-full-width="true"><figure><img src="https://2408445593-files.gitbook.io/~/files/v0/b/gitbook-x-prod.appspot.com/o/spaces%2FxYJmxgUa2SDfD4byrJY1%2Fuploads%2FscUxPdrwUZEFCcFwyW5h%2FPlans.png?alt=media&amp;token=741f33ef-e9e4-4df0-84bc-acf4c691afba" alt="" width="563"><figcaption></figcaption></figure></div>

3. When a new wizard appears, fill in all essential fields.

<div data-full-width="true"><figure><img src="https://2408445593-files.gitbook.io/~/files/v0/b/gitbook-x-prod.appspot.com/o/spaces%2FxYJmxgUa2SDfD4byrJY1%2Fuploads%2FSLofJpmhJNttuO4mq51R%2FCreate%20Plan.png?alt=media&amp;token=f132fc80-6129-401e-b1f3-787ce2f28b32" alt="" width="563"><figcaption></figcaption></figure></div>

* If you want to make this plan available only to specific company(-ies), please activate the '**Company Designated Plan**' toggle.

<figure><img src="https://2408445593-files.gitbook.io/~/files/v0/b/gitbook-x-prod.appspot.com/o/spaces%2FxYJmxgUa2SDfD4byrJY1%2Fuploads%2F7UkERiVnfrOoisTKHccv%2FToggle.png?alt=media&amp;token=ab186d19-4aff-421e-b17e-e28334af99fd" alt=""><figcaption></figcaption></figure>

4. Fill in all the required information in the Billing section.

{% hint style="warning" %}
**IMPORTANT!**

The price must be at least 1.0 when creating a plan.
{% endhint %}


# Subscription

A subscription is a Plan type where the SIM card is used for a month, and at the end of the month, an invoice is issued for all expenses according to the Plan (usage). Payment for the usage is deducted at the end of the month.

The subscription is designed for companies rather than end consumers. The end consumer may be linked to the SIM card and see the usage, but cannot manage the SIM card. Management and payment are handled by the company responsible for the SIM card.

### **Types of Subscription Plan:**

## <mark style="background-color:blue;">1. Monthly Bundle</mark>

* **Purpose:** A single Termina / SIMl controls this bundle. It includes a fixed amount of data per month. fixed price&#x20;
* **Validity Period:** 1 calendar month
* **Payment Terms:** Monthly Fee
* **Payment Type:** Pre-Billing, Advanced Billing, Post-Billing, or Manual Invoice Creation. The platform does not validate or enforce payment status (paid/unpaid)
* **Overage:** Yes - you can define a fixed rate that applies when usage exceeds the included balance.
* **Activation  Fee:** Yes. It is applied when a terminal or SIM is added, and included in the invoice at the start of the next billing period. The platform does not track payment status.
* **Prorate:** enabled (optional)
* **MRC:** Yes
* **Billing start date:**  is either the date when the SIM/Terminal is assigned or the date of the first usage, whichever occurs first.<br>

***

## <mark style="background-color:blue;">2. Pay per Megabyte</mark>

* **Purpose:** The user pays based on actual usage — the more you use, the more you pay.
* **Validity Period:** 1 calendar month – ongoing until manually stopped
* **Payment Terms:** Usage-based billing
* **Payment Type:** Pre-Billing, Advanced Billing, Post-Billing, or Manual Invoice Creation. The platform does not validate or enforce payment status (paid/unpaid)
* **Overage:** No
* **Activation  Fee:** Yes. It is applied when a terminal or SIM is added, and included in the invoice at the start of the next billing period. The platform does not track payment status.
* **Prorate:** No
* **MRC:**  Yes (applied either to all SIMs/Terminals or only to active ones)

***

## <mark style="background-color:blue;">3. Unlimited</mark>

* **Purpose:** Unlimited data usage for a fixed monthly cost.
* **Validity Period:** 1 calendar month (renewed monthly)
* **Payment Terms:** Monthly Fee
* **Payment Type:** Pre-Billing, Advanced Billing, Post-Billing, or Manual Invoice Creation. The platform does not validate or enforce payment status (paid/unpaid)
* **Overage:** No — unlimited usage
* **Activation  Fee:** Yes. It is applied when a terminal or SIM is added, and included in the invoice at the start of the next billing period. The platform does not track payment status.
* **Recurring fee:** Yes
* **Prorate:** enabled (optional)
* **MRC:** Yes
* **Billing start date:** is either the date when the SIM/Terminal is assigned or the date of the first usage, whichever occurs first.

<br>

***

## <mark style="background-color:blue;">4. Static Pool</mark>

* **Purpose:** This pool has a fixed price, along with a fixed allowed balance and overage rate, regardless of the number of terminals or SIMs included. The total data usage of all Terminals/SIMs within the pool is aggregated.
* **Validity Period:** 1 calendar month
* **Payment Terms:** Monthly Fee
* **Payment Type:** Pre-Billing, Advanced Billing, Post-Billing, or Manual Invoice Creation. The system does not validate or enforce payment status (paid/unpaid)
* **Overage:** Yes - you can define a fixed rate that applies when usage exceeds the included balance.
* **Activation  Fee:** Yes. It is applied when a terminal or SIM is added, and included in the invoice at the start of the next billing period. The platform does not track payment status.
* **Prorate:** No
* **MRC:** No

***

## <mark style="background-color:blue;">5. Dynamic Pool</mark>

* **Purpose:** Every new Terminal/SIM added to the dynamic pool adds to the total amount of data and increases the pool price.
* **Validity Period:** 1 calendar  month
* **Payment Terms:** Monthly Fee
* **Payment Type:** Pre-Billing, Advanced Billing, Post-Billing, or Manual Invoice Creation. The platform does not validate or enforce payment status (paid/unpaid)
* **Overage:** Yes - you can define a fixed rate that applies when usage exceeds the included balance.
* **Activation  Fee:** Yes. It is applied when a terminal or SIM is added, and included in the invoice at the start of the next billing period. The platform does not track payment status.
* **Prorate:** enabled (optional)
* **MRC:** Yes


# PAYGO

PAYGO is a real-time product that charges users for data on a per-megabyte basis. While it operates similarly to pay-per-megabyte systems, it provides advanced features and supports seamless integrations.&#x20;

Operators can set prices not only for total data usage but also specifically for different countries.&#x20;

If the operator supplies country-specific information or imposes restrictions in certain regions, corresponding pricing can be established.

* **Purpose:** A real-time prepaid product that charges users based on data usage (per MB/GB). Requires a positive balance in the Wallet to remain active.
* **Validity Period:** 1 calendar month and continues as long as the balance stays positive.&#x20;
* **Payment Terms:** Payment within the Wallet
* **Payment Type:** Transactions via Stripe or Invoice
* **Overage:** No — service stops when balance reaches zero
* **Activation  Fee** (one time): No
* **Re-fill:** Yes, you can refill with varying balances, each associated with a different price.
* **Auto refill with wallet:** Yes. For Company
* **Manual Refill with wallet:** Yes. For Organization
* **Prorate:** No
* **MRC:** Yes, applied from either the first usage or the assignment date.
* **Billing start date:** The count starts from the first usage date

<br>


# Key Features

<table data-view="cards"><thead><tr><th></th></tr></thead><tbody><tr><td>Change Plan</td></tr></tbody></table>


# Q\&A

On the **Plans** page, you can create and customize data bundles, assign SIM cards to Plans, and monitor Plan details. The table presents essential information about each Plan, including its name, type, associated operator, company, details, labels, and whether the Plan is prorated. You can also add preset configurations for quick and consistent Plan setup.

<details>

<summary>Why can't I select a company when creating a PAYGO plan?</summary>

The company list includes only companies that have Wallet enabled. PAYGO plans work exclusively with the Wallet feature, so if you don't have any companies with Wallet enabled, the company list will be empty when creating a PAYGO plan.

</details>


# Companies

The **Companies** page is designed to meet the administrative needs of managing multiple Companies within the platform.

{% tabs %}
{% tab title="Dictionary" %}
General Terms from **Companies** page:

* **Name -** The name of the Company.
* **End Users -** Number of end users associated with the Company.
* **Prepaid -** Number of prepaid SIM cards.
* **Subscription -** Number of subscription SIM cards.
* **PAYGO -** Number of PAYGO SIM cards.
* **Staff -** Total number of staff members.
* **Pool -** Number of pools associated with the Company.
* **Wallet -**&#x54;he balance of the Company’s wallet.
* **Labels -** Tags or categories for easy identification.
  {% endtab %}

{% tab title="Key Features" %}

1. **Detailed Information (Clicking on a row):** Provides additional details about the selected Company:
   * **General:** Overview of prepaid SIMs, subscription SIMs, PAYGO SIMs, end user information, and financial data, including the amount paid this month and lifetime payments.
   * **Wallet:** Detailed wallet information, including the starting balance, total refilled amount, total spent, and the ending balance. A table with transaction data is also provided, showing the date, description, and amount of each transaction.
   * **Staff:** List of staff members associated with the Company, including first name, last name, email, and type.
   * **Company Details:** Information about the Company name, owner, email, notification settings, and currency preferences.

The **Companies** page provides a clear and organized view of each Company’s SIM card usage, financial transactions, and associated staff, helping administrators maintain control and oversight.
{% endtab %}
{% endtabs %}


# End Users

Here you as an Organization can manage information about End Users, including their associated Companies, SIM cards, and financial details. This page is intended to streamline user management by offering detailed insights into End User accounts, SIM usage, and payment settings.

{% tabs %}
{% tab title="Dictionary" %}
General Terms from **End Users** page:

* **Name -** For end users, the name is shown if available; otherwise, the email is displayed when the name is not provided.
* **Company -** The company associated with the end user.
* **Prepaid -** Number of prepaid SIM cards assigned to the end user.
* **Subscription -** Number of subscription SIM cards assigned.
* **PAYGO -** Number of PAYGO SIM cards assigned.
* **Wallet -** Current wallet balance of the end user.
* **Labels -** Tags or categories for easy identification and filtering.
  {% endtab %}

{% tab title="Key Features" %}

1. **Detailed Information (Clicking on a row):** Provides further details about the selected End User:
   * **General:** Overview of SIM card assignments (prepaid, subscription, PAYGO), wallet information including paid amounts (monthly and lifetime), and general settings such as notification preferences and whether the End User pays for new purchases.
   * **Permissions:** Defines the actions the End User can perform, such as adding, deleting, editing, or viewing information. This includes managing payment methods, staff-related actions, and SIM card management (e.g., updating notes, auto-refill options, refilling).
   * **Log:** Displays a history of changes with date, modified fields, old and new values, and the user who made the changes. This is useful for auditing and tracking adjustments.

The **End Users** page allows for efficient management of SIM card assignments, tracking of wallet balances, and configuration of End User permissions and settings.
{% endtab %}
{% endtabs %}


# Automation - Rules

The **Automation Rules** page allows you to create and manage rules that automate various processes. This functionality helps streamline operations, improve efficiency, and ensure that specific actions are triggered automatically based on predefined criteria.

<div data-full-width="true"><figure><img src="https://2408445593-files.gitbook.io/~/files/v0/b/gitbook-x-prod.appspot.com/o/spaces%2FxYJmxgUa2SDfD4byrJY1%2Fuploads%2FvDqkk2j883n45RkS0CbH%2FRules.png?alt=media&amp;token=8c2d57e9-373f-41cf-9861-68567f89d01c" alt="" width="563"><figcaption></figcaption></figure></div>

Rules are used to automate processes and consist of the following components:

* Rule Type
* Trigger
* Period
* Condition
* Value
* Actions

Each rule type comes with its own set of available triggers. Every trigger, in turn, is linked to a specific set of periods, conditions, and values. The available actions depend on the selected trigger, the account level, and user permissions.

***

### Trigger list

| Trigger               | Applies to                | Triggered when                                                          |
| --------------------- | ------------------------- | ----------------------------------------------------------------------- |
| **Status**            | SIM and Satellite         | the status changes to the selected value (e.g., Activate/Suspend)       |
| **IMEI**              | SIM only                  | the IMEI changes                                                        |
| **Date**              | SIM and Satellite         | the specific date is reached (e.g., activation date, contract end date) |
| **Data left**         | Prepaid                   | the remaining data balance falls to or below the specified threshold    |
| **Data used**         | Subscription, PAYGO, Pool | total data usage reaches the defined limit                              |
| **Voice used**        | SIM only                  | voice usage reaches the specified number of minutes                     |
| **Funds used**        | PAYGO only                | the user has spent the defined amount of funds                          |
| **Remaining balance** | Wallet only               | the wallet balance drops to the specified amount or lower.              |

The rule should be triggered once the condition for the trigger is met. After that, it should perform all actions specified in the rule.

{% hint style="success" %}
The rule should check the trigger immediately after assignment.
{% endhint %}

***

### Action list

* **Change status** – Change the status of the entity to the specified one
  * **Suspended** – Only applicable to the IMEI trigger
  * **Activate/Suspended**
* **Email notifications:**
  * **Default account email** – Send a notification email to the default account email
  * **Staff** **email** – Send a notification email to the selected staff email
  * **Company email**– Send a notification email to the default company email
  * **End user**  **email**– Send a notification email to the owner’s email
  * &#x20;**Custom email(s)** – Sends a notification to one or more manually specified email addresses (maximum of 5).
* **Enable throttle** – Sends a request to the Integrator to activate throttling (if supported by the operator).
* **Push API** – Send a webhook to the specified API endpoint.


# Billing

The Billing section provides an overview and management tools for financial operations within the platform. It consists of three key subsections: Transactions, Invoices, and Pre-bills.

<table data-view="cards"><thead><tr><th></th><th data-hidden data-card-target data-type="content-ref"></th></tr></thead><tbody><tr><td>Transactions</td><td><a href="/menu/billing/transactions">Transactions</a></td></tr><tr><td>Invoices</td><td><a href="/menu/billing/invoices">Invoices</a></td></tr><tr><td>Pre-bills</td><td><a href="/menu/billing/pre-bills">Pre-bills</a></td></tr></tbody></table>


# Transactions

The Transactions page provides a detailed view of all transaction records within the system, allowing  to track, manage, and filter transaction data.

The page consists of several key areas that facilitate user interaction with the transaction information.

#### <mark style="background-color:blue;">Key Areas on the Transactions Page:</mark>

#### **1. Transaction List**&#x20;

* Displays a table of all transactions with the following columns:
  * **Date**: The timestamp of the transaction.
  * **Type**: Indicates the type of transaction (e.g., SIM refill, eSIM purchase, etc.).
  * **Destination**: Identifies the target associated with the transaction (e.g., a specific account or service).
  * **Amount**: The value of the transaction.
  * **Currency**: The currency of the transaction (e.g., EUR).
  * **Payment Method**: The method used for the transaction (e.g., Stripe, Invoice).
  * **End User**: The user associated with the transaction.
  * **Billing Cycle**: The billing cycle linked to the transaction.
  * **Labels**: Any tags associated with the transaction.

#### **2. Filters**&#x20;

A set of filtering options that allow users to refine their search and view specific transactions based on the following criteria:

**1) Status**

Defines the current state of the transaction or operation. Available options:

* **Pending** – The process has been initiated but is not yet completed.
* **Failed** – The process was attempted but did not succeed.
* **Completed** – The process was successfully finished.

**2) Payment Method**

Specifies the method used for payment. Available options:

* Credit Card (Stripe)
* iDEAL
* Manual
* PayPal
* Wallet
* Company Wallet

**3) Company**

Allows filtering by the associated company.

**4) Currency**

Filters records based on the currency used for the transaction.

**5) Type**

Defines the category of the transaction. Available options:

* **(e)SIM refill**
* **Refill wallet**
* **eSIM Purchase**

**6) Billing Cycle**

Filters records according to the billing cycle associated with the transaction.

**7) Labels**

Supports filtering by assigned labels.

#### **3. Transaction Details**&#x20;

* When a user clicks on a specific transaction, detailed information about that transaction is shown in a separate panel. This includes:
  * **General Information**: Displays key details such as the transaction ID, type, destination, amount, payment method, and associated end-user.
  * **Transaction Reason**: If available, an explanation or reason for the transaction can be displayed.
  * **Company Information**: Information about the company involved in the transaction (e.g., company name, relevant contacts).
  * **Labels**: Displays any tags associated with the transaction, which may help classify or provide further context.

#### 4. Additional Features

* **Export Function**:
  * The page includes an export function that allows users to download the transaction data in a suitable format (e.g., CSV or Excel). This is useful for offline analysis or reporting purposes.
  * The export function typically considers any applied filters, ensuring that only the relevant transactions are exported.
* **Manage Labels**:
  * A "Manage Labels" function is available to allow users to categorize or tag transactions with specific labels. This feature helps in organizing transactions and making them easier to search and report.
  * Labels can be added, removed, or modified as necessary.


# Invoices

The Invoices page provides a centralized interface for viewing, filtering, inspecting, and exporting all invoices generated within the system.

It is part of the **Billing** module and is accessible via **Billing → Invoices** in the navigation menu.

The page consists of three main components:

1. **Invoices List**
2. **Filters Panel**
3. **Invoice Details View**
4. **Export Function**

***

### **1. Invoices List**

The main section displays a tabular list of all invoices generated across companies and end users.\
Each row includes the following key fields:

* **Number** – the unique invoice identifier.
* **Created At** – date of invoice creation.
* **Company** – the company to which the invoice belongs.
* **End User** – the specific end-customer (if applicable).
* **Total Amount** – total charge amount.
* **Currency** – currency in which the invoice was issued.

Additional functions:

* **Row selection** for bulk actions.
* **Search bar** for quick filtering by invoice number or related data.
* **Quick action menu** (⋮) for accessing the invoice preview or exporting the document.

***

### **2. Filters Panel**

The **Filters** panel allows users to narrow down the list of invoices based on specific parameters.\
It opens via the **Filter** button located next to the main search bar.

#### **Available Filter**

* **Company**\
  Dropdown list containing all available companies.\
  Selecting a company limits the results to invoices associated with that entity.

#### **Controls**

* **Submit**\
  Applies the selected filters and refreshes the list.
* **Clear All**\
  Resets all applied filters, returning the list to its unfiltered state.

The filter panel provides a compact way to focus on specific billing records without leaving the page.

***

### **3. Invoice Details View**

Clicking any invoice number opens the **Invoice Details** panel on the right side of the screen.\
This view contains all invoice-specific information structured in a three-section layout:

#### **3.1 General**

Displays the primary invoice metadata:

* Invoice Number
* Creation Date
* Status
* Linked End User
* Company information (if applicable)

#### **3.2 Billed To**

Contains billing recipient information:

* Company or end user name
* Contact email
* Address (if available)

#### **3.3 From**

Shows the issuing organization’s details:

* Organization name
* Address
* VAT/Tax identifiers (if applicable)

#### **3.4 Item List**

A detailed breakdown of all items included in the invoice:

* **Item** – product or service name
* **Qty** – quantity
* **Unit Price** – price per unit
* **Amount** – line total

A summary line shows the overall **Total** amount.

The Details view helps users quickly audit, verify, or share invoice information.

***

### **4. Export Function**

The system supports exporting invoices directly from the Invoices list or from the Invoice Details view.

#### **Capabilities**

* Export a **single invoice** in CSV format.
* Export **multiple invoices** by selecting the desired rows and choosing the export option.
* Downloaded files adhere to standard invoice formatting, including company data, itemized charges, and totals.


# Pre-bills

The Pre-bills page allows users to view, filter, and analyze preliminary billing records generated by the system based on tariffs, usage, and other billing events.

{% tabs %}
{% tab title="Overview" %}
The main screen consists of several key sections:

#### **1. Statistics Panel**

Located at the top of the page, displaying key aggregated information:

* **Pre-bills (All):** total number of pre-bills.
* **Statuses:** number of pre-bills in each status:\
  – *Pending*\
  – *Approved*
* **Companies:** list of companies associated with pre-bills.
* **Bill-cycles:** available billing cycles.

#### **2. Search and Filters**

* Global search field for searching by pre-bill number or other parameters.
* Filter icon for advanced filtering options.

#### **3. Pre-bills Table**

Displays a list of pre-bills with columns:

* **Number** — unique pre-bill number.
* **Created at** — creation date.
* **Company** — company associated with the pre-bill.
* **Total amount** — total amount of the pre-bill.
* **Currency code** — currency (USD, EUR, etc.).

Each row can be opened to view detailed information.
{% endtab %}

{% tab title="Details" %}
The **Details** tab provides key attributes of the pre-bill and a breakdown of billing items.

#### **1. General Information**

Contains key document parameters:

* **Status** — current status (*Pending*, *Approved*).
* **Business type** — type of billing operation.
* **Currency** — document currency.
* **Reference** — additional reference or identifier.
* **Created at** — date the pre-bill was created.

#### **2. Item List**

Shows detailed billing items, including:

* **Item** — name or type of billing event (e.g., "Starter PayWhat SIMC").
* **Qty** — quantity of units.
* **Unit price** — price per unit.
* **Amount (local)** — amount in local currency.

At the bottom:

* **Total excl. VAT** — total amount excluding VAT.

<mark style="background-color:blue;">This tab is used for manual verification of billing components before approval.</mark>
{% endtab %}

{% tab title="Usage" %}
The **Usage** tab shows detailed resource usage that contributed to the pre-bill calculation.

#### **1. General Information**

* **Billing cycle** — billing cycle for which usage was calculated.
* **Created at** — date usage data was generated.

#### **2. Usage Table**

Displays detailed usage records:

* **Destination** — target resource or identifier.
* **Usage (MB / min / units)** — quantity of resources consumed.
* **Plan name** — plan or service bundle applied.
* **Pool name** — pool or group associated with the usage.
* **Calculation date** — date the usage was calculated.
* **Nickname**&#x20;
* **Labels**

Pagination and page controls are available at the bottom.

This tab enables the analysis of usage details.

#### 3. Export

The Usage tab also provides the ability to **export these details in CSV format** for further analysis or record-keeping.
{% endtab %}
{% endtabs %}


# VAT \[Tax]

### VAT Application Hierarchy: Organization → Company → End User

The system supports VAT configuration at three levels:

1. **Organization level**
2. **Company level**
3. **End user level**

{% hint style="warning" %}
Each participant is charged **their own VAT rate if one exists**.\
If the participant does not have a VAT rate, the system uses the **Organization’s VAT rate** as the fallback.
{% endhint %}

***

### 1. Organization VAT Only

**Input values:**

* Organization VAT: *e.g., 21%*
* Company VAT: none
* End user VAT: none

**Application logic:**

* The company is charged using **21%** (the organization’s VAT rate).
* The end user is also charged using **21%** (the organization’s VAT rate).

**Result:**

* All transactions use the **Organization-level VAT**.

***

### 2. Organization VAT + Company VAT

**Input values:**

* Organization VAT: *e.g., 21%*
* Company VAT: *e.g., 18%*
* End user VAT: none

**Application logic:**

* The company is charged using **18%** (the company’s VAT rate overrides the organization’s rate).
* The end user is charged using **21%** (falls back to the organization’s VAT rate because the end user does not have its own rate).

**Result:**

* Company pays: **18% VAT**
* End user pays: **21% VAT**

***

### 3. All Three Levels Have VAT

**Input values:**

* Organization VAT: *e.g., 21%*
* Company VAT: *e.g., 18%*
* End user VAT: *e.g., 22%*

**Application logic:**

* The company is charged using **18%** (company-level VAT takes priority).
* The end user is charged using **22%** (end-user-level VAT takes priority).

**Result:**

* Company pays: **18% VAT**
* End user pays: **22% VAT**

<br>


# Wallet

The Wallet page comprehensively overviews your company's financial transactions and wallet management.

<figure><img src="https://2408445593-files.gitbook.io/~/files/v0/b/gitbook-x-prod.appspot.com/o/spaces%2FxYJmxgUa2SDfD4byrJY1%2Fuploads%2FV0Xib9Ee1QjTBjMaHLaN%2F%D0%94%D0%B8%D0%B7%D0%B0%D0%B9%D0%BD%20%D0%B1%D0%B5%D0%B7%20%D0%BD%D0%B0%D0%B7%D0%B2%D0%B8%20(69).png?alt=media&amp;token=615f0c10-8e57-4e08-89f8-8deed9ae2901" alt=""><figcaption></figcaption></figure>

<mark style="background-color:blue;">**1. General**</mark>

* **Enable Wallet**: This toggle feature allows users to turn the wallet functionality on or off, providing flexibility based on the company’s financial management preferences.
* **Minimum Balance**: Сan either be ***positive*** or ***negative***. A positive minimum balance indicates that a certain amount must be maintained in the account, while a negative minimum balance allows for a deficit, meaning the account can go below zero up to a specified limit.

<mark style="background-color:blue;">**2. Overview of Transactions**</mark>

* **Starting Balance**: Displays the initial amount available in the wallet before any transactions are made, providing a baseline for financial tracking.
* **Total Refilled**: This shows the total amount added to the wallet over a specified period, helping users monitor funding activity.
* **Total Spent**: Indicates the cumulative amount spent from the wallet, allowing users to track expenditures efficiently.
* **Ending Balance**: Reflects the current wallet balance after accounting for all refills and expenditures, ensuring users have an accurate picture of their financial status.

<mark style="background-color:blue;">**3. Transaction History**</mark>

* **Date**: Lists the date of each transaction, providing a timeline for financial activities.
* **Description**: Offers a brief summary of each transaction, such as refills or payments made, to help users understand the context of each entry.
* **Amount**: Displays the monetary value of each transaction, allowing users to assess their financial movements at a glance.


# Webhooks

This section briefly describes the concept of webhooks and how to use them with the platform. It provides basic terms and definitions related to the topic of webhooks, as well as the main entities and examples of payloads that your application can receive.&#x20;

<table data-view="cards"><thead><tr><th></th><th data-hidden data-card-cover data-type="files"></th><th data-hidden data-card-target data-type="content-ref"></th></tr></thead><tbody><tr><td>Terms used</td><td><a href="https://2408445593-files.gitbook.io/~/files/v0/b/gitbook-x-prod.appspot.com/o/spaces%2FxYJmxgUa2SDfD4byrJY1%2Fuploads%2FsgD1xhfZ0OlSC3xUnI6s%2F%D0%94%D0%B8%D0%B7%D0%B0%D0%B9%D0%BD%20%D0%B1%D0%B5%D0%B7%20%D0%BD%D0%B0%D0%B7%D0%B2%D0%B8%20(22).png?alt=media&amp;token=df5e9125-667e-455f-ba46-aac5d81643af">Дизайн без назви (22).png</a></td><td><a href="/menu/webhooks/terms-used">Terms used</a></td></tr><tr><td>Endpoint validation</td><td><a href="https://2408445593-files.gitbook.io/~/files/v0/b/gitbook-x-prod.appspot.com/o/spaces%2FxYJmxgUa2SDfD4byrJY1%2Fuploads%2F7jYiaQlK8ebkvK0hdWuw%2F%D0%94%D0%B8%D0%B7%D0%B0%D0%B9%D0%BD%20%D0%B1%D0%B5%D0%B7%20%D0%BD%D0%B0%D0%B7%D0%B2%D0%B8%20(23).png?alt=media&amp;token=7d179083-26c9-435a-9535-9a1f79a757bc">Дизайн без назви (23).png</a></td><td><a href="/menu/webhooks/endpoint-validation">Endpoint validation</a></td></tr><tr><td>Authentication</td><td><a href="https://2408445593-files.gitbook.io/~/files/v0/b/gitbook-x-prod.appspot.com/o/spaces%2FxYJmxgUa2SDfD4byrJY1%2Fuploads%2FPlgyO0q1CvrnzV4Blx2V%2F%D0%94%D0%B8%D0%B7%D0%B0%D0%B9%D0%BD%20%D0%B1%D0%B5%D0%B7%20%D0%BD%D0%B0%D0%B7%D0%B2%D0%B8%20(24).png?alt=media&amp;token=0b480833-620e-420f-9daf-7cdc733a145b">Дизайн без назви (24).png</a></td><td><a href="/menu/webhooks/authentication">Authentication</a></td></tr><tr><td>Webhook Payload Models</td><td><a href="https://2408445593-files.gitbook.io/~/files/v0/b/gitbook-x-prod.appspot.com/o/spaces%2FxYJmxgUa2SDfD4byrJY1%2Fuploads%2FpjiGyPAD2yDRxZaBLfMG%2F%D0%94%D0%B8%D0%B7%D0%B0%D0%B9%D0%BD%20%D0%B1%D0%B5%D0%B7%20%D0%BD%D0%B0%D0%B7%D0%B2%D0%B8%20(20).png?alt=media&amp;token=46147eab-f858-49dd-b384-28e469e39ad1">Дизайн без назви (20).png</a></td><td><a href="/menu/webhooks/webhook-payload-models">Webhook Payload Models</a></td></tr><tr><td>Webhook Payload Types</td><td><a href="https://2408445593-files.gitbook.io/~/files/v0/b/gitbook-x-prod.appspot.com/o/spaces%2FxYJmxgUa2SDfD4byrJY1%2Fuploads%2FwaUC92apD35qG0Xw3RaV%2F%D0%94%D0%B8%D0%B7%D0%B0%D0%B9%D0%BD%20%D0%B1%D0%B5%D0%B7%20%D0%BD%D0%B0%D0%B7%D0%B2%D0%B8%20(21).png?alt=media&amp;token=f4987c3f-cbe6-40d3-908d-67ab1e4a3059">Дизайн без назви (21).png</a></td><td><a href="/menu/webhooks/webhook-payload-models">Webhook Payload Models</a></td></tr></tbody></table>


# Terms used

This page uses generally accepted and newly coined terms. Definitions of the most commonly used terms in this document are provided below.&#x20;

**Push API** – is the tool that allows websites to send instant messages (webhooks) to your Endpoint URL, on something triggers like creating a new account, changing SIM usage, etc. This tool sends a webhook from one application to another application when something event was triggered. For example, you can set up your endpoint URL to send a webhook notification when something Prepaid SIM Card has 200 MB of usage remaining.&#x20;

All webhooks described in this docs use the standard JSON syntax.&#x20;

**Webhook** – is the HTTP POST request to your endpoint URL, called in Push API process.

**Endpoint URL** – is a URL link to your-side web server that implements a handler of webhook with different payloads. For example, a handler of the "echo" webhook payload is necessarily required to work with Push API (for more details, see section 2).

**Webhook Payload** – is a body of Webhook. This docs define the set of default payloads that may occur in webhooks (for more information about webhook payloads, see section 5).

**Webhook Payload Model** – is a typical JSON that can occur in different webhook payloads. Models have required and optional fields, and are designed to unify sets of parameters of default objects like SIM Card, Account, etc. (for more information about webhook payload models, see section 4).

<br>


# Endpoint validation

A prerequisite for using Push API is the validation of your endpoint URL. You must implement a webhook request handler of the “echo” type for this.

To validate your endpoint URL, the System will send an "echo" type request, with the “echo\_data” parameter containing some short pseudo-random text. The size of the text will not exceed 50 characters. The text can include Latin letters, Arabic numbers, and the special character “:”.

In the response, the System will expect to receive a response of the “echo” type, with the “echo\_data” parameter, the content of which is identical to what was in the request. You can simply copy the request body into your response, without any additional operations.

You can see examples of HTTP requests and responses (Listing 2.1, 2.2).&#x20;

**Listing 2.1 – Example of webhook HTTP request**

```
POST /your_endpoint HTTP/1.1
Host: example.your_host.com
User-Agent: GuzzleHttp/7
Content-Type: application/json
Content-Length: 53

{"type":"echo","echo_data":"something:Echo:data:123"}
```

\
**Listing 2.2 – Example of HTTP response**

```
HTTP/1.1 200 OK
...
Content-Type: application/json 

{"type":"echo","echo_data":"something:Echo:123"}
```

\
\
The implementation of this handler is required for working with the Push API.

Validation of the endpoint URL is carried out when it is created on the platform, and may also be repeated periodically during its use.

If you do not have the opportunity to implement a handler for the "echo" webhook payload, you can use the manual endpoint URL validation feature. This action is extremely undesirable and is permissible only in special cases!

If you use the manual validation feature, your endpoint URL will continue to be marked as "Invalid", but webhooks will still try to be sent to it. You also assume responsibility for any incorrect URL links. We reserve the right to block invalid URLs

<br>


# Authentication

To enhance security against potential attacks like spam and DDoS on your endpoint, we recommend implementing authentication for all incoming requests. For this purpose, we include a hash and timestamp in the headers of webhooks. The hash is generated using the SHA256 cryptographic algorithm, following the format:

&#x20;                                                                  *<mark style="color:green;">`api_secret`</mark>`:`<mark style="color:blue;">`timestamp`</mark>`,`*

where:

*api\_secret* – is a secret key that you can get by sending us a request for it,

*timestamp* – is a UNIX timestamp in seconds.

**Listing 3.1 – Example of auth hash calculating (pseudocode)**

```
var apiSecret = "96f3fbc76a921307f1c90d42a2203c9d";
var timestamp = 1704067200; // 2024-01-01 00:00:00
var hash = sha256(apiSecret + ":" + timestamp);
// hash = "68361c09cc50993ca6e0486e1f530c1d4e36a8aca9c8d20eb0d3aafbe47d2d5d"

```

It is recommended to always authenticate all incoming webhooks.

<br>


# Webhook Payload Models

Account Balance ModelWebhook Payload Models are unified JSON objects that can occur in different webhook payloads.&#x20;

Models have required and optional fields. Required fields always exist in the model. Optional fields are parameters that may be absent for different reasons.&#x20;

Below are defined all the models that can be found in webhook payloads.

<table data-view="cards"><thead><tr><th></th><th data-hidden data-card-target data-type="content-ref"></th></tr></thead><tbody><tr><td>Account Model</td><td><a href="/menu/webhooks/webhook-payload-models/account-model">Account Model</a></td></tr><tr><td>End User Model</td><td><a href="/menu/webhooks/webhook-payload-models/end-user-model">End User Model</a></td></tr><tr><td>Account Address Model</td><td><a href="/menu/webhooks/webhook-payload-models/account-address-model">Account Address Model</a></td></tr><tr><td>Account Balance Model</td><td><a href="/menu/webhooks/webhook-payload-models/wallet-model">Wallet Model</a></td></tr><tr><td>Plan Model</td><td><a href="/menu/webhooks/webhook-payload-models/plan-model">Plan Model</a></td></tr><tr><td>Pool Model</td><td><a href="/menu/webhooks/webhook-payload-models/pool-model">Pool Model</a></td></tr><tr><td>SIM Card Model</td><td><a href="/menu/webhooks/webhook-payload-models/sim-card-model">SIM Card Model</a></td></tr><tr><td>Status Model</td><td><a href="/menu/webhooks/webhook-payload-models/status-model">Status Model</a></td></tr><tr><td>User Model</td><td><a href="/menu/webhooks/webhook-payload-models/user-model">User Model</a></td></tr><tr><td>Prepaid Refill Model</td><td><a href="/menu/webhooks/webhook-payload-models/prepaid-refill-model">Prepaid Refill Model</a></td></tr><tr><td>Date Time Model</td><td><a href="/menu/webhooks/webhook-payload-models/date-time-model">Date Time Model</a></td></tr><tr><td>Rule Model</td><td><a href="/menu/webhooks/webhook-payload-models/rule-model">Rule Model</a></td></tr><tr><td>Payment Model</td><td><a href="/menu/webhooks/webhook-payload-models/payment-model">Payment Model</a></td></tr><tr><td>Credit Card Model</td><td><a href="/menu/webhooks/webhook-payload-models/credit-card-model">Credit Card Model</a></td></tr></tbody></table>


# Account Model

Account Model - is a base model for show platform account parameters. The fields of the Account model are presented in the table (Table 4.1), with an example below (Listing 4.1). There are the following types of this model (Table 4.2).

**Table 4.1 - Fields of Account Model**

<table data-full-width="false"><thead><tr><th width="68">№</th><th width="195" align="center">Key</th><th width="143" align="center">Type</th><th width="97">Exists</th><th>Description</th></tr></thead><tbody><tr><td>1</td><td align="center">uuid</td><td align="center">uuid v4, string</td><td>required</td><td>Main identifier of account</td></tr><tr><td>2</td><td align="center">name</td><td align="center">string</td><td>required</td><td>Public name of account</td></tr><tr><td>3</td><td align="center">status</td><td align="center">Status Model</td><td>optional</td><td>Platform Account Status</td></tr><tr><td>4</td><td align="center">currency_code</td><td align="center">string</td><td>optional</td><td>"EUR" , "USD" , etc.</td></tr><tr><td>5</td><td align="center">email_for_notification</td><td align="center">string</td><td>optional</td><td>If account has this parameter</td></tr><tr><td>6</td><td align="center">vat_number</td><td align="center">string</td><td>optional</td><td>Unique identifier of taxable person</td></tr><tr><td>7</td><td align="center">address</td><td align="center">Account Address Model</td><td>optional</td><td>If account has any of address parameters</td></tr></tbody></table>

**Listing 4.1 – Example of Account Model (JSON)**

```
{
     "uuid":                    "ff472de7-59b2-425d-96ec-9d1ff4bab684",
     "name":                    "Example Company",
     "status":                  {...//Status Model},
     "currency_code":           "EUR",
     "email_for_notification":  "email.notif@gmail.com",
     "vat_number":              "123456789",
     "address":                 {...//Account Address Model}
}
```

**Table 4.2 - Account Type**

<table data-full-width="false"><thead><tr><th width="76">№</th><th width="148">Title</th><th>Description</th></tr></thead><tbody><tr><td>1</td><td>Admin</td><td>Has highest rules</td></tr><tr><td>2</td><td>Organisation</td><td>Has more rules than Companies and End Users and manages them</td></tr><tr><td>3</td><td>Company</td><td>Has more rules than End Users and manages them</td></tr><tr><td>4</td><td>End User</td><td>Main account of user with basic rules</td></tr></tbody></table>


# End User Model

End User Model - is an extended model from Account Model for show platform end user parameters. The fields of the End User model are presented in the table (Table 4.3), with an example below (Listing 4.2).

**Table 4.3 - Fields of End User Model**

<figure><img src="https://2408445593-files.gitbook.io/~/files/v0/b/gitbook-x-prod.appspot.com/o/spaces%2FxYJmxgUa2SDfD4byrJY1%2Fuploads%2FrMty1sk0ZKzHdKJkUUB5%2Fimage.png?alt=media&amp;token=b49e8d05-f120-45d2-9891-a1d512497ac7" alt=""><figcaption></figcaption></figure>

**Listing 4.2 - Example of End User Model (JSON)**

```
{
     "uuid":                    "ff472de7-59b2-425d-96ec-9d1ff4bab684",
     "name":                    "Example End User",
     "status":                  {...//Status Model},
     "currency_code":           "EUR",
     "email_for_notification":  "email.notif@gmail.com",
     "vat_number":              "1234567890",
     "address":                 {...//Account Address Model},
     "owner":                   {...//User Model},
     "company":                 {...//Account Model}
}
```


# Account Address Model

The Account Address Model is the model that is most often found within the Account Model and contains information about its contact address. Its fields are presented in the table (Table 4.4), with an example (Listing 4.3).&#x20;

**Table 4.4 – Fields of Account Address Model**&#x20;

<table><thead><tr><th width="82">№</th><th>Key</th><th>Type</th><th>Exists</th></tr></thead><tbody><tr><td>1</td><td>house_number</td><td>string</td><td>optional </td></tr><tr><td>2</td><td>street</td><td>string</td><td>optional </td></tr><tr><td>3</td><td>addition </td><td>string</td><td>optional </td></tr><tr><td>4</td><td>city </td><td>string</td><td>optional </td></tr><tr><td>5</td><td>state </td><td>string</td><td>optional </td></tr><tr><td>6</td><td>country_code</td><td>string</td><td>optional </td></tr><tr><td>7</td><td>postal_code</td><td>string</td><td>optional </td></tr></tbody></table>

**Listing 4.3 – Example of Account Address Model (JSON)**

```
{
     "house_number":  "52/1",
     "street":        "Green Street",
     "addition":      "Office 23",
     "city":          "Example City",
     "state":         "Example State",
     "country_code":  "US",
     "postal_code":   "17000"
}
```


# Wallet Model

The Wallet Model is a model that displays the wallet balance and currency of a specific account. Its fields are presented in the table (Table 4.5), with an example below (Listing 4.4).&#x20;

**Table 4.5 – Fields of Wallet Model**&#x20;

<table><thead><tr><th width="65">№</th><th width="176">Key </th><th width="88">Type </th><th width="103">Exists </th><th>Description </th></tr></thead><tbody><tr><td>1</td><td>remaining_balance</td><td>float </td><td>required </td><td>Remaining founds, 2 decimals</td></tr><tr><td>2</td><td>currency_code</td><td>string </td><td>required </td><td>Balance currency. “EUR”, “USD”, etc.</td></tr></tbody></table>

**Listing 4.4 – Example of Wallet Model (JSON)**

```
{
    "remaining_balance":   "52.99",
    "currency_code":       "EUR"
}
```


# Plan Model

The Plan Model – is a base model for showing platform plan parameters. Model fields are presented in the table (Table 4.6), with an example below (Listing 4.5). There are the following types of this model (Table 4.7).

**Table 4.6 – Fields of Plan Model**&#x20;

<table data-full-width="false"><thead><tr><th width="72">№</th><th width="139">Key </th><th width="142">Type </th><th width="106">Exists </th><th>Description</th></tr></thead><tbody><tr><td>1</td><td>uuid </td><td>uuid v4, string</td><td>required </td><td>Main identifier of plan</td></tr><tr><td>2</td><td>type </td><td>string </td><td>required </td><td>Type of the plan</td></tr><tr><td>3</td><td>name </td><td>string </td><td>required </td><td>Public name of the plan</td></tr><tr><td>4</td><td>operator_title</td><td>string </td><td>optional </td><td>Title of operator with integration, if it exists</td></tr><tr><td>5</td><td>prepaid_refills</td><td>array </td><td>optional </td><td>Available refills for this plan</td></tr></tbody></table>

**Listing 4.5 – Example of Plan Model (JSON)**

```
{
     "uuid":            "271295c0-2019-470d-b7d9-b79bc2686cfd",
     "type":            "prepaid",
     "name":            "Plan Name",
     "operator_title":  "Test Operator (Integration)"
     "prepaid_refills":          [
         {...//Refill Model},
         {...//Refill Model},
         ...other refills
     ]
}
```

**Table 4.7 – Plan Types**

<table><thead><tr><th width="77">№</th><th width="181">Title </th><th>Description </th></tr></thead><tbody><tr><td>1</td><td>Monthly bundle</td><td>Pay after using. One of subscription subtype</td></tr><tr><td>2</td><td>Pay per MB </td><td>There is static price for MB. One of subscription subtype</td></tr><tr><td>3</td><td>Unlimited</td><td>Usage is unlimited. One of subscription subtype</td></tr><tr><td>4</td><td>Dynamic pool</td><td>Pool usage can change. One of subscription subtype</td></tr><tr><td>5</td><td>Static pool</td><td>Pool usage can’t change. One of subscription subtype</td></tr><tr><td>6</td><td>Prepaid</td><td>Need to pay before using</td></tr><tr><td>7</td><td>PAYGO </td><td>One of subscription subtype</td></tr></tbody></table>


# Pool Model

The Pool Model – is a base model for showing platform pool parameters. Models fields are presented in the table (Table 4.8), with an example below (Listing 4.6).&#x20;

**Table 4.8 – Fields of Pool Model**&#x20;

<table><thead><tr><th width="68">№</th><th width="169">Key </th><th width="141">Type </th><th width="104">Exists </th><th>Description </th></tr></thead><tbody><tr><td>1</td><td>uuid </td><td>uuid v4, string</td><td>required </td><td>Main identifier of pool </td></tr><tr><td>2</td><td>name </td><td>string</td><td>required </td><td>Public name of pool</td></tr><tr><td>3</td><td>current_usage_kb</td><td>integer</td><td>optional</td><td>Current pool usage Listing</td></tr></tbody></table>

**Listing 4.6 – Example of Pool Model (JSON)**&#x20;

```
{ 
    "uuid":              "34160e3a-3492-4f6f-bbf6-c9a9be15ea55", 
    "name":              "Pool Name", 
    "current_usage_kb":  "51200"
}
```


# SIM Card Model

The SIM Card Model – is a base model for show platform SIM card parameters. Model fields are presented in the table (Table 4.9), with an example below (Listing 4.7). There are the following types of this model (Table 4.10).&#x20;

**Table 4.9 – Fields of SIM Card Model**&#x20;

<table><thead><tr><th width="67">№</th><th width="141">Key </th><th width="113">Type </th><th width="107">Exists </th><th>Description </th></tr></thead><tbody><tr><td>1</td><td>iccid </td><td>string </td><td>required </td><td>Identifier of SIM Card</td></tr><tr><td>2</td><td>sim_card_type</td><td>string </td><td>optional</td><td>Type of SIM, if it exists</td></tr><tr><td>3</td><td>msisdn </td><td>string </td><td>optional</td><td>Identifier of SIM line</td></tr><tr><td>4</td><td>imei </td><td>string </td><td>optional</td><td>Identifier of SIM device, if it exists</td></tr><tr><td>5</td><td>is_e_sim</td><td>boolean </td><td>optional</td><td>Shows whether it is an eSIM card </td></tr><tr><td>6</td><td>status </td><td>Status Model</td><td>optional</td><td>Current SIM Card status</td></tr><tr><td>7</td><td>plan </td><td>Plan Model</td><td>optional</td><td>SIM Plan, if it exists</td></tr><tr><td>8</td><td>company </td><td>Account Model</td><td>optional</td><td>Assigned SIM Company </td></tr><tr><td>9</td><td>end_user</td><td>Account Model</td><td>optional</td><td>Assigned SIM End User</td></tr><tr><td>10</td><td>details </td><td>array </td><td>optional</td><td>Details about SIM Card like usage, etc. </td></tr></tbody></table>

**Listing 4.7 – Example of SIM Card Model (JSON)**&#x20;

<pre><code>{ 
<strong>    "iccid":            "8920000012345678900", 
</strong><strong>    "sim_card_type":    "prepaid", 
</strong>    "msisdn":           "01234567890", 
    "imei":             "86-000000-111111-2", 
    "is_e_sim":         false, 
    "status":           {...//Status Model}, 
    "plan":             {...//Plan Model}, 
    "company":          {...//Account Model}, 
    "end_user":         {...//End User Model}, 
    "details":          ["current_usage_kb" => 512, ...] 
}
</code></pre>

**Table 4.10 – Sim Card Types**&#x20;

<table><thead><tr><th width="75">№</th><th width="193">Title </th><th>Description </th></tr></thead><tbody><tr><td>1</td><td>Prepaid </td><td>SIM Card with Prepaid Plan</td></tr><tr><td>2</td><td>Subscription </td><td>SIM Card with one of Subscription Plans </td></tr><tr><td>3</td><td>PAYGO </td><td>SIM Card with PAYGO Plan</td></tr><tr><td>4</td><td>Without Type</td><td>Blank SIM Card. May be unavailable</td></tr></tbody></table>


# Status Model

The Status Model – is a model for show platform status parameters. Model fields are presented in the table (Table 4.11), with an example below (Listing 4.8). There are the following types of this model (Table 4.12).&#x20;

**Table 4.11 – Fields of Status Model**&#x20;

<table><thead><tr><th width="69">№</th><th width="124">Key </th><th width="155">Type </th><th width="133">Exists </th><th>Description </th></tr></thead><tbody><tr><td>1</td><td>id</td><td>id, integer</td><td>required </td><td>Status identifier</td></tr><tr><td>2</td><td>title </td><td>string </td><td>required </td><td>Status title </td></tr></tbody></table>

**Listing 4.8 – Example of Status Model (JSON)**&#x20;

<pre><code>{
<strong>    "id":      "1",
</strong>    "title":   "pending",
}
</code></pre>

**Table 4.12 – Status Types**&#x20;

<table><thead><tr><th width="68">№</th><th width="187">Title </th><th>Description </th></tr></thead><tbody><tr><td>1</td><td>Pending </td><td>Waiting for activation </td></tr><tr><td>2</td><td>Invalid </td><td>Broken</td></tr><tr><td>3</td><td>Active </td><td>In use</td></tr><tr><td>4</td><td>Suspended </td><td>I pause for some reason. Waiting for reactivation.</td></tr><tr><td>5</td><td>Not Available</td><td>Some problems with SIM</td></tr><tr><td>6</td><td>Blank </td><td>Need to assign one of the Plans</td></tr><tr><td>7</td><td>Activation </td><td>Ready Active, wait for first usage</td></tr><tr><td>8</td><td>Archived </td><td>Deleted or SIM Swaped</td></tr></tbody></table>


# User Model

The User Model – is a base model for showing platform user parameters. Models fields are presented in the table (Table 4.13), with an example below (Listing 4.9).&#x20;

**Table 4.13 – Fields of User Model**&#x20;

<table><thead><tr><th width="67">№</th><th width="202">Key </th><th width="125">Type </th><th width="95">Exists </th><th>Description </th></tr></thead><tbody><tr><td>1</td><td>uuid </td><td>uuid v4, string</td><td>required </td><td>Main identifier of user</td></tr><tr><td>2</td><td>email </td><td>string</td><td>required </td><td>User email</td></tr><tr><td>3</td><td>first_name</td><td>string</td><td>optional</td><td>User first name, if it set</td></tr><tr><td>4</td><td>last_name</td><td>string</td><td>optional</td><td>User last name, if it set</td></tr><tr><td>5</td><td>status </td><td>Status Model</td><td>optional</td><td>Current user status</td></tr><tr><td>6</td><td>company </td><td>Account Model</td><td>optional</td><td>If End User does not exist</td></tr><tr><td>7</td><td>end_user</td><td>End User Model</td><td>optional</td><td>Main account for user</td></tr><tr><td>8</td><td>is_two_factor_enabled</td><td>boolean </td><td>optional</td><td>Shows user 2FA state</td></tr><tr><td>9</td><td>timezone</td><td>string</td><td>optional</td><td>Shows user setting timezone</td></tr><tr><td>10</td><td>format_date_time</td><td>string</td><td>optional</td><td>User format for date and time</td></tr><tr><td>11</td><td>format_number</td><td>string</td><td>optional</td><td>User format for numbers</td></tr></tbody></table>

**Listing 4.9 – Example of User Model (JSON)**

```
{
    "uuid":                    "b528bcb9-86cf-2d72834d02ab",
    "email":                   "user_email@gmail.com",
    "first_name":              "John",
    "last_name":               "Johnson",
    "status":                  {...//Status Model},
    "company":                 {...//Account Model},
    "end_user":                {...//End User Model},
    "is_two_factor_enabled":   true,
    "timezone":                "UTC",
    "format_date_time":        "Y-m-d H:i:s",
    "format_number":           "fr-CA"
}
```


# Prepaid Refill Model

The Prepaid Refill Model – is a model for showing platform plan prepaid refill parameters. Model fields are presented in the table (Table 4.14), with an example below (Listing 4.10).&#x20;

**Table 4.14 – Fields of Refill Model**&#x20;

<table><thead><tr><th width="68">№</th><th width="144">Key </th><th width="142">Type </th><th width="95">Exists </th><th>Description </th></tr></thead><tbody><tr><td>1</td><td>uuid </td><td>uuid v4, string</td><td>required </td><td>Main identifier of refill</td></tr><tr><td>2</td><td>amount_mb</td><td>integer </td><td>required </td><td>MB amount for refill </td></tr><tr><td>3</td><td>price </td><td>float </td><td>required </td><td>Price for refill (with VAT if it exists)</td></tr><tr><td>4</td><td>currency_code</td><td>string </td><td>required </td><td>“EUR”, “USD”, etc.</td></tr></tbody></table>

**Listing 4.10 – Example of Refill Model (JSON)**&#x20;

```
{
    "uuid":           "b528bcb9-86cf-2d72834d02ab",
    "amount_mb":      "315",
    "price":          "90.95",
    "currency_code":  "USD"
}
```


# Date Time Model

The Date Time Model – is a model for showing date time parameters like timestamp, time, date, and timezone. Model fields are presented in the table (Table 4.15), with an example below (Listing 4.11).&#x20;

**Table 4.15 – Fields of Date Time Model**

<table><thead><tr><th width="65">№</th><th width="153">Key </th><th width="88">Type </th><th width="103">Exists </th><th>Description </th></tr></thead><tbody><tr><td>1</td><td>unix_timestamp</td><td>integer </td><td>required </td><td>Current date time timestamp</td></tr><tr><td>2</td><td>human_time</td><td>string </td><td>required </td><td>Time in format ‘H:i:s’</td></tr><tr><td>3</td><td>human_date</td><td>string </td><td>required </td><td>Date in format ‘Y-m-d’</td></tr><tr><td>4</td><td>timezone</td><td>string </td><td>required </td><td>Always UTC</td></tr></tbody></table>

&#x20;

**Listing 4.11 – Example of Date Time Model (JSON)**

```
{
    "unix_timestamp":  "1711929600",
    "human_time":      "17:25:11",
    "human_date":      "2024-06-12",
    "timezone":        "UTC"
}
```


# Rule Model

&#x20;Rule Model – is a model for showing platform rule parameters. Model fields are presented in the table (Table 4.16), with an example below (Listing 4.12).&#x20;

**Table 4.16 – Fields of Rule Model**&#x20;

<table><thead><tr><th width="65">№</th><th width="153">Key </th><th width="88">Type </th><th width="103">Exists </th><th>Description </th></tr></thead><tbody><tr><td>1</td><td>uuid </td><td>string </td><td>required </td><td>Identificator of current rule</td></tr><tr><td>2</td><td>name </td><td>string </td><td>required </td><td>Rule name</td></tr><tr><td>3</td><td>description </td><td>string </td><td>required </td><td>Short info about the rule</td></tr></tbody></table>

**Listing 4.12 – Example of Rule Model (JSON)**

```
{
    "uuid":          "1711929600",
    "name":          "Rule for refills",
    "description":   "Send notification to email when usage reaches 100MB"
}
```


# Payment Model

The Payment Model – is a model for show platform payment parameters. Model fields are presented in the table (Table 4.17), with an example below (Listing 4.13). Types of Payment Methods describes in the Table 4.18 and types of Refill Types – in the table 4.19. { "unix\_timestamp": "1711929600", "human\_time": "17:25:11", "human\_date": "2024-06-12", "timezone": "UTC" } { "uuid": "1711929600", "name": "Rule for refills", "description": "Send notif to email when usage reaches 100MB" } Sheets Doc. No. Date Sheet Rev. Push API Documentation 18 3 27 PPAD.01&#x20;

**Table 4.17 – Fields of Payment Model**&#x20;

<table><thead><tr><th width="65">№</th><th width="165">Key </th><th width="124">Type </th><th width="103">Exists </th><th>Description </th></tr></thead><tbody><tr><td>1</td><td>uuid </td><td>uuid v4, string</td><td>required </td><td>Main identifier of payment</td></tr><tr><td>2</td><td>ransaction_id</td><td>string </td><td>required </td><td>Identificator of transaction</td></tr><tr><td>3</td><td>amount </td><td>float </td><td>required </td><td>Money amount for payment</td></tr><tr><td>4</td><td>currency_code</td><td>string </td><td>required </td><td>EUR, USD, etc</td></tr><tr><td>5</td><td>payment_method</td><td>string </td><td>required </td><td>Wallet, card, etc.</td></tr><tr><td>6</td><td>refill_type</td><td>string </td><td>required </td><td>Payment object – refill balance, sim or etc.</td></tr><tr><td>7</td><td>credit_card</td><td>Credit Card Model</td><td>optional</td><td>If payment was made with card</td></tr><tr><td>8</td><td>email </td><td>string </td><td>optional</td><td>Purchaser email</td></tr><tr><td>9</td><td>name </td><td>string </td><td>optional</td><td>Purchaser name</td></tr><tr><td>10</td><td>company </td><td>Account Model </td><td>optional</td><td>Purchaser company if end user does not exist</td></tr><tr><td>11</td><td>end_user</td><td>End User Model </td><td>optional</td><td>Purchaser end user</td></tr><tr><td>12</td><td>receipt_url</td><td>string </td><td>optional</td><td>Link to see original receipt</td></tr><tr><td>13</td><td>metadata </td><td>array </td><td>optional</td><td>Additional info about payment</td></tr><tr><td>14</td><td>payment_at</td><td>Date Time Model</td><td>required </td><td>Operation date </td></tr></tbody></table>

**Listing 4.13 – Example of Payment Model (JSON)**

```
{
    "uuid":             "b528bcb9-86cf-2d72834d02ab",
    "transaction_id":   "txn_322Knxiwkaxi4d26770123zOgB",
    "amount":           "35.20",
    "currency_code":    "EUR",
    "payment_method":   "card",
    "refill_type":      "refill_sim",
    "credit_card":      {...//Credit Card Model},
    "email":            "purchaser@gmail.com",
    "name":             "Purchaser Name",
    "company":          {...//Account Model},
    "end_user":         {...//End User Model},
    "receipt_url":      "https://payment.com/jajkxawjj...",
    "metadata":         ["sim_iccid" => "8991712410", ...],
    "payment_at":       {...//Date Time Model},
}
```

Table 4.18 – Payment Types&#x20;

<table><thead><tr><th width="69">№</th><th width="151">Title </th><th>Description </th></tr></thead><tbody><tr><td>1</td><td>wallet </td><td>Money for payment was used from Wallet</td></tr><tr><td>2</td><td>bancontact </td><td>One of Internet payment types. Depends on your payment integration</td></tr><tr><td>3</td><td>card </td><td>Money for payment was used from assigned to the Account credit card</td></tr><tr><td>4</td><td>cardknox </td><td>One of Internet payment types. Depends on your payment integration</td></tr><tr><td>5</td><td>ideal </td><td>One of Internet payment types. Depends on your payment integration</td></tr><tr><td>6</td><td>manual</td><td>Payment was made by admin manually</td></tr><tr><td>7</td><td>paypal </td><td>One of Internet payment types. Depends on your payment integration</td></tr><tr><td>8</td><td>stripe </td><td>One of Internet payment types. Depends on your payment integration</td></tr></tbody></table>

**Table 4.19 – Refill Types**&#x20;

<table><thead><tr><th width="69">№</th><th width="199">Title </th><th>Description </th></tr></thead><tbody><tr><td>1</td><td>Refill SIM</td><td>SIM Card MB amount was refilled</td></tr><tr><td>2</td><td>Refill eSIM</td><td>eSIM Card MB amount was refilled </td></tr><tr><td>3</td><td>Refill Wallet</td><td>Wallet money amount was refilled</td></tr><tr><td>4</td><td>Buying an eSIM</td><td>eSIM Purchase</td></tr></tbody></table>


# Credit Card Model

The Credit Card Model – is a model for show platform credit card parameters. Model fields are presented in the table (Table 4.20), with an example below (Listing 4.14).&#x20;

**Table 4.20 – Fields of Credit Card Model**&#x20;

<table><thead><tr><th width="65">№</th><th width="153">Key </th><th width="88">Type </th><th width="103">Exists </th><th>Description </th></tr></thead><tbody><tr><td>1</td><td>uuid </td><td>string </td><td>required </td><td>Identificator of current rule</td></tr><tr><td>2</td><td>name </td><td>string </td><td>required </td><td>Rule name</td></tr><tr><td>3</td><td>description </td><td>string </td><td>required </td><td>Short info about the rule</td></tr></tbody></table>

**Listing 4.14 – Example of Credit Card Model (JSON)**

```
{
    "uuid":         "1711929600",
    "name":         "Rule for refills",
    "description":  "Send notification to email when usage reaches 100MB"
}
```


# Webhook Payload Types

Payload Types are data arrays with defined keys and data, some of which are required and others are not.

You need to be prepared to process different payload types and know which data they contain.&#x20;

"Optional" marks fields that must not be present in the body of the webhook that is sent. Fields without ‘optional’ marks are required.

The listed types may change, and new ones may be added. Please follow the latest revisions of this documentation.

<table data-view="cards"><thead><tr><th></th></tr></thead><tbody><tr><td>Technical Payloads</td></tr><tr><td>Event Payloads</td></tr><tr><td>Rule Payloads</td></tr></tbody></table>


# Technical Payloads

These payloads are designed to perform certain system operations, such as endpoint validation, for example.&#x20;

**echo** – a payload that is sent to an endpoint for validation. The endpoint must respond with the same payload (Listing 5.1).&#x20;

**Listing 5.1 – Example of echo Payload (JSON)**

```
{
     "type":           "echo",
     "data":           {
         "echo_data":      "echo:Ariel:1715854344"
     },
     "created_at":     {...//Date Time Model}
}

```


# Event Payloads

vent Payloads are payloads that are sent to the endpoint when a certain event occurs, such as a user being deleted or company data being changed.

<table data-view="cards"><thead><tr><th></th><th data-hidden data-card-target data-type="content-ref"></th></tr></thead><tbody><tr><td>Company Events</td><td><a href="/menu/webhooks/webhook-payload-types/event-payloads/company-events">Company Events</a></td></tr><tr><td>Company Staff Events</td><td><a href="/menu/webhooks/webhook-payload-types/event-payloads/company-staff-events">Company Staff Events</a></td></tr><tr><td>End User Events</td><td><a href="/menu/webhooks/webhook-payload-types/event-payloads/end-user-events">End User Events</a></td></tr><tr><td>SIM Card Events</td><td><a href="/menu/webhooks/webhook-payload-types/event-payloads/sim-card-events">SIM Card Events</a></td></tr><tr><td>Payment Payloads</td><td><a href="/menu/webhooks/webhook-payload-types/event-payloads/payment-payloads">Payment Payloads</a></td></tr></tbody></table>


# Company Events

Company Events are triggered by certain actions aimed at the company or elements related to it.&#x20;

**company.added** – occurs when an Organization adds a company to itself and its owner completes registration, not only invited (Listing 5.2).&#x20;

**Listing 5.2 – Example of company.added payload (JSON)**

```
// Some code
```

**company.deleted** – occurs when the Organization deletes its own company. The company must be confirmed and has a confirmed owner, not only invited (Listing 5.3).&#x20;

**Listing 5.3 – Example of company.deleted Payload (JSON)**

```
{
    "type":        "company.added",
    "data":        {
        "company":     {...//Account Model}
    },
    "created_at":  {...//Date Time Model}
}
```

**company.updated** – occurs when certain data is updated in an organization's Company, such as a name or currency, for example (Listing 5.4).&#x20;

**Listing 5.4 – Example of company.updated Payload (JSON)**

```
{
    "type":        "company.updated",
    "data":        {
        "company":     {...//Account Model}
    },
    "created_at":  {...//Date Time Model}
}
```


# Company Staff Events

Company Staff Events are triggered by certain actions aimed at the company’s employees (staff).&#x20;

**company.staff.added** – occurs when the Company adds a Staff user to itself. The staff user must be registered, not only invited (Listing 5.5).&#x20;

**Listing 5.5 – Example of company.staff.added Payload (JSON)**

```
{
    "type":      "company.staff.added",
    "data":      {
        "user":     {...//User Model}
    },
    "created_at":  {...//Date Time Model}
}
```

**company.staff.deleted** – occurs when Company deletes its own Staff user. The user must be registered, not only invited (Listing 5.6).&#x20;

**Listing 5.6 – Example of company.staff.deleted Payload (JSON)**

```
{
    "type":      "company.staff.deleted",
    "data":      {
        "user":     {...//User Model}
    },
    "created_at":  {...//Date Time Model}
}
```

**company.staff.updated** – occurs when certain data is updated in an company’s Staff user, such as a name or email, for example (Listing 5.7).

**Listing 5.7 – Example of company.staff.updated Payload (JSON)**

<pre><code>{
    "type":      "company.staff.updated",
    "data":      {
        "user":     {...//User Model}
<strong>    },
</strong>    "created_at":  {...//Date Time Model}
}

</code></pre>


# End User Events

End User Events are triggered by certain actions aimed at the End User or elements related to it.&#x20;

**end\_user.added** – occurs when Company or Organization adds an End User to themselves and the end user confirms registration, not only be invited (Listing 5.8).&#x20;

**Listing 5.8 – Example of end\_user.added Payload (JSON)**

```
{
    "type":         "end_user.added",
    "data":         {
        "end_user":     {...//End User Model}
    },
    "created_at":   {...//Date Time Model}
}
```

**end\_user.deleted** – occurs when Company or Organization deletes their own End User. The end user must be registered, not only invited (Listing 5.9).&#x20;

**Listing 5.9 – Example of end\_user.deleted Payload (JSON)**

```
{
    "type":         "end_user.deleted",
    "data":         {
        "end_user":     {...//End User Model}
    },
    "created_at":   {...//Date Time Model}
}
```

**end\_user.updated** – occurs when certain data is updated in an organization's/company’s End User, such as a name or email, for example (Listing 5.10).&#x20;

**Listing 5.10 – Example of end\_user.updated Payload (JSON)**

```
{
    "type":          "end_user.updated",
    "data":          {
        "end_user":      {...//End User Model}
    },
    "created_at":    {...//Date Time Model}
}

```


# SIM Card Events

SIM Card Events are triggered by certain actions aimed at the SIM Card.&#x20;

**sim\_card.assigned\_to\_end\_user** – occurs when a blank SIM Card has been assigned to the End User. There are two situations: the end user registers on the platform with a bought SIM Card or the Organization / Company assigns its own SIM card to its end user (Listing 5.11).&#x20;

**Listing 5.11 – Example of sim\_card.assigned\_to\_end\_user Payload (JSON)**&#x20;

<pre><code>{
<strong>    "type":          "sim_card.assigned_to_end_user",
</strong>    "data":          {
        "sim_card":      {...//Sim Card Model}
<strong>    },
</strong>    "created_at":     {...//Date Time Model}
}
</code></pre>

**sim\_card.first\_usage** – occurs when the SIM was first used (Listing 5.12).&#x20;

**Listing 5.12 – Example of sim\_card.first\_usage Payload (JSON)**

```
{
    "type":         "sim_card.first_usage",
    "data":         {
        "sim_card":     {...//Sim Card Model}
    },
    "created_at":   {...//Date Time Model}
}

```


# Payment Payloads

**payment.created** – occurs when some payment has been made (Listing 5.13). The payload contains only either the company or the end user.&#x20;

Listing 5.13 – Example of payment.created Payload (JSON)

```
{
    "type":         "payment.created",
    "data":         {
        "payment":      {...//Payment Model}
    },
    "created_at":   {...//Date Time Model}
}
```


# Rule Payloads

These payloads are sent to the endpoint when certain rules that have been created for the account are triggered.


# SIM Card Rule Payloads

It occurs when certain rules related to the SIM have been triggered.   &#x20;

**rule.sim\_card.current\_usage.triggered** – occurs when SUBSCRIPTION SIM Card current usage has been changed (Listing 5.14).

**Listing 5.14 – Example of rule.sim\_card.current\_usage.triggered Payload (JSON)**

<pre><code>{
    "type":        "rule.sim_card.current_usage.triggered",
    "data":        {
        "rule":        {...//Rule Model},
        "sim_card":    {...//Sim Card Model}
<strong>    },
</strong>    "created_at":   {...//Date Time Model}
}
</code></pre>

**rule.sim\_card.status.changed** – occurs when SIM Card status has been changed. SIM Card has been activated for example (Listing 5.15).&#x20;

**Listing 5.15 – Example of rule.sim\_card.status.changed Payload (JSON)**

```
{
    "type":        "rule.sim_card.status.changed",
    "data":        {
        "rule":        {...//Rule Model},
        "sim_card":    {...//Sim Card Model}
    },
    "created_at":   {...//Date Time Model}
}


```

**rule.sim\_card.remaining\_usage.triggered** – occurs when PREPAID SIM Card remaining usage has been changed (Listing 5.16).&#x20;

**Listing 5.16 – Example of rule.sim\_card.remaining\_usage\_triggered Payload (JSON)**

<pre><code>{
    "type":        "rule.sim_card.remaining_usage.triggered",
    "data":        {
        "rule":        {...//Rule Model},
        "sim_card":    {...//Sim Card Model}
<strong>    },
</strong>    "created_at":  {...//Date Time Model}
}
</code></pre>

**rule.sim\_card.imei.changed** – occurs when SIM Card IMEI has been changed (Listing 5.17).&#x20;

**Listing 5.17 – Example of rule.sim\_card.imei.changed Payload (JSON)**

```
{
    "type":        "rule.sim_card.imei.changed",
    "data":        {
        "rule":         {...//Rule Model},
        "sim_card":     {...//Sim Card Model}
    },
    "created_at":   {...//Date Time Model}
}
```

**rule.sim\_card.date.triggered** – occurs when Rule “Date Triggered” has been happened (Listing 5.18).&#x20;

**Listing 5.18 – Example of rule.sim\_card.date.triggered Payload (JSON)**

<pre><code>{
<strong>    "type":       "rule.sim_card.date.triggered",
</strong>    "data":       {
       "rule":        {...//Rule Model},
       "sim_card":    {...//Sim Card Model}
<strong>    },
</strong>    "created_at":  {...//Date Time Model}
}
</code></pre>


# SIM Pools Payloads

Occurs when certain rules related to the SIM Pool has been triggered.&#x20;

**rule.pool.usage.triggered** – occurs when Pool usage has been changed (Listing 5.19).&#x20;

**Listing 5.19 – Example of rule.pool.usage.triggered Payload (JSON)**

<pre><code>{
<strong>    "type":     "rule.pool.usage.triggered",
</strong>    "data":     {
        "rule":     {...//Rule Model},
        "pool":     {...//Pool Model}
    },
    "created_at":  {...//Date Time Model}
}
</code></pre>


# Wallet Payloads

rule.company.wallet.triggered – occurs when the Wallet has been refilled or spent (Listing 5.20). The payload contains only either the company or the end user.&#x20;

**Listing 5.20 – Example of rule.company.wallet.triggered Payload (JSON)**

<pre><code>{
<strong>    "type":        "rule.company.wallet.triggered",
</strong>    "data":        {
        "rule":        {...//Rule Model},
        "company":     {...//Account Model},
        "wallet":      {...//Wallet Model}
<strong>    },
</strong>     "created_at":  {...//Date Time Model}
} 
</code></pre>


# Copy of SIMs

The **SIMs** page provides convenient access to essential information about each SIM card, including their statuses, SIM types, operators, associated companies, and end users.&#x20;

This enables to easily track data usage, and remaining days on active plans, and view detailed information for each card, such as ICCID, operator, plan, company, and other relevant details.


<figure><img src="https://2408445593-files.gitbook.io/~/files/v0/b/gitbook-x-prod.appspot.com/o/spaces%2FxYJmxgUa2SDfD4byrJY1%2Fuploads%2FXLv3z5wenrOYty7r4qCe%2FSIMs.png?alt=media&amp;token=85564456-2e70-481d-8455-374f9dae117c" alt=""><figcaption></figcaption></figure>

{% tabs %}
{% tab title="Dictionary" %}

## <mark style="background-color:blue;">SIM Types:</mark>

### **1.**[ **Prepaid**](/menu/plans/prepaid)

* A SIM card with a certain balance. When the balance runs out, you can refill it yourself or through auto-refills,  and the SIM card will continue to work.
* The client pays for the balance top-up, and the amount is added to the SIM card, making it usable.
* SIM cards have usage terms defined by operator contracts. For example, if there are no refills for three years, the SIM card may be deactivated. This is just an example, as details are always specified in contracts with operators.

### **2.** [**Subscription**](/menu/plans/subscription)

A subscription is a product type where the SIM card is used for a month, and at the end of the month, an invoice is issued for all expenses according to the plan (usage). Payment for the usage is deducted at the end of the month.

**Types of Subscription:**

* [**Static Pool**](https://faq.droam.com/menu/pages/JZRWnnRzP0JkYZSyOTU7#id-4.-static-pool)
* [**Dynamic Pool**](https://faq.droam.com/menu/pages/JZRWnnRzP0JkYZSyOTU7#id-5.-dynamic-pool)
* [**Unlimited**](https://faq.droam.com/menu/pages/JZRWnnRzP0JkYZSyOTU7#id-3.-unlimited)
* [**Monthly Bundle**](https://faq.droam.com/menu/pages/JZRWnnRzP0JkYZSyOTU7#id-1.-monthly-bundle)
* [**Pay per Megabyte**](/menu/plans/subscription#pay-per-megabyte)

### **3.** [**PAYGO**](/menu/plans/paygo)

Pay GO (pay-as-you-go in real time) is a product that charges for data per megabyte.&#x20;

PAYGO is a flexible data billing product that charges users per megabyte of data used, offering advanced features and seamless integration. Unlike standard pay-per-megabyte models, PAYGO allows operators to set prices not only based on total data consumption but also for specific countries.

***

### <mark style="background-color:blue;">SIM Statuses</mark>:

1. **Not available** – No integration.
2. **Pending** – Being checked by the integrator because it was just added to the platform, or operations are being performed on it (e.g., SIM swap).
3. **Blank** – SIM without a line.
4. **Activation ready** – Has a line and a plan (linked to a company if not for store use).
5. **Active** – Operating in normal mode.
6. **Suspended** – Manually or systemically suspended (e.g., expired).
7. **Invalid** – Something went wrong with the integration

***

### <mark style="background-color:blue;">General terms in the SIMs section:</mark>&#x20;

* **ICCID -** The unique identifier for each SIM card. For eSIMs, the number is displayed along with a QR code, making it easy to distinguish between physical SIMs and eSIMs.
* **In session:**
  * Yes - the SIM is currently online and in use.
  * No - the SIM is currently offline and not in use.
  * N/A - the status of the SIM is undetermined because the integration does not support it.
* **Operator -** The mobile network provider associated with the SIM, such as Telefonica, Vodafone UK, HOT Mobile, Odido, Orange France, Partner, Plus, WWS.
* **Plan -** Shows the name of the current plan, which is automatically generated but can be customized if needed
* **Company -** Company name to which the SIM card is assigned.
* **End User -** The email address of the end user linked to the SIM.
* **Data left (MB) -** Remaining data allowance for the SIM.
* **Days left -** The remaining days before the plan or SIM expires.
* **This month (MB) -** Data usage for the current month.
* **Note -** A field for any additional notes or comments.
* **Rules -** Customizable rules applied to the SIM
* **Labels -** Customizable labels for organizing SIMs.
* **SIM type -** Indicates whether the SIM is Prepaid, Subscription, or PAYGO.
  {% endtab %}

{% tab title="Key features" %}

### Key features of the page include:

1. <mark style="background-color:blue;">**Dynamic Table:**</mark>&#x20;

You can adjust the order of displayed data, add new columns from the existing list, or hide columns that are not needed. This flexibility allows you to customize the interface to fit your specific needs.

2. <mark style="background-color:blue;">**By clicking the "+" button, you can perform 5 actions:**</mark>

<figure><img src="https://2408445593-files.gitbook.io/~/files/v0/b/gitbook-x-prod.appspot.com/o/spaces%2FxYJmxgUa2SDfD4byrJY1%2Fuploads%2FtZPzuwWYrCD7xzoLoqbF%2FIMG_7632%20(2).PNG?alt=media&amp;token=5c67e45b-c4a0-41b6-b599-000ac45e779d" alt="" width="368"><figcaption></figcaption></figure>

1. Upload new SIM card(s) into the system

2. Create New Prepaid SIM card(s)

3. Create New Subscription SIM card(s)

4. Create New PAYGO SIM card(s)

5. Prepare an eSIM(s) for the store

6. <mark style="background-color:blue;">**Bulk Operations -**</mark> You can perform bulk actions such as:

   * **Activate:** Quickly activate multiple SIM cards at once.
   * **Suspend:** Suspend a group of SIM cards, temporarily halting their services.
   * **Replace Plan:** Update the data plan for several SIMs in one go.
   * **Send SMS:** Send a message to the end users associated with the selected SIM cards.
   * **Change Note:** Modify or update notes for multiple SIM cards to include new information or instructions.
   * **Refresh Usage:** Refresh the usage data for all selected SIMs to ensure up-to-date statistics.
   * **Rules:** Apply or modify automation rules for the selected SIMs, such as data limits or notifications.
   * **Assign Company:** Assign multiple SIM cards to a company for better organization.
   * **Unassign Company:** Remove the company association from selected SIM cards.
   * **Labels:** Add or modify labels to categorize and organize multiple SIM cards at once.
   * **Cancel SIM:** Cancel the selected SIM cards and remove them from the system.
   * **Upload Details:** Upload specific details or configurations in bulk for selected SIM cards.
   * **Export:** Export the information of selected SIM cards to a file for further analysis or reporting.

7. <mark style="background-color:blue;">**Detailed SIM Card Information:**</mark> Here you can click on any SIM card number (ICCID) to access more detailed information, organized into three main tabs:
   * **Details:** Manage the SIM card status, view data left, add labels for bulk management, assign the SIM to an end user, set up specific rules, send SMS messages, and more.
   * **Usage:** Check daily data usage and see information about the countries where the SIM is being used.
   * **Log:** Displays a history of changes with date, modified fields, old and new values, and the user who made the changes. This is useful for auditing and tracking adjustments.

It helps track the status and usage of SIM cards, ensuring full control over mobile connections. This is crucial for maintaining seamless operations, avoiding overages on mobile expenses, and responding promptly to any issues or changes.
{% endtab %}
{% endtabs %}

## Q\&A

<details>

<summary>Why can't I see any usage?</summary>

There could be a couple of reasons for this.

1. The product has not been created (attach the SIM to a plan and a company)
2. Your SIM hasn't generated any usage so far.

</details>

<details>

<summary>What does the Activation Ready status mean?</summary>

This status means that the SIM is active with the operator, but there has been no usage yet. Once the SIM card is used, the status will change to "Active."

</details>

<details>

<summary>Why can't I add SIM Card to the eSIM store?</summary>

You are unable to add a SIM card to the eSIM store due to the following reasons:

* The necessary integration for the SIM is missing.
* The SIM card is not an eSIM. Only eSIMs can be added to the eSIM store, so please ensure you are adding an eSIM and not a regular SIM card.

</details>

<details>

<summary>How do I refill?</summary>

You have two options for refilling your balance:

1. **Manual Refill**\
   You can refill your balance manually through your account page on the Platform. Simply log in to your account and follow the prompts to add funds.
2. **Auto-Refill**\
   Alternatively, you can set up an auto-refill option. This allows for automatic balance top-ups when your data falls below a specified threshold. To use this feature, you will need to provide a credit card on your account page.

Regardless of the method you choose, your data will be added immediately in real-time upon successful completion of the refill.

</details>


# Copy of Plans

On the **Plans** page, you can create and customize data bundles, assign SIM cards to Plans, and monitor Plan details. The table presents essential information about each Plan, including its name, type, associated operator, company, details, labels, and whether the Plan is prorated. You can also add preset configurations for quick and consistent Plan setup.

{% tabs %}
{% tab title="Dictionary" %}

### Plan types:

### <mark style="background-color:blue;">**1. Prepaid**</mark>

A Prepaid Plan for a SIM card comes with a set balance, and once that balance is depleted, the client can refill it manually or through auto-refills.

#### **How It Works:**

* **Balance Tracking**: the balance is monitored in real-time. When the balance reaches zero, the SIM card is deactivated.
* **Refilling**: The organization can configure/create refills.

#### **Usage Terms**:

Prepaid SIM cards have specific terms based on the operator’s contract. For example, if a SIM card remains inactive (no refills) for three years, it may be deactivated. These details vary and are specified in the operator's contract.

#### **Additional Prepaid Options**:

* **Auto-Refill**: This feature automatically tops up the balance when it falls below a certain threshold (e.g., below 100 MB). The system charges either the company's card or the end user's card to the organization's account, and upon successful payment, the balance is updated instantly.
* **Wallet Balance**: This option allows the client to store a larger sum in advance for auto-refills. For instance, instead of topping up multiple SIM cards frequently with small amounts, the client can deposit $1,000 to cover auto-refills as needed.

#### **Product Expiry**:

Each Prepaid product comes with a usage term. For example, 1 GB of data may be valid for 365 days. If the balance is not refilled within that period, any remaining balance will expire. However, with every refill, the validity period extends from the refill date, ensuring the product can be used for a longer time as long as the balance is regularly topped up.

### <mark style="background-color:blue;">**2. Subscription**</mark>

A subscription is a Plan type where the SIM card is used for a month, and at the end of the month, an invoice is issued for all expenses according to the Plan (usage). Payment for the usage is deducted at the end of the month.

The subscription is designed for companies rather than end consumers. The end consumer may be linked to the SIM card and see the usage, but cannot manage the SIM card. Management and payment are handled by the company responsible for the SIM card.

### **Types of Subscription Plan:**

#### **1) Static Pool**

A static pool is a pool with a fixed price, independent of the amount of SIM cards in the pool.

#### **2) Dynamic Pool**

Dynamic pool - every new sim added to the pool adds to the total amount of data and increases the pool price. Also known as "SIM cards with pooled data between them

#### **3) Unlimited**

This is a subscription with no usage limits. After paying a fixed cost you can have access to unlimited usage without additional fees.

#### **4) Monthly Bundle**

This bundle is controlled by only one SIM card. You will pay for a fixed amount of data per month. If the entire amount is not used, the funds are not refunded.\
If usage exceeds the bundle limit, additional charges for the extra data apply.

#### **5) Pay per Megabyte**

In this product, the user pays for each megabyte of data used. The more megabytes the user consumes, the more they pay.

### <mark style="background-color:blue;">**3. PAYGO**</mark>

PAYGO is a real-time product that charges users for data on a per-megabyte basis. While it operates similarly to pay-per-megabyte systems, it provides advanced features and supports seamless integrations. Operators can set prices not only for total data usage but also specifically for different countries. If the operator supplies country-specific information or imposes restrictions in certain regions, corresponding pricing can be established.

**Product Classification**\
PAYGO is classified as a Prepaid service, which means it operates based on a balance. Users must maintain a positive balance to utilize the service; it cannot be accessed if the balance is zero.

PAYGO plans work exclusively with the [Wallet ](/menu/wallet)feature, so if you don't have any companies with Wallet enabled, the company list will be empty when creating a PAYGO plan.

#### **How It Works**

1. **Data Collection**
   * The system gathers information from the SIM card, including:
     * **The amount of megabytes used**
     * **The country in which the card was utilized**
2. **Pricing Determination**
   * The system identifies the applicable price based on the collected data and the specific country.
3. **Balance Deduction**
   * The necessary amount is instantly deducted from the user's balance.

#### **Real-Time Processing**

As new information is received, the system performs calculations and deducts funds, ensuring that the balance decreases continuously in real time.
{% endtab %}

{% tab title="Key Features" %}
Key features of the page include:

1. **Dynamic Table:** The table is fully customizable, enabling you to add new columns or hide existing ones based on your preferences. This flexibility allows for a more personalized and efficient management experience.
2. **Bulk Operations:** You can perform bulk actions to streamline plan management, such as applying changes to multiple SIM cards simultaneously.
3. **Detailed SIM Card Information:** By clicking on a SIM card number (ICCID), you can access detailed information organized into two main tabs:
   * **Details:** View and manage the SIMs assigned to each plan, track refill history, manage labels, and see lifetime refill statistics. This tab provides a comprehensive view of how each SIM card is using its data plan.
   * **Log:** Displays a history of changes with date, modified fields, old and new values, and the user who made the changes. This is useful for auditing and tracking adjustments.

This page meets the needs of businesses and organizations that require efficient control over their mobile data plans. By allowing customization and real-time monitoring of data plans, it ensures that mobile data resources are allocated and used effectively.&#x20;

The ability to track changes and manage multiple SIM cards simultaneously helps to maintain oversight, prevent data overages, and optimize costs, making it an essential tool for managing mobile connectivity.
{% endtab %}
{% endtabs %}

## Q\&A

<details>

<summary>Why can't I select a company when creating a PAYGO plan?</summary>

The company list includes only companies that have Wallet enabled. PAYGO plans work exclusively with the Wallet feature, so if you don't have any companies with Wallet enabled, the company list will be empty when creating a PAYGO plan.

</details>


# Prepaid

### <mark style="background-color:blue;">Prepaid</mark>&#x20;

* **Purpose**: A fixed balance valid for a defined period and monitored in real-time. Once the balance is used, the Terminal can be refilled manually or automatically.
* **Validity Period:** The validity period is set by the specific prepaid product (for example, 365 days), based on the validity days of the chosen plan.
* **Payment Terms:** One-time payment / Refill
* **Payment Type:** Transactions via Stripe or Invoice
* **Overage:** No – usage stops when the balance or remaining days reach zero.
* **Activation  Fee:** No
* **Re-fill:** Yes, different balance with different price
* **Auto refill of Terminal/SIM:** Yes. Available for Companies
* **Manual Refill of Terminal/SIM:** Yes. Available for Organizations
* **Refill/Autorefill with wallet:** Yes

(Each refill extends the validity period of the prepaid product within the plan's validity days.)

* **Prorate:** No
* **MRC:**  No
* **Billing start date:** The billing cycle starts when the first usage occurs, and days are counted from that point.

### <mark style="background-color:blue;">**Additional Info**</mark>

* **Usage Terms**:

Prepaid SIM cards have specific terms based on the operator’s contract. For example, if a SIM card remains inactive (no refills) for three years, it may be deactivated. These details vary and are specified in the operator's contract.

* **Auto-Refill**:&#x20;

This feature automatically tops up the balance when it falls below a certain threshold (e.g., below 100 MB). The system charges either the company's card or the end user's card to the organization's account, and upon successful payment, the balance is updated instantly.

* **Wallet Balance**:&#x20;

This option allows the client to store a larger sum in advance for auto-refills. For instance, instead of topping up multiple SIM cards frequently with small amounts, the client can deposit $1,000 to cover auto-refills as needed.

* **Product Expiry**:

Each Prepaid product comes with a usage term. For example, 1 GB of data may be valid for 365 days. If the balance is not refilled within that period, any remaining balance will expire. However, with every refill, the validity period extends from the refill date, ensuring the product can be used for a longer time as long as the balance is regularly topped up.

***

### <mark style="background-color:blue;">**How to Create a Prepaid Plan**</mark>


# Subscription

A subscription is a Plan type where the SIM card is used for a month, and at the end of the month, an invoice is issued for all expenses according to the Plan (usage). Payment for the usage is deducted at the end of the month.

The subscription is designed for companies rather than end consumers. The end consumer may be linked to the SIM card and see the usage, but cannot manage the SIM card. Management and payment are handled by the company responsible for the SIM card.

### **Types of Subscription Plan:**

1. #### <mark style="background-color:blue;">Monthly Bundle</mark>

* **Purpose:** A single Termina / SIMl controls this bundle. It includes a fixed amount of data per month. fixed price&#x20;
* **Validity Period:** 1 calendar month
* **Payment Terms:** Monthly Fee
* **Payment Type:** Pre-Billing, Advanced Billing, Post-Billing, or Manual Invoice Creation. The platform does not validate or enforce payment status (paid/unpaid)
* **Overage:** Yes - you can define a fixed rate that applies when usage exceeds the included balance.
* **Activation  Fee:** Yes. It is applied when a terminal or SIM is added, and included in the invoice at the start of the next billing period. The platform does not track payment status.
* **Prorate:** enabled (optional)
* **MRC:** No
* **Billing start date:**  is either the date when the SIM/Terminal is assigned or the date of the first usage, whichever occurs first.

<br>

***

#### 2<mark style="background-color:blue;">. Pay per Megabyte</mark>

* **Purpose:** The user pays based on actual usage — the more you use, the more you pay.
* **Validity Period:** 1 calendar month – ongoing until manually stopped
* **Payment Terms:** Usage-based billing
* **Payment Type:** Pre-Billing, Advanced Billing, Post-Billing, or Manual Invoice Creation. The platform does not validate or enforce payment status (paid/unpaid)
* **Overage:** No
* **Activation  Fee:** Yes. It is applied when a terminal or SIM is added, and included in the invoice at the start of the next billing period. The platform does not track payment status.
* **Prorate:** enabled (optional)
* **MRC:**  Yes (applied either to all SIMs/Terminals or only to active ones)

***

#### <mark style="background-color:blue;">3. Unlimited</mark>

* **Purpose:** Unlimited data usage for a fixed monthly cost.
* **Validity Period:** 1 calendar month (renewed monthly)
* **Payment Terms:** Monthly Fee
* **Payment Type:** Pre-Billing, Advanced Billing, Post-Billing, or Manual Invoice Creation. The platform does not validate or enforce payment status (paid/unpaid)
* **Overage:** No — unlimited usage
* **Activation  Fee:** Yes. It is applied when a terminal or SIM is added, and included in the invoice at the start of the next billing period. The platform does not track payment status.
* **Recurring fee:** Yes
* **Prorate:** enabled (optional)
* **MRC:** No
* **Billing start date:** is either the date when the SIM/Terminal is assigned or the date of the first usage, whichever occurs first.

<br>

***

#### <mark style="background-color:blue;">4. Static Pool</mark>

* **Purpose:** This pool has a fixed price, along with a fixed allowed balance and overage rate, regardless of the number of terminals or SIMs included. The total data usage of all Terminals/SIMs within the pool is aggregated.
* **Validity Period:** 1 calendar month
* **Payment Terms:** Monthly Fee
* **Payment Type:** Pre-Billing, Advanced Billing, Post-Billing, or Manual Invoice Creation. The system does not validate or enforce payment status (paid/unpaid)
* **Overage:** Yes - you can define a fixed rate that applies when usage exceeds the included balance.
* **Activation  Fee:** Yes. It is applied when a terminal or SIM is added, and included in the invoice at the start of the next billing period. The platform does not track payment status.
* **Prorate:** disabled
* **MRC:** No

***

5. #### <mark style="background-color:blue;">Dynamic Pool</mark>

* **Purpose:** Every new Terminal/SIM added to the dynamic pool adds to the total amount of data and increases the pool price.
* **Validity Period:** 1 calendar  month
* **Payment Terms:** Monthly Fee
* **Payment Type:** Pre-Billing, Advanced Billing, Post-Billing, or Manual Invoice Creation. The platform does not validate or enforce payment status (paid/unpaid)
* **Overage:** Yes - you can define a fixed rate that applies when usage exceeds the included balance.
* **Activation  Fee:** Yes. It is applied when a terminal or SIM is added, and included in the invoice at the start of the next billing period. The platform does not track payment status.
* **Prorate:** enabled (optional)
* **MRC:** No


# PAYGO

PAYGO is a real-time product that charges users for data on a per-megabyte basis. While it operates similarly to pay-per-megabyte systems, it provides advanced features and supports seamless integrations. Operators can set prices not only for total data usage but also specifically for different countries. If the operator supplies country-specific information or imposes restrictions in certain regions, corresponding pricing can be established.

* **Purpose:** A real-time prepaid product that charges users based on data usage (per MB/GB). Requires a positive balance in the Wallet to remain active.
* **Validity Period:** 1 calendar month and continues as long as the balance stays positive.&#x20;
* **Payment Terms:** Payment within the Wallet
* **Payment Type:** Transactions via Stripe or Invoice
* **Overage:** No — service stops when balance reaches zero
* **Activation  Fee** (one time): No
* **Re-fill:** Yes, you can refill with varying balances, each associated with a different price.
* **Auto refill with wallet:** Yes. For Company
* **Manual Refill with wallet:** Yes. For Organization

\ <br>

Prorate: No

MRC:  Yes, applied from either the first usage or the assignment date.

Billing start date: The count starts from the first usage date

<br>


# Q\&A

On the **Plans** page, you can create and customize data bundles, assign SIM cards to Plans, and monitor Plan details. The table presents essential information about each Plan, including its name, type, associated operator, company, details, labels, and whether the Plan is prorated. You can also add preset configurations for quick and consistent Plan setup.

<details>

<summary>Why can't I select a company when creating a PAYGO plan?</summary>

The company list includes only companies that have Wallet enabled. PAYGO plans work exclusively with the Wallet feature, so if you don't have any companies with Wallet enabled, the company list will be empty when creating a PAYGO plan.

</details>


# Copy of Automation - Rules

The **Automation Rules** page allows you to create and manage rules that automate various processes. This functionality helps streamline operations, improve efficiency, and ensure that specific actions are triggered automatically based on predefined criteria.
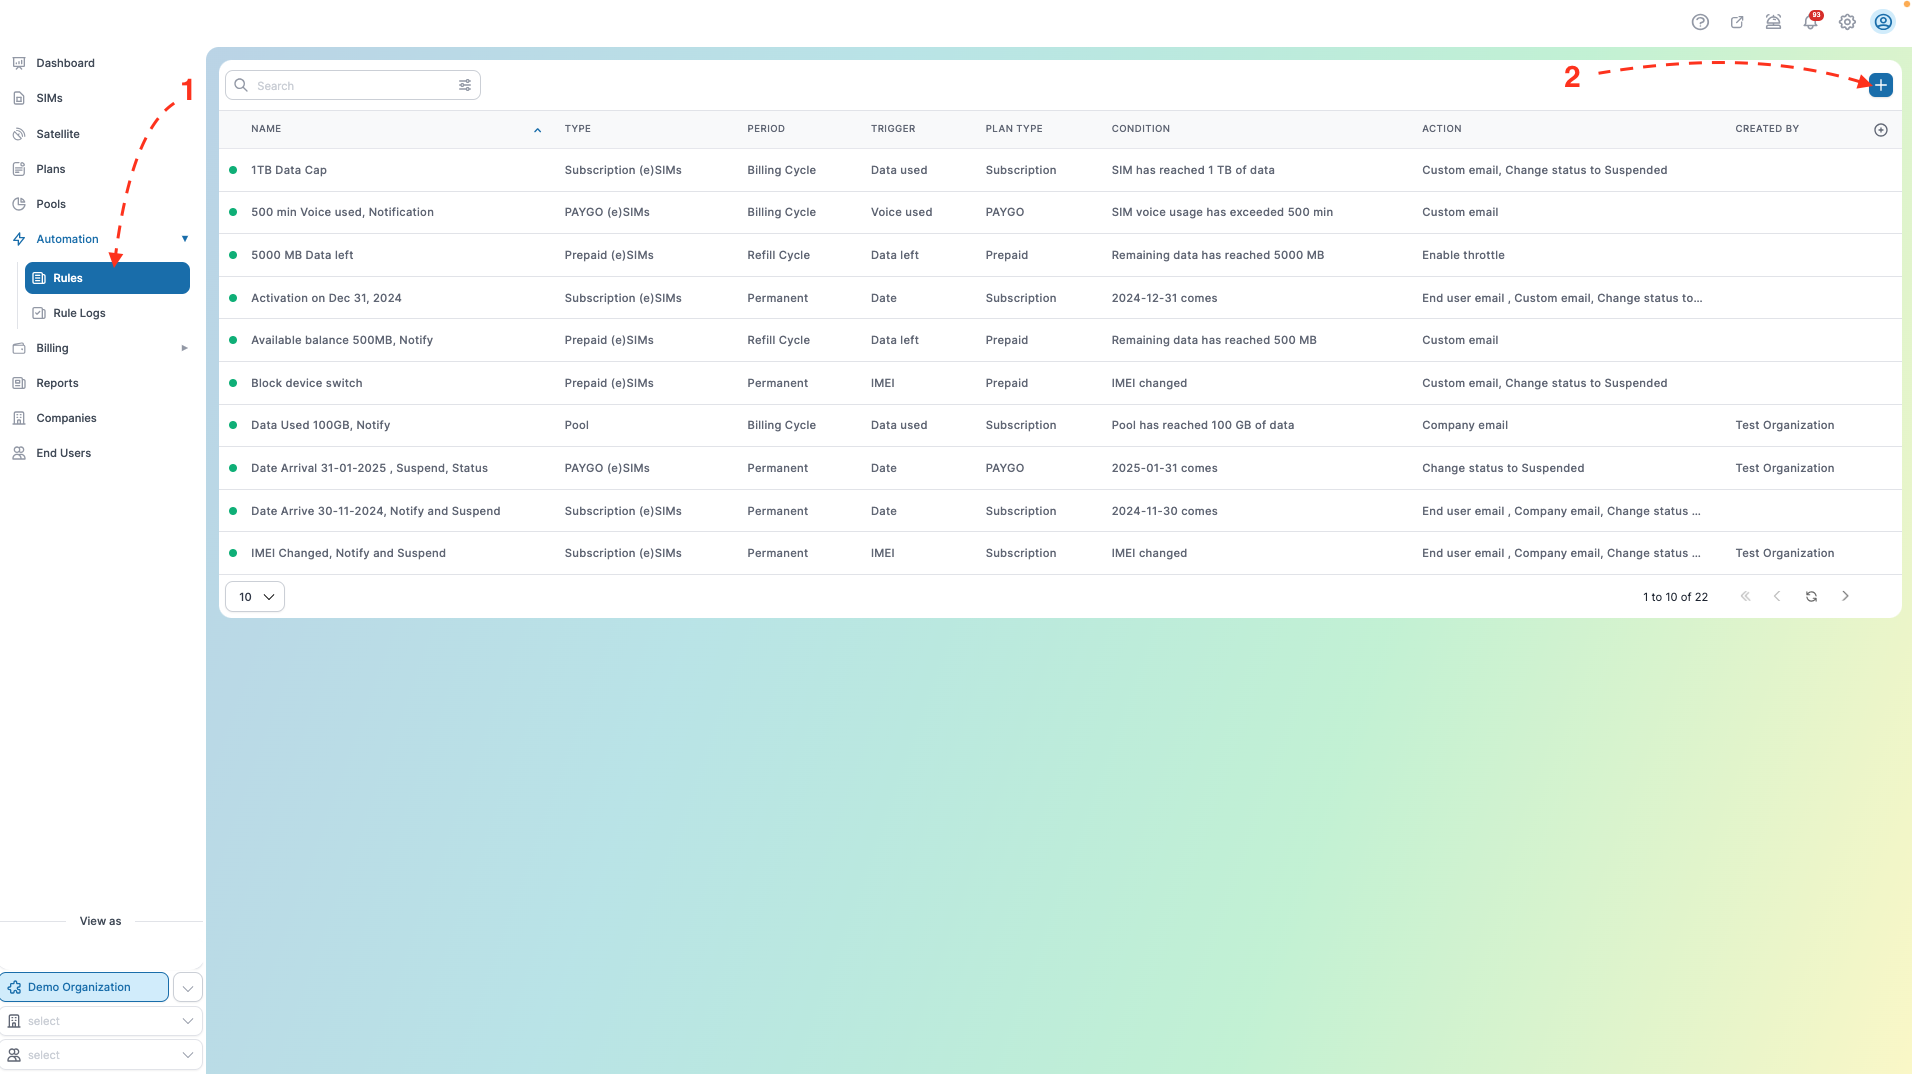
{% tabs %}
{% tab title="Dictionary" %}
General Terms from the **Automation** page:

* **Name -** The identifier for the rule.
* **Type -** The type of entity the rule applies to (e.g., SIM, Pool, Account).
* **Period -** The timeframe or cycle during which the rule is active (e.g., billing cycle, permanent, refill cycle).
* **Trigger -** The event or condition that activates the rule (e.g., status change, specific date, remaining balance).
* **Plan Type -** The type of plan to which the rule applies.
* **Condition -** The specific criteria that must be met for the rule to trigger.
* **Action -** The action that will be taken when the rule is triggered (e.g., suspend, activate, send email notification).
* **Created By -** The initiator of the rule.
  {% endtab %}

{% tab title="Key Features" %}

1. **Detailed Information:** Clicking on a specific row provides additional details:
   * **SIMs:** Displays the number of SIMs affected by the rule.
   * **General:** Provides an overview including the rule’s name, period, type, plan type, and description.
   * **Condition:** Details the trigger, condition, value, and specific action to be taken.&#x20;
   * **Action:** Specifies what actions will be performed when the rule is triggered, including email and push notifications. Includes options for email notifications (on/off), push API notifications (on/off), and additional email settings for end users and companies.

#### 2. Rule Logs <a href="#rule-logs" id="rule-logs"></a>

Tracks the history of rule executions with:

* **Date:** When the action was triggered.
* **Destination:** The recipient of the notification or action.
* **Trigger:** The condition or event that activated the rule.
* **Rule:** The name or identifier of the rule. This field is available only when the transaction was made manually.
* **Action:** The action is taken when the rule is triggered.

Rules can help to automate repetitive tasks and ensure timely responses based on specific conditions. By setting up automation rules, you can efficiently manage operations, reduce manual effort, and ensure that actions and notifications are handled consistently and automatically.&#x20;

This helps in optimizing workflow, maintaining operational efficiency, and ensuring that critical processes are executed without manual intervention.
{% endtab %}
{% endtabs %}


# Settings

The **Settings** page provides access to essential configuration options for managing your account and platform functionality.


<table data-view="cards"><thead><tr><th></th><th data-hidden data-card-cover data-type="files"></th><th data-hidden data-card-target data-type="content-ref"></th></tr></thead><tbody><tr><td>Account Settings</td><td><a href="https://2408445593-files.gitbook.io/~/files/v0/b/gitbook-x-prod.appspot.com/o/spaces%2FxYJmxgUa2SDfD4byrJY1%2Fuploads%2F5lTDcEoIJLZZYOaCAnOL%2FOrganisation-acc-sett%5C.png?alt=media&amp;token=fc53cbb9-a309-4c8a-8e06-3a49cc7927db">Organisation-acc-sett\.png</a></td><td><a href="/menu/settings/account-settings">Account Settings</a></td></tr><tr><td>Company Staff </td><td><a href="https://2408445593-files.gitbook.io/~/files/v0/b/gitbook-x-prod.appspot.com/o/spaces%2FxYJmxgUa2SDfD4byrJY1%2Fuploads%2F06ZhmJkP3oZ6h76PJUvD%2FOrganisation-staff.png?alt=media&amp;token=0d0b377b-f75c-4d18-8daa-ced1ddd79e4b">Organisation-staff.png</a></td><td><a href="/menu/settings/team-and-security">Team and Security</a></td></tr><tr><td>Operators</td><td><a href="https://2408445593-files.gitbook.io/~/files/v0/b/gitbook-x-prod.appspot.com/o/spaces%2FxYJmxgUa2SDfD4byrJY1%2Fuploads%2F1M5FcGtCorVnvc1mkAOH%2FOrganisation-operators.png?alt=media&amp;token=98852162-f361-4e89-8c12-e1fe4ae739c7">Organisation-operators.png</a></td><td><a href="/menu/settings/operators">Operators</a></td></tr><tr><td>Notifications</td><td><a href="https://2408445593-files.gitbook.io/~/files/v0/b/gitbook-x-prod.appspot.com/o/spaces%2FxYJmxgUa2SDfD4byrJY1%2Fuploads%2F6keUZLqLWkpqy9KgDe3e%2FOrganisation-notif.png?alt=media&amp;token=5414783f-1544-461d-adbd-7f803181dabb">Organisation-notif.png</a></td><td><a href="/onboarding-guide/optional-settings/8.-notifications">8. Notifications</a></td></tr><tr><td>Billing Integrations</td><td><a href="https://2408445593-files.gitbook.io/~/files/v0/b/gitbook-x-prod.appspot.com/o/spaces%2FxYJmxgUa2SDfD4byrJY1%2Fuploads%2FPqVGdWFRdeLXk4LrBxol%2FOrganisation-%20bill.png?alt=media&amp;token=1033ef12-aaf8-4062-87c2-c627052e1033">Organisation- bill.png</a></td><td><a href="/menu/settings/billing-integrations">Billing Integrations</a></td></tr><tr><td>VAT</td><td><a href="https://2408445593-files.gitbook.io/~/files/v0/b/gitbook-x-prod.appspot.com/o/spaces%2FxYJmxgUa2SDfD4byrJY1%2Fuploads%2FD3gmusAIwmgYMydfVWDl%2FOrganisation-vat.png?alt=media&amp;token=6108e0a3-457d-4474-8794-e94102543e61">Organisation-vat.png</a></td><td><a href="/menu/settings/vat">VAT</a></td></tr><tr><td>Rules</td><td><a href="https://2408445593-files.gitbook.io/~/files/v0/b/gitbook-x-prod.appspot.com/o/spaces%2FxYJmxgUa2SDfD4byrJY1%2Fuploads%2FiMz6RJoejBcbXj6QbYtP%2FOrganisation5657.png?alt=media&amp;token=27cf029b-6910-457a-8e47-20efa1c75a29">Organisation5657.png</a></td><td><a href="broken://pages/gXLtoy4l9NIbAOSugxaI">Broken link</a></td></tr><tr><td>Communication</td><td><a href="https://2408445593-files.gitbook.io/~/files/v0/b/gitbook-x-prod.appspot.com/o/spaces%2FxYJmxgUa2SDfD4byrJY1%2Fuploads%2FTLTJuZUW5h8gHWFJWC8U%2FOrganisation877.png?alt=media&amp;token=7bcbcac4-84ef-4814-9f5b-94da8d767d09">Organisation877.png</a></td><td><a href="/onboarding-guide/optional-settings/9.-communication">9. Communication</a></td></tr><tr><td>Self-SIM Activation</td><td><a href="https://2408445593-files.gitbook.io/~/files/v0/b/gitbook-x-prod.appspot.com/o/spaces%2FxYJmxgUa2SDfD4byrJY1%2Fuploads%2Fwp5B3GstPqDm21Kl84Uz%2FOrganisation.9090.png?alt=media&amp;token=ad990634-bac2-4f59-9f0a-2b6115eb5ee6">Organisation.9090.png</a></td><td><a href="/menu/settings/self-sim-activation">Self-SIM Activation</a></td></tr><tr><td>Сustom link(s)</td><td><a href="https://2408445593-files.gitbook.io/~/files/v0/b/gitbook-x-prod.appspot.com/o/spaces%2FxYJmxgUa2SDfD4byrJY1%2Fuploads%2F8ul78p8B4xBUVlyPZiUY%2FOrganisation-custom%20link.png?alt=media&amp;token=cd1b758c-e526-425b-93e1-b747862561e6">Organisation-custom link.png</a></td><td><a href="/menu/settings/custom-link-s">Custom Link(s)</a></td></tr><tr><td></td><td></td><td></td></tr></tbody></table>


# Account Settings

The **Account Settings** page serves as a comprehensive hub for managing essential information related to your account. This section is organized into four key areas: Billing Info, Address Info, Contact Info, and Default Settings.
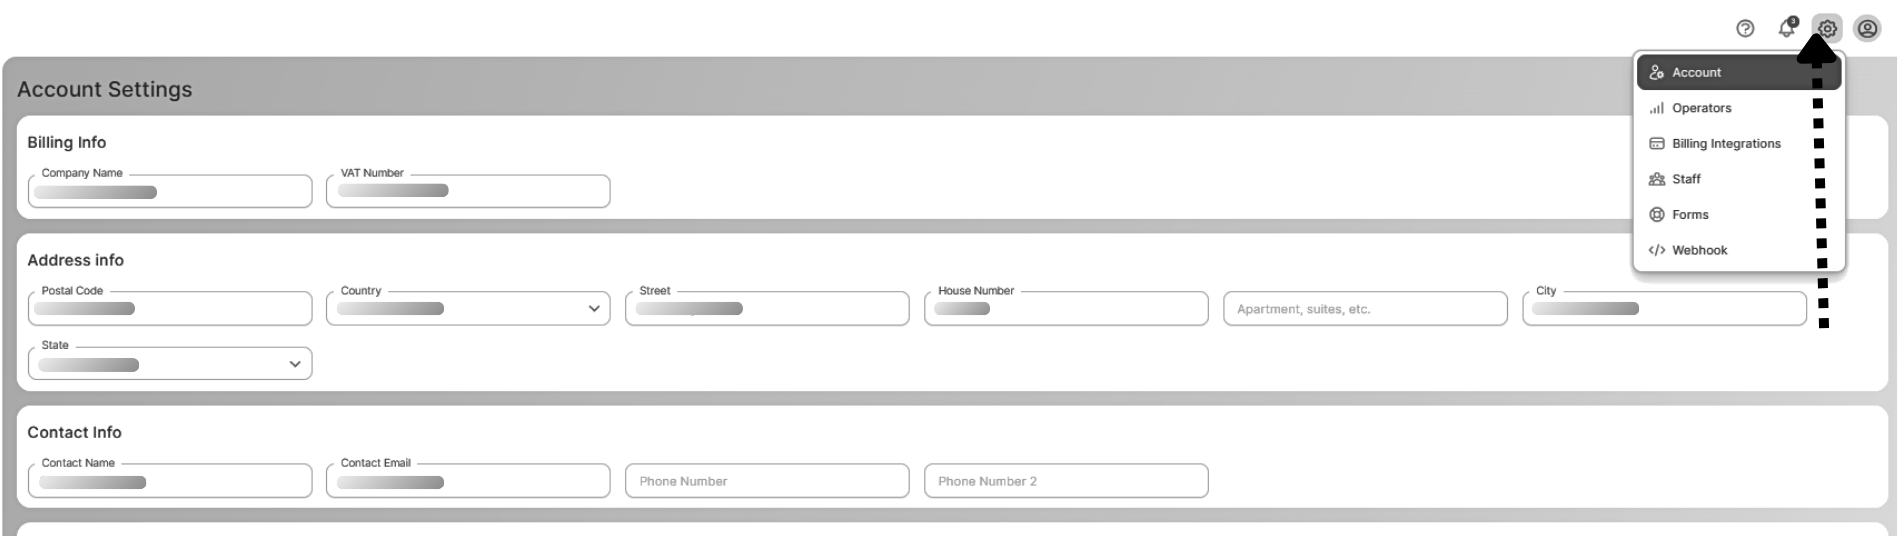
<figure><img src="https://2408445593-files.gitbook.io/~/files/v0/b/gitbook-x-prod.appspot.com/o/spaces%2FxYJmxgUa2SDfD4byrJY1%2Fuploads%2FG4KEXyuAb7StrELCsgKB%2FSIMs%20(8).png?alt=media&amp;token=ed86d588-236a-4a23-8755-8fc2d3a4d81c" alt=""><figcaption></figcaption></figure>

### <mark style="background-color:blue;">1.</mark> <mark style="background-color:blue;">Billing Info</mark>

In the **Billing Info** section, users can enter and update their company’s financial details. This includes:

* **Company Name**: The official name of your organization as it appears on billing statements and legal documents.
* **VAT Number**: A unique identification number assigned to your business for value-added tax purposes, necessary for invoicing and tax compliance.

This information is crucial for ensuring accurate billing and compliance with financial regulations.

### <mark style="background-color:blue;">**2. Address Info**</mark>

The **Address Info** section allows users to provide their organization's physical address for billing and communication purposes. The fields include:

* **Postal Code**: The postal code for your business location, ensuring accurate mail delivery.
* **Country**: The country where your organization is located.
* **Street**: The street address of your business.
* **House Number / Apartment**: Specific house or apartment number to pinpoint your location.
* **City**: The city where your organization operates.
* **State**: The state or region of your business address, if applicable.

Having accurate address information is essential for effective communication and service delivery.

### <mark style="background-color:blue;">**3. Contact Info**</mark>

The **Contact Info** section is designed to maintain up-to-date contact information for the primary point of contact within your organization. This includes:

* **Contact Name**: The name of the person responsible for managing account-related inquiries.
* **Contact Email**: The email address for the primary contact, ensuring prompt communication regarding account matters.
* **Phone Number**: The primary phone number for reaching the contact person.
* **Phone Number 2**: An optional secondary phone number for additional contact methods.

This section ensures that communication is streamlined and that support can be provided efficiently.

### <mark style="background-color:blue;">**4. Default Settings**</mark>

The **Default** section allows users to set preferences for their account. This includes:

* **Currency**: The default currency is set so that you don't have to select it repeatedly when creating a plan.
* **Email for Notifications**: The email address designated to receive notifications related to account activity, such as billing alerts, service updates, and other important communications.


# Team and Security

The **Staff** page allows the Organization to register team members and manage their access rights on the platform. This functionality ensures that each staff member has the appropriate permissions to perform their tasks while maintaining security and control over sensitive information.

### <mark style="background-color:blue;">**Complete the following steps:**</mark>

1. Go to **Settings**.

<figure><img src="https://2408445593-files.gitbook.io/~/files/v0/b/gitbook-x-prod.appspot.com/o/spaces%2FxYJmxgUa2SDfD4byrJY1%2Fuploads%2FZxRNzK9xW57zH0J37eG1%2Fsettings.png?alt=media&amp;token=95bc6e02-df92-4698-8263-8e1cfa5ef762" alt=""><figcaption></figcaption></figure>

2. Click on  **Team and Security**&#x20;

<div data-full-width="true"><figure><img src="https://2408445593-files.gitbook.io/~/files/v0/b/gitbook-x-prod.appspot.com/o/spaces%2FxYJmxgUa2SDfD4byrJY1%2Fuploads%2FoHVMAQBnOTMnNSfQdyD5%2FTeam%20and%20Security.png?alt=media&amp;token=e8c5bc0a-7625-4c6b-aa5e-35c22837562f" alt="" width="563"><figcaption></figcaption></figure></div>

3. Click on the Staff member you want to edit access for

<figure><img src="https://2408445593-files.gitbook.io/~/files/v0/b/gitbook-x-prod.appspot.com/o/spaces%2FxYJmxgUa2SDfD4byrJY1%2Fuploads%2FwizFv0VAezu8nOXbOsQv%2FStaff%20member.png?alt=media&amp;token=7d9ac466-a550-4a05-ac11-0b32ae93f869" alt=""><figcaption></figcaption></figure>

4. Go to the Permissions tab and check or uncheck the appropriate box next to the relevant field.

<figure><img src="https://2408445593-files.gitbook.io/~/files/v0/b/gitbook-x-prod.appspot.com/o/spaces%2FxYJmxgUa2SDfD4byrJY1%2Fuploads%2F6ZYQUoYjCRzfTa4yKuxJ%2FPermissions.png?alt=media&amp;token=dd81c516-57cf-4200-aa33-2bc8beef23f7" alt=""><figcaption></figcaption></figure>

### <mark style="background-color:blue;">**1. Automation**</mark>**&#x20;(Allow / Restrict)**

This section governs the automation rules for staff. Administrators can set permissions for various actions related to automation:

* **Rule**: Control access to automation rules by allowing or restricting staff from:
  * **Add**: Create new automation rules.
  * **View**: Access existing rules.
  * **Edit**: Modify existing rules.
  * **Delete**: Remove rules from the system.

### <mark style="background-color:blue;">**2. Company**</mark>**&#x20;(Allow / Restrict)**

This section focuses on permissions related to company management:

* **Payment Method**: Manage payment methods for the company by allowing or restricting actions to:
  * **Add**: Introduce new payment methods.
  * **View**: Access current payment methods.
  * **Delete**: Remove existing payment methods.
* **Staff**: Control access to staff management features:
  * **Add**: Create new staff profiles.
  * **View**: Access staff information.
  * **Edit**: Modify staff profiles.
  * **Delete**: Remove staff members.
  * **Log**: View action logs of staff activities.
  * **Permissions**: Manage individual permissions for staff.
  * **Reset**: Reset staff passwords.
* **Webhook**: Set permissions for webhook management:
  * **View**: Access existing webhooks.
  * **Update**: Modify webhook settings.

### <mark style="background-color:blue;">**3. eSIM Store**</mark>**&#x20;(Allow / Restrict)**

In this section, administrators can control access to the eSIM store:

* **View**: Allow or restrict staff from viewing eSIM offerings.
* **Update**: Enable or disable staff from updating eSIM inventory or pricing.

### <mark style="background-color:blue;">**4. End-User**</mark>**&#x20;(Allow / Restrict)**

This section manages permissions related to end-user management:

* **Add**: Create new end-user profiles.
* **View**: Access end-user details.
* **Edit**: Modify existing end-user profiles.
* **Delete**: Remove end-users from the platform.
* **Permissions**: Manage permissions for end-users.
* **Payment Method**: Control access to end-user payment methods:
  * **Add**: Create new payment methods.
  * **View**: Access current payment methods.
  * **Delete**: Remove payment methods.
* **Staff**: Manage staff assigned to specific end-users with similar permission controls as listed above.

### <mark style="background-color:blue;">**5. SIM Card**</mark>**&#x20;(Allow / Restrict)**

This section governs the management of SIM cards:

* **Add**: Create new SIM card entries.
* **View**: Access details of existing SIM cards.
* **Edit**: Modify SIM card information.
* **Delete**: Remove SIM cards from the system.
* **Actions**: Control various SIM card actions, including:
  * **Assign/Unassign Company**: Manage company assignments for SIM cards.
  * **Assign/Unassign End-User**: Manage end-user assignments.
  * **Assign/Unassign Plan**: Link SIM cards to specific plans.
  * **Assign/Unassign Rule**: Apply automation rules to SIM cards.
  * **Assign/Unassign Label**: Tag SIM cards for better organization.
  * **Cancel Location**: Manage location settings for SIM cards.
  * **Change Status**: Modify the status of SIM cards.
  * **Send SMS**: Control SMS functionality for SIM cards.
  * **SIM Swap**: Manage SIM swapping procedures.
  * **Update Note**: Add notes to SIM card records.
  * **Manual Refill**: Perform manual refills for prepaid SIM cards.

### <mark style="background-color:blue;">**6. Satellite**</mark>**&#x20;(Allow / Restrict)**

T

his section governs the management of Terminals:

* **Add**: Create new invoice templates.
* **View**: Access existing invoices.
* **Edit**: Modify invoice details.
* **Delete**: Remove invoices from the system.
* **Actions**: Control various SIM card actions, including:
  * **Assign/Unassign Company**: Manage company assignments for Terminals.
  * **Assign/Unassign Plan**: Link Terminals to specific plans.
  * **Assign/Unassign Label**: Tag Terminals for better organization.
  * **Change Status**: Modify the status of Terminals.
  * **Update Note**: Add notes to Terminal records.

### <mark style="background-color:blue;">**7. Invoice Software**</mark>**&#x20;(Allow / Restrict)**

This section controls access to invoice management features:

* **Add**: Create new invoice templates.
* **View**: Access existing invoices.
* **Edit**: Modify invoice details.
* **Delete**: Remove invoices from the system.
* **Parameters**: Set permissions for viewing and editing invoice parameters.

### <mark style="background-color:blue;">**7. Operator**</mark>**&#x20;(Allow / Restrict)**

Manage telecom operator details:

* **Add**: Create new operator profiles.
* **View**: Access information about existing operators.
* **Edit**: Modify operator details.
* **Delete**: Remove operators from the system.

### <mark style="background-color:blue;">**8. Organization**</mark>**&#x20;(Allow / Restrict)**

This section allows control over organizational settings:

* **View**: Access organization details.
* **Edit**: Modify organizational information.
* **Staff**: Manage staff related to the organization with similar permissions as outlined in previous sections.
* **Webhook**: Manage webhooks specific to the organization.

### <mark style="background-color:blue;">**9. Payment**</mark>**&#x20;(Allow / Restrict)**

This section controls access to payment management:

* **View**: Allow or restrict staff from accessing payment details.

### <mark style="background-color:blue;">**10. Billing**</mark>**&#x20;(Allow / Restrict)**

Manage billing settings and permissions:

* **View**: Access billing information.
* **Edit**: Modify billing settings.
* **Advance Billing Enable**: Control whether advance billing options are available.
* **Create**: Allow or restrict staff from creating billing entries.

### <mark style="background-color:blue;">**11. Plan**</mark>**&#x20;(Allow / Restrict)**

Control access to service plans:

* **Add**: Create new service plans.
* **View**: Access details of existing plans.
* **Edit**: Modify plan information.
* **Delete**: Remove plans from the system.

### <mark style="background-color:blue;">**12. Pool**</mark>**&#x20;(Allow / Restrict)**

Manage access to resource pools:

* **Pool**: Control permissions for adding, viewing, editing, and deleting resource pools.

### <mark style="background-color:blue;">**13. PSP**</mark>**&#x20;(Allow / Restrict)**

Manage Payment Service Provider settings:

* **Add**: Create new PSP entries.
* **View**: Access details of existing PSPs.
* **Edit**: Modify PSP information.
* **Delete**: Remove PSPs from the system.


# Operators

The Operators section is dedicated to managing telecom operators associated with the platform.

A centralized management approach simplifies the oversight of multiple operators, ensuring efficient operations and easy adaptation to changing business requirements.

<table><thead><tr><th width="180">Operator Name</th><th width="180">Status</th></tr></thead><tbody><tr><td>FloLive </td><td>Integrated ✅</td></tr><tr><td>HOT Mobile</td><td>Integrated ✅</td></tr><tr><td>KPN</td><td>Integrated ✅</td></tr><tr><td>Odido</td><td>Integrated ✅</td></tr><tr><td>Partner</td><td>Integrated ✅</td></tr><tr><td>Pelephone</td><td>Integrated ✅</td></tr><tr><td>Plus</td><td>Integrated ✅</td></tr><tr><td>Rogers</td><td>Integrated ✅</td></tr><tr><td>Tele2 Sweden</td><td>Integrated ✅</td></tr><tr><td>Telefonica</td><td>Integrated ✅</td></tr><tr><td>Vodafone</td><td>Integrated ✅</td></tr><tr><td>WWS</td><td>Integrated ✅</td></tr></tbody></table>

## Q\&A

<details>

<summary>How to add new operators?</summary>

1. Navigate to **Settings**.
2. Select **"Operators"** from the menu.
3. Click the **"+"** button on the right side of the page to add a new operator.
4. On the **"Add a New Operator"** page, select an operator from the provided list.
5. Enter any additional details, if required.
6. Click the **Create** button to finalize.

If the operator you need isn't listed, please reach out to our manager for assistance.

</details>


# Billing Integrations

The **Billing Integrations** page is designed to manage and monitor financial transactions through integrated payment service providers (PSPs) and invoicing systems.&#x20;

[**1. PSPs (Payment Service Providers)**](/onboarding-guide/optional-settings/3.-psp-integration)

This section provides an overview of transaction data from various payment service providers integrated into the platform. For each PSP, you can view both monthly and total transaction details, presented in EUR and transaction count.

*

```
<mark style="background-color:yellow;">**1) Stripe**</mark>
```

```
<figure><img src="/files/hm1SYCi1vIfivFxNGFg3" alt=""><figcaption></figcaption></figure>

* To set up the integration with Stripe, you will need to enter your **Key** and **Secret**.
* Follow up on the instructions below
  * Open your Stripe Dashboard and navigate to the "Developers" page. Find "Webhooks" in the tabs list and select it. Click the designed button to add an endpoint URL, then enter the  following URL: [https://platform.droam.com/webhook/d813177c-51af-4836-8ab7-0c146ad6a886/stripe](https://platform.droam.com/webhook/d813177c-51af-4836-8ab7-0c146ad6a886/stripe)
  * For next step, add the events to listen to by selecting the following list of 9 events:
    * charge.refunded
    * charge.succeeded
    * charge.updated
    * setup\_intent.succeeded
    * source.canceled
    * source.chargeable
    * payment\_intent.succeeded
    * payment\_method.attached
    * payment\_method.detached
  * Save these settings by clicking the "Add endpoint" button to complete the Stripe webhook setup.


<mark style="background-color:yellow;">**2) PayPal**</mark>

<figure><img src="/files/sRyWOP1cz6ZpHyCC9Uw1" alt=""><figcaption></figcaption></figure>

To integrate with PayPal, you will need to provide the following details:&#x20;

* Endpoint
* Username
* &#x20;Password
* Checkout
* Signature


<mark style="background-color:yellow;">**3) Cardknox**</mark>**&#x20;(pending)**

<figure><img src="/files/1ikxsOh3SjLvTlvehRoH" alt=""><figcaption></figcaption></figure>

To integrate with Cardknox, you will need to provide the **X-key**


<mark style="background-color:yellow;">**4) Mollie**</mark>

<figure><img src="/files/QDmUMjLUFdq1pCkT3A00" alt=""><figcaption></figcaption></figure>

To integrate with Cardknox, you will need to provide the **API Key**


<div data-gb-custom-block data-tag="hint" data-style="info" class="hint hint-info"><p>If you plan to use only Subscription - PSP is not needed</p></div>
```

***

**2. Invoice Integration**

This section allows you to add and manage third-party invoicing systems to streamline your billing process. By clicking the “+” button, you can integrate with supported invoicing platforms:

* **WeFact**: A cloud-based invoicing system.
* **Xero**: A popular accounting software for small businesses.

Once integrated, these systems allow for automated invoice generation and management, enhancing billing efficiency on the platform.

You as an Organization can connect all your products there and on the platform using SKU, and customers using Identifier.

{% hint style="info" %}
**Important**

If a Company or End User wants to make a payment, they can only use the payment methods linked by the organization. If the organization has not linked any payment systems, it means that the company and end user cannot make any payments (it all depends on the product type being used).
{% endhint %}


# VAT

You can set a default VAT percentage to apply to all external transactions, with the flexibility to customize it for individual customers as needed.

**To update a customer's VAT percentage:**

1. Navigate to the **Companies** or **End Users** tab in the main Menu.
2. Select the relevant company/customer
3. In the **General** tab, navigate to **Billing Details** and click **Edit**.

<figure><img src="https://2408445593-files.gitbook.io/~/files/v0/b/gitbook-x-prod.appspot.com/o/spaces%2FxYJmxgUa2SDfD4byrJY1%2Fuploads%2F58d983WaYSEXSA9hClBj%2F15.32.14.png?alt=media&amp;token=af27e794-f3d5-4da5-b157-093ff3183559" alt=""><figcaption></figcaption></figure>

4. Adjust the VAT percentage under **Billing Details**, or specify it when creating a new company.
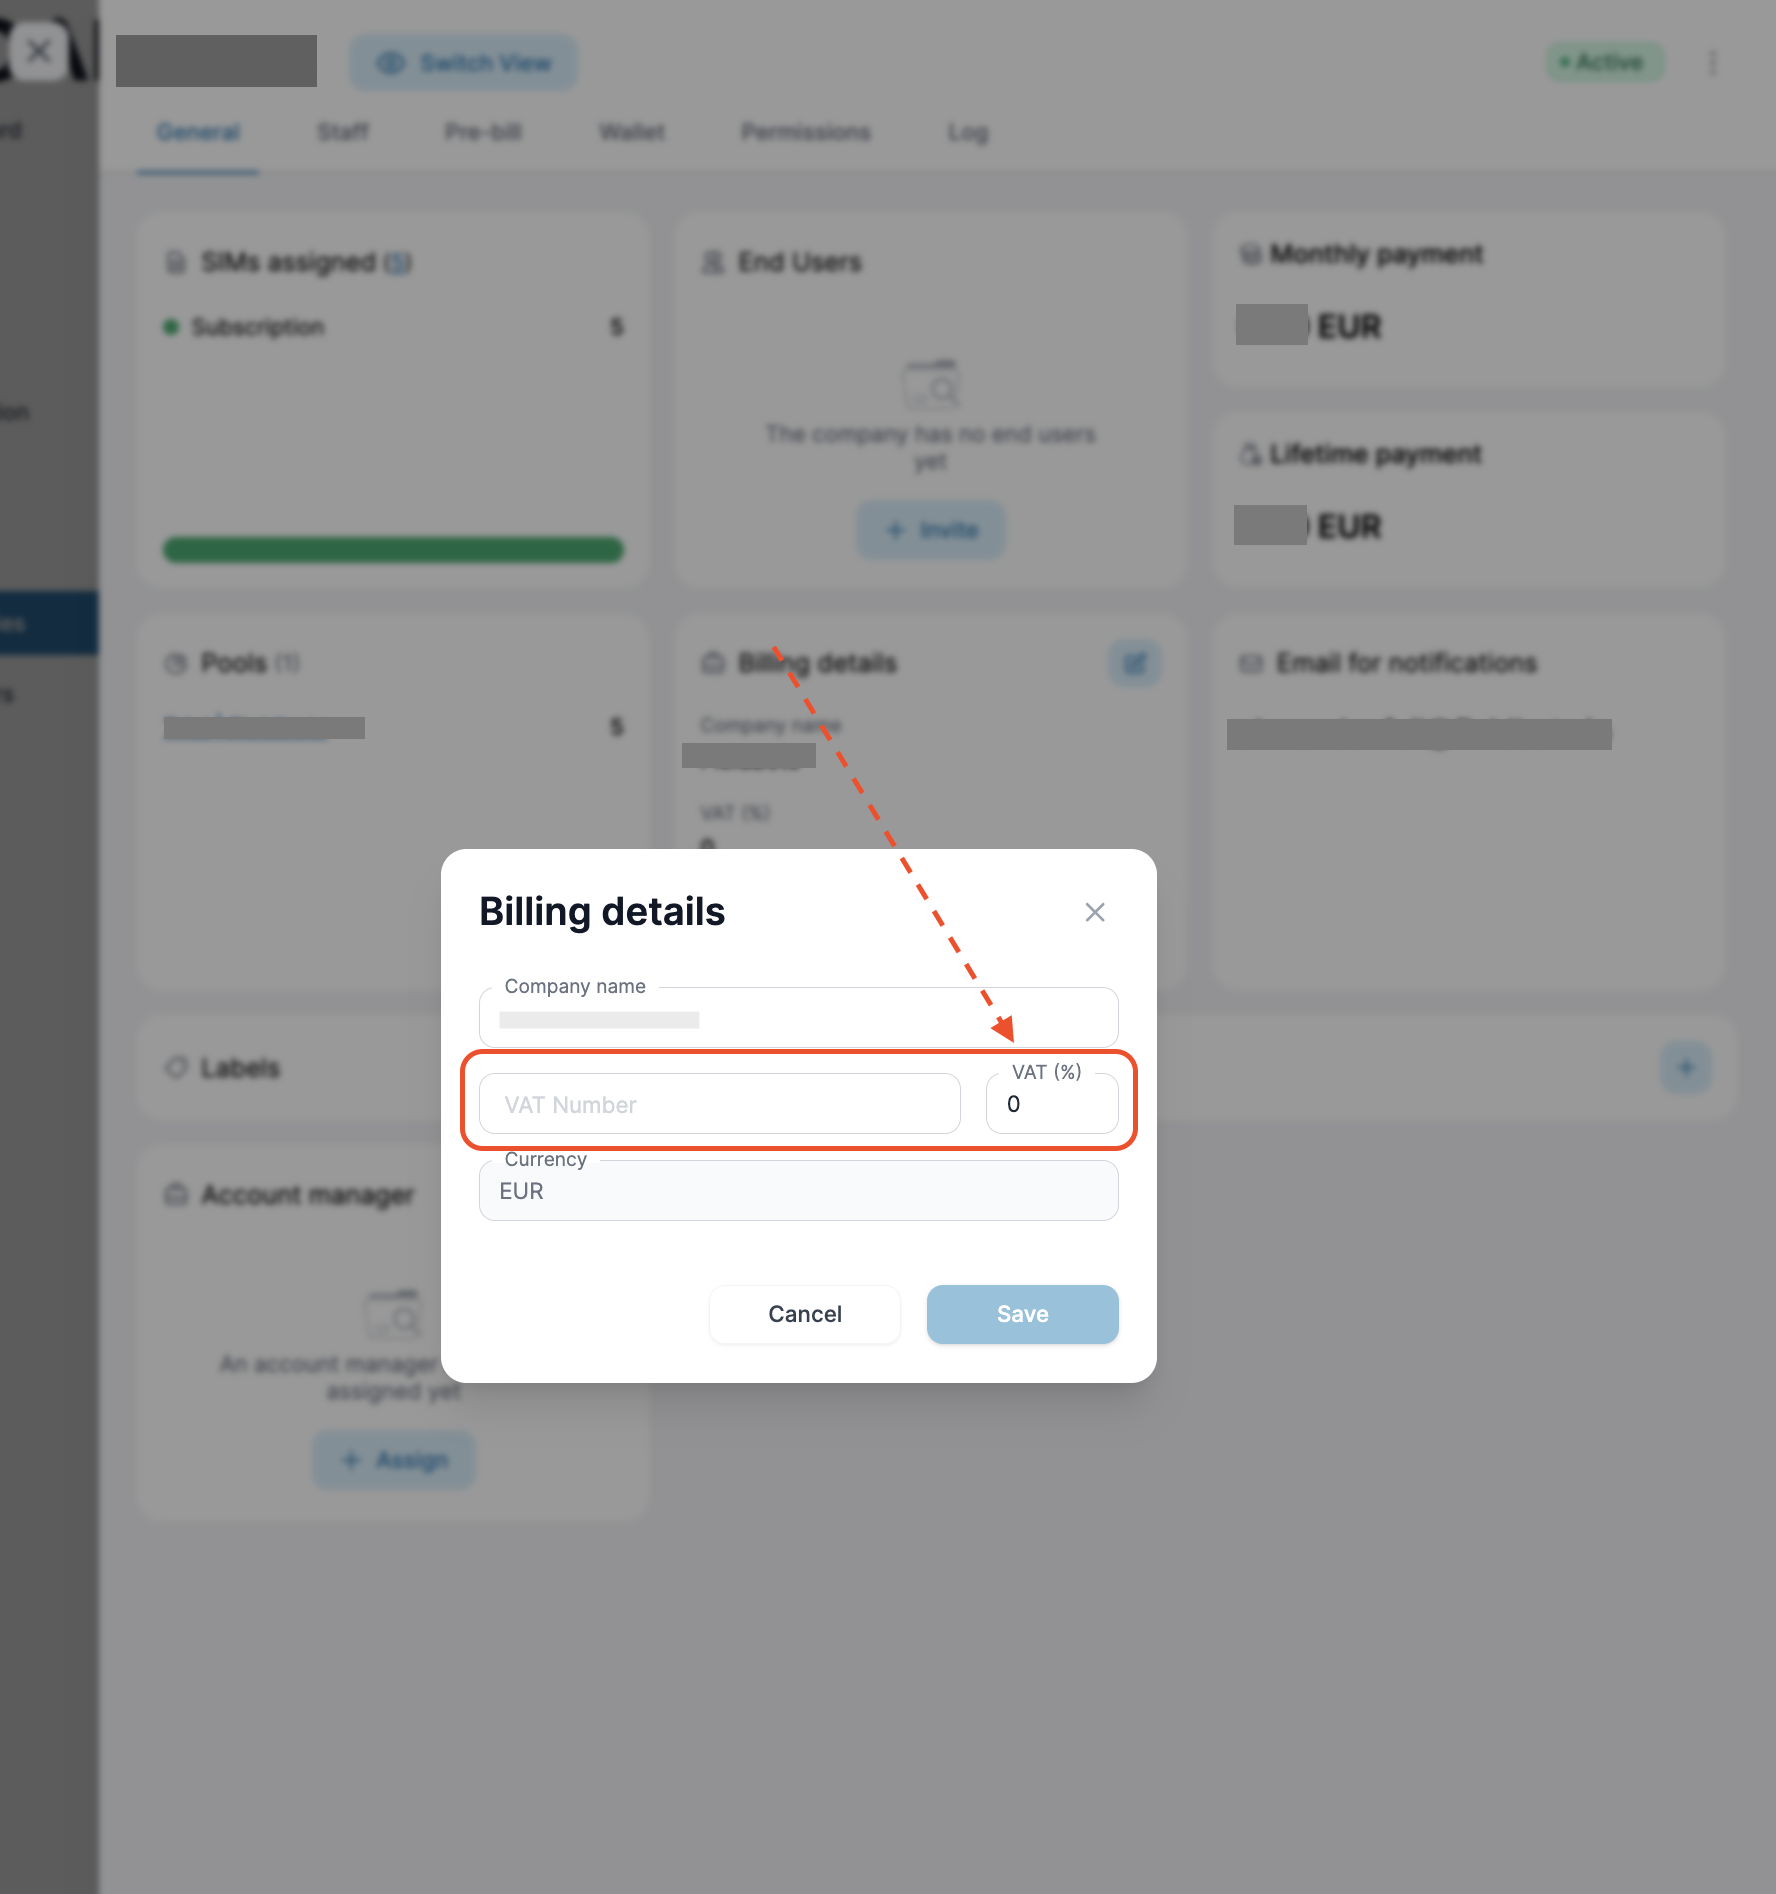
<figure><img src="https://2408445593-files.gitbook.io/~/files/v0/b/gitbook-x-prod.appspot.com/o/spaces%2FxYJmxgUa2SDfD4byrJY1%2Fuploads%2Fgc6CmW610lcJRGABLVYd%2F15.41.05.png?alt=media&amp;token=fd1417cb-6996-4313-b36b-f32c9efdf573" alt=""><figcaption></figcaption></figure>

{% hint style="warning" %}
**Important**

* VAT is calculated and added to the amount being refilled.
  * *For example, when a client refills a wallet, VAT is applied based on the set percentage.*

* **If VAT is set to 0%**, VAT will not be collected on any transaction or refill, and the system will not apply VAT to platform prices.
  * *For example, If the default VAT is 0%, prices will be shown without VAT, and no VAT will be charged on transactions.*
    {% endhint %}

{% hint style="success" %}
**VAT Application on Platform Prices**

* By default, all platform prices are displayed **excluding VAT**.
* Once VAT is configured in the **organization settings**, it is automatically applied to platform prices unless a different VAT percentage is specified for a specific company.
  {% endhint %}


# Self-SIM Activation

Below you can find a step-by-step guide on how to request the activation of the SIM(s) via the platform. For any questions about the process or if you have any suggestions, please contact your account manager or mail us at <support@droam.com>

<br>

**Single SIM activation**&#x20;

1. Go to the SIMs menu and enter the ICCID in the search field;
2. Click on the SIM and find the “Activate” button;
3. Fill in the fields by setting up the activation date, SIM type, and Plan (optionally, set the End-user and Note)\*;
4. You will receive an automatic email confirmation once the SIM is activated

<br>

**Bulk SIM activation**

1. Enter the ICCIDs in the search field separated by a comma. Example:
2. Select all SIMs from the search results;
3. Find the “Plus” button and click on “Activate”
4. Set the Activation Date, SIM type and in the Plan field, choose the plan that is associated with the SIMs operator;
5. All selected SIMs will appear in the “SIMs to activate” field automatically
6. Confirm the action by clicking on “New Activation”
7. You will receive an automatic email confirmation once the SIM is activated

<br>

{% hint style="info" %}
Note:&#x20;

* You can only perform bulk activation for the SIMs from the same operator and with the same plan.
* The described method can only be used for the SIMs in “Available” status on the platform, meaning without a plan.
* All the plans in the list are associated with your account only. Choose the SIM type depending on the plan type: Prepaid, Subscription, or Paygo.
  {% endhint %}

We are confident these enhancements will elevate your experience with our products and services. Our commitment to innovation and customer satisfaction remains unwavering, and we are excited to have you on this journey with us.

Thank you for choosing DROAM as your trusted partner.

<br>


# Custom Link(s)

Set your custom external links in the account settings and specify who can view them—just you or your company as well.&#x20;

*How to use:*&#x20;

*1)* Go to the account settings,&#x20;

2\) Find the 'Custom Menu'

3\) Enter your external links if you'd like.&#x20;

<figure><img src="https://2408445593-files.gitbook.io/~/files/v0/b/gitbook-x-prod.appspot.com/o/spaces%2FxYJmxgUa2SDfD4byrJY1%2Fuploads%2FfrkLk80t508G5yGLXDjA%2FCustom%20links.png?alt=media&amp;token=4ef036b4-030d-477f-9cfc-0f1206446b87" alt=""><figcaption></figcaption></figure>

4\) The links you add will appear in the top navigation menu.
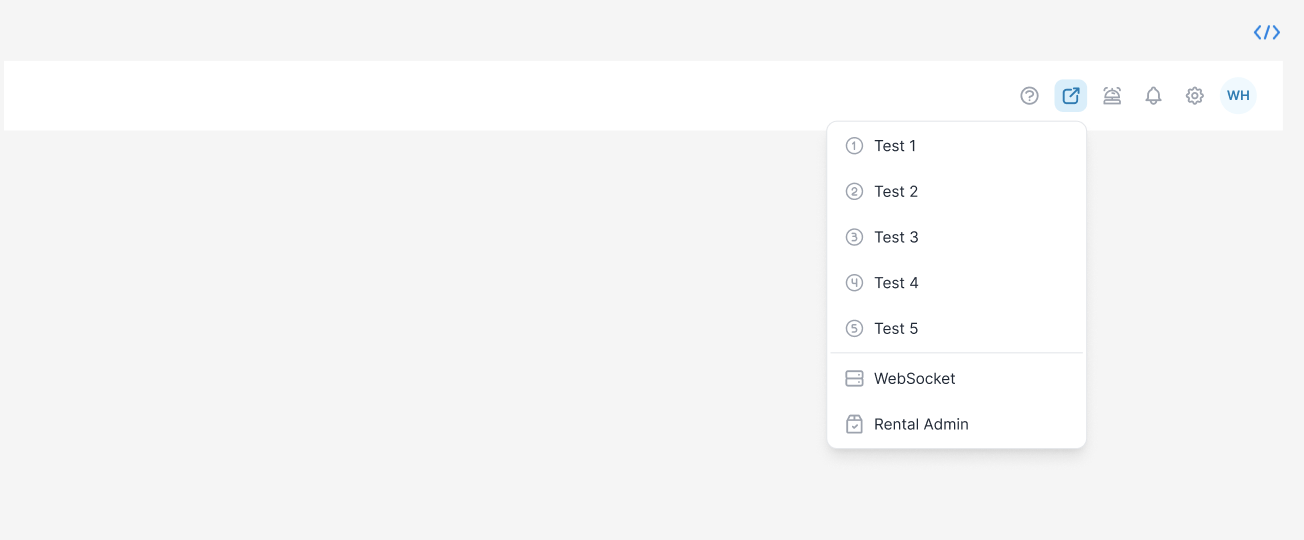
<figure><img src="https://2408445593-files.gitbook.io/~/files/v0/b/gitbook-x-prod.appspot.com/o/spaces%2FxYJmxgUa2SDfD4byrJY1%2Fuploads%2F0r3xbWatORCcd1eKYX42%2Fcustom_links.png?alt=media&amp;token=13ac1da6-146e-45a8-868d-f5b0032d3f5c" alt=""><figcaption></figcaption></figure>

{% hint style="warning" %}
**Important:**

You can add up to 5 external links, which will be displayed in the header navigation.
{% endhint %}

***


# Upload SIMs

As an organization, you can upload SIMs to the platform by following these steps:

1. Go to the **SIMs** from the menu on the left.
2. Choose either **"Upload SIM Details"** or click the **plus (+)** button.

<div data-full-width="true"><figure><img src="https://2408445593-files.gitbook.io/~/files/v0/b/gitbook-x-prod.appspot.com/o/spaces%2FxYJmxgUa2SDfD4byrJY1%2Fuploads%2FF3LqjRlmv2G4VrjS9Dj8%2FUpload%20SIMS.png?alt=media&amp;token=4987cbf3-95b1-494d-bf0a-ca324ef3a37b" alt="" width="563"><figcaption></figcaption></figure></div>

**Option 1: Upload SIM Details**

* A popup window will appear.
* You’ll be able to upload a `.xlsx` file and click **"Confirm"** to proceed.
* You can also **download a template file** to see the required fields for each SIM.
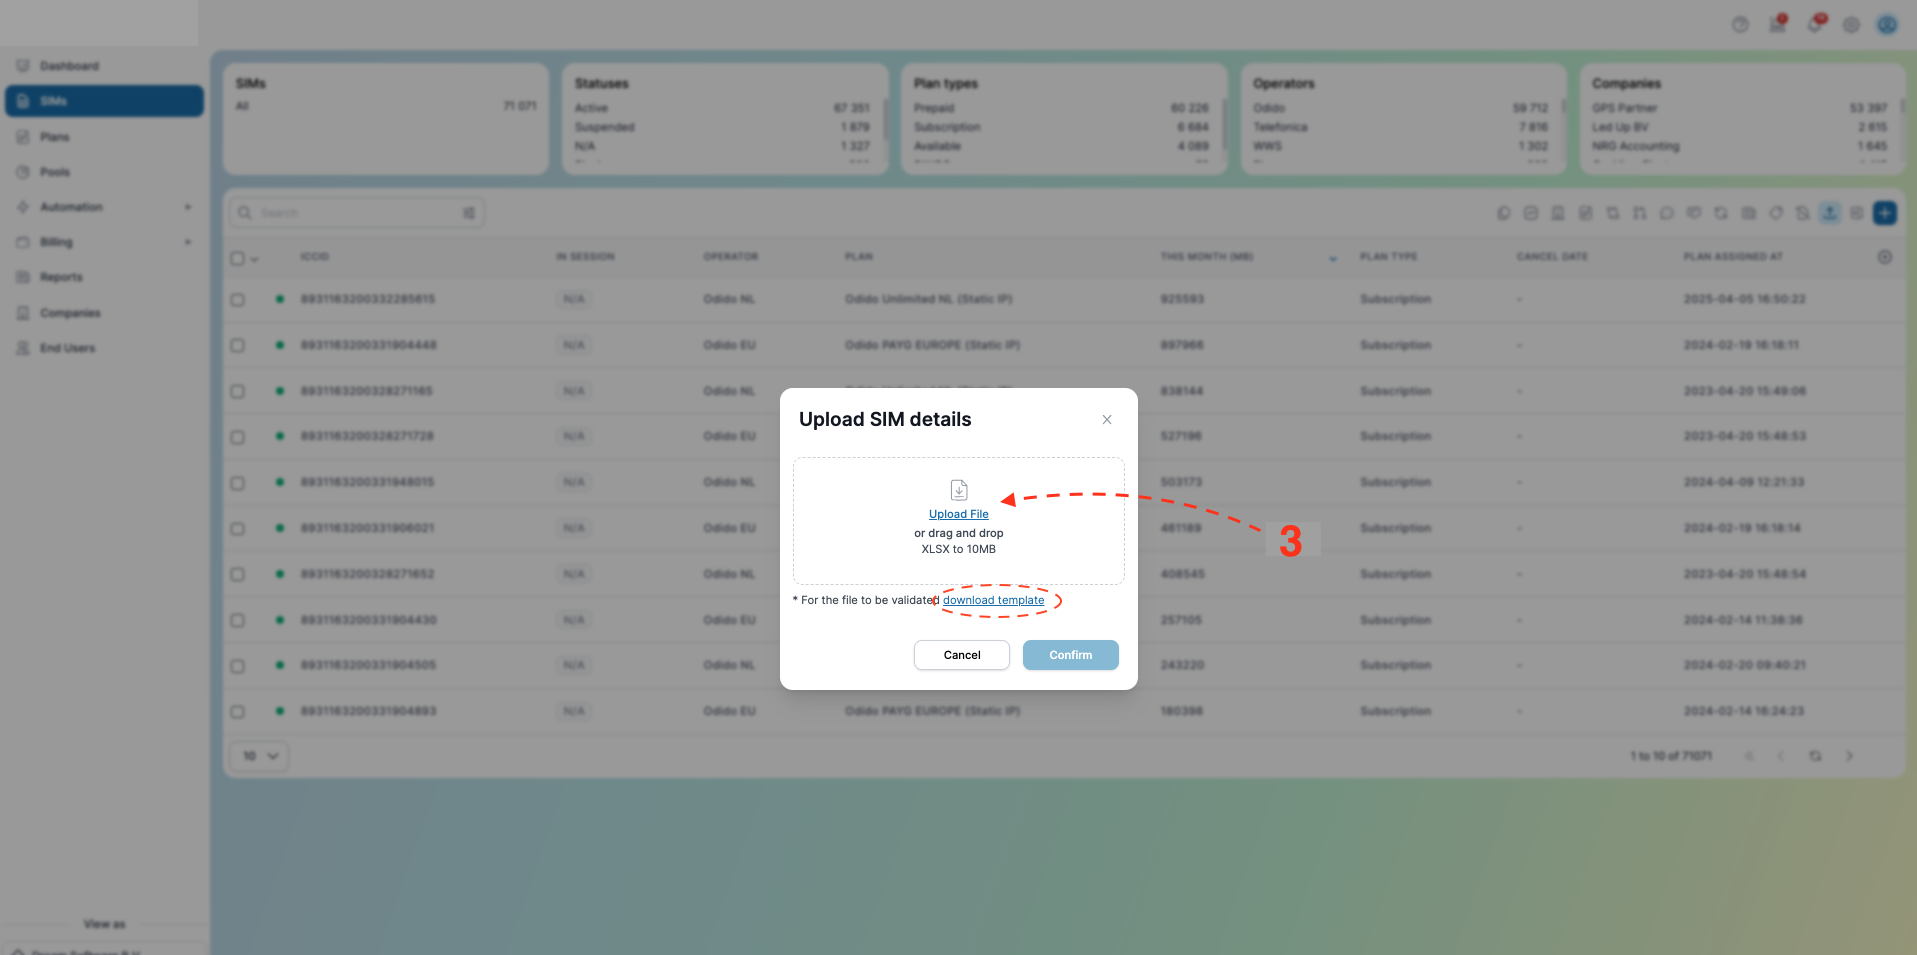
<div data-full-width="true"><figure><img src="https://2408445593-files.gitbook.io/~/files/v0/b/gitbook-x-prod.appspot.com/o/spaces%2FxYJmxgUa2SDfD4byrJY1%2Fuploads%2FCeoiXLxCmZ63JhEIW9q5%2FUpload%20SIM%20details.png?alt=media&amp;token=fa9be58d-4bb2-4222-9bdb-99ccb8b8274c" alt="" width="563"><figcaption></figcaption></figure></div>

**Option 2: Plus (+) Button**

* A modal window will open.

<div data-full-width="true"><figure><img src="https://2408445593-files.gitbook.io/~/files/v0/b/gitbook-x-prod.appspot.com/o/spaces%2FxYJmxgUa2SDfD4byrJY1%2Fuploads%2Fd7a85vRUoRrbC2bnqXHm%2FOperator%3ACompany.png?alt=media&amp;token=6770d1f4-93aa-4cf1-aad2-ce4ce92af433" alt="" width="563"><figcaption></figcaption></figure></div>

* Select the **Operator** (required) and the **Company** (optional).
* Click on **"File"** to upload your `.xlsx` file, then click **"Confirm."**
* A **template file** is also available for download to check which fields are needed for each SIM.
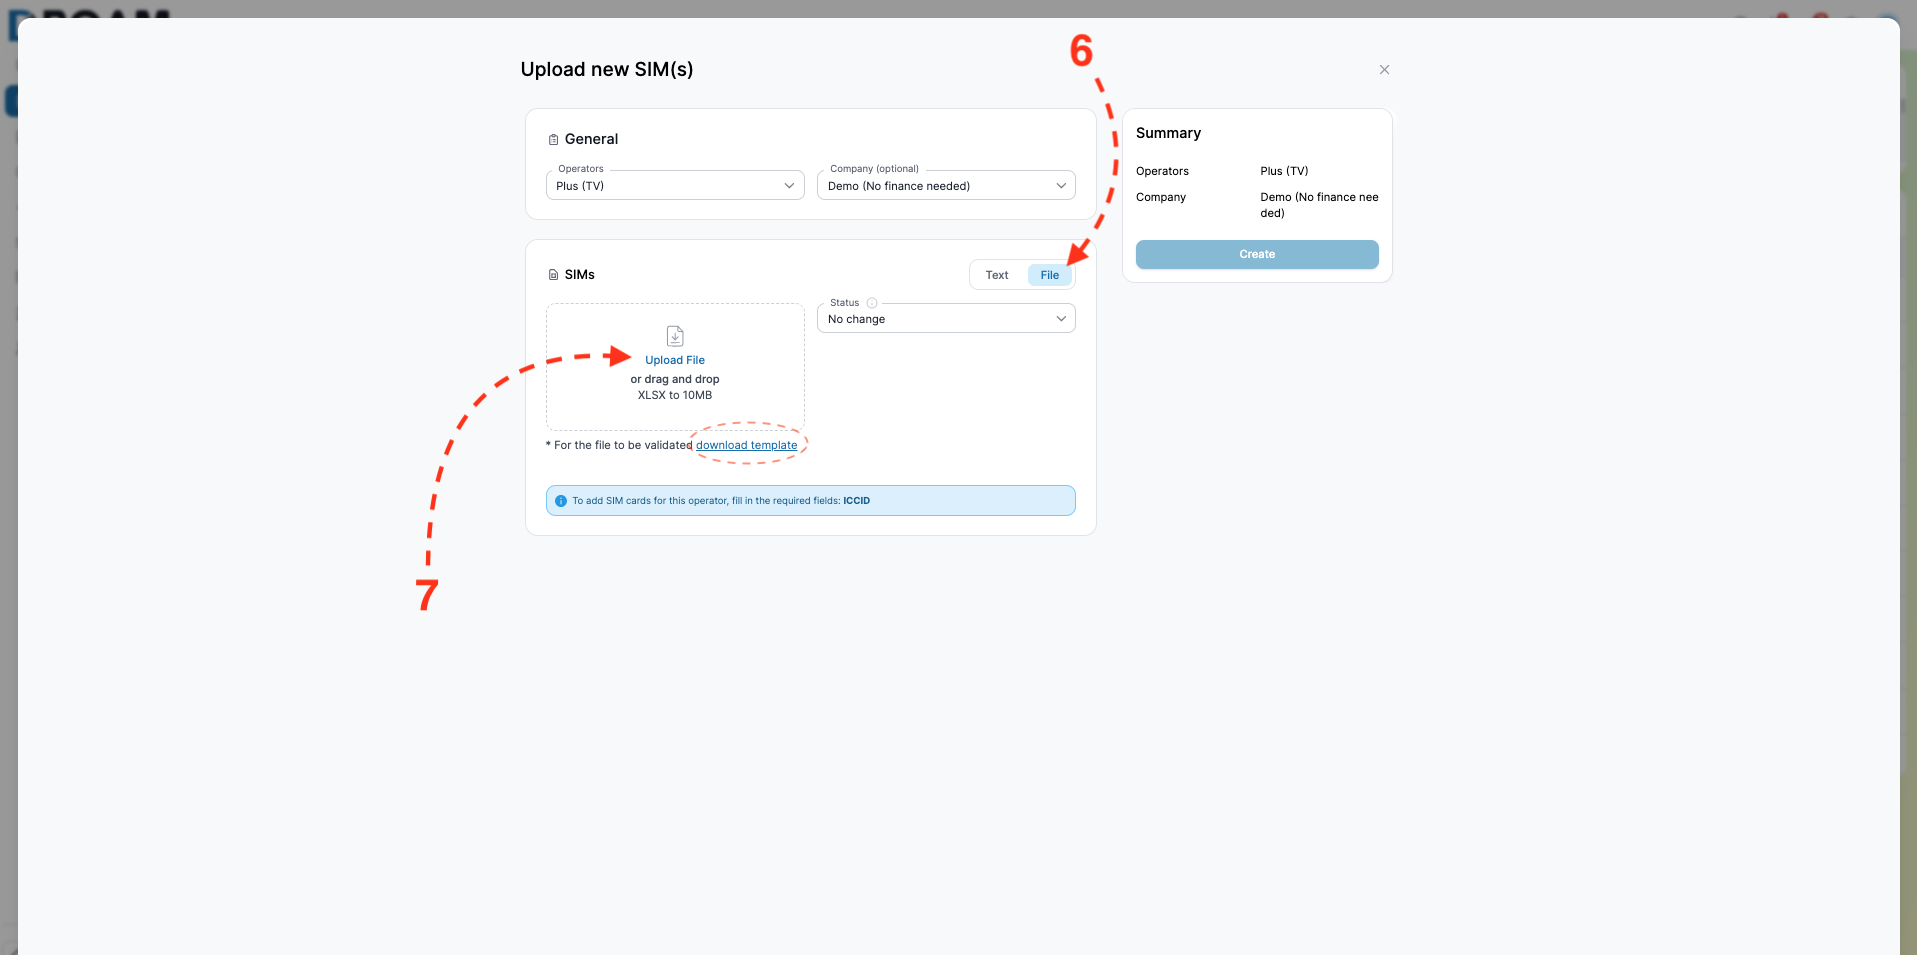
<div data-full-width="true"><figure><img src="https://2408445593-files.gitbook.io/~/files/v0/b/gitbook-x-prod.appspot.com/o/spaces%2FxYJmxgUa2SDfD4byrJY1%2Fuploads%2FdUX0vZ2sgsjnWrBHvqss%2FPlus%20Button.png?alt=media&amp;token=d6df8b25-9c94-4211-ace1-910b122bf454" alt="" width="563"><figcaption></figcaption></figure></div>

{% hint style="info" %}
The XLSX file can contain 10,000 SIMs or more. However, we recommend starting with a test upload of around 100 SIMs to ensure everything works as expected before uploading the full list.
{% endhint %}


# eSIM Purchase & Activation

### <mark style="color:green;">**1. Registered End User**</mark> <sup>(purchase on the Platform)</sup>

1. Go to the **eSIM Store** from the menu on the left.
2. Use the **search bar** to find the country or countries you need.
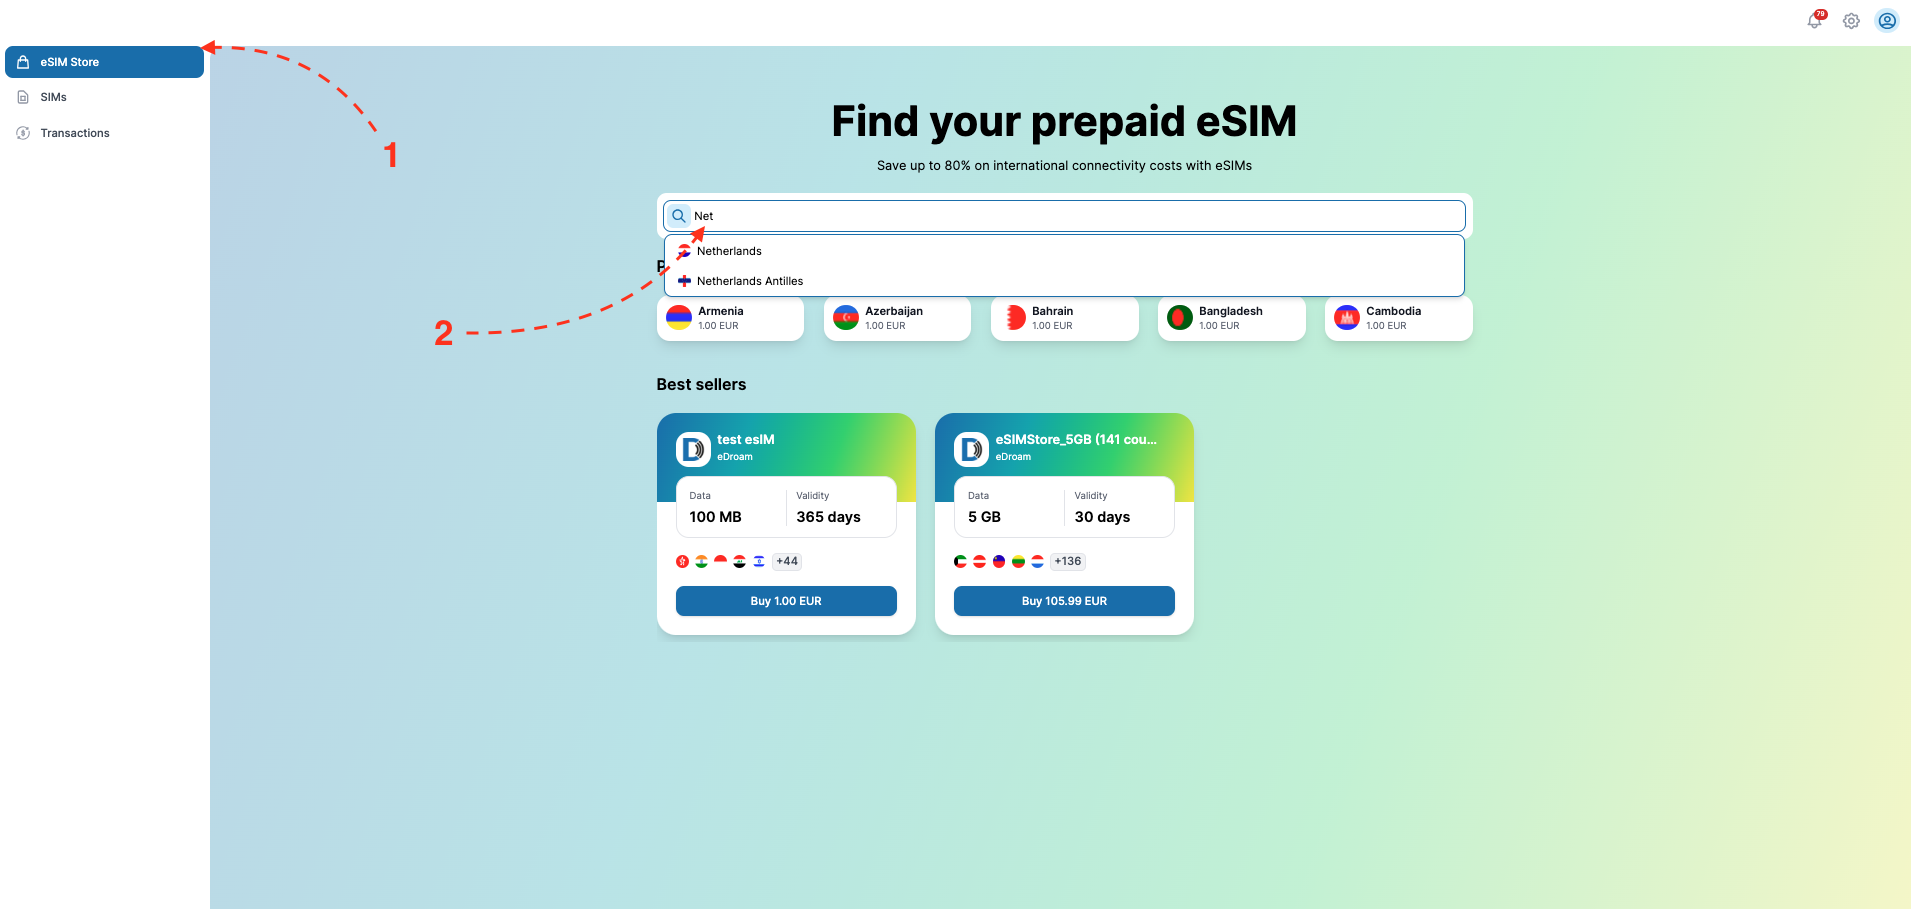
<div data-full-width="true"><figure><img src="https://2408445593-files.gitbook.io/~/files/v0/b/gitbook-x-prod.appspot.com/o/spaces%2FxYJmxgUa2SDfD4byrJY1%2Fuploads%2FzzApS8EM1fJhNoK9ZQK6%2FFind%20eSIM.png?alt=media&amp;token=23831429-5224-4c5a-a694-45bda4e96e4c" alt="" width="563"><figcaption></figcaption></figure></div>

3. Click on the **plan/package** you’d like to purchase.

<div data-full-width="true"><figure><img src="https://2408445593-files.gitbook.io/~/files/v0/b/gitbook-x-prod.appspot.com/o/spaces%2FxYJmxgUa2SDfD4byrJY1%2Fuploads%2FTfj5Td2vWjt3vDh6W0Gr%2Fplan%20for%20eSIM.png?alt=media&amp;token=b5572c0e-3a32-4566-94e7-bbcfd66e5c79" alt="" width="563"><figcaption></figcaption></figure></div>

4. Review the package details in the popup window. Click **"Buy Now."**

<div data-full-width="true"><figure><img src="https://2408445593-files.gitbook.io/~/files/v0/b/gitbook-x-prod.appspot.com/o/spaces%2FxYJmxgUa2SDfD4byrJY1%2Fuploads%2FqZHRlZzxlDOBOm8mRJ2I%2Fpopup%20window.png?alt=media&amp;token=95476b5c-05b1-411d-8b01-e5d178cad783" alt="" width="563"><figcaption></figcaption></figure></div>

5. Select your **preferred payment method.**
6. Click **"Checkout."**

<div data-full-width="true"><figure><img src="https://2408445593-files.gitbook.io/~/files/v0/b/gitbook-x-prod.appspot.com/o/spaces%2FxYJmxgUa2SDfD4byrJY1%2Fuploads%2FVPOKPbrBeNemlmNq0PVr%2FPayment.png?alt=media&amp;token=40777081-eece-4a8c-b8b4-b92efa8d4567" alt="" width="563"><figcaption></figcaption></figure></div>

7. Review the payment details in the **Payment Confirmation** popup. Click **"Pay."**

<div data-full-width="true"><figure><img src="https://2408445593-files.gitbook.io/~/files/v0/b/gitbook-x-prod.appspot.com/o/spaces%2FxYJmxgUa2SDfD4byrJY1%2Fuploads%2FgOW25pCUhkuB9A18zFiQ%2FPayment%20Confirmation.png?alt=media&amp;token=a6217ee7-15a7-4e5c-92d4-f9f9ceb0f851" alt="" width="563"><figcaption></figcaption></figure></div>

8. If the payment is successful, a **Thank You** page will appear.

<div data-full-width="true"><figure><img src="https://2408445593-files.gitbook.io/~/files/v0/b/gitbook-x-prod.appspot.com/o/spaces%2FxYJmxgUa2SDfD4byrJY1%2Fuploads%2FHfqDhTkAEpL4iFqoun5b%2FThank%20you%20page.png?alt=media&amp;token=1aca71c5-dd7c-4e90-8f43-890bc1002518" alt="" width="563"><figcaption></figcaption></figure></div>

9. Click “Install eSIM” on the Thank You page, or go to the SIMs section from the left-hand menu to find your eSIM.
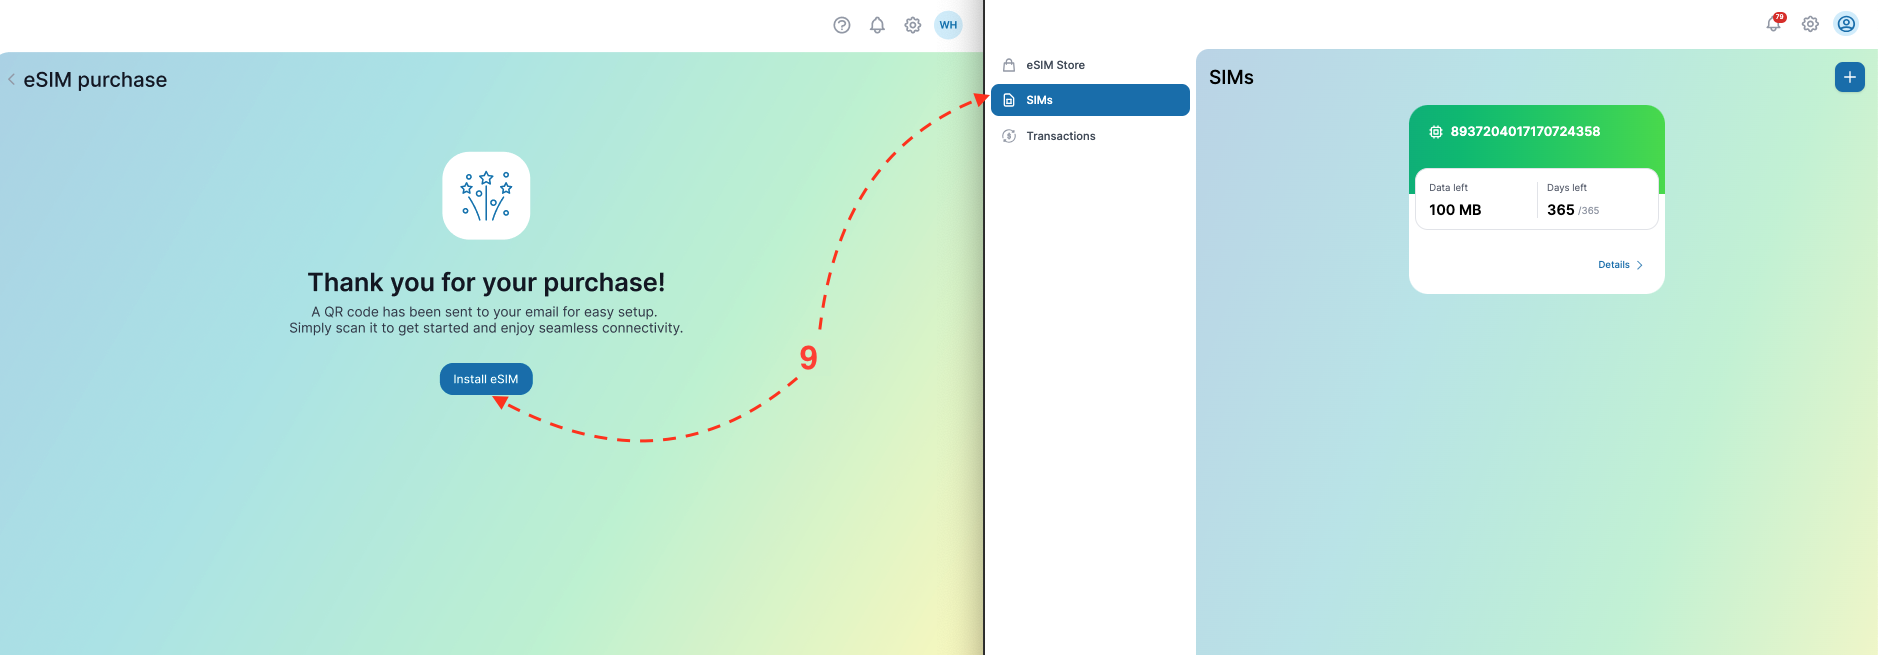
<div data-full-width="true"><figure><img src="https://2408445593-files.gitbook.io/~/files/v0/b/gitbook-x-prod.appspot.com/o/spaces%2FxYJmxgUa2SDfD4byrJY1%2Fuploads%2FLubPwiuy6KsAhNC3xEqd%2FSIM%20.png?alt=media&amp;token=a0a9ac2e-4c1b-4923-b8b4-16639a49e222" alt="" width="563"><figcaption></figcaption></figure></div>

10. Click **"Details"** next to your eSIM.

<div data-full-width="true"><figure><img src="https://2408445593-files.gitbook.io/~/files/v0/b/gitbook-x-prod.appspot.com/o/spaces%2FxYJmxgUa2SDfD4byrJY1%2Fuploads%2FzkfLiyPBkdTqK4TCn74u%2FSIM%20Details.png?alt=media&amp;token=efb11481-acc2-45e6-9ce5-12eb38867b42" alt="" width="563"><figcaption></figcaption></figure></div>

11. Find the **"Install eSIM"** section and click **"More Info."**

<div data-full-width="true"><figure><img src="https://2408445593-files.gitbook.io/~/files/v0/b/gitbook-x-prod.appspot.com/o/spaces%2FxYJmxgUa2SDfD4byrJY1%2Fuploads%2FlaPAiDFDQdoRBVL5KAKf%2FQR%20-%20Install%20eSIM.png?alt=media&amp;token=58225f8e-0baa-4acb-bcfb-e9f85ff5c46f" alt="" width="563"><figcaption></figcaption></figure></div>

12. Follow the steps shown to activate your eSIM.
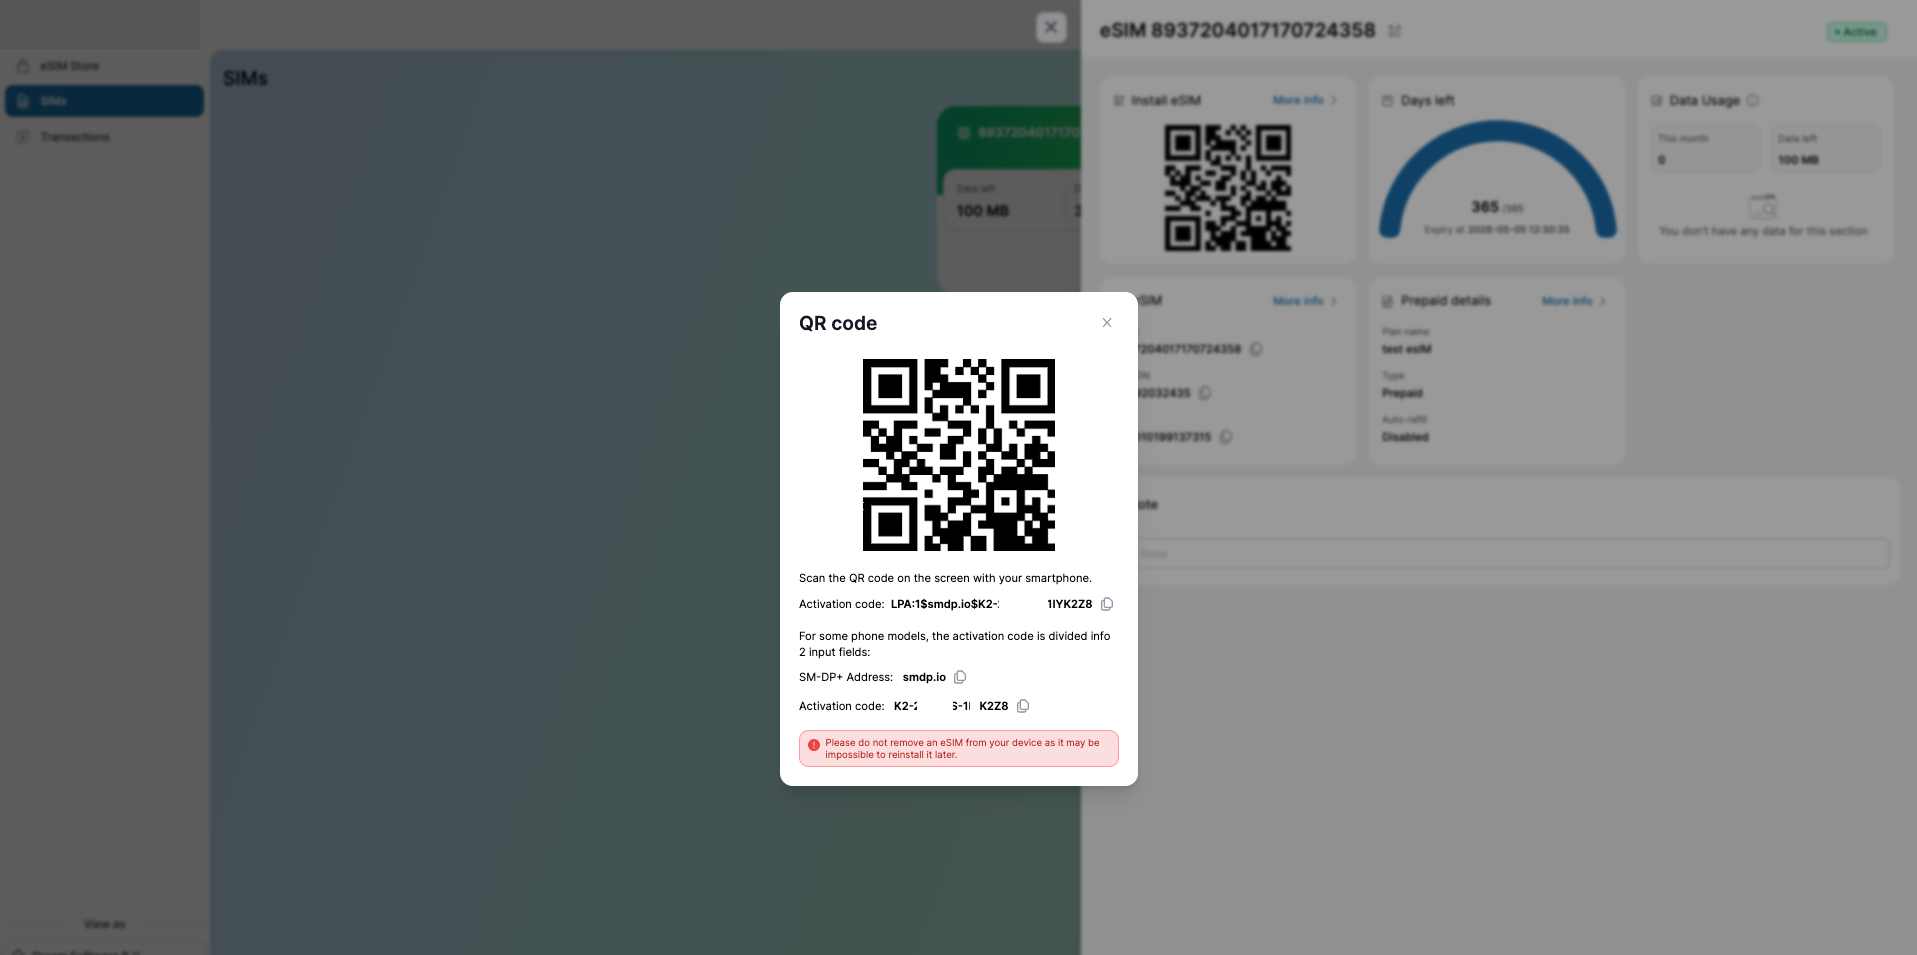
<div data-full-width="true"><figure><img src="https://2408445593-files.gitbook.io/~/files/v0/b/gitbook-x-prod.appspot.com/o/spaces%2FxYJmxgUa2SDfD4byrJY1%2Fuploads%2FPxmdMUD0IfydTzqMRGI3%2FInstallation%20Instructions.png?alt=media&amp;token=220896d5-a927-4ef1-8c14-ac96e23ccff7" alt="" width="563"><figcaption></figcaption></figure></div>

***

### <mark style="color:green;">NEW User</mark> <sup>(purchase on the eStore)</sup>

1. On the main page of the **eSIM Store**, use the **search** bar to select the appropriate country or countries.
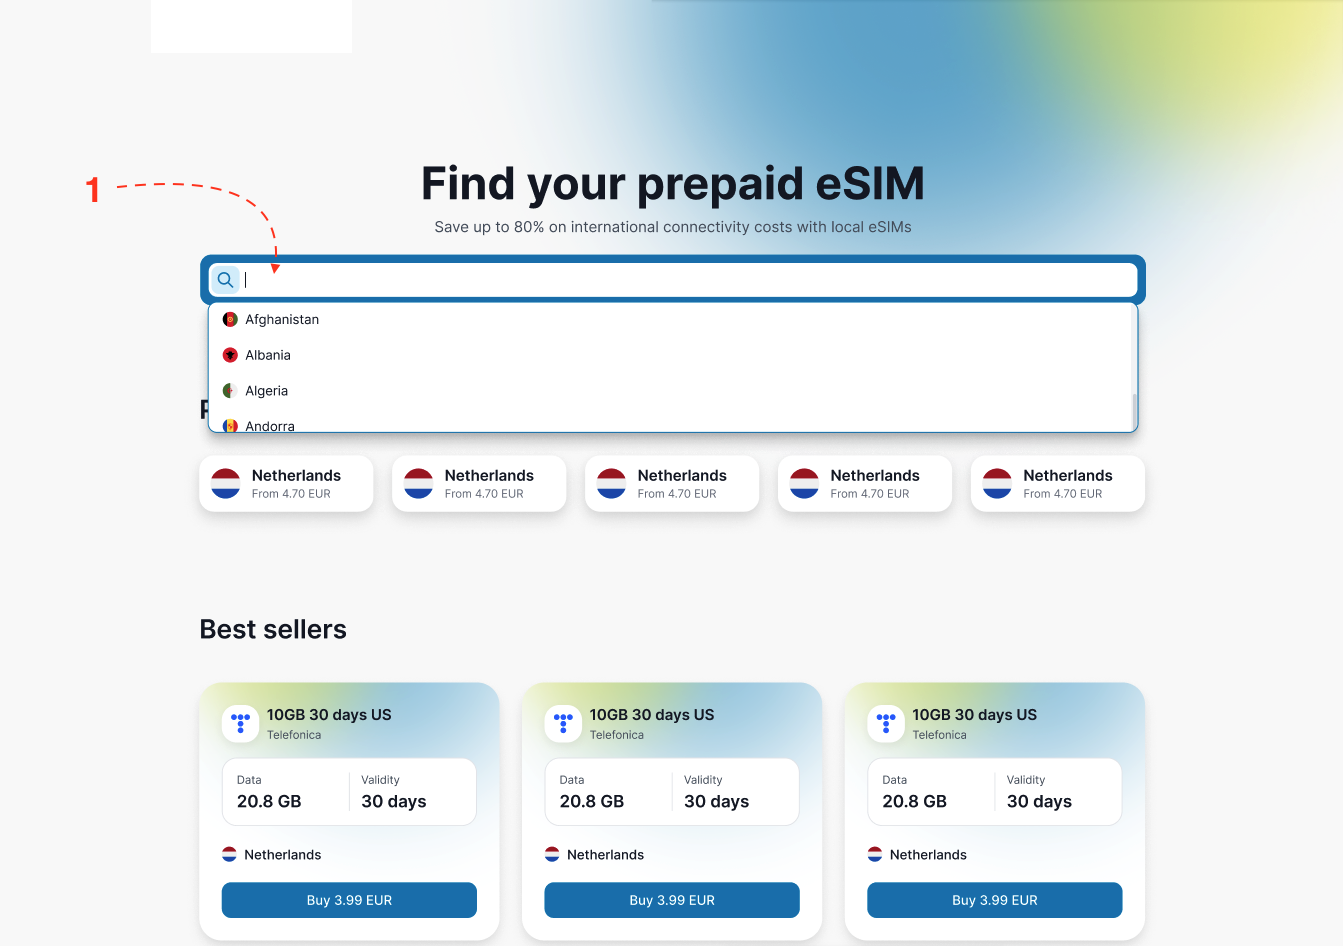
<div data-full-width="true"><figure><img src="https://2408445593-files.gitbook.io/~/files/v0/b/gitbook-x-prod.appspot.com/o/spaces%2FxYJmxgUa2SDfD4byrJY1%2Fuploads%2FwqH0mhAkYfAggqM7kets%2FESTORE.png?alt=media&amp;token=979b5c12-9e6f-4e4a-a138-0d6d90f34c95" alt="" width="563"><figcaption></figcaption></figure></div>

2. Click on the **plan** you'd like to purchase.

<div data-full-width="true"><figure><img src="https://2408445593-files.gitbook.io/~/files/v0/b/gitbook-x-prod.appspot.com/o/spaces%2FxYJmxgUa2SDfD4byrJY1%2Fuploads%2FIrGR8bFHnFKPYjQ1KSqs%2FPLAN%20BUY.png?alt=media&amp;token=7b3727be-e457-4ff6-8a1d-12d281bdcce1" alt="" width="563"><figcaption></figcaption></figure></div>

3. Review the details in the popup window. Click **"Buy Now."**

<div data-full-width="true"><figure><img src="https://2408445593-files.gitbook.io/~/files/v0/b/gitbook-x-prod.appspot.com/o/spaces%2FxYJmxgUa2SDfD4byrJY1%2Fuploads%2F3lEg2U6k00CZr45PQgv2%2FPlan%20Details.png?alt=media&amp;token=265e8940-6c21-4d28-be33-3dec9c4e27d7" alt="" width="563"><figcaption></figcaption></figure></div>

4. Enter your email and click **"Send Email Verification."**

<div data-full-width="true"><figure><img src="https://2408445593-files.gitbook.io/~/files/v0/b/gitbook-x-prod.appspot.com/o/spaces%2FxYJmxgUa2SDfD4byrJY1%2Fuploads%2FFbFfHdnpC7xnqEjLksGj%2FEmail.png?alt=media&amp;token=ba876211-3439-4c32-b513-c43bd52b2eef" alt="" width="563"><figcaption></figcaption></figure></div>

5. Check your inbox for the 6-digit verification code and enter it. Then click **"Verify."**

<div data-full-width="true"><figure><img src="https://2408445593-files.gitbook.io/~/files/v0/b/gitbook-x-prod.appspot.com/o/spaces%2FxYJmxgUa2SDfD4byrJY1%2Fuploads%2FtLHYxqa2L1WS1pqoGEXm%2FVerif%20Code.png?alt=media&amp;token=b80530db-59aa-4d06-9679-ff60de25b1c3" alt="" width="563"><figcaption></figcaption></figure></div>

6. Set up your account by entering your **first and last name.** and click **"Continue."**

* If you're creating a business account, check the box **"Set up a business account."**

<div data-full-width="true"><figure><img src="https://2408445593-files.gitbook.io/~/files/v0/b/gitbook-x-prod.appspot.com/o/spaces%2FxYJmxgUa2SDfD4byrJY1%2Fuploads%2FGiOpUG929kvtxrEfAYWw%2FACC%20set%20up.png?alt=media&amp;token=1764f6fe-fa07-4823-b4c2-cd5d11f150eb" alt="" width="563"><figcaption></figcaption></figure></div>

7. Create a password. Then click **"Continue."**

* To increase security, you can enable Multi-Factor Authentication (MFA) by checking the corresponding box.&#x20;

<div data-full-width="true"><figure><img src="https://2408445593-files.gitbook.io/~/files/v0/b/gitbook-x-prod.appspot.com/o/spaces%2FxYJmxgUa2SDfD4byrJY1%2Fuploads%2FB2QCLwzFfMr05e0yM8oF%2FCreate%20pass.png?alt=media&amp;token=1a917612-598e-4caf-9a61-413e4407f0ad" alt="" width="563"><figcaption></figcaption></figure></div>

8. Enter your **billing address** and click **"Complete."**

* Please make sure to check the box confirming that you agree to the **Terms of Use and the Privacy & Cookies Policy.**

<div data-full-width="true"><figure><img src="https://2408445593-files.gitbook.io/~/files/v0/b/gitbook-x-prod.appspot.com/o/spaces%2FxYJmxgUa2SDfD4byrJY1%2Fuploads%2Fh9QOvkDSSYNslQi6vnjF%2FComplete%20registr.png?alt=media&amp;token=8e895df4-de55-4de9-8892-5e1300a8129e" alt="" width="563"><figcaption></figcaption></figure></div>

9. Select your **preferred payment method.** Click **"Complete."**

<div data-full-width="true"><figure><img src="https://2408445593-files.gitbook.io/~/files/v0/b/gitbook-x-prod.appspot.com/o/spaces%2FxYJmxgUa2SDfD4byrJY1%2Fuploads%2FFAeckjerzFLgbWJUifjY%2FSelect%20a%20payment%20method.png?alt=media&amp;token=9055d553-d049-435a-9009-dcd36108f027" alt="" width="563"><figcaption></figcaption></figure></div>

9. Proceed with the payment. (For example: Stripe)
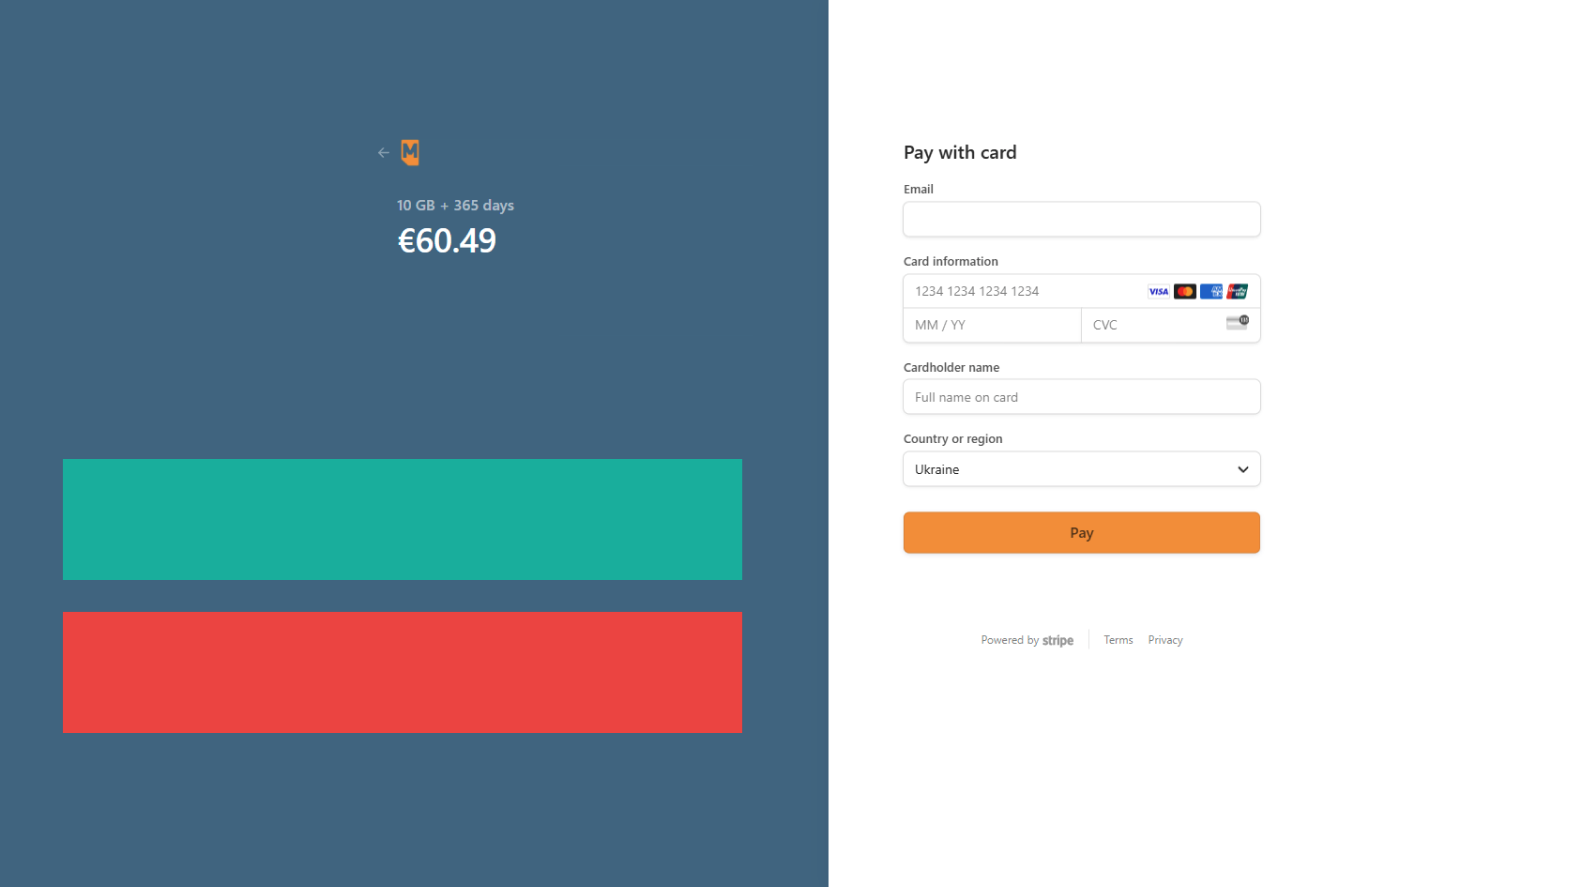
<div data-full-width="true"><figure><img src="https://2408445593-files.gitbook.io/~/files/v0/b/gitbook-x-prod.appspot.com/o/spaces%2FxYJmxgUa2SDfD4byrJY1%2Fuploads%2FkA6s77SAwn6FupXQZ010%2FProceed%20with%20Payment.png?alt=media&amp;token=9b60052e-9ce0-4a73-bb18-5bbeb20737c3" alt="" width="563"><figcaption></figcaption></figure></div>

11. If the payment is successful, a **Thank You** page will appear.
12. On the Thank You page, click **"Install eSIM"** to begin the activation process.

<div data-full-width="true"><figure><img src="https://2408445593-files.gitbook.io/~/files/v0/b/gitbook-x-prod.appspot.com/o/spaces%2FxYJmxgUa2SDfD4byrJY1%2Fuploads%2FFiDbwtUBEoA37AjVhoub%2FESTORE%20Thank%20yo%20Page.png?alt=media&amp;token=20c8defd-d033-4aeb-890e-0cfa3564f7aa" alt="" width="563"><figcaption></figcaption></figure></div>


# eSIM Store Activation

### To enable the eSIM Store, please **follow these steps:**

1. Ensure that the eSIM Store is available for the company you wish to enable it for. To do this, Navigate to the Companies section.
2. Click on the desired company.

<div data-full-width="true"><figure><img src="https://2408445593-files.gitbook.io/~/files/v0/b/gitbook-x-prod.appspot.com/o/spaces%2FxYJmxgUa2SDfD4byrJY1%2Fuploads%2FC8ZWEr8G642Xhuc4RO50%2F1-2%20steps.png?alt=media&amp;token=1c686884-a7a8-4157-acbb-8e4b75541e27" alt="" width="563"><figcaption></figcaption></figure></div>

3. Go to the Permissions tab.
4. Check the box next to the eSIM Store.

<div data-full-width="true"><figure><img src="https://2408445593-files.gitbook.io/~/files/v0/b/gitbook-x-prod.appspot.com/o/spaces%2FxYJmxgUa2SDfD4byrJY1%2Fuploads%2FtDbdxNtMhiUm1ZE57Y1Z%2F3-4%20Steps.png?alt=media&amp;token=312a67fa-7e32-4d4d-a36a-16b481a1f31e" alt="" width="563"><figcaption></figcaption></figure></div>

5. Next, proceed to the “Plans” menu.
6. Filter by the company you need.
7. Filter by the desired operator.

<div data-full-width="true"><figure><img src="https://2408445593-files.gitbook.io/~/files/v0/b/gitbook-x-prod.appspot.com/o/spaces%2FxYJmxgUa2SDfD4byrJY1%2Fuploads%2FdoNGXBgZAR6YbYRvTXR2%2F5-7%20Steps.png?alt=media&amp;token=c26e4ac4-1227-4eb7-b162-8486487034f3" alt="" width="563"><figcaption></figcaption></figure></div>

8. Select the plan you wish to enable for the eSIM Store.
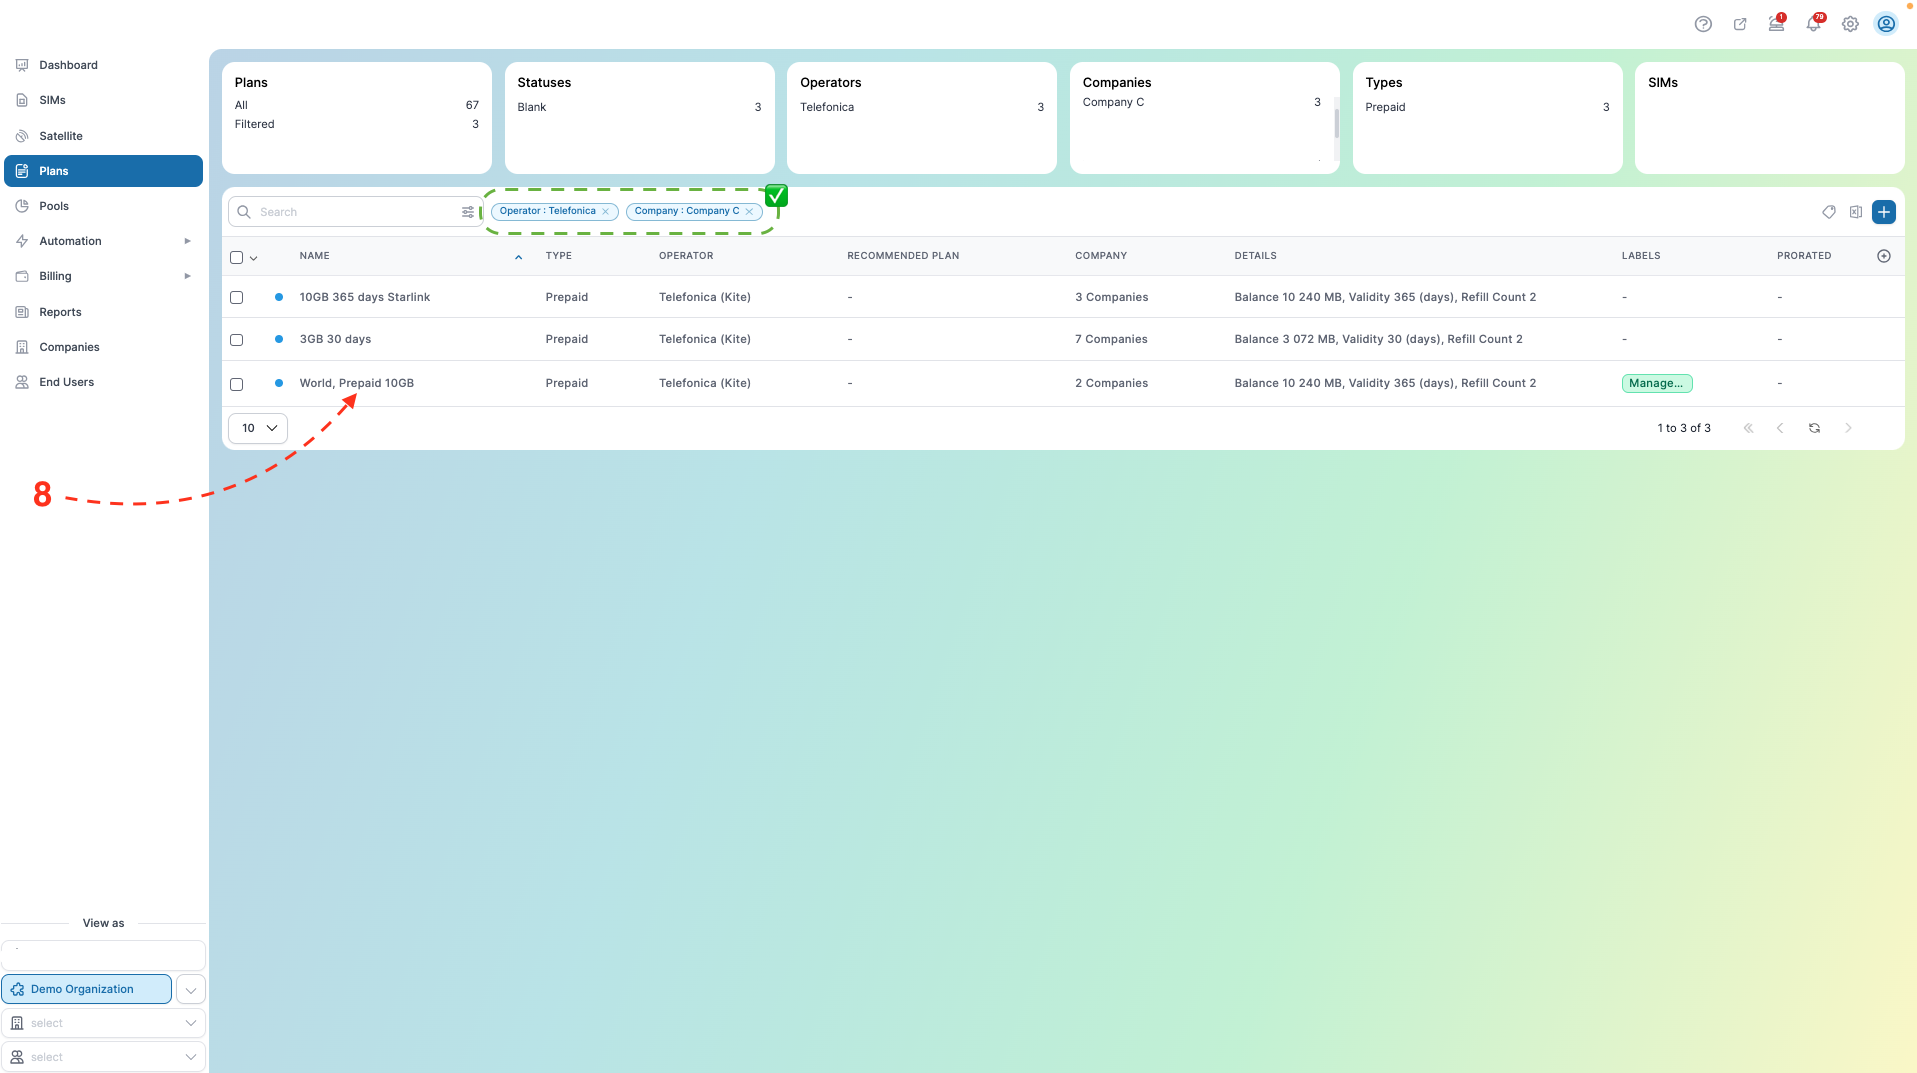
<figure><img src="https://2408445593-files.gitbook.io/~/files/v0/b/gitbook-x-prod.appspot.com/o/spaces%2FxYJmxgUa2SDfD4byrJY1%2Fuploads%2FVHCJHR02xVOvp7428SYU%2F8%20Step.png?alt=media&amp;token=a169bd9d-e09d-45a8-b5f5-94d2264a96ab" alt="" width="563"><figcaption></figcaption></figure>

9. Choose the appropriate Coverage.

<div data-full-width="true"><figure><img src="https://2408445593-files.gitbook.io/~/files/v0/b/gitbook-x-prod.appspot.com/o/spaces%2FxYJmxgUa2SDfD4byrJY1%2Fuploads%2FSsF3HQBgYdtFGtoOo3t8%2F9%20Step.png?alt=media&amp;token=b5791e20-2008-4ea2-868b-736f0bc2bdcd" alt="" width="563"><figcaption></figcaption></figure></div>

10. Select the Rate Plan.
11. Click the Save button.

<div data-full-width="true"><figure><img src="https://2408445593-files.gitbook.io/~/files/v0/b/gitbook-x-prod.appspot.com/o/spaces%2FxYJmxgUa2SDfD4byrJY1%2Fuploads%2Fyxq8b7QuGu8qQx7Nuci9%2F10-11%20Steps.png?alt=media&amp;token=148ff1c5-fb8a-4b99-84b3-287b917819a1" alt="" width="563"><figcaption></figcaption></figure></div>

To confirm that the eSIM Store is enabled for the company:

12. Go to the company level for which the eSIM Store has been activated and ensure it appears in the menu.
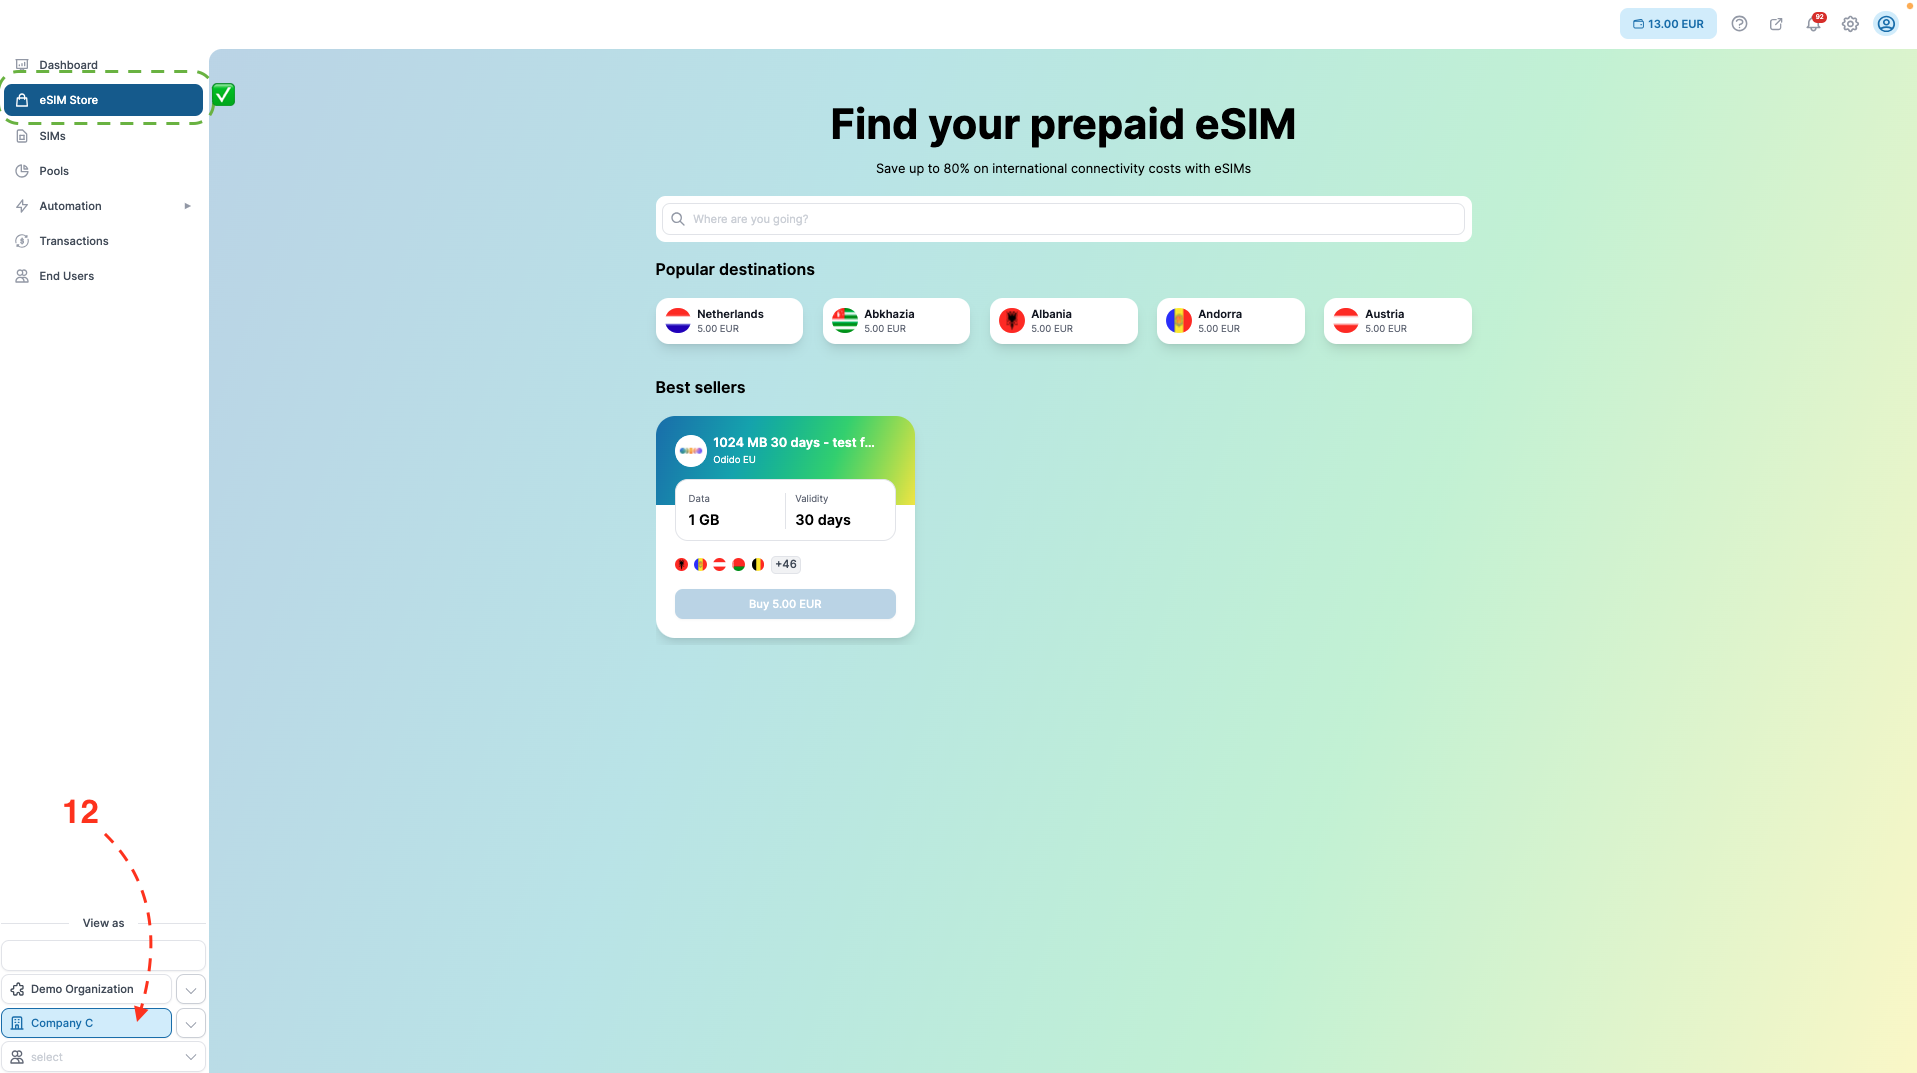
<div data-full-width="true"><figure><img src="https://2408445593-files.gitbook.io/~/files/v0/b/gitbook-x-prod.appspot.com/o/spaces%2FxYJmxgUa2SDfD4byrJY1%2Fuploads%2FwrsBqy8JfOVq0qDzKgez%2F12%20Step.png?alt=media&amp;token=f32d0fb0-1274-46c3-a51a-504acefee8ce" alt="" width="563"><figcaption></figcaption></figure></div>

Enjoy using the eSIM Store!<br>


---

[Next Page](/llms-full.txt/1)